4
Installation Guide
AT-HDVS-SC-RX
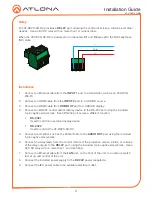
Relay
The AT-HDVS-SC-RX provides a
RELAY
port, allowing the control of screens, curtains, and other
devices. Use a 48 V DC relay with no more than 1 A current draw.
When the AT-HDVS-SC-RX is powered-on or rebooted,
C1
and
C2
are set to the Normally Open
(NO) state.
C2
COM
C1
Installation
1. Connect an Ethernet cable from the
INPUT 1
port to a transmitter, such as an AT-HDVS-
200-TX.
2. Connect an HDMI cable from the
INPUT 2
port to a UHD/HD source.
3. Connect an HDMI cable from
HDMI OUT
port to a UHD/HD display.
4. Connect an RS-232 control and/or display device to the RS-232 port using the included
5-pin captive screw block. Each RS-232 port serves a different function.
•
RS-232 1
Used to control an external display device.
•
RS-232 2
Used to control the AT-HDVS-SC-RX.
5.
Connect an amplifier, such as the AT-GAIN-60, to the
AUDIO OUT
port using the included
5-pin captive screw block.
6. Connect the relay leads from the control motors of the projection screen, blinds, or curtains,
of the relay outputs to the
RELAY
port, using the included 3-pin captive screw block. Use a
48 V DC relay with no more than 1 A current draw.
7. Connect an Ethernet cable from the
LAN
port, on the front of the unit, to a network switch
for set up and control of the unit.
8. Connect the included power supply to the
DC 24V
power receptacle.
9. Connect the IEC power cable to an available electrical outlet.
Содержание AT-HDVS-SC-RX
Страница 11: ...11 Installation Guide AT HDVS SC RX Notes ...

