


Instruction Manual
9
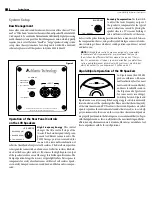
Setting Levels
When setting up a complete home theater we strongly recommend that you
use a Sound Pressure Level (SPL) meter. As of this writing Radio Shack® has
one that’s affordably priced (approximately $40) that can be used effectively.
To use this meter, turn on your system, put the processor/receiver in Test
Mode and set its main volume control to 0dB (or a reasonably loud level).
Sit in the prime listening position, set the SPL meter to the 70dB scale, slow
response, and C weighting. Hold the meter with the microphone pointed up,
towards the ceiling and in front of you. Cycle the test tone from speaker to
speaker, setting each to the same level (usually75dB) using the individual
level settings available in the processor/receiver (please see the instructions
for your processor/receiver if you are unsure of how to access the test signal
or level controls).
IMPORTANT NOTE:
The power recommendation for these speaker
systems assumes that you will not operate your amplifier/receiver in
a way that produces distortion. Even rugged speakers like these can
be damaged by an amplifier driven into audible distortion. The harsh
amplifier distortion (“clipping”) that occurs in this situation will even-
tually cause damage to the speaker system. This type of damage may
be cumulative and can build up over time, as the amplifier is driven
into overload again and again. Such damage is easily identifiable
through examination of the damaged speaker’s voice coil and is not
covered by the warranty.
These systems will play very loudly when provided with enough undistorted
power to do so. If necessary, consult your dealer or Atlantic Technology for
additional information.
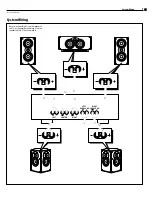
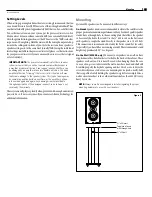
Mounting
¼" x 20 insert
Figure
Top plate of stand
with through-hole
¼" x 20 bolt
Mounting
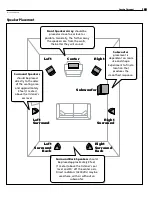
System 4200 speakers can be mounted in different ways:
On Stands
Speaker stands are recommended to elevate the satellites to the
proper position for maximum performance. Many brands of quality speaker
stands have a through hole in the mounting plate that allows the speaker
to be securely bolted to the stand. Use the ¼” x 20 insert on the bottom of
each speaker to couple the stand directly to the speaker via a ¼” x 20 bolt.
This connection is recommended not only for better sound but for safety
(especially if you have little ones running around) The recommended stand
height is approximately 30”. See Figure 5.
On the Wall (400 SR only)
To mount your speakers on a wall, we have
supplied metal key-hole brackets attached to the back of the cabinet. These
speakers are heavy and care must be used when hanging them. Be sure
to use a strong screw to drive into the wall, one whose head and shaft will
fit within properly the keyhole opening and slot. Also be sure to drive the
screw directly into a stud or to use a mounting device (such a molly-bolt)
that is capable of safely holding the speaker’s weight. Never simply drive a
nail or screw into sheet rock or other wall materials, as the 4200 SR is very
heavy for its size.
NOTE:
Always consult a knowledgeable installer regarding the proper
mounting hardware to use with your speakers.


