6
System 4200 High Performance Loudspeakers
Stereo Systems
If you are setting up a stereo system using a pair of 4200 LR’s with
subwoofer(s), begin with these general guidelines:
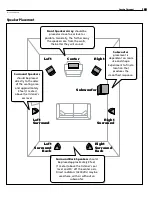
The distance between the speakers should be approximately one-half
their distance from the prime listening position.
If you point the front of the speakers directly towards the prime listening
position (“toe” them in), you will achieve the most precise imaging and
the most direct high frequency sound. If you have a “bright” or “hard”
sounding room, aiming the speakers straight out into the room (or just
aiming them partially towards you) may make for a more natural and
pleasing sonic balance.
For the smoothest upper bass/lower midrange response, the distance
from each speaker to its three closest room surfaces should be different.
In most rooms, you should not place your speakers in the corners.
Try to keep the speakers at least 2 feet (.6m) from the back and side
walls.
The goal is to reproduce the most accurate musical timbre and the most
convincing natural sound. Additionally, a well set-up stereo pair of speakers
will create excellent imaging and a cohesive representation of the sound-
stage. Placement in the room and your listening position has an enormous
impact on the ultimate sound you will achieve from your system. The most
important thing is to be creative! Try placing your speakers on the long wall
instead of the short one. Toe the speakers in or point them straight ahead.
Pull them away from the wall or push them closer. Don’t be timid. You’ll find
that moving your speakers, even a few inches, can dramatically change and
possibly improve their sound.
Connecting Your System
We recommend that you connect your system using high quality dual
conductor stranded wire of 16 gauge or heavier, for lengths up to 25 feet
(8m) . (Remember, the lower the gauge number, the heavier the wire). Use
heavier gauge wire for longer runs. Please contact your audio/video dealer
or installer for specific cable recommendations and further information
regarding special circumstances. The terminals themselves are designed to
allow the use of very heavy speaker wire or connectors. Be sure to tighten
them securely, but don’t over-tighten them.
WARNING:
To prevent risk of electrical shock or damage to your
equipment, always switch off the amplifier or receiver when making
any system connections.
You can connect your speakers by using a variety of audio connectors such as
banana plugs (single or double), pin connectors, spade lugs, etc., or you can:
1.
Remove ½” (13mm) of insulation from each wire end.
2.
Twist the stranded wire together, keeping the two ends
separate.
3.
Place the appropriate wire through the postholes in the
connectors. These holes are revealed when you loosen the
connector’s capscrew.
4.
Screw down the capscrew tightly, but be careful not to over
tighten it.
5.
Check the tightness of the capscrews 24 hours after hookup
and occasionally after that, as they can loosen over time.
We recommend that you check your local electrical codes to make sure that
you are not using improper connectors. It’s important to observe polarity
while making speaker connections: red (+) terminals on the amplifier to red
(+) on the speaker, black (–) on the amplifier to black (–) on the speaker.
Look carefully at the wires you are using and note that one of the conductors
of each pair will typically be identified by color, printing on the outer jacket,
ridges on the outer jacket, or a thread intertwined with the wire strands. By
convention, the marked wire is connected to the red (+) terminal. Whether
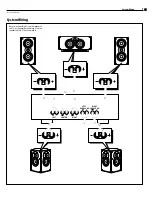
you are connecting a complete system, or adding a single speaker compo-
nent to your present system, the wiring should look like the system wiring
diagrams on the opposite page
WARNING:
Before turning on the amplifier, be certain that no stray
wire strands are touching across any terminals as this might damage
your amplifier.
Finally, check the polarity of your front speakers by listening to some ste-
reo music with good bass content. If the sound seems “hollow”, unusually
spread out, or seem to have weak bass, recheck your connections for proper
polarity and correct any out of phase connections, if necessary.
Connecting Your System


