


Technical Manual & Parts Lists
11
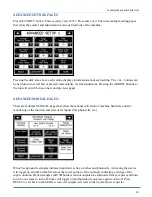
The blank area to the left of the time display will show the machine piece counter. Press it to reset the
daily piece count and access the machine monitor information.
Also shown on the main screen is the sew time for the previous panel.
FOOT PEDALS:
There are four foot pedals located in front of the console.
The right side pedal labeled CONVEYOR is used to run the main conveyor at high speed for loading
and unloading the panel.
The next pedal to the left is the sew pedal. It causes the sewing head to run at medium speed. After using
this pedal, use the Rotate Home/ Footlift button to reset the foot up.
The next pedal to the left is the Footlift pedal. Press it to lower and raise the foot. After using this pedal,
use the Rotate Home/ Footlift button to reset the foot up.
The left pedal is an air pedal used to remove the down air pressure from the presser foot so it can be
swung out for sew head maintenance. To use this function, first tap the foot lift pedal to drop the foot.
Then step on the left air pedal to remove the air pressure on the foot. There is a spring on the belt feed
mechanism that will lift the foot under slight tension, so you need to press the foot down manually as
you unlatch the presser arm lock, and the foot will swing out.
MACHINE OPERATION:
When all the “READY” conditions are good except the Panel Trailing Edge Eye, use the CONVEYOR
pedal to move the panel into position at the needle. The panel should be stopped so that it is under the
foot, against the front edge guide, and the trailing edge should be about 3-4” in front of the RED
photocell dot on the panel. Tap the Footlift pedal to drop the foot. Press the SEW pedal to sew a few
inches while holding the panel tight against the edge guide plate. Do not sew past the RED dot. (If you
sew past the red dot the first corner will not sew correctly.) If the right edge of the trailing edge of the
panel is not against the rear edge guide, press the CONVEYOR pedal to swing the panel up against the
Содержание 1317A
Страница 2: ...Technical Manual Parts Lists 1 ...
Страница 24: ...Technical Manual Parts Lists 19 11317A AUTO H D PANEL FLANGER AAC Drawing Number 9005447 Rev 1 ...
Страница 28: ...Technical Manual Parts Lists 23 ...
Страница 30: ...Technical Manual Parts Lists 25 ...
Страница 32: ...Technical Manual Parts Lists 27 ...
Страница 34: ...Technical Manual Parts Lists 29 ...
Страница 36: ...Technical Manual Parts Lists 31 ...
Страница 39: ...Technical Manual Parts Lists 34 ...
Страница 40: ...Technical Manual Parts Lists 35 ...
Страница 42: ...Technical Manual Parts Lists 37 ...
Страница 44: ...Technical Manual Parts Lists 39 ...
Страница 48: ...Technical Manual Parts Lists 43 ...
Страница 50: ...Technical Manual Parts Lists 45 ...
Страница 51: ...Technical Manual Parts Lists 46 1318112 1 CONTROL PANEL AAC Drawing Number 1318112 Rev 2 ...
Страница 52: ...Technical Manual Parts Lists 47 ...
Страница 55: ...Technical Manual Parts Lists 50 ...
Страница 56: ...Technical Manual Parts Lists 51 ...
Страница 60: ...Technical Manual Parts Lists 55 ...
Страница 63: ...Technical Manual Parts Lists 58 ...
Страница 64: ...Technical Manual Parts Lists 59 ...
Страница 71: ...Technical Manual Parts Lists 66 ...
Страница 72: ...Technical Manual Parts Lists 67 ...
Страница 79: ...Technical Manual Parts Lists 74 ...
Страница 81: ...Technical Manual Parts Lists 76 ...
Страница 83: ...Technical Manual Parts Lists 78 ...
Страница 85: ...Technical Manual Parts Lists 80 1318356 CONVEYOR SUB ASSY 2 AAC Drawing Number 1318356 Rev 0 ...
Страница 88: ...Technical Manual Parts Lists 83 ...
Страница 89: ...Technical Manual Parts Lists 84 ...
Страница 92: ...Technical Manual Parts Lists 87 ...
Страница 93: ...Technical Manual Parts Lists 88 ...
Страница 98: ...Technical Manual Parts Lists 93 ...
Страница 100: ...Technical Manual Parts Lists 95 ...
Страница 102: ...Technical Manual Parts Lists 97 ...
Страница 104: ...Technical Manual Parts Lists 99 1317A PSM PROGRAM SETTINGS MAP ...
Страница 105: ...Technical Manual Parts Lists 100 1317A WD WIRNG DIAGRAM CNTRL PNL ...
Страница 106: ...Technical Manual Parts Lists 101 1317A PD PNEUMATIC DIAGRAM 1317A ...
Страница 107: ...Technical Manual Parts Lists 102 ...