background image


  Si203User

’s Guide


38 

2. Using Wireless LAN 

  enable to equip an internal 802.11 radio module to transfer data and do wireless communication. 
supports TCP/IP network protocol, and communicate with a host computer directly. 


2.1


Connecting to Wlan


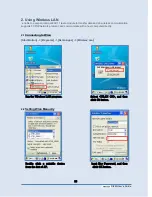
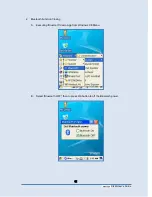
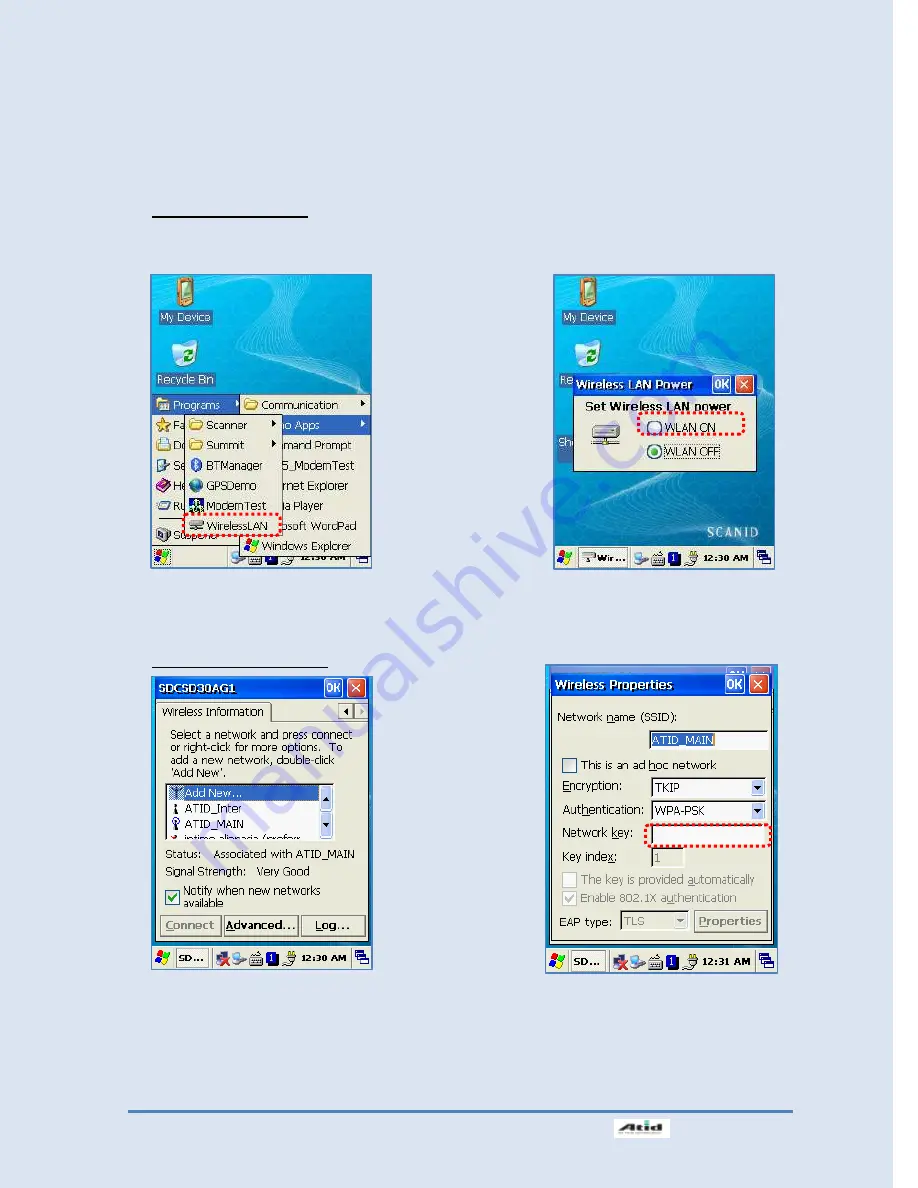
[Start Button] -> [Programs] -> [Demo Apps] -> [Wireless Lan]   


2.2


Setting Wlan Manually


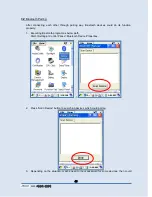
Run the Wireless LAN program.


Select  <WLAN  ON>,  and  then 
click Ok button. 

Double  click  a  suitable  device 
from the list of AP.


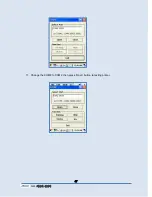
Input  Key  Password,  and  then 

click OK button. 

Содержание Si203

Страница 1: ...ATID Co Ltd Si203 User s Guide ...

Страница 2: ...nd trade names referred to herein are property of their respective owners Microsoft Windows Windows 2000 Windows CE NET Windows NT and Windows XP are registered trademarks of Microsoft Corporation ATID Co Ltd 1205 Byuksan Gyungln Digital Valley II 481 10 Gasan Dong Gumchon Gu Seoul Korea Tel 82 2 544 1436 Fax 82 2 2113 0040 www atid1 com ...

Страница 3: ...et 16 2 2 Hard Reset 16 2 3 Initializing System 17 3 Using Micro SD SIM SAM Card 19 3 1 Installing Micro SD 19 3 2 Installing SIM Card and SAM Card 20 4 System Settings 21 4 1 Setting Brightness 21 4 2 Screen Calibration 21 4 3 Setting Volume and Sounds 22 4 4 Setting Data and Time 22 5 Using keypad 24 5 1 Using keypad 24 5 2 Inputting Data 24 5 3 Using Fun Button 25 6 Using stylus 25 7 Using Acti...

Страница 4: ...g 43 3 3 Bixolon SPP R200 Printer Demo 46 4 Using GPS 48 4 1 Executing GPS Demo Program 48 5 Using Camera 49 5 1 Using Camera 49 6 Using HF13 56MHz Reader 50 6 1 Executing HF13 56 Demo Program 50 6 2 Mifare Tag Window 50 6 3 ISO15693 Tag Window 51 7 Using 900MHz RFID Tag Reader 52 7 1Executing RF900Demo Program 52 8 Using Modem 53 8 1 Modem ON OFF 53 8 2 Modem Resetting 54 Chapter5 Appendix 56 Con...

Страница 5: ...onfiguring and maintaining the PDA Read and follow all warnings and cautions in this document before you handle and operate ATID equipment Safety Information Read and follow all warnings and cautions in this manual before you handle and operate ATID equipment If you do not follow the safety warnings and cautions you might be seriously injured and the equipment and data are also might be damaged Wa...

Страница 6: ... from factory 2 Caution when using User careless or products repair might damage the stored data Manufacture is not responsible for this damage so important data should be kept separately If you has problem do not try to repair or disassemble the product arbitrarily please contact customer service center Do not use your where have electromagnetic wave or the risk may occur such as hospital plane s...

Страница 7: ...d so on devices as optional items Its various function applied to Industry Enterprise Logistics and so on can be used extensively in many fields 1 Package components After opening the product packaging box check the items listed as below If there is missing or defective products on the above please contact the customer support center or your place of purchase 1 SI203 Body 2 Adaptor and AC Cable 3 ...

Страница 8: ...nd Strap Hole Speaker Main Battery Battery Latch Scan Button F8F7 F9 WLAN Option LED Phone Receiver Power LED Volume Buttons Touch Screen Keypad Reset Button Microphone Adaptor Connecting Jack Earphone Jack Cradle Connector Sync Cable Connector L R Arrow Key Camera Flash Option UHF Connecting Port ...

Страница 9: ...rcode and RFID Tag Speaker Build in speaker which could emit various sound effects Sync Cable Connector Enable you to connect and send data to PC via USB sync cable Earphone Jack Enable you to connect to earphone L R Arrow Key Enable you to move the cursor to left and right And press Fun button simultaneously could move the cursor to up and down Power LED Power LED will be Red when the battery is ...

Страница 10: ...ttery charge it completely 1 1 Switch On Backup Battery The image as blow shows the battery compartment which already removed the main battery Slide the lever to right to start to supplying power to the system To attaching main battery to the back battery compartment of the PDA To confirm the battery latch locked firmly Refer to 1 2 Battery attaching and detaching Connecting adaptor to the PDA ada...

Страница 11: ...ht UNLOCK side and then lift the main battery out of the compartment along both sides of groove Attaching Battery Put the top part of battery into the upward groove and then press down the bottom of battery into the battery compartment slide battery latch to the left LOCK side to attach battery firmly Battery latch Both sides of groove R L Battery Attaching Groove ...

Страница 12: ... charging 1 4 Power On and Off Press Power button one time the device will enter low Power mode Sleep Mode under the system is started and the following window is displayed on the desktop or other programs is running in the system Press Power button once again could activate the system Taskbar Display the currently running programs Start button Activates the start menu and then execute a program S...

Страница 13: ...e sleep mode time at the power management so that could save power and prolog the battery life Start Button Setting Control Panel Power Management Power Off Power Button Power Off 1 When the system is in booting status press Power button for a couple of seconds then the backlight will be turned off and enter the low power mode sleep mode 2 You can also press Start Button Suspend button to turn the...

Страница 14: ... button to turn on the system 1 5 Checking Battery Gauge Note Battery life is largely affected from the user using method and surrounding environments A 2200mA battery is usually needs 6 12 hours to get charged completely Checking Battery Gauge Start Button Setting Control Panel Power Management Battery Low Power Warning If the remaining battery gauge cannot support the system running any more a l...

Страница 15: ... if the battery damaged or reached its end of life Warning Please dispose the used batteries in a designated place Caution If the main battery and the backup battery are both discharged the RAM date will disappear Among the running programs the RAM data will disappear in which are using and the system will not be restore to previous state but rebooting system after start charging ...

Страница 16: ...ktop will appear in about ten seconds User s changed registry information copied files and Installed programs will be restored 2 2 Hard Reset When do you need to perform Hard Reset Hard Reset which is also called Cold Reset enables to initialize hardware completely User s installed programs copied files and registry values will keep remained even performed Hard Reset but the real time and date wil...

Страница 17: ... and then press Reset button to perform Hard Reset Boot Menu window would appear in a couple of seconds Warning Except for Clean System please do not use other functions The system might be work not properly if you use other functions on the Boot Menu Boot Menu System Information Firmware Upgrade Clean System Configuration Setting Exit Boot Menu Move 2 Up 8 Down Select Enter Boot Menu System Infor...

Страница 18: ...uration Setting Exit Boot Menu Move 2 Up 8 Down Select Enter Clean Registry Initializing registry Clean OS Root Initializing Mydevice region Clean Flash Disk Initializing Flash Disk region Factory Reset Initializing to factory default settings Using 2 8 button to select your need command Press BKS button to return to main menu Using 2 8 buttons to select Exit Boot Menu then press Enter button to e...

Страница 19: ... Card Slot 3 1 Installing Micro SD 1 Micro SD Card Slot 1 SAM Card Slot 1 SIM Card Slot Push the cover to the right along arrow direction to open it lift the cover up along arrow direction Put Micro SD card into Slot and press down the cover as arrow direction Push the cover up as arrow direction to lock it and attach the main battery and turn on the power ...

Страница 20: ... You can find the Micro SD Memory Card icon when executing the file explorer after inserted the Micro SD card 3 2 Installing SIM Card and SAM Card SIM Card and SAM Card can easily insert and pull out along arrow direction ...

Страница 21: ...y lamp 4 2 Screen Calibration At first beginning of using the device after purchasing or need to use the device for a long period time if you cannot select the place where you touched with stylus you need to reset the coordinate calibration values Touch screen calibration Start Button Setting Control Panel Stylus Calibration Recalibration Press and hold stylus pen briefly on the center of cross sy...

Страница 22: ...an readjust you need volume at control panel Volume and Sounds Setting Volume and Sounds Start Button Setting Control Panel Volume and Sounds 4 4 Setting Data and Time Start Button Setting Control Panel Date and Time Setting Year Double Click the year and click the up and down arrow button to set year ...

Страница 23: ...ck L R arrow button to set Month Setting Day Click the day directly to set day Setting Time Click AM PM Time area directly using up and down arrow button to set Time Setting Time Zone Click up and down arrow direction to select time zone and click apply button ...

Страница 24: ...to change to the numeric mode and directly press number on the keypad Alphabet Keypad Mode Press 1 ALP button or keypad icon on the taskbar to change to the Lowercase or Uppercase and directly press alphabets or special symbols on the keypad Each button has 2 3 letters or symbols Press the button once the first letter or symbol will be inputted press twice continuously then the second letter or sy...

Страница 25: ...HOME Del Enable you to delete a letter which located after the cursor 7 Enable it has Tab button function 0 Enable you to input 000 symbols F3 F4 Enable you to use as like function buttons 6 Using stylus You can tie the stylus to the hand strap hole so that enable you to use the stylus as like a mouse on a PC Caution Please do not use sharp objects on the touch screen Use only supplied stylus othe...

Страница 26: ...ad the latest version of ActiveSync program from Microsoft Windows CE Website and install it to your PC ActiveSync Windows XP Download Address http www microsoft com downloads Caution You must use ActiveSync v3 7 version or above Click Next Button Designate installation folder then click Next button The installation was finished and then uses the USB cable to connect to the USB port on the compute...

Страница 27: ... PDA Setting PC Start button Programs Microsoft ActiveSync Windows XP Executing Microsoft ActiveSync program Click File Click Get Connected Select Allow USB connection with this desktop computer press OK button ActiveSync connected to PDA ...

Страница 28: ...mitting Data Using the USB cable to connect PC and the device Windows XP Double click PC Connection icon To check if set to connected to USB Sync cable You can check the ActiveSync connecting state on the taskbar Connecting state Disconnecting state Start button Programs Microsoft ActiveSync ...

Страница 29: ...Si203사용자 설명서 29 After ActiveSync connected click Explore button Designate transmitting file path Transmitting files ...

Страница 30: ...Si203User s Guide 30 8 Firmware Upgrade Start Button Setting Control Panel Firmware Upgrade ...

Страница 31: ...this chapter will provide you the information of each module Optional modules as below 1 Barcode Scanner 1D Laser Barcode Scanner 2D Imager Barcode Scanner 2 Wireless LAN 802 11 a b g 3 Bluetooth 4 GPS 5 Camera 6 HF13 56 Reader 7 UHF 900MHz Tag Reader EPC Gen 2 ISO IEC 18000 6B 8 Modem ...

Страница 32: ...ine which could recognize all the 1D and 2D barcodes 1 1 Scanning Barcode 1 2 Setting Barcode Emulator Barcode Emulator program enables you to set the barcode value input type scan button scan sound and so on Start Button Programs Demo Apps Scanner BarcodeDemo Press Scan Buttons to Read Barcode ...

Страница 33: ...arcodeEmulator Run the Barcode Emulator Barcode Emulator Icon will be showed on the taskbar Run WordPad Program then click the Emulator Icon Result Type Keyboard Event Barcode inputted one by one Copy Paste Barcode will be stored be stored in clipboard and shown at paste way ...

Страница 34: ... will include an Enter Space Barcode value will include a Space Tab Inputting type as same as Tab Key Function Key Setup F1 F8키 Hardware Keypad Gun1 Gun2 Gun Trigger Sound Set sound ON OFF after scanned barcode Vibrator Set vibrator ON OFF after scanned barcode Close Exit Emulator Program ...

Страница 35: ...ng Barcode Symbology Start Button Program Scanner BarcodeSetup Click Set Enable Status button Make a check mark on the barcode which you want to use and then click SET button Run BarcodeSetup Program Set Barcode Type in detail ...

Страница 36: ... reading range 2D Symbology Selection 1 Initialize all the symbologies to factory default value 2 Unable to read all the symbologies 3 Enable to read all the symbologies 1 2 3 Warning Please do not look directly into the laser beam of barcode or it may do harm to your vision 1D Symbology selection 1 Initialize all the symbologies to factory default value 2 Unable to read all the symbologies 3 Enab...

Страница 37: ...ning rang of is from 40 300mm if failed to scan barcode please try to adjust scan angle and distance 2 The laser beam is a red thick line when scanning a barcode Incorrect Scanning Beam Position 1 The laser beam must across the barcode 2 It will couldn t scan barcode if the laser beam across only a fraction of barcode 1D 2D 1D 2D ...

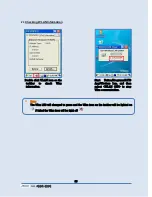
Страница 38: ... supports TCP IP network protocol and communicate with a host computer directly 2 1 Connecting to Wlan Start Button Programs Demo Apps Wireless Lan 2 2 Setting Wlan Manually Run the Wireless LAN program Select WLAN ON and then click Ok button Double click a suitable device from the list of AP Input Key Password and then click OK button ...

Страница 39: ...on the taskbar to check Wlan information Start Button Programs ATID App Wireless Lan and then select WLAN OFF to stop Wlan communication Note The Wlan LED will changed to green and the Wlan icon on the taskbar will be lighted on if failed the Wlan icon will be light off ...

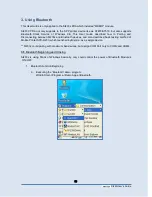
Страница 40: ...isconnecting between SI203x and Bluetooth devices and also described basic testing method of Mobile Printer SPR R203 which launched by Bixolon as a sample device SI203x could pairing with maximum 6ea devices but assign COM Port only to COM2 and COM4 3 1 Bluetooth Beginning and Closing SI203x is using Stack of Windows basically only could control the power of Bluetooth Module s ON OFF 1 Bluetooth F...

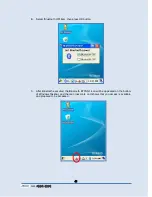
Страница 41: ...etooth ON item then press OK button C After Bluetooth executed the Bluetooth BTPAN1 icon will be appeared on the bottom of Windows Taskbar and the red cross mark on it shows that you access is available and prepared to be accessed ...

Страница 42: ...Si203User s Guide 42 2 Bluetooth Function Closing A Executing Bluetooth demo App from Windows CE Menu B Select Bluetooth OFF then to press OK button to off the Bluetooth power ...

Страница 43: ...h devices could do its function properly 1 Executing Bluetooth program as below path Start Settings Control Panel Bluetooth Device Properties 2 Press Scan Device button to searching devices which could pairing 3 Depending on the situation maybe need to input password for some devices then could ...

Страница 44: ...need some devices have to input Pin Code password firstly SPP R200 printer factory setting Pin Code is 0000 4 The devices which can connect will be listed after finished searching If cannot find your need device please press Scan Device button to searching your device again ...

Страница 45: ...ice to the pairing items then click Yes button to ending the Bluetooth Manager You can set the Password Authentication code according to the each device The Red Cross mark X on the Key icon will disappear if finished to registration 6 Click Active button to active the paired device ...

Страница 46: ... policy 1 Download SPP R200 Windows SDK from the Bixolon homepage www bixolon com to a suitable directory and unzip the file 2 Bluetooth Power ON 3 Executing Bluetooth Device Properties programs which located in Control Panel 4 SPP R200 printer power ON 5 Setting the SPP R200 printer to be in the status of pairing Please refer to the User Guide of SPP R200 Printer 6 Press Scan Device button to sea...

Страница 47: ...Si203사용자 설명서 47 11 Change the COM8 to COM2 then press Open button to testing printer ...

Страница 48: ...Demo Execute GPSDemo Program Start Start to receiving GPS data Stop Stop to receiving GPS Data Exit Exit the GPS Demo program Confirmation of GPS receiving data 1 Finding an open place to check your GPS signals 2 According to the actual environment the time to receive data is different about 3 10min After receiving GPS data once it is faster to receive GPS data than the first attempt ...

Страница 49: ...o resolution screen capture etc 5 1 Using Camera Start Button Program DEMO Apps CameraDemo Execute Camera Program Camera s Main Screen Camera UI Brightness Bar Stored images Number Preview Window Re rotation Button Image files store path Setting Resolution Preview Button Preview Stop Button Capture Button Setting Image Effect ...

Страница 50: ...F13 56 Demo Program Start Button Program DEMO Apps RF13 56Demo 6 2 Mifare Tag Window Mifare Version Read firmware version of ISO15693 AntennaOff Stop the Antenna MF_UID Read Mifare Tag ID Block Read Read Block Data Block Write Write Block Data Keyload Register authorization key to the R W while to access Mifare Increment Increase the values to data block Decrement Decrease the values to data block...

Страница 51: ...사용자 설명서 51 6 3 ISO15693 Tag Window ISO15693 UID Read ISO15693 Tag ID Read Blk Read ISO15693 Block data Write Blk Write ISO15693 Block data Clear Clear data information Click UID button to read ISO 15693 Tag ...

Страница 52: ...ported protocol of EPC GEN2 The Frequency range is 850MHz 960MHz and could adjustable 7 1Executing RF900Demo Program Start button Program DEMO Apps RF900Demo UHF Reader Run RF900Demo Program INVENTORY Mode Single Read Read one Tag each time Multi Read Read multi Tag each time Anti Collision INVENTORY Press Inventory button to read tags ...

Страница 53: ...emo Apps ModemTest Press P o w e r U p button wati tillpowerup succeed Press RAS Connect button if there is no SIM card the prompt messege window will pop up If there is the SIM card then setting each item on the Operator Setting interface and press Save button ...

Страница 54: ...Si203User s Guide 54 8 2 Modem Resetting Then RAS Connecting success Double click Mydevice icon Double click Flash Disk ...

Страница 55: ...Si203사용자 설명서 55 Double click Phone UI Delete Gprs ini file Press Yes button then to resetting ...

Страница 56: ...phone Jack Communication Port RS 232Serial Port USB 1 1 Expansion Slot 1 Micro SD Slot SDHC Support 1 SIM Slot 1 SAM Slot Keypad 29key Notification Vibrator and LED Power Supply Main Battery Lithium ion 3 7V Above 3 000mAH rechargeable Up to 4 400mAH Option Backup Battery Lithium Polymer 3 7V 100mAH rechargeable Adaptor Input AC100V 240V Output DC5V 3A Network Character Wireless Lan WLAN 802 11 a ...

Страница 57: ...Si203사용자 설명서 57 Writing Range 0m 3m Antenna Gain 2 dbi Standard Speed 62 5 kbps RF Output 1W EIRP Protocol EPC Gen2 ISO 18000 6C ISO 18000 6B Multi Reading Anti collision ...

Отзывы: