Manual, Robotic Electric Tool Changer, QC‑18
Document #9620‑20‑B‑18 Electric Tool Changer‑06
Pinnacle Park • 1031 Goodworth Drive • Apex, NC 27539 • Tel: 919.772.0115 • Fax: 919.772.8259 •
B-9
US Patent No.: 8,132,816 B2
2.4 Tool Interface
The Tool plate is attached to the customer’s tooling. It may be necessary for an interface plate to be utilized
to adapt the Tool plate to customer’s tooling. The Tool plate is designed with alignment features (dowel
holes and a recess) to accurately position and bolt holes to secure the Tool plate to customer’s tooling.
Custom tool interface plates can be supplied by ATI to meet customer’s requirements (see
If the customer chooses to design and build a tool interface plate, the following should be considered:
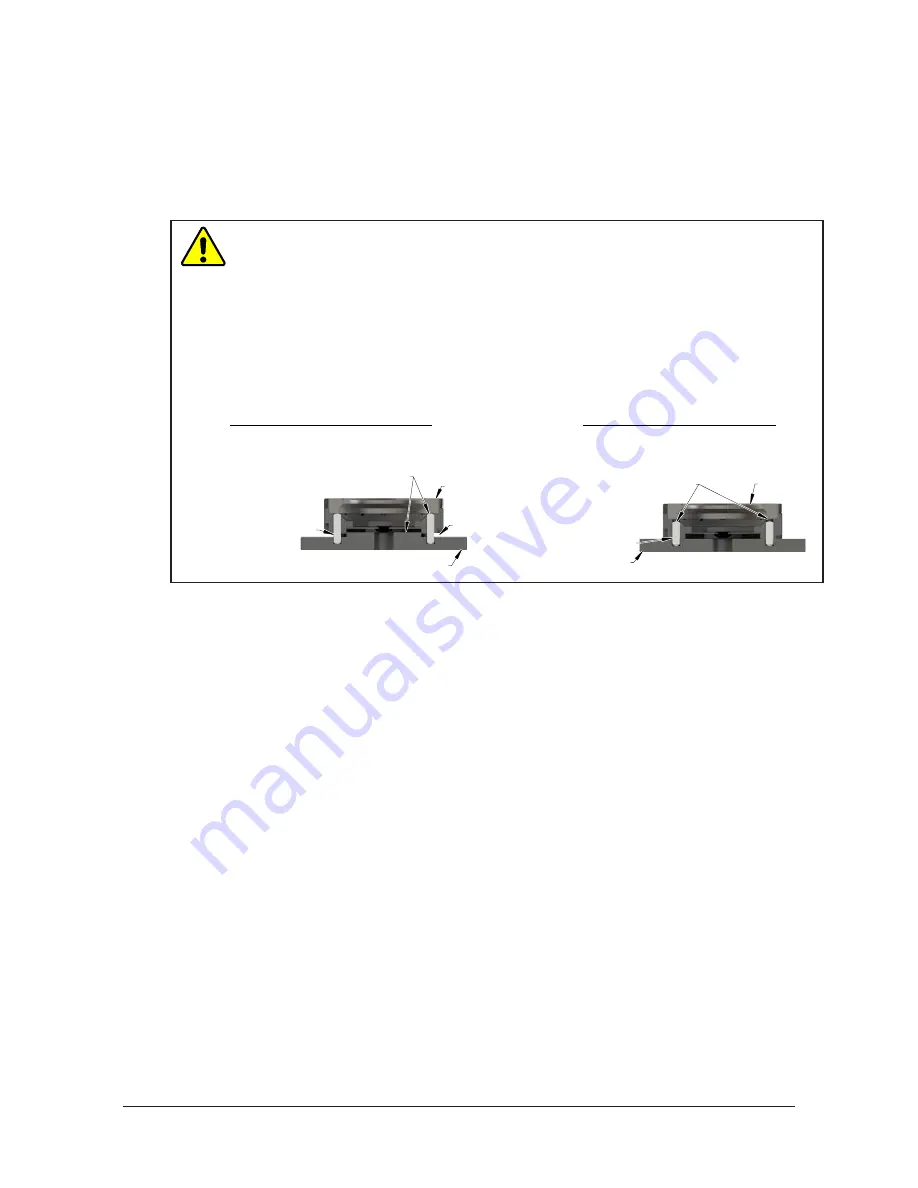
CAUTION:
Do not use more than two alignment features when securing a Tool plate
to an interface plate. Using more than two alignment features can cause damage to
equipment. Use either two dowel pins or a single dowel pin along with a boss/recess
feature to align the Tool plate with the interface plate.
CAUTION:
Do not use dowel pins that are too long that will not allow the interface
plate and Tool body to mate flush with each other. Using dowel pins that are too long
will cause a gap between the interface plate and the Tool body causing damage to the
equipment. Use the proper size dowel pins that will not extend further than allowed
by the Tool body.
Tool Plate
Interface Plate
Dowel pins which are
proper size allowing
interface plate and Tool
Plate to mount flush.
Two dowel pins (or a
boss/recess) being used as
alignment features.
Correct Mounting of Tool Plate
Tool Plate
Interface Plate
Dowel pins which
are too long and
cause a gap between
interface plate and Tool.
Boss and two dowel pins
as alignment features can be
difficult to align and can
cause damage to equipment.
Gap
Incorrect Mounting of Tool Plate
single dowel pin along with a
•
The interface plate should be designed to include bolt holes for mounting and either two dowel pins
or
a dowel pin and a boss for accurate positioning on the customer tooling and Tool plate. The dowel and
boss features are important to prevent rotation.
•
Dowel pins must not extend out from the surface of the interface plate farther than the depth of the
dowel holes in the Tool plate.
•
The thickness of the interface plate must be great enough to provide the necessary thread engagement
for the mounting bolts. Fasteners should be chosen to meet minimum recommended engagement
lengths while not exceeding the maximum available thread depth. Use of bolts that are too long can
cause damage to the tool side changer.
•
The plate design should take into account clearances required for Tool Changer module attachments
and accessories.
•
If a boss is to be used on the interface plate, a boss of proper height and diameter must be machined
into the interface plate to correspond with the recess in the Tool plate.
•
The tool interface plate should be designed with a hole in its center to allow for manually returning
the locking mechanism to the unlocked position under adverse conditions (i.e. unintended loss of
power and/or air pressure). The center access hole should be kept small [minimum recommended hole
diameter: 1” (25.4 mm)] to prevent debris from contaminating the locking mechanism while operating
in dirty environments. Even greater protection will result if the standard race cover with removable
access plug is used. [Note: Through hole diameter in plate: .563” (14.3 mm). Grommet outside
diameter: .88” (22.5 mm)].


