Page 4
General Recommendations
Before you begin the SETUP, we strongly recommend that you
take a few moments to:
• Familiarize yourself with the controls and functions of the
preamplifier-processor.
• Carefully study the system connection diagrams and basic
operational instructions.
• Fully understand the setup and programming instructions.
Precautions
• Install the ATP7500 on a solid shelf.
• Be sure that the area surrounding the unit is well
ventilated and not near a heat source of any kind.
• Prevent any moisture from entering the unit.
• Do not place anything on top of the unit.
• Make all connections BEFORE you turn the unit on.
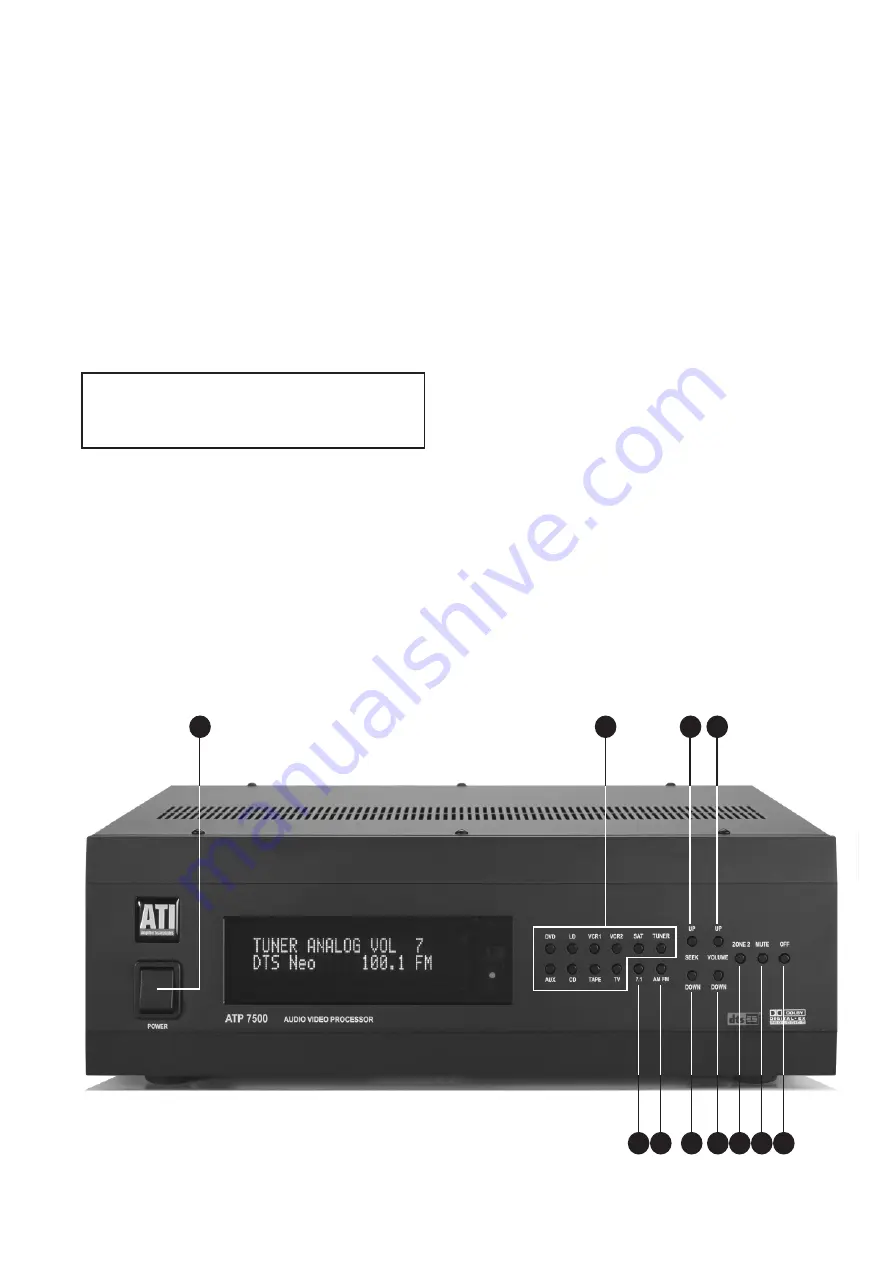
Front Panel Controls
A Power Switch
Switches the unit into standby mode and the LED turns on.
Do not use this switch to turn the unit off; use the OFF button.
PLEASE NOTE: TO TURN THE UNIT ON, YOU MUST
SELECT A SOURCE EITHER ON THE FRONT PANEL
OR THE REMOTE CONTROL.
B Source Buttons
When a source button is pressed, that source is selected
and the unit is turned on from the STANDBY mode.
C Seek Up
Advances the tuner to the next higher valid station.
D Volume Up
Raises the volume in 1dB increments. The volume will
increase faster if the button is held down.
E 7.1
Selects multi-channel audio and DVD Video.
F AM/FM
Selects AM or FM reception.
G Seek Down
Advances the tuner to the next lower valid station.
H Volume Down
Lowers the volume in 1dB increments. The volume will
decrease faster if the button is held down.
I Zone 2
Toggles the CD, TAPE, TUNER, AUX source buttons, AM/FM,
VOLUME, MUTE, SEEK, and OFF to control ZONE2. If no
settings are selected, the display will default to MAIN ZONE.
J Mute
Toggles the muting for MAIN ZONE and ZONE2.
K Off
Turns the system from ON to Standby.
K
J
I
H
G
F
E
B
C
A
D
All manuals and user guides at all-guides.com


