AWM-AD Page 3 of 4
5.
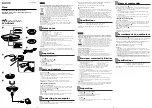
Adjust tilt tension & install security screw
5.1
Use the allen key to adjust the tilt tension until the monitor
holds in a vertical position at the end of the arm.
Note:
Support
monitor while
adjusting.
Tighten
Loosen
Tighten
Loosen
5.2 OPTIONAL security screw
Tilt the head upwards to install the optional security screw.
7.
Tension gauge
7.1
When installing
multiple monitors
of a similar weight,
use the tension
gauge to make
installation faster.
1.
Set up one monitor and
record the position of the
marker on the gauge.
2.
When installing subsequent
monitors, pre-tension the
arm to the recorded amount,
then fine-tune the tension by
following steps
6.3
to
6.5
.
Arm Tension Gauge
Marker
Heavier
Monitor
Lighter
Monitor
6.
Adjust arm tension
6.1
To accurately set the tension of the arm, position
the monitor at 90 degrees
6.2
Use the allen key to adjust the arm tension to the weight of the
monitor. Follow steps
6.3
to
6.5
to set the tension.
6.3
If the monitor sags or falls down,
increase the arm tension by rotating
the screw clockwise.
6.5
If the monitor floats or hovers in all
positions the arm tension is balanced
and does not require further adjustment.
6.4
If the monitor springs upwards from the
bottom position, decrease the arm tension
by rotating the screw anti-clockwise.
Monitor Falls
(from top)
Increase Tension
Monitor ‘Floats’
(all positions)
Balanced
Monitor Springs
(from bottom)
Reduce Tension
90°


