User’s manual
MS2085DECT 6.0 4-line cordedSmall Business Main Console
Страница 1: ...User s manual MS2085 DECT 6 0 4 line corded Small Business Main Console...
Страница 2: ...ry Handset with coiled cord installed User s manual Console Two telephone line cords 4 conductor Console power adapter Quick start guide User s manual MS2085 DECT 6 0 4 line corded Small Business Main...
Страница 3: ...or cordless headset 12 To deregister the cordless handset or headset from the MS2085 main console 15 Adding a corded headset 16 To add a corded headset to the console 16 System setup 17 Menu settings...
Страница 4: ...he directory 56 Capacity 56 Create directory entries 57 Create a new directory entry 57 Review directory entries 57 Search directory 58 Search by name 58 Dial delete or edit entries 59 Display dial 59...
Страница 5: ...t the auto attendant 75 Answering system capacity 75 Auto attendant operation 76 Using the auto attendant 76 Auto attendant flow chart 77 Answering system operation 78 New message indication 78 Messag...
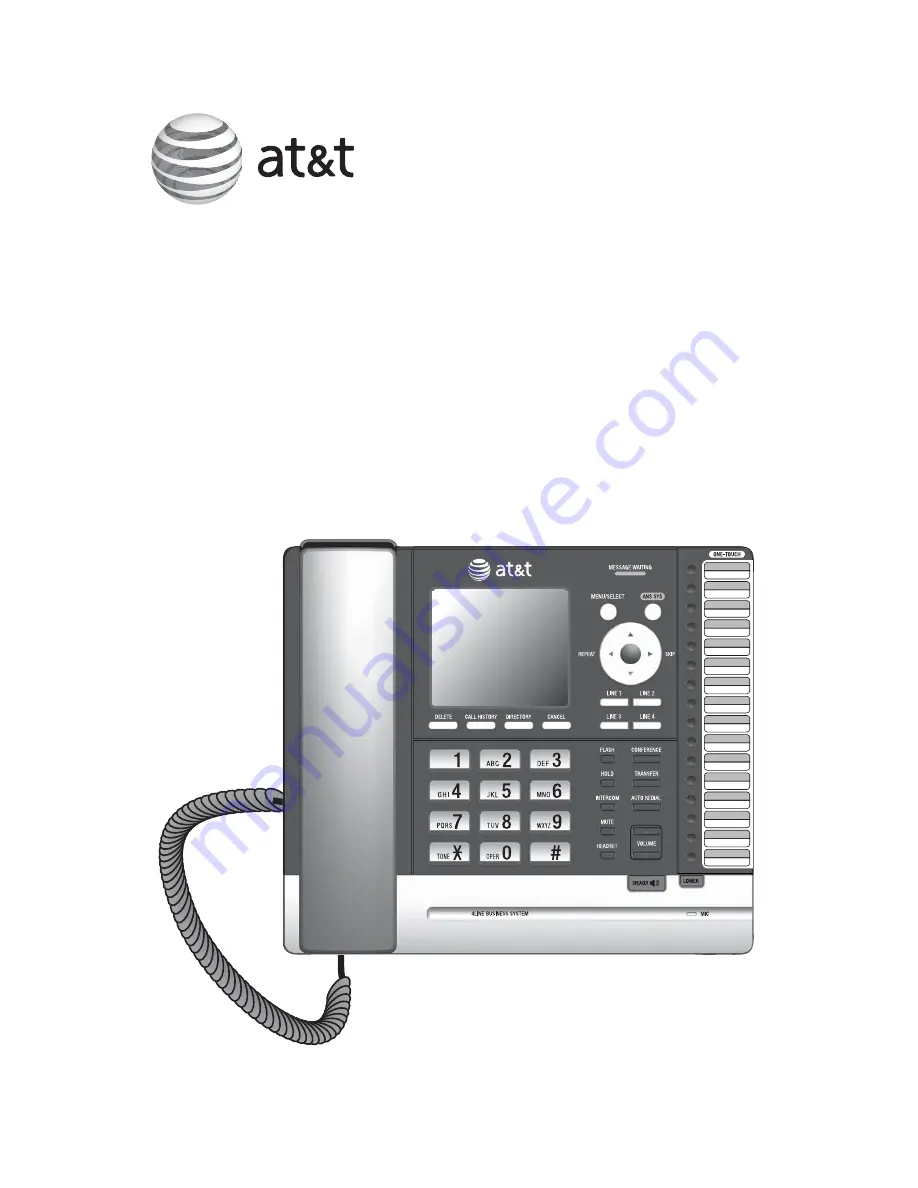
Страница 6: ...KIP to skip to the next message CANCEL While in a menu press to cancel an operation and exit the menu display LINE 1 LINE 4 keys Press to make or answer a call on the desired line pages 40 41 ANSWER O...
Страница 7: ...d hold to broadcast your voice to that extension Directory card To write names on the directory card follow the steps below Pull out the directory card Write the information on the directory card Repl...
Страница 8: ...u item Main menu System Setup Ringers Set Date Time One Touch Phone Settings Registration Customer Support Using menus Press MENU SELECT to show the first menu item System Setup Press or to scroll thr...
Страница 9: ...two touch memory for faster dialing and has a directory that can store up to 50 additional numbers with names This telephone has a caller ID feature that supports caller ID with call waiting service C...
Страница 10: ...s and electrical outlets not controlled by wall switches near where you are installing the phones The auto attendant function is available only on MS2085 telephone Assign a different system extension...
Страница 11: ...contact your DSL service provider for more information about DSL filters Your product may be shipped with a protective sticker covering the console display remove it before use For customer service or...
Страница 12: ...der for more information about DSL filters Option 1 To connect two 2 line wall jacks 3 Router Line 3 4 Line 1 2 Plug the larger end of the console power adapter into an electrical outlet not controlle...
Страница 13: ...e 3 4 Line 1 2 Plug the larger end of the console power adapter into an electrical outlet not controlled by a wall switch If you have DSL high speed Internet service a DSL filter not included is requi...
Страница 14: ...ess the lower tabs of the mounting bracket into the lower slots of the console until they lock into place 3 Unplug the power adapter from the power outlet Unplug the telephone line cords from the wall...
Страница 15: ...ct two 2 line wall jacks illustration on page 7 Align the upper wall mounting hole on the back of the console with the upper tab of the standard wall plate Make sure the lower wall mounting hole on th...
Страница 16: ...on follow the steps below If the telephone line cords and power adapter cord are bundled untie them first Push the console up to remove it from wall Unplug the telephone line cords or DSL filters from...
Страница 17: ...It takes up to 60 seconds to complete the registration You hear a confirmation tone when the registration is successful The console shows Deskset is connected to Console X and the deskset shows Deskse...
Страница 18: ...MENU SELECT Scroll down to Registration and press MENU SELECT Press MENU SELECT again to select Handset The MS2085 main console screen shows Registering handset Put handset on cradle to start Place th...
Страница 19: ...main console press MENU SELECT Scroll down to Registration and press MENU SELECT Set your headset to discoverable mode refer to the user s manual of your headset for instructions Press or to scroll t...
Страница 20: ...t takes up to 10 seconds to complete the deregistration If you are deregistering the cordless handset the console shows Handset deregistered and a confirmation tone when the deregistration is successf...
Страница 21: ...Canada dial 1 866 288 4268 See page 44 for instructions on using the corded headset with this telephone Plug a 2 5 mm headset into the HEADSET jack on the side of the console Side view of the console...
Страница 22: ...use to enter the main menu Press or to scroll to the feature to be changed to scroll to the feature to be changed The symbol indicates the selected menu item Press MENU SELECT to select the menu item...
Страница 23: ...Press MENU SELECT to save the setting and return to the previous menu There is a confirmation tone To exit without making changes press CANCEL NOTES If the extension number is already being used the...
Страница 24: ...ign Ext No Press REPEAT or SKIP to choose the desired extension number 11 26 and then press MENU SELECT The screen displays Unassign Ext No XX from phone Deskset X Press MENU SELECT to confirm There i...
Страница 25: ...tem Setup Press or to scroll to Prime Line then press MENU SELECT Press or to choose the desired line and then press MENU SELECT NOTE If you choose the line that is not connected to the If you choose...
Страница 26: ...re selected The extensions marked with a tick will ring when there is an incoming call from the line chosen in Step 4 The extensions not marked with a tick will not ring when there is an incoming call...
Страница 27: ...he screen displays System desksets can link to this phone Please connect PSTN lines to phone jacks Then returns to previous menu If you choose Deskset the screen displays This phone can link to a mast...
Страница 28: ...The screen displays Obtaining IP from DHCP server Please wait The process takes up to one minute There is a confirmation tone when the IP is successfully assigned The screen displays IP obtained XXX X...
Страница 29: ...ic IP Use the dialing keys to enter a specific IP Press DELETE to delete a character Press and hold DELETE to delete all characters Press REPEAT or SKIP to choose Add dot then press MENU SELECT to add...
Страница 30: ...ss or to scroll to Network Info Press MENU SELECT Press or to browse through the network information 1 2 3 4 System Setup Prime Line Line Group Set Line Mode Set Master Network setup Network Info L1 L...
Страница 31: ...me Press or VOLUME on the console to adjust the ringer volume Press MENU SELECT to save the setting and return to the previous menu There is a confirmation tone To exit without making changes press CA...
Страница 32: ...ss or to select the desired line Line 1 Line 2 Line 3 or Line 4 Press or to select a desired ringer tone Repeat steps 4 5 above to choose ringer tones for other lines if desired Press MENU SELECT to s...
Страница 33: ...ing then press MENU SELECT Press or to select a desired line Line 1 Line 2 Line 3 or Line 4 Press or to scroll to the desired time 2 seconds to 30 seconds Press MENU SELECT to save the setting and ret...
Страница 34: ...ELECT Use the dialing keys to enter the day month and year Press MENU SELECT to move to the time editing Use the dialing keys to enter the hour and minute Press REPEAT or SKIP to select AM or PM or pr...
Страница 35: ...ogram then press MENU SELECT The screen displays Enter Number Use the dialing keys to enter a telephone number up to 24 digits Press DELETE to delete a digit Press and hold DELETE to delete all digits...
Страница 36: ...ENU SELECT or press CANCEL to previous menu The screen displays Press a 1 touch key to save the number Press the desired one touch key to store a the telephone number in the upper location OR Press LO...
Страница 37: ...to View then press MENU SELECT Press or to scroll to the desired one touch location Press REPEAT or SKIP to scroll to Edit then press MENU SELECT The screen displays Edit Number Use the dialing keys t...
Страница 38: ...the number as usual Press REPEAT or SKIP to to scroll to Done then press MENU SELECT to save the setting and return to the previous menu There is a confirmation tone Delete an one touch key When the c...
Страница 39: ...ECT Press or to scroll to Phone Settings then press MENU SELECT Press or to scroll to LCD Language then press MENU SELECT Press or to select English Fran ais or Espa ol Press MENU SELECT again to save...
Страница 40: ...the telephone number and when you dial from the call log all 10 digits are dialed If you have more than one area code for your region enter those area codes as local area codes When the console is id...
Страница 41: ...to optimize readability in different lighting conditions When the console is idle press MENU SELECT Press or to scroll to Phone Settings then press MENU SELECT Press or to scroll to LCD Contrast then...
Страница 42: ...ve a page If you set AUTO MUTE to Off you can hear on the console when you receive a page If you set AUTO MUTE to On the MUTE light turns on and a page is muted when you receive a page unless you pres...
Страница 43: ...SELECT Press or to scroll to Phone Settings then press MENU SELECT Press or to scroll to Hold reminder then press MENU SELECT Press or to scroll to On or Off Press MENU SELECT to save the setting and...
Страница 44: ...s feature to reset all feature settings for this Console to their default settings The messages stored in the mailbox will not be reset To reset all feature settings to default When the console is idl...
Страница 45: ...or transferring call on the corresponding line Flashes rapidly when there is an incoming call or a transferring call on the corresponding line Making a call To make a call from the console Lift the h...
Страница 46: ...he handset or press SPEAKER to dial OR To override automatic line selection press LINE 1 LINE 4 for the desired line then lift the handset Using the speakerphone During a call press SPEAKER to switch...
Страница 47: ...recently called number Press or to view other recently called numbers Press CANCEL to exit the redial list To redial a number To dial the displayed number lift the handset or press lift the handset o...
Страница 48: ...e screen displays Redial in XX secs When the other party answers you will need to take an action to speak with the other party To answer the call lift the handset press SPEAKER or HEADSET While auto r...
Страница 49: ...the new call Press FLASH at any time to switch back and forth between calls Volume control Use this feature to independently set the listening volume to one of six levels for each of the listening op...
Страница 50: ...ess MUTE again and resume speaking NOTE Transferring the call changing lines or putting a call on hold also cancels the mute function Temporary tone dialing If you have dial pulse rotary service only...
Страница 51: ...press HOLD To release the hold press and release LINE 1 LINE 4 of the call on hold NOTES A call on hold after 10 minutes is automatically forwarded to the auto attendant even if the auto attendant is...
Страница 52: ...er extensions are dropped and no extensions can join the call If another extension tries to access the line you are using its screen displays Privacy To cancel call privacy During the call press MENU...
Страница 53: ...ontinue with the conversation and continue with the conversation To access the call history while on a call During the call press CALL HISTORY then press or to to scroll to the desired entry Press MEN...
Страница 54: ...ed first because an intercom call cannot be placed on hold The system supports a maximum of three extensions to have conference call with two outside calls at a time To make a conference call Make or...
Страница 55: ...ou cannot make any conference calls if all four telephone lines are in use If you are experiencing difficulty in using the conference features on this telephone please consider using AT T s complete l...
Страница 56: ...al a one touch entry on page 32 OR Press or to scroll to a desired extension then press MENU SELECT The screen displays Intercom to Device X Device X represents the name of destination device NOTES Be...
Страница 57: ...is put on hold The destination handset rings and the call is answered by pressing LINE 1 LINE 4 You hear a short tone from the console The outside call is automatically transferred to the desired ext...
Страница 58: ...every 30 seconds when a transferred call has not been answered To turn off the reminder beep see Hold reminder on page 38 NOTE If the desired extension does not answer the intercom call within one mi...
Страница 59: ...ed extension The destination party can now respond Page all devices Press INTERCOM on the console while on a call Press or to scroll to Page all then press MENU SELECT Press or to scroll to a desired...
Страница 60: ...store up to 50 entries with a maximum of 15 alphanumeric characters including spaces for names and 30 digits for telephone numbers A convenient search feature can help you quickly find and dial number...
Страница 61: ...d Pause then press MENU SELECT A P appears on the screen Store a signal for switching to temporary tone signalling If you have dial pulse rotary service this signal is required for some special servic...
Страница 62: ...ated with the dial pad key if there is an entry in the directory beginning with that letter If there is no entry matching the letter you press it remains in the current entry 4 To see other names star...
Страница 63: ...the dialing keys to edit the number Press DELETE to delete a digit Press and hold DELETE to delete all digits Press REPEAT or SKIP to move the cursor to the left or right You can include a pause while...
Страница 64: ...before answering the telephone and while on another call There are fees associated with caller ID services In addition this service might be called by different names such as caller ID with visual ca...
Страница 65: ...and date of the call and the caller s name and telephone number are included in the display Caller ID information appears on the screen as the telephone rings or until the caller hangs up or until th...
Страница 66: ...ys the name of the first corresponding number from the directory Missed new calls indicator When the console is in idle mode and has new or missed calls its screen shows XX Missed call s All new or mi...
Страница 67: ...he directory Dial a call history entry When in the call history press or to browse the number you wish to call Lift the handset or press SPEAKER OR To override automatic line selection press LINE 1 LI...
Страница 68: ...e screen Store a signal for switching to temporary tone signalling If you have dial pulse rotary service this signal is required for some special services Press or to choose Add Tone then press MENU S...
Страница 69: ...PRIVATE NAME The caller prefers not to show the name PRIVATE NUMBER The caller prefers not to show the phone number PRIVATE CALLER The caller prefers not to show the phone number and name UNKNOWN NAM...
Страница 70: ...please dial 0 To leave a message please dial 9 If you have many extensions record a separate extension list in the Directory OGM menu item and reference it in your auto attendant announcement as shown...
Страница 71: ...ion tone To record the announcement When the console is idle press ANS SYS Press or to scroll to Auto Attendant then press MENU SELECT Press or to scroll to Announcement then press MENU SELECT Press o...
Страница 72: ...nnouncement For example Day OGM 1 is set to end at 05 00 PM the start time of Day OGM 2 Day OGM 3 or Night OGM should be set as 05 00 PM NOTE The time is in a 12 hour clock format If you set an invali...
Страница 73: ...ges Press MENU SELECT to confirm There is a confirmation tone To exit without making changes press CANCEL Reset auto attendant Use this feature to reset the auto attendant settings and announcements t...
Страница 74: ...he console is idle press ANS SYS Press or to scroll to Private Mailbox then press MENU SELECT Press or to scroll to Auto ATT Delay then press MENU SELECT Press or to choose the desired time 12 seconds...
Страница 75: ...or to scroll to Private Mailbox then press MENU SELECT Press or to scroll to Delete all msgs then press MENU SELECT The screen displays Delete all messages Press MENU SELECT to confirm There is a con...
Страница 76: ...hone sharing the same line can answer the call by pressing the corresponding line key When the console is idle press ANS SYS Press or to scroll to Private Mailbox then press MENU SELECT Press or to sc...
Страница 77: ...REPEAT or SKIP to move the cursor to the left or right Press MENU SELECT to save the setting and return to the previous menu There is a confirmation tone To exit without making changes press CANCEL Me...
Страница 78: ...NU SELECT to save the setting and return to the previous menu There is a confirmation tone To exit without making changes press CANCEL Call screening Use this feature to choose whether incoming messag...
Страница 79: ...t answer calls when the phone is being used for setup message review call history review or a phone call If an auto attendant is active adjust the delay times for different features to let the auto at...
Страница 80: ...If the caller does not enter a command in 12 seconds the auto attendant announces That extension is not answering Thank you and drops the call If the destination extension does not pick up after arou...
Страница 81: ...plays outgoing announcement Person answers call Normal call Caller enters another extension or records a message Yes No AA calls extension Caller dials extension number Caller dials 9 Caller enters r...
Страница 82: ...ages in the mailbox While the telephone is idle press ANS SYS on the console Press or to choose Central Mailbox or Private Mailbox then press MENU SELECT Press or to choose Play new msgs to play the n...
Страница 83: ...ck to the previous message Press after three seconds of the message playing to repeat the message currently playing 3 Press to delete the current message during playback 41 Press to play the auto atte...
Страница 84: ...not enter a valid remote access code the answering system answers the call as usual and all the voice and digits entered will be recorded as messages stored in your general mailbox 2 If you do not ent...
Страница 85: ...can sometimes cause power surges harmful to electronic equipment For your own safety take caution when using electric appliances during storms Cleaning your telephone Your telephone base has a durabl...
Страница 86: ...near water or when you are wet For example do not use it in a wet basement or shower or next to a swimming pool bathtub kitchen sink or laundry tub Do not use liquids or aerosol sprays for cleaning I...
Страница 87: ...en portable wireless telephones and implanted cardiac pacemakers Supported by the U S Food and Drug Administration WTR recommends to physicians that Pacemaker patients Should keep wireless telephones...
Страница 88: ...or repair procedures follow the instructions outlined under the Limited Warranty If this equipment is causing harm to the telephone network the telephone service provider may temporarily discontinue y...
Страница 89: ...ommunications Operation of this equipment in a residential area is likely to cause harmful interference in which case the user will be required to correct the interference at his own expense This Clas...
Страница 90: ...ould expect the repair or replacement to take approximately 30 days 3 How long is the limited warranty period The limited warranty period for the PRODUCT extends for ONE 1 YEAR from the date of purcha...
Страница 91: ...se or receipt and Provide your name complete and correct mailing address and telephone number 7 Other limitations This warranty is the complete and exclusive agreement between you and the manufacturer...
Страница 92: ...F 122 F 0 C 50 C 5 1VDC 1200mA RF frequency band Channels Operating temperature Telephone base voltage AC adapter output PSTN Jacks 1 4 FXO ports Appendix Technical specifications 87 Ethernet Network...
Страница 93: ...5 Skip the message 6 Transfer the message 7 End remote access call or hang up Call your telephone number then enter your four digit access code preset to 0000 Model name MS2085 Type DECT 6 0 4 line c...
Страница 94: ...n Telephones All Rights Reserved AT T and the AT T logo are trademarks of AT T Intellectual Property licensed to Advanced American Telephones San Antonio TX 78219 Printed in China Issue 1 AT T 03 12 w...