


EN 9
Notes
• The temperature can be changed during cooking.
• Cooking times are rough estimates and can vary depending on a
number of conditions.
• For certain dishes, the oven should be preheated.
• If you use baking paper, this should be able to withstand high
temperatures.
• A lot of steam is released when cooking larger pieces of meat or
dishes using dough, such as pies. This can cause condensation on
the oven door. This is a normal occurrence and does not influence
the functioning of the appliance. When the cooking process has
ended, dry the door and the glass.
• Prevent condensation from forming and do not allow hot food to
cool in a closed oven.
• Any glass dishes you use must be able to withstand temperatures
of 275 °C.
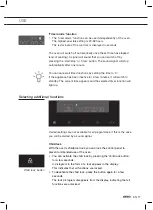
Oven settings
Use the table to select the right oven function. Also consult the cooking
instructions on the food packaging.
Function
Description
Recommended
temp. °C
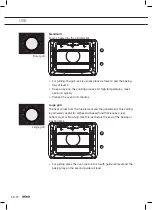
Quick preheat
Use this function to heat the oven quickly to the desired
temperature.
This function is not suitable for cooking
food!The preheat process is complete once the oven has
been preheated to the desired temperature.
160
Top heat + bottom heat
Heat is generated by the heating elements at the top and
bottom of the appliance. This setting is suitable for baking
and roasting.
200
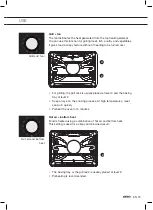
Small grill
Food is heated by the top grill heating element.
240
Large grill
Food is heated by the heating element (the grill) at the
top of the oven. The top heating element is activated
simultaneously to increase the effect of the elements.
240
USE
Содержание OX4511C
Страница 1: ...Instructions for use Oven OX4511C OX4592C OX6511C OX6592C...
Страница 2: ...EN 2 EN Instructions for use EN 3 EN 28 Pictograms used Important information Tip...
Страница 29: ...EN 29...
Страница 30: ...EN 30...
Страница 31: ...EN 31...


