


EN 21
Removal and installation of the oven door
Keep your fingers away from the hinges of the oven door. The hinges
are spring loaded and can cause injury if they spring back.
Make sure that the hinge latches are applied correctly to lock the
hinges.
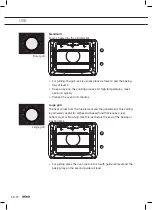
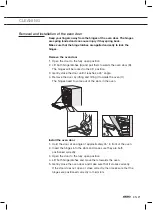
Remove the oven door
1. Open the door to the fully open position.
2. Lift both hinge latches (A) and pull them towards the oven door (B).
The hinges will be locked in the
45°
position.
3. Gently close the door until it reaches a 45° angle.
4. Remove the door by lifting and tilting it towards the oven (C).
The hinges need to come out of the slots in the oven.
B
A
C
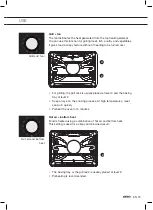
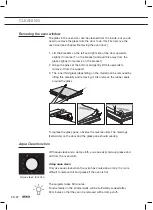
Install the oven door
1. Hold the door at an angle of approximately 45° in front of the oven.
2. Insert the hinges into the slots and make sure they are both
positioned correctly.
3. Open the door to the fully open position.
4. Lift both hinge latches and move them towards the oven.
5. Gently close the oven door and make sure that it closes correctly.
If the door does not open or close correctly, then make sure that the
hinges are positioned correctly in their slots.
CLEANING
Содержание OX4511C
Страница 1: ...Instructions for use Oven OX4511C OX4592C OX6511C OX6592C...
Страница 2: ...EN 2 EN Instructions for use EN 3 EN 28 Pictograms used Important information Tip...
Страница 29: ...EN 29...
Страница 30: ...EN 30...
Страница 31: ...EN 31...


