background image

73

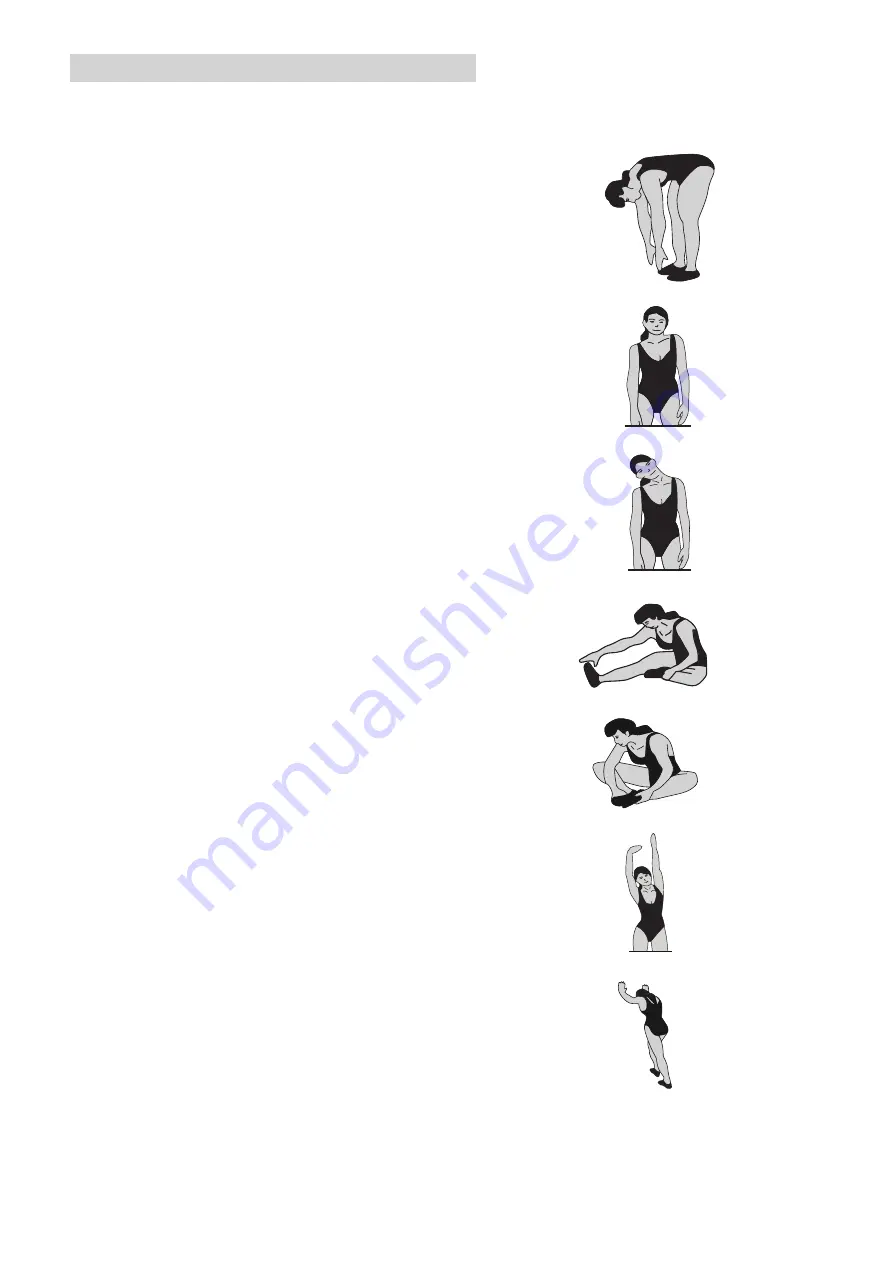
Forward bends:

Slowly bend forward with your knees bent, letting your 

shoulders and back relax as you try to touch your toes. 

Go down as far as you can and hold the position for 15 

seconds.

shoulder lift:

Lift your right shoulder up, towards your ear and hold 

the position for a moment. Then repeat the exercise 

with your left shoulder

Neck lateral flexion stretch:

one side, then the other

Harmstring Stretch:

commence with knee slightly bent, then push knee 

straight as tension allows, push chest towards foot.

Adductor stretch:

push down with elbows on knees very gently, keep 

back straight

Lateral stretching:

Stretch your arms upwards. Now try to stretch your 

right arm up as far as you can, feeling your right side 

stretch. Hold this position for a moment. Then repeat 

the exercise with your left arm.

Gastrocnemius stretch:

keep knee straight and heel down, feet facing forward

EXERCISE INSTRUCTIONS

Содержание E3

Страница 1: ...BENUTZERHANDBUCH MANUAL E3 VERSION A BS www AsVIVA de Produktinfo ...

Страница 2: ...5 PULSMESSTABELLE 36 WARTUNG UND PFLEGE 37 STÖRUNGSSSUCHE 38 GEWÄHRLEISTUNGSRECHT 39 GARANTIEBEDINGUNGEN 40 EU KONFORMITÄTSERKLÄRUNG 77 TABLE OF CONTENTS WARRANTY TERMS 42 IMPORTANT SAFETY INSTRUCTIONS 43 EXPLODED DIAGRAMM 45 PARTS AND TOOLS 47 ASSEMBLY 51 COMPUTER 60 IC APP FUNCTIONS 68 EXERCISE INSTRUCTIONS 72 PULSE MEASURING TABLE 74 TROUBLESHOOTING 75 WARRANTY DEVICE 76 EU KONFORMITÄTSERKLÄRUN...

Страница 3: ...bzw Rechnungsnummer an Ihren Händler oder direkt an uns Unsere Serviceadresse http www asviva de kontakt Damit Ihnen unsere Service Mitarbeiter optimal weiterhelfen können beachten Sie bitte folgende Vorgehensweise 1 Ist ein bestimmtes Teil beschädigt Teilen Sie uns bitte anhand der Teileiste die genaue Teilenummer mit 2 Liegt eine Störung beim Gerät vor Sollten Sie die Möglichkeit einer Videoaufn...

Страница 4: ...ren Temperament berücksichtigen Sie sollten die Kinder ggf beaufsichti gen und vor allem auf die richtige Benutzung des Gerätes hinweisen Als Spielzeug sind die Trainingsgeräte auf keinen Fall geeignet Bitte beachten Sie beim Aufstellen des Gerätes dass in jede Richtung ausreichend Freiraum vor handen ist Kinder sollten nicht unbeaufsichtigt in die Nähe des Gerätes kommen da sie aufgrund Ihres nat...

Страница 5: ...te Unterlage unter das Gerät zu legen Generell gilt dass Sportgeräte kein Spielzeug sind Sie dürfen daher nur bestimmungsgemäß und von entsprechend informierten bzw unterwiesenen Personen benutzt werden Wenn Sie Schwindelgefühle Übelkeit Brustschmerzen oder andere anormale Symptome verspü ren stoppen Sie sofort das Training und konsultieren Sie Ihren Arzt Personen wie Kinder Invaliden und behinder...

Страница 6: ... A5 1 A5 2 A5 3 A5 4 A5 5 A5 6 A5 7 A5 8 A5 9 A5 10 A5 11 A5 12 A9 A9 1 A9 1 A10 A12 1 A13 A12 A11 A12 A13 A3 6 A4 A7 A8 A1 A2 A3 A5 M A3 2 A3 3 A3 1 A5 2 A9 2 A9 3 A9 4 A9 5 A1 A3 4 A3 5 A5 1 A5 2 A5 3 A5 4 A5 5 A5 6 A5 7 A5 8 A5 9 A5 10 A5 11 A5 12 A9 A9 1 A9 1 A10 A12 1 A13 A12 A11 A12 A13 A3 6 ...

Страница 7: ...P2 P1 R2 R5 R20 O1 O1 O2 O2 G2 G1 D3 C2 C3 C4 C5 D1 D4 D5 D6 D7 D8 F2 F9 F10 F11 F19 G3 R20 R19 R19 A B C J D E1 E3 E2 E4 S1 S2 L1 L2 H1 K1 K2 P1 P2 F3 F4 F5 N1 N2 N2 N1 R11 B1 B2 B3 B4 J1 B5 C1 R2 R3 R4 R10 R7 R5 R5 R7 R15 R14 R12 R15 R13 R17 R17 R17 R18 F6 F7 F8 F1 F12 F12 F14 F15 F16 F13 F13 R20 R3 R12 R13 R1 R13 R12 R15 R15 R5 R6 F20 R8 H2 R9 R5 R5 R5 R7 R7 D2 Q F3 F4 F5 F6 F7 F14 F16 F17 F18 ...

Страница 8: ...enr Beschreibung Menge Teilenr Beschreibung Menge A Main frame 1 G Decoration cover 2 B Front stabilizer 1 S Swing handlebar tube 2 C Slide track 1 H Plastic cover 2 D Central support tube 1 J Console 1 E Side handlebar 2 K1 Bottle 1 F Connect tube pedal tube 2 K2 Bottle holder 1 ...

Страница 9: ...o P No R Teilenr Beschreibung Menge Teilenr Beschreibung Menge L Decoration cover of pedal tube 2 O Decoration cover 2 M Adaptor 1 P Swing handlebar tube 2 N Decoration cover of joint pedal tube 2 R Plastic cover 2 TEILEISTE ...

Страница 10: ...IP 2 D2 SENSOR WIRE 1 A5 5 BEARING 1 D3 SENSOR WIRE 2 A5 6 AXLE 1 D4 SCREW M3x35 4 A5 7 WASHER 2 D5 NUT 4 A5 8 IRON BRICKET 1 D6 PAD FOR HAND PULSE 2 A5 9 NUT 1 D7 PAD FOR HAND PULSE 2 A5 10 SCREW 1 D8 END CAP 2 A5 11 BEARING 2 E1 SIDE HANDLEBAR R 1 A5 12 CLIP 1 E2 SIDE HANDLEBAR L 1 A7 CRANK R 1 E3 SPONGE R 1 A8 CRANK L 1 E4 SPONGE L 1 A9 SCREW F1 CONNECT TUBE R 1 A9 1 NUT 1 F2 CONNECT TUBE L 1 A...

Страница 11: ...2 DECORATION COVER 1 R18 NUT M12 2 G3 BUSH 2 R19 NUT M10 4 H1 PLASTIC COVER R 1 R20 WAVE WASHER 4 H2 PLASTIC COVER L 1 J CONSOLE 1 J1 SCREW 4 K1 WATER BOTTLE 1 K2 BOTTLE HOLDER 1 L1 DECORATION COVER OF PEDAL TUBE R 1 L2 DECORATION COVER OF PEDAL TUBE L 1 M ADAPTOR 1 N1 DECORATION COVER OF HANDLE BAR 2 N2 DECORATION COVER OF HANDLE BAR 2 O1 WHEEL COVER R 2 O2 WHEEL COVER L 2 P1 DECORATION COVER OF ...

Страница 12: ...tt 1 1 Montieren Sie den Front Stabilizer B mit Hilfe der Schrauben R4 der Unterlegscheiben R13 und R14 an dem Hauptrahmen A 2 Ziehen Sie die Schrauben fest Schritt 2 1 Montieren Sie den Slide Stack C mit Hilfe der Schrauben R1 der Unterlegscheiben R12 R13 und den Muttern M10 an dem Hauptrahmen A 2 Ziehen Sie die Schrauben fest Hinweis Sie können das Gerät durch justieren von B1 und C1 in die Waag...

Страница 13: ...Tube D auf den Hauptrahmen A Sichern Sie dies mit den Schrauben R10 sowie den Unterlegscheiben R14 und R15 2 Montieren Sie die Plastic Cover H1 und H2 mit Hilfe der Schraube R9 an dem Support Tube D Achtung Vergewissern Sie sich dass bei der Montage der Mittelstange D keine Kabel beschädigt werden MONTAGE ...

Страница 14: ...ird 1 Stecken Sie das Decoration Cover G auf das Central Support Tube D Montieren Sie die rechte Swing Handlebar Tube S1 auf die Achse Q mit Hilfe der Unterlegscheiben R15 und R17 der Unterlegscheibe R20 und der Schraube R7 2 Stecken Sie die rechte Moving Handlebar E1 auf die rechte Swing Handlebar Tube S1 Befestigen Sie dies mit den Schrauben R3 und R6 3 Wiederholen Sie den Vorgang für die linke ...

Страница 15: ...ieren Sie die rechte Pedal Tube F1 an dem Pedalarm mit Hilfe der Schraube R7 und der Unterlegscheiben R20 R16 und R15 2 Befestigen Sie die Connect Tube F9 an der Swing Right Handlebar S1 mit Hilfe der Schrauben R2 und Mutter R18 ...

Страница 16: ...tieren Sie die linke Pedal Tube F2 an dem Pedalarm mit Hilfe der Schraube R7 und der Unterlegscheiben R20 R16 und R15 2 Befestigen Sie die Connect Tube F9 an der Swing Right Handlebar S2 mit Hilfe der Schrauben R2 und Mutter R18 ...

Страница 17: ...Computer J auf die Computerabdeckung Befestigen Sie diesen mit den Schrauben J1 Hinweis Achten Sie darauf dass Sie die Kabel nicht beschädigen 2 Befestigen Sie den Flaschenhalter K2 mit Hilfe der Schrauben R8 an der Central Support Tube D Stecken Sie die Flasche K1 in den Flaschenhalter F2 ...

Страница 18: ... der rechten Pedal Tube 2 Befestigen Sie das Decoration Cover P1 und P2 an das Ende des Swing Tube S1 und Connect Tube F9 mit Hilfe der Schraube R5 3 Befestigen Sie die Wheel Cover O1 und O2 an den hinteren Rollen mit Hilfe der Schrauben R9 4 Wiederholen Sie den Vorgang auf der linken Seite ...

Страница 19: ...19 MONTAGE Schritt 9 1 Platzieren Sie die Handlebar Cover N1 und N2 an der rechten Handlebar und befestigen Sie diese mit der Schraube R5 2 Wiederholen Sie den Vorgang auf der linken Seite ...

Страница 20: ...20 MONTAGE Schritt 10 1 Schließen Sie das Netzteil M erst an dem Gerät an 2 Schließen Sie das Netzteil anschließend in einer geeigneten Steckdose an ...

Страница 21: ...r den Kalorienverbrauch dienen lediglich als Anhaltspunkt für eine Person mittlerer Statur bei mittlerer Widerstandseinstellung und können erheblich von dem tatsächlichen Kalorienverbrauch abweichen Dieser Computer wurde nach den entsprechend zutreffenden EMV Normen getestet Dennoch ist es möglich dass die Anzeige insbesondere durch elektrostatische Entladungen gestört werden kann Dies kann sich i...

Страница 22: ... RESET Drücken Sie diese Taste um alle Werte zu löschen RECOVERY Drücken Sie diese Taste um den Herzfrequenzstatus zu testen Power ON Schalten Sie das Gerät an Der Computer startet und zeigt zunächst alle Werte für 2 Sekunden an Nach 4 minütiger Trainingsunterbrechung schaltet der Computer automatisch in den Ruhemodus Drücken Sie eine beliebige Taste um den Computer erneut zu starten Trainingsausw...

Страница 23: ...ie gegenwärtige Trainingsleistung die der Computer durch Ihre Übung empfängt von 10 350 an Manueller Modus Drücken Sie im Hauptmenü START um das manuelle Training zu starten 1 Drehen Sie in Richtung UP oder DOWN um das Trainingsprogramm auszuwählen Wählen Sie MANUAL und bestätigen Sie Ihre Eingabe durch ENTER 2 Drehen Sie in Richtung UP oder DOWN um die Werte TIME DISTANCE PULSE und CALORIES einzu...

Страница 24: ...N und wählen Sie zwischen BEGINNER 1 BEGINNER 4 Drücken Sie ENTER um die Eingaben zu bestätigen 3 Drehen Sie in Richtung UP oder DOWN um die Zeit einzustellen 4 Drücken Sie START STOP um das Training zu beginnen Drehen Sie in Richtung UP oder DOWN um das Level einzustellen 5 Drücken Sie START STOP um das Training zu stoppen Drücken Sie REST um in das Hauptmenü zu gelangen COMPUTERFUNKTIONEN ...

Страница 25: ... DOWN und wählen Sie zwischen ADVANCE 1 ADVANCE 4 Drücken Sie ENTER um die Eingaben zu bestätigen 3 Drehen Sie in Richtung UP oder DOWN um die Zeit einzustellen 4 Drücken Sie START STOP um das Training zu beginnen Drehen Sie in Richtung UP oder DOWN um das Level einzustellen 5 5 Drücken Sie START STOP um das Training zu stoppen Drücken Sie REST um in das Hauptmenü zu gelangen COMPUTERFUNKTIONEN ...

Страница 26: ... DOWN und wählen Sie zwischen SPORTY 1 SPORTY 4 Drücken Sie ENTER um die Eingaben zu bestätigen 3 Drehen Sie in Richtung UP oder DOWN um die Zeit einzustellen 4 Drücken Sie START STOP um das Training zu beginnen Drehen Sie in Richtung UP oder DOWN um das Level einzustellen 5 Drücken Sie START STOP um das Training zu stoppen Drücken Sie REST um in das Hauptmenü zu gelangen COMPUTERFUNKTIONEN ...

Страница 27: ... in Richtung UP oder DOWN um Programm 55 75 90 oder TAG Zielherzfrequenz 30 230 auszuwählen Bestätigen Sie Ihre Angabe durch ENTER 4 Drehen Sie in Richtung UP oder DOWN um die Zeit einzustellen 5 Drücken Sie START STOP um das Training zu beginnen Drehen Sie in Richtung UP oder DOWN um das Level einzustellen 6 Drücken Sie START STOP um das Training zu stoppen Drücken Sie RESET um in das Hauptmenü z...

Страница 28: ...ER 2 Drehen Sie in Richtung UP oder DOWN und wählen Sie WATT 10 350 Drücken Sie ENTER um die Eingaben zu bestätigen 3 Drücken Sie START STOP um das Training zu beginnen Drehen Sie in Richtung UP oder DOWN um WATT einzustellen 4 Drücken Sie START STOP um das Training zu stoppen Drücken Sie RESET um in das Hauptmenü zu gelangen COMPUTERFUNKTIONEN ...

Страница 29: ...Traningstyp Quick Start Mit dem Training sofort beginnen ohne Einstellungen vorzunehmen Interval Maximaler kumulativer Trainingsverbrauch innerhalb des selben Zeitrahmens Map Mode Trainieren Sie auf Ihrer Lieblingsstrecke dank der Kartenfunktion Anzeige Training Klare und verständliche Benutzeroberfläche Alle wichtige Informationen wie Zeit zurückgelegte Strecke aktueller Widerstand verbrauchte Ka...

Страница 30: ...chluss wie effektiv Ihr Training war AI Training Die APP verwendet einen Algorithmus um Ihre Trainingsaufzeichnung zu analysieren und Ihnen somit ein optimierten Trainingserlebnis zu bieten So ist jede Trainingseinheit effizient einfach und sicher AI Diagnose AI Diagnose ist eine erweiterte und personalisierte Analyse Der Algorithmus bietet nicht nur ein optimierten Trainingserlebniss IC APP FUNKT...

Страница 31: ...rt von Training Sie absolvieren wollen Marathon Explosivenes Geeignet für Kraftausdauertraining Training für den Aufbau von Muskeln Get Fit BAI your life Training optimiert auf den Verbrauch von Kalorien Fettverbrennung Sicheres Training für ältere Menschen IC APP FUNKTIONEN ...

Страница 32: ...ntervalle und die Unterstützung verschiedener Trainingsgeräte Mit Leichtigkeit können Sie zwischen den Geräten wechseln und somit Ihr Training weiter optimieren und Ihr Ziel effizienter erreichen Bitte beachten Sie Zum optimalen Training mit den AI System wird Ihnen die Verwendung eines Brustgurtes oder einer Apple Watch zwecks Messung der Herzfrequenz empfohlen IC APP FUNKTIONEN ...

Страница 33: ...cker während Sie versuchen Ihre Zehen zu berühren Gehen Sie soweit runter wie Sie können und halten Sie die Position 15 Sekunden lang Schulterheben Heben Sie Ihre rechte Schulter nach oben hin zu Ihrem Ohr und halten Sie die Position einen Moment lang Wiederholen Sie die Übung anschließend mit Ihrer linken Schulter Kopfrollen Legen Sie Ihren Kopf nach rechts und halten Sie die Position einen Momen...

Страница 34: ... Sie Ihre Knie langsam nach unten Halten Sie diese Position 15 Sekunden lang Seitliches Dehnen Strecken Sie Ihre Arme nach oben Versuchen Sie nun Ihren rechten Arm so weit wie möglich nach oben zu strecken dabei spüren Sie wie Ihre rechte Seite gedehnt wird Halten Sie diese Position einen Moment lang Wiederholen Sie die Übung anschließend mit Ihrem linken Arm Dehnen der Wadenmuskeln und der Achill...

Страница 35: ...pergewicht zu verändern benötigt er mindestens 3 Trainingseinheiten je Woche 3 Gestaltung des Trainings Jede Trainingseinheit sollte aus 3 Trainingsphasen bestehen Aufwärm Phase Trainings Phase und Abkühl Phase In der Aufwärm Phase soll die Körpertemperatur und die Sauerstoffzufuhr langsam gesteigert wer den Dieses ist durch gymnastische Übungen über eine Dauer von 5 bis 10 Minuten möglich Danach ...

Страница 36: ...e 73 110 Schläge pro Minute 145 80 Jahre 70 105 Schläge pro Minute 140 85 Jahre 68 100 Schläge pro Minute 135 90 Jahre 65 98 Schläge pro Minute 130 Ihr Maximum Puls beträgt ungefähr 220 minus Ihres Alters Die obigen Zahlen sind Durchschnitts werte und sollten als allgemeine Richtlinien verwendet werden ACHTUNG bitte folgendes beachten Einige Bluthochdruck Medikamente erniedrigen Ihren Maximum Puls...

Страница 37: ...ten von Zeit zu Zeit mit handelsüblichem Schmierfett eingefettet werden Informationen zur Batterieverordnung Im Zusammenhang mit dem Vertrieb von Batterien oder Akkus oder mit der Lieferung von Geräten die Batterien oder Akkus enthalten sind wir verpflichtet Sie gemäß der Batterieverordnung auf folgendes hinzuweisen Batterien dürfen nicht in den Hausmüll gegeben werden Sie sind zur Rückgabe ge bra...

Страница 38: ...hre Hände mit ein wenig Wasser und versuchen Sie es noch ein mal Reinigen Sie die Handpulssen soren oder Pulsempfänger um einen guten Kontakt zwischen Ihren Körper und den Pulssen soren zu sichern Die Handstange hat Spiel wackelt Schrauben haben sich gelöst Prüfen Sie alle Schrauben auf festen Sitz Geräuschentwicklung der be weglichen Teile Unkorrekte Montage Entfernen Sie die Verkleidung und stel...

Страница 39: ...sbrauch entstanden ist 1 Die Gewährleistung bezieht sich nicht auf alle Teile des Gerätes die einem funktionsbedingten Verschleiß unterliegen soweit es sich nicht um Produktions oder Materialfehler handelt Schäden die durch unsachgemäße oder mangelhafte Pflege und nicht fachmännisch durchgeführ te Reparaturen Umbauten oder Austausch von Teilen entstehen Schäden die durch unsachgemäßen Gebrauch und...

Страница 40: ...hnen schnellstmöglich weiterhelfen zu können benötigen wir eine möglichst genaue Störungsbe schreibung unter Nennung der Rechnungsnummer der genauen Artikelnummer sowie der betroffenen Teile Teilenummern entnehmen Sie bitte der Explosionszeichnung aus dem Bedienungshandbuch GARANTIEINHABER Garantieinhaber ist der Erstkäufer bzw jede Person die ein neugekauftes Produkt von einem Erstkäu fer als Ges...

Страница 41: ...erheitsvorkehrungen Nichtbeachtung der Bedienungsanleitung Wartung und Pflege Gewaltanwendung z B Schlag Stoß Fall Eingriffe die nicht von der von unserem Support angewiesen oder autorisiert wurden eigenmächtige Reparaturversuche Verschleißteile Zug Seile Kugellager Antriebs und Laufriemen Laufbretter Laufrollen Sitz Polster Zylinder Griffe Pedalriemen Federn Bremsbeläge Pedale Speichen Felgen Bel...

Страница 42: ...customer number or invoice number Our service is available 24 hours Our service adress https www asviva de contact To ensure that our service staff can help you optimally please consider the following procedure 1 Is a specific part damaged Please tell us the exact part number using the parts list 2 Is there a fault with the unit Should you have the possibility of a video recording e g mobile phone...

Страница 43: ...l their temperament You should supervise the children if necessary and should point out the correct use of the appliance As a toy the training equipment is by no m ans suitable When installing the unit please ensure that there is sufficient clearance in each direction Children should not be near the unit unattended as they can use the unit in a kind and fashion due to their natural play for which ...

Страница 44: ... like we recommend that you place a suitable non slip support underneath the unit In general sports equipment is not a toy They may therefore only be used according to the regula tions and by appropriately informed or instructed persons If you experience dizziness nausea chest pain or other abnormal symptoms stop training and consult immediately your doctor Persons such as children disabled person...

Страница 45: ... A5 1 A5 2 A5 3 A5 4 A5 5 A5 6 A5 7 A5 8 A5 9 A5 10 A5 11 A5 12 A9 A9 1 A9 1 A10 A12 1 A13 A12 A11 A12 A13 A3 6 A4 A7 A8 A1 A2 A3 A5 M A3 2 A3 3 A3 1 A5 2 A9 2 A9 3 A9 4 A9 5 A1 A3 4 A3 5 A5 1 A5 2 A5 3 A5 4 A5 5 A5 6 A5 7 A5 8 A5 9 A5 10 A5 11 A5 12 A9 A9 1 A9 1 A10 A12 1 A13 A12 A11 A12 A13 A3 6 ...

Страница 46: ...8 P2 P1 R2 R5 R20 O1 O1 O2 O2 G2 G1 D3 C2 C3 C4 C5 D1 D4 D5 D6 D7 D8 F2 F9 F10 F11 F19 G3 R20 R19 R19 A B C J D E1 E3 E2 E4 S1 S2 L1 L2 H1 K1 K2 P1 P2 F3 F4 F5 N1 N2 N2 N1 R11 B1 B2 B3 B4 J1 B5 C1 R2 R3 R4 R10 R7 R5 R5 R7 R15 R14 R12 R15 R13 R17 R17 R17 R18 F6 F7 F8 F1 F12 F12 F14 F15 F16 F13 F13 R20 R3 R12 R13 R1 R13 R12 R15 R15 R5 R6 F20 R8 H2 R9 R5 R5 R5 R7 R7 D2 Q F3 F4 F5 F6 F7 F14 F16 F17 F1...

Страница 47: ...F No G No Description Qty No Description Qty A Main frame 1 G Decoration cover 2 B Front stabilizer 1 S Swing handlebar tube 2 C Slide track 1 H Plastic cover 2 D Central support tube 1 J Console 1 E Side handlebar 2 K1 Bottle 1 F Connect tube pedal tube 2 K2 Bottle holder 1 ...

Страница 48: ...No O No P No R No Description Qty No Description Qty L Decoration cover of pedal tube 2 O Decoration cover 2 M Adaptor 1 P Swing handlebar tube 2 N Decoration cover of joint pedal tube 2 R Plastic cover 2 PARTS AND TOOLS ...

Страница 49: ... A5 5 BEARING 1 D3 SENSOR WIRE 2 A5 6 AXLE 1 D4 SCREW M3x35 4 A5 7 WASHER 2 D5 NUT 4 A5 8 IRON BRICKET 1 D6 PAD FOR HAND PULSE 2 A5 9 NUT 1 D7 PAD FOR HAND PULSE 2 A5 10 SCREW 1 D8 END CAP 2 A5 11 BEARING 2 E1 SIDE HANDLEBAR R 1 A5 12 CLIP 1 E2 SIDE HANDLEBAR L 1 A7 CRANK R 1 E3 SPONGE R 1 A8 CRANK L 1 E4 SPONGE L 1 A9 SCREW F1 CONNECT TUBE R 1 A9 1 NUT 1 F2 CONNECT TUBE L 1 A9 2 TURNING CONNECTOR...

Страница 50: ...T 2 G2 DECORATION COVER 1 R18 NUT M12 2 G3 BUSH 2 R19 NUT M10 4 H1 PLASTIC COVER R 1 R20 WAVE WASHER 4 H2 PLASTIC COVER L 1 J CONSOLE 1 J1 SCREW 4 K1 WATER BOTTLE 1 K2 BOTTLE HOLDER 1 L1 DECORATION COVER OF PEDAL TUBE R 1 L2 DECORATION COVER OF PEDAL TUBE L 1 M ADAPTOR 1 N1 DECORATION COVER OF HANDLE BAR 2 N2 DECORATION COVER OF HANDLE BAR 2 O1 WHEEL COVER R 2 O2 WHEEL COVER L 2 P1 DECORATION COVE...

Страница 51: ...n frame A using two screws R4 two spring washers R13 and two washers R12 Step 2 1 Mount the slid track C to the main frame A using four screws R1 four spring washers R13 four washers R12 aswell as M10 nut R19 Note You can adjust the stand by adjusting B1 and C1 ...

Страница 52: ... sensor A2 Put the central support tube D into the main frame A and use four bolts R10 four spring washer R15 and four washers R14 2 Mount the plastic cover H1 and H2 by using the bolts R9 to the support tube D Caution Please make sure to not damage any cables ...

Страница 53: ...ottom to the top side 1 Stick the decoration cover G to the central support tube D Mount the right swing handlebar tube S1 to the axle Q by using the washers R15 and R17 washers R20 and the screw R7 2 Stick the right moving handlebar E1 to the right swing handlebar tube S1 Use the screws R3 and R6 for this 3 Repeat this process for the opposite site ASSEMBLY ...

Страница 54: ...MBLY Step 5 1 Insert the right pedal tube F1 to the pedalarm by using the screw R7 and the washers R15 R16 and R20 2 Tight the connect tube F9 to the swing right handlebar S1 by using the screw R2 and nut R18 ...

Страница 55: ... ASSEMBLY Step 6 1 Insert the left pedal tube F2 to the pedalarm by using the screw R3 and the washers R15 R16 and R20 2 Tight the connect tube F9 to the right handle bar by using nut R18 and the screw R2 ...

Страница 56: ...nd insert the console J in top of the central sup port tube Tight it by using the screws J1 Note Please be careful to not damage any cables 2 Attach the bottle holder K2 to the central support tube D by using the screws R8 Place the water bottle K1 into the bottle holder ...

Страница 57: ... the screw R5 to fix it 2 Place the decoration cover P1 and P2 onto the joint of the swing tube S1 and connect tube F9 and secure it by using the screw R5 3 Place the wheel cover O1 and O2 onto the rear wheel and tight it by using the screw R9 4 Repeat this process for the opposite side ...

Страница 58: ...58 ASSEMBLY Step 9 1 Place the handlebar cover N1 and N2 onto the right side handlebar and use the screw R5 to fix it 2 Repeat the steps for the opposite side ...

Страница 59: ...59 ASSEMBLY Step 10 1 At first plug the adaptor M into the machine 2 After the adaptor M is plugged into the machine plug it into the power socket ...

Страница 60: ...ter shows no values The calorie consumption is only for reference The real consumption can differ significantly The computer has been tested arrcording to the applicable EMC standards Nevertheless it is possible that the display in particular by electrostatic discharges can be disturbed This can result in unwanted reset or in an incorrect indication In this case you restart your computer power off...

Страница 61: ...get back to the homescreen TOTAL RESET Press TOTAL RESET to delete all data RECOVERY Press RECOVERY to test your heart rate Power ON Start using the machine The computer will start and show all values for 2 seconds If you stop using the machine for 4 minutes the computer will automatically turn on standby Press any key ti wake up the computer Workouts Press UP or DOWN to chose between Manual Begin...

Страница 62: ...ue is to high the computer will give you a signla RPM Shows the revolutions per minute from 0 to 999 WATT Shows the current WATT value from 10 350 Manual mode Press START in the homescreen to start the manual workout 1 Turn UP or DOWN to chose the workout program Chose MANUAL and confirm it by pressing ENTER 2 Turn UP or DOWN to chose between the following TIME DISTANCE PULSE and CALORIES Press EN...

Страница 63: ... by pressing ENTER 2 Turn UP or DOWN to chose between BEGINNER 1 BEGINNER 4 Press ENTER to confirm 3 Turn UP or DOWN to set the time 4 Press START STOP to start the workout Turn UP or DOWN to set the level 5 Press START STOP to stop the workout Press RESET to get back to the homescreen COMPUTER ...

Страница 64: ... by pressing ENTER 2 Turn UP or DOWN to chose between ADVANCE 1 ADVANCE 4 Press ENTER to confirm 3 Turn UP or DOWN to set the time 4 Press START STOP to start the workout Turn UP or DOWN to set the level 5 Press START STOP to stop the workout Press RESET to get back to the homescreen COMPUTER ...

Страница 65: ... it by pressing ENTER 2 Turn UP or DOWN to chose between SPORTY 1 SPORTY 4 Press ENTER to confirm 3 Turn UP or DOWN to set the time 4 Press START STOP to start the workout Turn UP or DOWN to set the level 5 Press START STOP to stop the workout Press RESET to get back to the homescreen COMPUTER ...

Страница 66: ...UP or DOWN to set your age 3 Turn UP or DOWN to chose 55 75 90 or target heart rate 30 230 Confirm it by pressing enter 4 Turn UP or DOWN to set the time 5 Press START STOP to start the workout Turn UP or DOWN to set the level 6 Press START STOP to stop the workout Press RESET to get back to the homescreen COMPUTER ...

Страница 67: ...it by pressing ENTER 2 Turn UP or DOWN to chose WATT 10 350 Press ENTER to confirm 3 Turn UP or DOWN to set the time 4 Press START STOP to start the workout Turn UP or DOWN to set the WATT value 5 Press START STOP to stop the workout Press RESET to get back to the homescreen COMPUTER ...

Страница 68: ...ith ease Workout Typ Quick Start Start the training Interval Max cumulative exercise consumption within the same time frame Map Mode Train on your favorite track through the map function Workout Display Clear and user friendly interface design Time distance resistance calories all the important statistics are on display ...

Страница 69: ...cord and provide you the most suitable workout prescription So every workout session is efficient simple and safe AI Diagnose AI diagnose is a more advanced and personalized analysis Not only dies the algorithm provides a workout prescription we combine the Asian body type norm analysis and online calculation provide you the data for every muscle group and every physiological sign Offer you a comp...

Страница 70: ...pate full marathon or half marathon This is the workout you re looking for long term muscular endurance and pace training Do you want to train for instant muscle strength Oxygen consumption training and anaerobic threshold training will help you achieve your goal quickly and easily Get Fit BAI your life Training optimized for fat burning Safe training for elders IC APP FUNCTIONS ...

Страница 71: ...cription due date reminder warm advice and support all kind of cardio training equipment It can help you switch between different equipment with ease extend the training time and achieve your goal efficently Please note Using all kind of sensors like chest strap and Apple Watch to collect data from every workout IC APP FUNCTIONS ...

Страница 72: ...repeated again remembering not to force or jerk your muscles into the stretch As you get fitter you may need to train longer and harder It is advisable to train at least three times a week and if possible space your workouts evenly throughout the week Muscle Toning To tone muscle while on your Crosstrainer you will need to have the resistance set quite high This will put more strain on your leg mu...

Страница 73: ...al flexion stretch one side then the other Harmstring Stretch commence with knee slightly bent then push knee straight as tension allows push chest towards foot Adductor stretch push down with elbows on knees very gently keep back straight Lateral stretching Stretch your arms upwards Now try to stretch your right arm up as far as you can feeling your right side stretch Hold this position for a mom...

Страница 74: ...0 55 83 123 beats per minute 165 60 80 120 beats per minute 160 65 78 116 beats per minute 155 70 75 113 beats per minute 150 75 73 110 beats per minute 145 80 70 105 beats per minute 140 85 68 100 beats per minute 135 90 65 98 beats per minute 130 Your maximum heart rate is about 220 minus your age The above numbers are averages and should be used as general guidelines Important please note follo...

Страница 75: ...our skin is extremely dry Moisten your hands with a little water and try again Clean the hand pulse sensors or pulse receivers to ensure good contact between your body and the pulse sensors The handbar moves shaking Screws have come loose Check all screws for tightness Noise generated by moving parts Incorrect assembly Remove the covering and ensu re the correct assembly of the moving parts No res...

Страница 76: ...nt at the time of handing over and was not caused by improper use function related wear or abuse 1 The warranty does not cover all parts of the device which are subject to wear due to function in so far as they are not production or material defects Damage caused by improper or faulty maintenance and repairs alterations or replacement of parts which have not been carried out by a qualified person ...

Страница 77: ... Richtlinie 2009 125 EG ErP Ökodesign Richtlinie Verordnung EG Nr 1275 2008 hereby declare that Equipment E3 Model number E5000 are in compliance with actual EU standarts especially EN ISO 20957 1 2013 EN 957 9 2003 DIN EN ISO 13849 1 2008 12 Sicherheit von Maschinen Teil 1 DIN EN ISO 12100 Risikobeurteilung Company Representative AS STORES GmbH Kohnacker 9a 41542 Dormagen Germany E Mail info asvi...

Отзывы: