


2-9
ASUS V2/V3-M3N8200
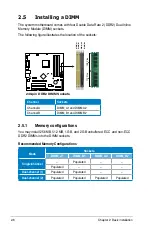
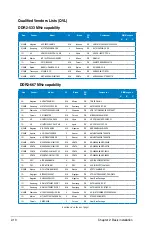
• When using only one memory module, start installing the DDR2 DIMM from
slot DIMM_A1 or DIMM_B1 for better overclocking capability.
• For dual-channel configuration (2), you may:
- install identical DIMMs in all four sockets OR
- install identical DIMM pair in DIMM_A1 and DIMM_B1 (yellow sockets)
and another identical DIMM pair in DIMM_A2 and DIMM_B2 (black
sockets)
• Due to the chipset’s limitation, the 1066 MHz memory modules run at 1066
MHz only when:
- two 1066 MHz memory modules installed in the same colored-slots
(either in the yellow slots or black slots); and
- one 1066 MHz memory module installed in any of the slots.
In other cases, the 1066 MHz memory modules can only run at
800 MHz.
• Always use identical DDR2 DIMM pairs for dual channel mode. For
optimum compatibility, we recommend that you obtain memory modules
from the same vendor.
• If you are using a Windows 32-bit version operating system (e.g. 32-bit
Windows, 32-bit Vista), the system will allocate a certain amount of memory
space for system devices.
• When installing total memory of 4GB capacity or more, Windows
®
32-bit
operation system may only recognize less than 3GB. Hence, a total
installed memory of less than 3GB is recommended.
The motherboard can support 8 GB physical memory on the operating system
listed below. You may install a maximum of 2 GB DIMMs on each slot.
64-bit
Windows
®
XP Professional x64 Edition
Windows
®
Vista x64 Edition
Содержание V2-M3N8200 - V Series - 0 MB RAM
Страница 1: ...V2 V3 M3N8200 ASUS PC Desktop Barebone Installation Manual R R ...
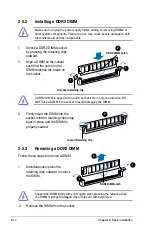
Страница 42: ...2 24 Chapter 2 Basic installation ...
Страница 52: ...3 10 Chapter 3 Starting up ...
Страница 108: ...5 44 Chapter 5 BIOS setup ...


