


Chapter 2: Hardware setup
2-24
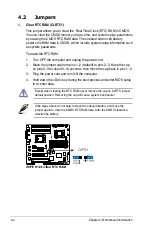
Back side
The back side of the SATA/SAS backplane faces the rear panel when installed.
This side includes the power connectors and SATA/SAS interfaces for the
motherboard Serial ATA connectors or the SAS card.
Connectors
Description
SGPIO1
Connects to SATA SGPIO1 connector on the motherboard
SGPIO2
Connects to SAS SGPIO2 connector on the motherboard
BPSMB1
Connects to Front panel SMB connector on the motherboard
U1
Connects to 4-pin plug of the power supply
CON1/CON2/
CON3/CON4
Connects to SATA/SAS connectors on the motherboard
Move the
SGPIO_SEL1
jumper on the SATA/SAS backplane to 2–3 when
installing the PIKE RAID card.
SGPIO1
SGPIO2
BPSMB1
U1
CON1
CON2
CON3
CON4
SGPIO_SEL1
Содержание TS700-E6/RS8
Страница 1: ...Pedestal 5U Rackmount Server TS700 E6 RS8 User Guide ...
Страница 20: ...Chapter 1 Product introduction 1 10 ...
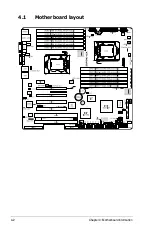
Страница 54: ...Chapter 4 Motherboard information 4 2 4 1 Motherboard layout ...
Страница 142: ...6 34 Chapter 6 RAID configuration ...
Страница 157: ...ASUS TS700 E6 RS8 7 15 8 Click Yes I want to restart this computer now and click Finish to restart the computer ...
Страница 161: ...ASUS TS700 E6 RS8 7 19 8 The programs you select are being installed 9 Click Finish to finish the installation ...
Страница 163: ...ASUS TS700 E6 RS8 7 21 5 The system installs the driver automatically 4 Click Install to start the installation ...


