background image

2-13

ASUS T-Series M3N8200

2.7.2 

Expansion card installation

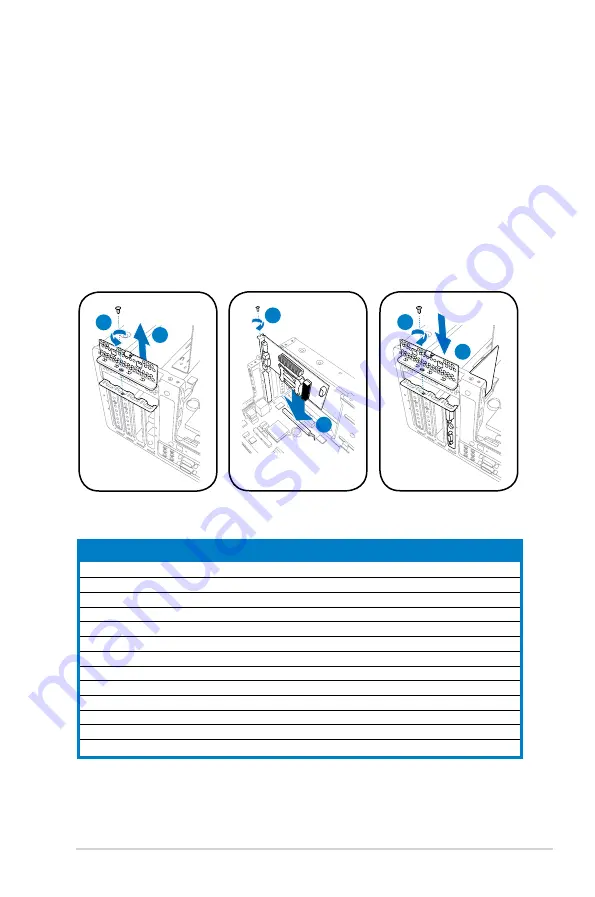
To install an expansion card:

1.  Before installing the expansion card, read the documentation that came with 

it and make the necessary hardware settings for the card.

2.  Locate and remove one metal bracket lock screw.

3.  Remove the metal bracket lock.

4.  Align the card connector with the slot, then press firmly.

5.  Secure the card with one screw.
6.  Replace the metal braket lock, then secure it with one screw.

Standard interrupt assignments

IRQ 

Standard Function 


System Timer 

 1 

Keyboard Controller 

 2 

Programmable Interrupt 


 4 

Communications Port (COM1) 

 6 

Floppy Disk Controller 

 7* 

Printer Port (LPT1) 

 8 

System CMOS/Real Time Clock 

 9* 

ACPI Mode when used

10* 

IRQ Holder for PCI Steering 

11* 

IRQ Holder for PCI Steering 

12* 

PS/2 Compatible Mouse Port 

13 

Numeric Data Processor 

14* 

Primary IDE Channel 

* These IRQs are usually available for ISA or PCI devices.

3

4

6

5

1

2

Содержание T3-M3N8200

Страница 1: ...T Series M3N8200 ASUS PC Desktop Barebone T3 M3N8200 T4 M3N8200 Only some models have the Time and IR LED display ...

Страница 2: ...TICULAR PURPOSE IN NO EVENT SHALL ASUS ITS DIRECTORS OFFICERS EMPLOYEES OR AGENTS BE LIABLE FOR ANY INDIRECT SPECIAL INCIDENTAL OR CONSEQUENTIAL DAMAGES INCLUDING DAMAGES FOR LOSS OF PROFITS LOSS OF BUSINESS LOSS OF USE OR DATA INTERRUPTION OF BUSINESS AND THE LIKE EVEN IF ASUS HAS BEEN ADVISED OF THE POSSIBILITY OF SUCH DAMAGES ARISING FROM ANY DEFECT OR ERROR IN THIS MANUAL OR PRODUCT SPECIFICAT...

Страница 3: ... 2 4 2 5 CPU installation 2 5 2 5 1 Overview 2 5 2 5 2 Installing CPU 2 5 2 5 3 Installing the heatsink and fun 2 7 2 6 Installing a DIMM 2 9 2 6 1 Memory configurations 2 9 2 6 2 DIMM installation 2 11 2 7 Installing an expansion card 2 12 2 7 1 Expansion slots 2 12 2 7 2 Expansion card installation 2 13 2 8 Installing an optical drive 2 14 2 9 Installing a Serial ATA disk drive 2 15 2 10 Reinsta...

Страница 4: ...ash utility 5 3 5 1 2 AFUDOS utility 5 4 5 1 3 ASUS CrashFree BIOS 2 utility 5 6 5 1 4 ASUS Update utility 5 8 5 2 BIOS setup program 5 11 5 2 1 BIOS menu screen 5 12 5 2 2 Menu bar 5 12 5 2 3 Navigation keys 5 12 5 2 4 Menu items 5 13 5 2 5 Sub menu items 5 13 5 2 6 Configuration fields 5 13 5 2 7 Pop up window 5 13 5 2 8 Scroll bar 5 13 5 2 9 General help 5 13 5 3 Main menu 5 14 5 3 1 System Tim...

Страница 5: ...on Feature 5 27 5 5 4 ACPI APIC Support 5 27 5 5 5 APM Configuration 5 28 5 5 6 Hardware Monitor 5 29 5 6 Boot menu 5 30 5 6 1 Boot Device Priority 5 30 5 6 2 Boot Settings Configuration 5 30 5 6 3 Security 5 32 5 7 Tools menu 5 34 5 7 1 ASUS EZ Flash 2 5 34 5 7 2 LED Poster Configuration 5 34 5 7 3 AL NET2 5 35 5 7 4 ASUS O C Profile 5 36 5 8 Exit menu 5 37 Appendix A 1 Power supply specification...

Страница 6: ...ollowing measures Reorient or relocate the receiving antenna Increase the separation between the equipment and receiver Connect the equipment to an outlet on a circuit different from that to which the receiver is connected Consult the dealer or an experienced radio TV technician for help Canadian Department of Communications Statement This digital apparatus does not exceed the Class B limits for r...

Страница 7: ...eep paper clips screws and staples away from connectors slots sockets and circuitry Avoid dust humidity and temperature extremes Do not place the product in any area where it may become wet Place the product on a stable surface When using the product do not block any air inlet outlet in the chassis The maximum environmental temperature is 35ºC If you encounter technical problems with the product c...

Страница 8: ...r panel and internal components 2 Chapter 2 Basic installation This chapter provides step by step instructions on how to install components in the system 3 Chapter 3 Starting up This chapter helps you power up the system and install drivers and utilities from the support CD 4 Chapter 4 Motherboard information This chapter gives information about the motherboard that comes with the system This chap...

Страница 9: ...n to aid in completing a task Where to find more information Refer to the following sources for additional information and for product and software updates 1 ASUS Websites The ASUS websites worldwide provide updated information on ASUS hardware and software products Refer to the ASUS contact information 2 Optional Documentation Your product package may include optional documentation such as warran...

Страница 10: ...ct your retailer immediately Item description 1 ASUS T Series M3N8200 barebone system with ASUS motherboard 250 W PFC power supply unit Front I O card 6 in 1 storage card reader 2 Cables AC power cord ATA cable Serial ATA cable Serial ATA power cable 3 Support CD 4 Installation Manual 5 Optional items Telephone Adapter card Remote control ...

Страница 11: ...ter gives a general description of ASUS T Series M3N8200 The chapter lists the system features including introduction on the front and rear panel and internal components T3 M3N8200 T4 M3N8200 Only some models have the Time and IR LED display ...

Страница 12: ... 1000 MHz FSB and up to 8GB system memory With audio functions extensive connectivity and Gigabit LAN capability T Series M3N8200 is designed for the sophisticated With these and many more T Series M3N8200 definitely delivers the cutting edge technology for your computing and multimedia needs 1 2 Front panel external and internal The front panel includes the system and audio control buttons system...

Страница 13: ...k Pro card slot This slot is for a Memory Stick Memory Stick Pro storage card 9 USB 2 0 ports 2 0 These Universal Serial Bus 2 0 USB 2 0 ports are available for connecting USB 2 0 devices such as a mouse printer scanner camera PDA and others 10 Secure Digital MultimediaCard slot This slot is for a Secure Digital MultimediaCard storage card 11 W R LED This LED lights up when data is being read from...

Страница 14: ...mory Stick Memory Stick Pro card slot This slot is for a Memory Stick Memory Stick Pro storage card 22 USB 2 0 ports 2 0 These Universal Serial Bus 2 0 USB 2 0 ports are available for connecting USB 2 0 devices such as a mouse printer scanner camera PDA and others 23 Secure Digital MultimediaCard slot This slot is for a Secure Digital MultimediaCard storage card 24 Eject button Press this button t...

Страница 15: ...ne In 4 6 channel mode the function of this port becomes Low Frequency Enhanced Output Center 33 HDMI port This port is for a High Definition Multimedia Interface HDMI connector and is HDCP compliant allowing playback of HD DVD Blu Ray and other protected content 34 PS 2 mouse port This green 6 pin connector is for a PS 2 mouse 35 COM port This port connects a mouse modem or other devices that con...

Страница 16: ... port becomes Surround output 43 Line Out port This Line Out lime port connects a headphone or a speaker In 4 6 channel mode the function of this port becomes Front Speaker Out 44 Coaxial S PDIF Out port This port connects an external audio output device via a coaxial S PIF cable 45 Voltage selector This switch allows you to adjust the system input voltage according to the voltage supply in your a...

Страница 17: ...lot 8 Power supply unit 1 4 Internal components The illustration below is the internal view of the system when you remove the top cover and the power supply unit The installed components are labeled for your reference Proceed to Chapter 2 for instructions on installing additional system components 1 2 3 4 5 6 7 8 The illustration shows an open chassis lifted at a 90o angle ...

Страница 18: ...1 Chapter 1 System introduction ...

Страница 19: ...T3 M3N8200 T4 M3N8200 Only some models have the Time and IR LED display Chapter 2 This chapter provides step by step instructions on how to install components in the system Basic installation ...

Страница 20: ...that the system is ON in sleep mode or in soft off mode and not powered OFF Unplug the power cable from the power outlet and ensure that the standby power LED is OFF before installing any system component Use a grounded wrist strap or touch a safely grounded object or a metal object such as the power supply case before handling components to avoid damaging them due to static electricity Hold compo...

Страница 21: ... are disengaged from the chassis 4 Lift the cover then set aside 2 Use a Phillips screw driver to remove the cover screws Keep the screws for later use 2 3 Removing the cover To remove the cover 1 On the rear panel locate the three screws that secure the cover to the chassis 1 1 1 4 3 3 2 2 2 ...

Страница 22: ...PU and other system components To turn over the PSU When removing the PSU ensure to hold or support it firmly The unit may accidentally drop and damage other system components 1 Lay the system chassis on its side on a flat and stable surface 2 Locate and remove the two screws that secures the PSU to the chassis 3 Lift the PSU in the direction of the arrow to a 90º angle ...

Страница 23: ...he 940 pin socket designed for the AMD Opteron processor Ensure than you use a CPU that is designed for the AM2 socket The CPU fits in only one correct orientation DO NOT force the CPU into the socket to prevent bending the pins the CPU 2 5 2 Installing CPU To install a CPU 1 Locate the AM2 CPU socket on the motherboard 2 Press the CPU socket lever sideways then lift it up to a 90º 100º angle R M3...

Страница 24: ...d triangle on the CPU with the small triangle on the socket Insert the CPU into the socket until it fits in place 4 Push down the socket lever to secure the CPU Ensure to install the CPU fan blower and heatsink assembly on top of the installed CPU ...

Страница 25: ...o remove the retention module base when installing the CPU or installing other motherboard components If you purchased a separate CPU heatsink and fan assembly make sure that a Thermal Interface Material is properly applied to the CPU heatsink or CPU before you install the heatsink and fan assembly Your boxed CPU heatsink and fan assembly should come with installation instructions for the CPU heat...

Страница 26: ... the fan and heatsink assembly perfectly fits the retention mechanism module base otherwise you cannot snap the retention bracket in place 4 Push down the retention bracket lock on the retention mechanism to secure the heatsink and fan to the module base 5 When the fan and heatsink assembly is in place connect the CPU fan cable to the connector on the motherboard labeled CPU_FAN Do not forget to c...

Страница 27: ...y we recommend that you obtain memory modules from the same vendor Due to chipset resource allocation the system may detect less than 2 GB system memory when you installed two 1 GB DDR2 memory This motherboard does not support memory modules made up of 128 Mb chips or double sided x16 memory modules 2 6 1 Memory configurations You may install up to 8 GB system memory using 256 MB 512 MB 1 GB and 2...

Страница 28: ...12MB Apacer Heat Sink Package N A DS AHU512E800C5K1C V 512MB Apacer Heat Sink Package N A DS AHU01GE800C5K1C V 512MB Apacer Heat Sink Package Apacer DS 78 A1GA0 9K4 V 512MB A DATA AD29608A8A 25EG N A SS M2OAD6G3H3160G1E53 V V V 1024 A DATA AD26908A8A 25EG N A DS M2OAD6G3I4170I1E58 V 512MB KINGMAX KKA8FEIBF HJK 25A KINGMAX SS KLDC28F A8KI5 V 1024MB KINGMAX KKA8FEIBF HJK 25A KINGMAX DS KLDD48F ABKI5...

Страница 29: ...ining clips outward 3 Align a DIMM on the socket such that the notch on the DIMM matches the break on the socket 4 Firmly insert the DIMM into the socket until the retaining clips snap back in place and the DIMM is properly seated A DDR2 DIMM is keyed with a notch so that it fits in only one direction DO NOT force a DIMM into a socket to avoid damaging the DIMM ...

Страница 30: ...pansion cards Failure to do so may cause you physical injury and damage the motherboard PCI Express x16 slot This motherboard supports PCI Express x16 graphic cards that comply with PCI Express specifications The figure shows a graphics card installed on the PCI Express x16 slot The chassis supports PCI Express x 16 cards with 192 mm x 19 mm or smaller dimensions only PCI slot The PCI slots suppor...

Страница 31: ...ress firmly 5 Secure the card with one screw 6 Replace the metal braket lock then secure it with one screw Standard interrupt assignments IRQ Standard Function 0 System Timer 1 Keyboard Controller 2 Programmable Interrupt 4 Communications Port COM1 6 Floppy Disk Controller 7 Printer Port LPT1 8 System CMOS Real Time Clock 9 ACPI Mode when used 10 IRQ Holder for PCI Steering 11 IRQ Holder for PCI S...

Страница 32: ...bays for an optical drive To install an optical drive 1 Place the chassis upright 2 Insert the optical drive to the upper 5 25 in drive bay then carefully push the drive until its screw holes align with the holes on the bay 2 2 PCI Slot PCIE X16 Slot USB 1 1 OHCI USB 2 0 EHCI USB1 1 1 OHCI USB1 2 0 EHCI HDA AZALIA SB Internal GPU SATA Controller PCI 1394 Marvell_ LAN_8056 LNKA LNKB shared LNKC sha...

Страница 33: ...install a Serial ATA hard disk drive 1 Connect the SATA power cable to the plug of the power supply unit 2 Connect the SATA signal cable and the power plugs to the connectors at the back of the drive 3 Locate the HDD tray 4 Insert a hard disk drive with the HDD PCB facing the top of the chassis to the tray then secure it with four screws 5 Connect the SATA signal cable to the SATA connector on the...

Страница 34: ...supply in your area If the voltage supply in your area is 100 127 V set the switch to 115 V If the voltage supply in your area is 200 240 V set the switch to 230 V Setting the switch to 115 V in a 230 V environment will seriously damage the system REAR S P K LINE IN FRONT MIC IN SIDE S P K C T R BASS 1 If necessary connect the 4 pin 12V power plug to the ATX12V connector on the motherboard 2 If ne...

Страница 35: ...ont edge of the cover at least two inches from the front panel cover Fit the cover tabs with the chassis rail and the front panel tabs 3 Lower the rear edge of the cover as shown 4 Push the cover slightly toward the front panel until it fits in place 5 Secure the cover with the three screws you removed earlier 2 3 4 5 ...

Страница 36: ...2 18 Chapter 2 Basic installation ...

Страница 37: ...Chapter 3 Starting up This chapter helps you power up the system and install drivers and utilities from the support CD T3 M3N8200 T4 M3N8200 Only some models have the Time and IR LED display ...

Страница 38: ... Powering up The system power button is located on the front panel Press the system power button to enter the OS Press to enter the system OS Because motherboard settings and hardware options vary use the setup procedures presented in this chapter for general reference only Refer to your OS documentation for more information In Windows OS pressing the button shuts down restarts or puts the system ...

Страница 39: ...e ASSETUP EXE from the BIN folder Double click the ASSETUP EXE to run the CD Click an item to install Click an icon to display other information 3 3 Support CD information The support CD that came with the system contains useful software and several utility drivers that enhance the system features Screen display and driver options may not be the same for other operating system versions The content...

Страница 40: ...on Wizard Allows you to easily install all necessary drivers for your system NVIDIA Chipset Driver Program Installs the NVIDIA Chi drivers Program Realtek Audio Driver Installs the Realtek Audio Driver Marvell Yukon Gigabit Ethernet Driver Installs the Marvell Yukon Gigabit Ethernet Driver ITECIR Vista Driver Installs ITECIR Vista Driver The ITECIR Vista Driver item appears only in some models wit...

Страница 41: ...on VCT application ASUS PC Probe II This smart utility continuously monitors vital system information such as fan rotations CPU temperature and system voltages and alerts you on any detected problems This utility helps you keep your computer in a healthy operating condition ASUS Update Installs the ASUS Update that allows you to update the motherboard BIOS and drivers This utility requires an Inte...

Страница 42: ...3 Chapter 3 Starting up 3 3 4 ASUS contact information The Contact tab displays the ASUS contact information ...

Страница 43: ... chapter gives information about the motherboard that comes with the system This chapter includes the motherboard layout jumper settings and connector locations T3 M3N8200 T4 M3N8200 Only some models have the Time and IR LED display ...

Страница 44: ...0 5in R M3N18L FRONT_CON BUZZER SB_PWR ATX12V DDR DIMM_A1 64 bit 184 pin module DDR DIMM_B1 64 bit 184 pin module DDR DIMM_A2 64 bit 184 pin module DDR DIMM_B2 64 bit 184 pin module nVidia MCP 78S EATXPWR PRI_IDE SATA3 SATA2 SATA1 SPDIF_OUT KBPWR CLRTC USBPW1 4 LAN1_USB12 F_USB34 PS 2KBMS T Mouse B Keyboard AUDIO CD VIA VT6308 VGA_HDMI COM1 SPDIFO ALC883 CR2032 3V Lithium Cell CMOS Power IDT0631GQ...

Страница 45: ... Turn OFF the computer and unplug the power cord 2 Remove the onboard battery 3 Move the jumper cap from pins 1 2 default to pins 2 3 Keep the cap on pins 2 3 for about 5 10 seconds then move the cap back to pins 1 2 4 Re install the battery 5 Plug the power cord and turn ON the computer 6 Hold down the Del key during the boot process and enter BIOS setup to re enter data Except when clearing the ...

Страница 46: ...ch USB port Otherwise the system would not power up The total current consumed must NOT exceed the power supply capability 5VSB whether under normal condition or in sleep mode 3 Keyboard power 3 pin KBPWR This jumper allows you to enable or disable the keyboard wake up feature Set this jumper to pins 2 3 5VSB to wake up the computer when you press a key on the keyboard the default is the Space Bar...

Страница 47: ...8200 4 Q FAN Mode 3 pin QFAN_MODE Set this jumper to 1 2 Default if you are using 3 pin CPU fan Set this jumper to 2 3 if you are using a 4 pin CPU fan R M3N18L M3N18L QFAN_MODE QFAN_MODE DC MODE PWM MODE Default 2 3 1 2 ...

Страница 48: ...ack wire of each cable matches the ground pin of the connector Do not forget to connect the fan cable to the fan connector Insufficient air flow within the system may damage the motherboard components These are not jumpers DO NOT place jumper caps on the fan connectors R M3N18L M3N18L CPU Fan Connector CPU_FAN GND CPU FAN PWR CPU FAN IN CPU FAN PWM 2 SPI connector 8 1 pin SPI This connector is for...

Страница 49: ...TXPWR 3 Volts 3 Volts Ground 5 Volts 5 Volts Ground Ground Power OK 5V Standby 12 Volts 5 Volts 5 Volts 3 Volts 12 Volts Ground Ground Ground PSON Ground 5 Volts 12 Volts 3 Volts 5 Volts Ground ATX12V GND 12V DC GND 12V DC 4 IDE connector 40 1 pin PRI_IDE This connector is for an IDE 100 66 signal cable a blue connector for the primary IDE connector on the motherboard Pin 20 on the IDE connector i...

Страница 50: ... Connect the right angle side of SATA signal cable to SATA device Or you may connect the right angle side of SATA cable to the onboard SATA port to avoid mechanical conflict with huge graphics cards right angle side Serial ATA hard disk drive connection Connector Color Setting Use SATA1 2 Red Master Boot disk SATA3 Red Slave Data Disk R M3N18L M3N18L SATA Connectors GND RSATA_TXP3 RSATA_TXN3 GND R...

Страница 51: ...audio connector 4 pin CD These connectors allow you to receive stereo audio input from sound sources such as a CD ROM TV tuner or MPEG card R M3N18L M3N18L Internal Audio Connector CD black Right Audio Channel Left Audio Channel Ground Ground ...

Страница 52: ...hapter 5 BIOS setup This chapter tells how to change system settings through the BIOS Setup menus and describes the BIOS parameters T3 M3N8200 T4 M3N8200 Only some models have the Time and IR LED display ...

Страница 53: ...a bootable floppy disk in DOS mode 3 ASUS CrashFree BIOS 2 Updates the BIOS using a bootable floppy disk or the motherboard support CD when the BIOS file fails or gets corrupted 4 ASUS Update Updates the BIOS in Windows environment Refer to the corresponding sections for details on these utilities Save a copy of the original motherboard BIOS file to a bootable floppy disk in case you need to resto...

Страница 54: ... press Enter to enable it You can switch between drives by pressing Tab before the correct file is found Then press Enter 1 Insert the floppy disk USB flash disk that contains the BIOS file to the floppy disk drive or the USB port Press Alt F2 during POST to display the following This function can support devices such as USB flash disk or floppy disk with FAT 32 16 format only Do not shut down or ...

Страница 55: ...pt type afudos o filename where the filename is any user assigned filename not more than eight alphanumeric characters for the main filename and three alphanumeric characters for the extension name Make sure that the floppy disk is not write protected and has at least 600 KB free space to save the file The succeeding BIOS screens are for reference only The actual BIOS screen displays may not be ex...

Страница 56: ...e motherboard Save the BIOS file to a bootable floppy disk 4 The utility reads the file and starts updating the BIOS Do not shut down or reset the system while updating the BIOS to prevent system boot failure Write the BIOS filename on a piece of paper You need to type the exact BIOS filename at the DOS prompt A afudos iM3N18L ROM AMI Firmware Update Utility Version 1 19 ASUS V2 07 03 11 24BB Copy...

Страница 57: ...sk that contains the updated BIOS file Prepare the USB flash disk or the floppy disk containing the updated motherboard BIOS before using this utility Ensure that you rename the original or updated BIOS file in the floppy disk or the USB flash disk to M3N18L ROM Visit ASUS website www asus com to download the latest BIOS file Recovering the BIOS from the USB flash disk To recover the BIOS from the...

Страница 58: ...d the utility automatically checks the optical drive for the original or updated BIOS file The utility then updates the corrupted BIOS file Bad BIOS checksum Starting BIOS recovery Checking for floppy Bad BIOS checksum Starting BIOS recovery Checking for floppy 4 Restart the system after the utility completes the updating process Bad BIOS checksum Starting BIOS recovery Checking for floppy Floppy ...

Страница 59: ...1 4 ASUS Update utility The ASUS Update is a utility that allows you to manage save and update the motherboard BIOS in Windows environment The ASUS Update utility allows you to Save the current BIOS file Download the latest BIOS file from the Internet Update the BIOS from an updated BIOS file Update the BIOS directly from the Internet and View the BIOS version information This utility is available...

Страница 60: ...Next Updating the BIOS through the Internet To update the BIOS through the Internet 1 Launch the ASUS Update utility from the Windows desktop by clicking Start Programs ASUS ASUSUpdate ASUSUpdate The ASUS Update main window appears 2 Select Update BIOS from the Internet option from the drop down menu then click Next ...

Страница 61: ...date BIOS from a file option from the drop down menu then click Next 4 From the FTP site select the BIOS version that you wish to download Click Next 5 Follow the screen instructions to complete the update process The ASUS Update utility is capable of updating itself through the Internet Always update the utility to avail all its features 3 Locate the BIOS file from the Open window then click Open...

Страница 62: ... wish to enter Setup after POST reboot the system by doing any of the following procedures Restart using the OS standard shut down procedure Press Ctrl Alt Del simultaneously Press the reset button on the system chassis Press the power button to turn the system off then back on Using the power button reset button or the Ctrl Alt Del keys to force reset from a running operating system can cause dam...

Страница 63: ...corner of a menu screen are the navigation keys for that particular menu Use the navigation keys to select items in the menu and change the settings Some of the navigation keys differ from one screen to another Navigation keys Sub menu items v02 58 C Copyright 1985 2004 American Megatrends Inc Select Screen Select Item Change Option F1 General Help F10 Save and Exit ESC Exit Use ENTER TAB or SHIFT...

Страница 64: ...ue of a field select it then press Enter to display a list of options Refer to 5 2 7 Pop up window 5 2 7 Pop up window Select a menu item then press Enter to display a pop up window with the configuration options for that item 5 2 8 Scroll bar A scroll bar appears on the right side of a menu screen when there are items that do not fit on the screen Press the Up Down arrow keys or Page Up Page Down...

Страница 65: ...Date Tue 12 25 2007 IDE Configuration Primary IDE Master Not Detected Primary IDE Slave Not Detected SATA1 Not Detected SATA2 Not Detected SATA3 Not Detected IDE Not Detected System Information Select Screen Select Item Change Option F1 General Help F10 Save and Exit ESC Exit Use ENTER TAB or SHIFT TAB to select a field Use or to configure system time BIOS SETUP UTILITY Main Advanced Power Boot To...

Страница 66: ... Serial ATA controller mode Configuration options SATA Mode RAID Mode AHCI Mode If you install SATA 3Gbps harddisk with NCQ feature we recommend that you set this feature to AHCI for better performance If you want to install 2 SATA harddisk for RAID system please set this feature to Raid before you install the OS The items in this menu allow you to set or change the configurations for the IDE devi...

Страница 67: ...enables the LBA mode if the device supports this mode and if the device was not previously formatted with LBA mode disabled Configuration options Disabled Auto Block Multi sector Transfer M Auto Enables or disables data multi sectors transfers When set to Auto the data transfer from and to the device occurs multiple sectors at a time if the device supports multi sector transfer feature When set to...

Страница 68: ...3200 Speed 1800 MHz Count 1 System Memory Usable Size 448 MB 5 4 Advanced menu The Advanced menu items allow you to change the settings for the CPU and other system devices Take caution when changing the settings of the Advanced menu items Incorrect field values can cause the system to malfunction Jumperfree Configuration CPU Configuration Chipset Onboard Devices Configuration USB Configuration Se...

Страница 69: ... MHz x10 0 2000 MHz x10 5 2100 MHz x11 0 2200 MHz x11 5 2300 MHz x12 0 2400 MHz Processor Voltage Auto Allows you to configure CPU voltage Configuration options Auto 1 125 v 1 150 v 1 175 v 1 475 v AI Overclocking Auto Allows you to select the overclocking options to achieve the desired CPU internal frequency Select either one of the preset overclocking configiuration options Auto Loads the optima...

Страница 70: ...Down iGPU Spread Spectrum Disabled Allows you to enable or disable the iGPU spread spectrum Configuration options Disabled 1 00 Tri Center 2 00 Tri Center 3 00 Tri Center 5 00 Tri Center Memory Voltage Auto Allows you to set the memory voltage Configuration options Auto 1 920V 2 013V 2 085V 2 178V 2 259V 2 353V 2 424V 2 517V NB Voltage Auto Allows you to set the chipset voltage Configuration optio...

Страница 71: ...I static resources affinity table Configuration options Disabled Enabled Select Screen Select Item Change Option F1 General Help F10 Save and Exit ESC Exit CPU Configuration Module Version 13 21 AGESA Version 3 1 4 0 Physical Count 1 Logical Count 1 AMD Sempron tm Processor 3200 Revision F2 Cache L1 128 KB Cache L2 128 KB Cache L3 N A Speed 1800MHz NB Clk N A Current FSB Multiplier 9x Maximum FSB ...

Страница 72: ...e system to malfunction North Bridge Configuration South Bridge Configuration Hyper Transport Configuration NVMM ROM Version 4 074 23 Memory Options Information North Bridge Chipset Configuration Memory Configuration DRAM Timing configuration North Bridge Configuration Memory Configuration Bank Interleaving Auto Enable Clock to All DIMMs Disabled MemClk Tristate C3 ATLVID Disabled Memory Hole Rema...

Страница 73: ...emory remapping around memory hole Configuration options Disabled Enabled DCT Unganged Mode support Auto Configuration options Auto Always Power Down Enable Enabled Enables or disables DDR power down mode Configuration options Disabled Enabled The following items appear only when the Power Down Enable item is set to Enabled Power Down Mode Channel Configuration options Channel Chip Select DRAM Tim...

Страница 74: ...ect the graphics controller to use as primary boot device Configuration options PCI VGA Card First Internal VGA First PCIE VGA Card First iGPU and Ext VGA Selection Disabled iGPU if Ex Allows you to select the internal VGA or external VGA to display Configuration options Disable iGPU if External VGA Card Exist Both Exist and iGPU by Frame Buffer petect iGPU Frame Buffer Detect Disabled Enables or ...

Страница 75: ...rt Configuration SB to K8 CPU Freq Auto Disabled SB to K8 CPU Frequency 16 16 SB to K8 CPU Freq Auto Disabled Configuration options Disabled Enabled SB to K8 CPU Frequency 16 16 Allows you to select the SouthBridge to K8 CPU link width Configuration options 4 4 8 8 16 16 ...

Страница 76: ...n options Enabled Disabled Onboard LAN A Boot ROM Disabled Allows you to enable or disable the option ROM in the onboard LAN A controller Configuration options Disabled Enabled VIA VT6308P Firewire 1394 Enabled Enables or disables the onboard VIA VT6308P Firewire 1394 Configuration options Enabled Disabled Serial Port1 Address 3F8 IRQ4 Allows you to select the Serial Port1 base address Configurati...

Страница 77: ...t is disabled Configuration options Disabled Enabled Auto USB 2 0 Controller Mode HiSpeed Allows you to set the USB 2 0 controller mode to HiSpeed 480 Mbps or FullSpeed 12 Mbps Configuration options FullSpeed HiSpeed BIOS EHCI Hand Off Enabled Enables or disables the BIOS EHCI hand off feature Configuration options Disabled Enabled USB Configuration Module Version 2 24 3 13 4 USB Devices Enabled N...

Страница 78: ... ACPI Version Feature Disabled Allows you to enable or disable the ACPI version features Configuration options Disabled Enabled 5 5 4 ACPI APIC Support Enabled Allows you to enable or disable the Advanced Configuration and Power Interface ACPI support in the Advanced Programmable Interrupt Controller APIC When set to Enabled the ACPI APIC table pointer is included in the RSDT pointer list Configur...

Страница 79: ...ystem state was before the AC power loss Configuration options Power Off Power On Last State Power On By PCI Devices Disabled When set to Enabled this parameter allows you to turn on the system through a PCI LAN or modem card This feature requires an ATX power supply that provides at least 1A on the 5VSB lead Configuration options Disabled Enabled Power On By Onboard LAN Enabled Allows you to enab...

Страница 80: ...field shows N A VCORE Voltage 3 3V Voltage 5V Voltage 12V Voltage The onboard hardware monitor automatically detects the voltage output through the onboard voltage regulators Smart Q Fun Function Enabled Allows you to enable or disable the smart Q fun function CPU Temperature Select Screen Select Item Change Option F1 General Help F10 Save and Exit ESC Exit v02 61 C Copyright 1985 2007 American Me...

Страница 81: ...Boot Device Priority Boot Settings Configuration Security Select Screen Select Item Change Option F1 General Help F10 Save and Exit ESC Exit Specifies the Boot Device Priority sequence A virtual floppy disk drive Floppy Drive B may appear when you set the CD ROM drive as the first boot device BIOS SETUP UTILITY Main Advanced Power Boot Tools Exit v02 61 C Copyright 1985 2007 American Megatrends In...

Страница 82: ...n ROM Configuration options Force BIOS Keep Current Bootup Num Lock On Allows you to select the power on state for the NumLock Configuration options Off On PS 2 Mouse Support Auto Allows you to enable or disable support for PS 2 mouse Configuration options Disabled Enabled Auto Wait for F1 If Error Enabled When set to Enabled the system waits for the F1 key to be pressed when error occurs Configur...

Страница 83: ...fter you set a password this item shows Installed To set a Supervisor Password 1 Select the Change Supervisor Password item and press Enter 2 From the password box type a password composed of at least six letters and or numbers then press Enter 3 Confirm the password when prompted The message Password Installed appears after you successfully set your password To change the supervisor password foll...

Страница 84: ...set a User Password 1 Select the Change User Password item and press Enter 2 On the password box that appears type a password composed of at least six letters and or numbers then press Enter 3 Confirm the password when prompted The message Password Installed appears after you set your password successfully To change the user password follow the same steps as in setting a user password Clear User P...

Страница 85: ...H TYPE ATMEL 26DF081 161 3 PATH A BOARD M3N18L VER 0112 H 02 B 03 DATE 12 14 2007 BOARD Unknown VER Unknown DATE Unknown Select Screen Select Item Change Option F1 General Help F10 Save and Exit ESC Exit BIOS SETUP UTILITY Main Advanced Power Boot Tools Exit ASUS EZ Flash 2 LED Poster configuration Turn On Off LED Timer Display Enabled LED Poster Blacklight 100 AI NET2 ASUS O C Profile v02 61 C Co...

Страница 86: ...N cable Disabled v02 61 C Copyright 1985 2007 American Megatrends Inc Marvell Check LAN cable during POST Mavell POST Check LAN cable Disabled Enables or disables Mavell checking LAN cable during POST feature Configuration options Disabled Enabled Turn On Off LED Timer Display Enabled Allows you to enable or disable LED Timer Display feature Configuration options Enabled Disabled LED Poster Backli...

Страница 87: ...save the current BIOS file to the BIOS Flash Press Enter to save the file Load from Profile 1 2 Allows you to load the previous BIOS settings saved in the BIOS Flash Press Enter to load the file Start O C Profile Allows you to run the utility to save and load CMOS Press Enter to run the utility ASUSTek O C Profile Utility V1 21 Current CMOS Restore CMOS A Note Enter Select or Load B Backup ESC Exi...

Страница 88: ...option a confirmation appears Select OK to discard any changes and load the previously saved values Load Setup Defaults This option allows you to load the default values for each of the parameters on the Setup menus When you select this option or if you press F5 a confirmation window appears Select OK to load default values Select Exit Save Changes or make other changes before saving the values to...

Страница 89: ...5 38 Chapter 5 BIOS setup ...

Страница 90: ...T3 M3N8200 T4 M3N8200 Appendix Appendix The Appendix includes the power supply unit specification for this system ...

Страница 91: ... 5 50mV 70mV A 2 Debug code table Code Descrpiotion CPU CPU initiation Test CMOS R W functionality CHIP Early chipset initialization Disable shadow RAM Disable L2 cache Program basic chipset registers ddr Detect memory Auto detection of DRAM size type and ECC Auto detection of L2 cache H A Initialize Hardware Monitor SIO 1 Test special keyboard controller for Super I O chips 2 Enable keyboard inte...

Страница 92: ...functions of the remote control buttons No Button Description 1 Power Press to turn on off the power of the screen and the speakers 2 Pause Press to pause a playback 3 Stop Press to stop playing a media file 4 Fast forward Press to fast forward a media file 5 Next track Press to go to the next track 6 Information Press to display program information under Media Center or other menu options 7 Four ...

Страница 93: ...tch live TV programs 14 Shift Toggles between numerical and alphabetical input 15 Teletext buttons Available on European models only 16 Volume up down Press to increase decrease the volume 17 OK Press to confirm an action 18 Return Press to return to the previous page 19 Previous track Press to go back to the previous track 20 Rewind Press to rewind a media file 21 Play Press to play a media file ...

Отзывы: