


2-20
Chapter 2: Basic Installation
C
h
ap
te
r
2
2.3
Starting up for the first time
1.
After making all the connections, replace the system case cover.
2.
Ensure that all switches are off.
3.
Connect the power cord to the power connector at the back of the system chassis.
4.
Connect the power cord to a power outlet that is equipped with a surge protector.
5.
Turn on the devices in the following order:
a. Monitor
b. External SCSI devices (starting with the last device on the chain)
c.
System power
6.
After applying power, the system power LED on the system front panel case lights up.
For systems with ATX power supplies, the system LED lights up when you press the
ATX power button. If your monitor complies with the “green” standards or if it has a
“power standby” feature, the monitor LED may light up or change from orange to green
after the system LED turns on.
The system then runs the power-on self tests (POST). While the tests are running, the
BIOS beeps (refer to the BIOS beep codes table) or additional messages appear on
the screen. If you do not see anything within 30 seconds from the time you turned on
the power, the system may have failed a power-on test. Check the jumper settings and
connections or call your retailer for assistance.
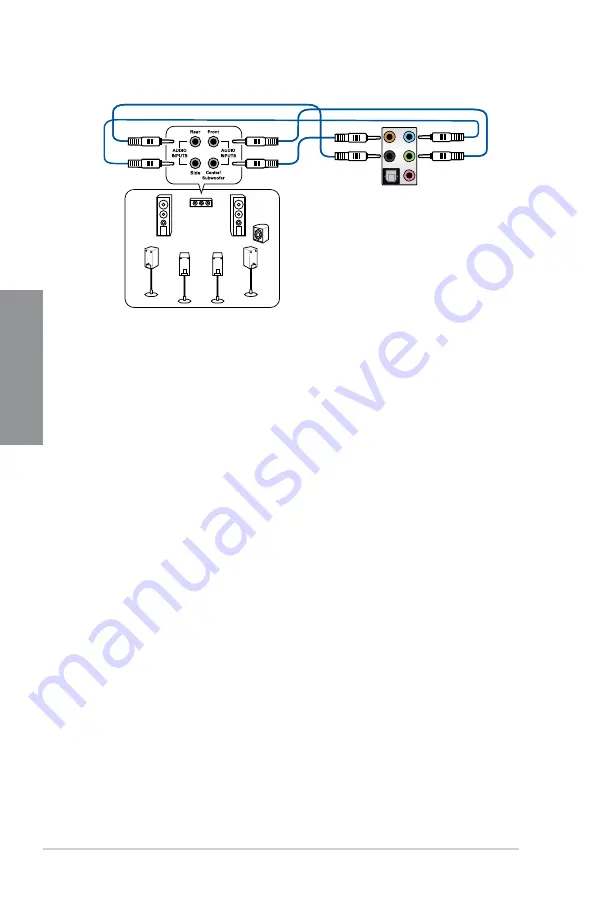
Connect to 8 channel Speakers
Содержание STRIX Z270G GAMING
Страница 1: ...Motherboard STRIX Z270G GAMING ...
Страница 16: ...xvi ...
Страница 18: ...1 2 Chapter 1 Product Introduction Chapter 1 1 1 2 Motherboard layout ...
Страница 38: ...1 22 Chapter 1 Product Introduction Chapter 1 ...
Страница 44: ...2 6 Chapter 2 Basic Installation Chapter 2 To uninstall the CPU heatsink and fan assembly ...
Страница 45: ...ROG STRIX Z270G GAMING 2 7 Chapter 2 To remove a DIMM 2 1 4 DIMM installation ...
Страница 46: ...2 8 Chapter 2 Basic Installation Chapter 2 2 1 5 ATX power connection Ensure to connect the 8 pin power plug ...
Страница 47: ...ROG STRIX Z270G GAMING 2 9 Chapter 2 2 1 6 SATA device connection OR ...
Страница 50: ...2 12 Chapter 2 Basic Installation Chapter 2 To install HYPER M 2 x4 card The SSD card is purchased separately ...
Страница 51: ...ROG STRIX Z270G GAMING 2 13 Chapter 2 2 1 9 M 2 installation ...
Страница 60: ...2 22 Chapter 2 Basic Installation Chapter 2 ...
Страница 106: ...A 8 Appendix Appendix ...