


ASUS STRIX B250I GAMING
1-13
Chapter 1
7.
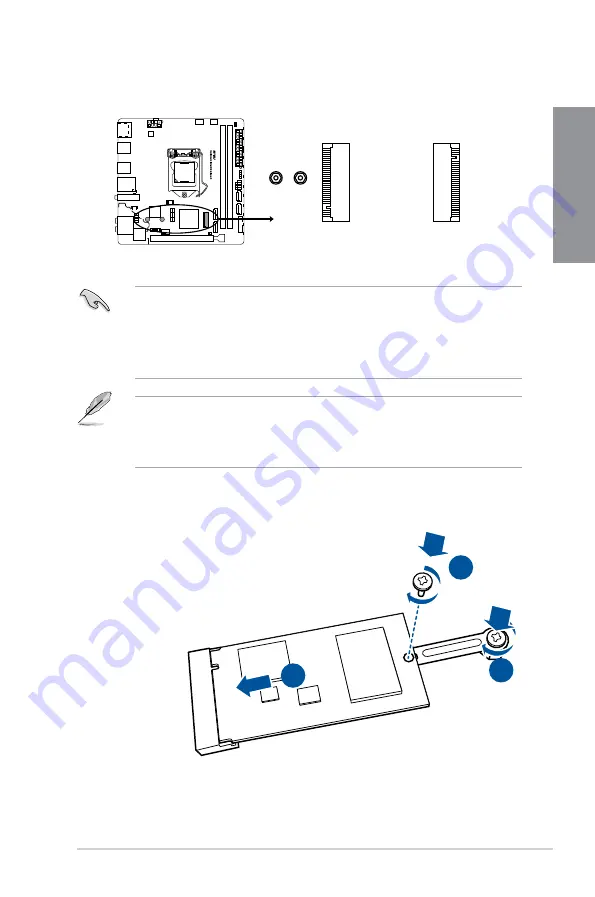
M.2 sockets (M.2_1~2)
These sockets allow you to install M.2 SSD modules.
•
M.2_1 socket supports PCIe 3.0 x4 and SATA M Key design and type 2242/ 2260/
2280 SATA storage devices.
•
M.2_2 socket supports PCIe 3.0 x4 M Key design and type 2242/ 2260/ 2280 PCIe
storage devices.
•
M.2_2 socket supports Intel
®
Rapid Storage Technology.
•
The M.2 SSD module is purchased separately.
•
For a 2242 storage device, use the bundled 2242 mounting kit. Before installing a
2242 M.2 SSD module, ensure that the mounting kit is properly installed with the
bigger screw hole on the 2260 standoff.
STRIX B250I GAMING M.2(SOCKET3)
M.2_2(SOCKET3)
(Bottom)
2280
2260
M.2_1(SOCKET3)
2
3
1
To install a 2242 M.2 SSD module:
1. Align the bigger hole on the mounting kit with the 2260
standoff and secure it with a screw.
2. Install the 2242 M.2 SSD module to the M.2 socket.
3. Secure the M.2 SSD module to the M.2 socket with a
screw.
Содержание STRIX B250I GAMING
Страница 1: ...Motherboard STRIX B250I GAMING ...
Страница 14: ...xiv ...
Страница 35: ...ASUS STRIX B250I GAMING 2 5 Chapter 2 To uninstall the CPU heatsink and fan assembly ...
Страница 36: ...2 6 Chapter 2 Basic Installation Chapter 2 To remove a DIMM 2 1 4 DIMM installation ...
Страница 37: ...ASUS STRIX B250I GAMING 2 7 Chapter 2 2 1 5 ATX power connection Ensure to connect the 8 pin power plug ...
Страница 38: ...2 8 Chapter 2 Basic Installation Chapter 2 2 1 6 SATA device connection OR ...
Страница 40: ...2 10 Chapter 2 Basic Installation Chapter 2 2 1 9 M 2 installation 1 3 2 ...
Страница 48: ...2 18 Chapter 2 Basic Installation Chapter 2 ...
Страница 70: ...3 22 Chapter 3 BIOS Setup Chapter 3 ...