background image

C h a p t e r   4 :     M o t h e r b o a r d   i n f o

C h a p t e r   4 :     M o t h e r b o a r d   i n f o

C h a p t e r   4 :     M o t h e r b o a r d   i n f o

C h a p t e r   4 :     M o t h e r b o a r d   i n f o

C h a p t e r   4 :     M o t h e r b o a r d   i n f o

4 - 1 4

4 - 1 4

4 - 1 4

4 - 1 4

4 - 1 4

1 0 .

1 0 .

1 0 .

1 0 .

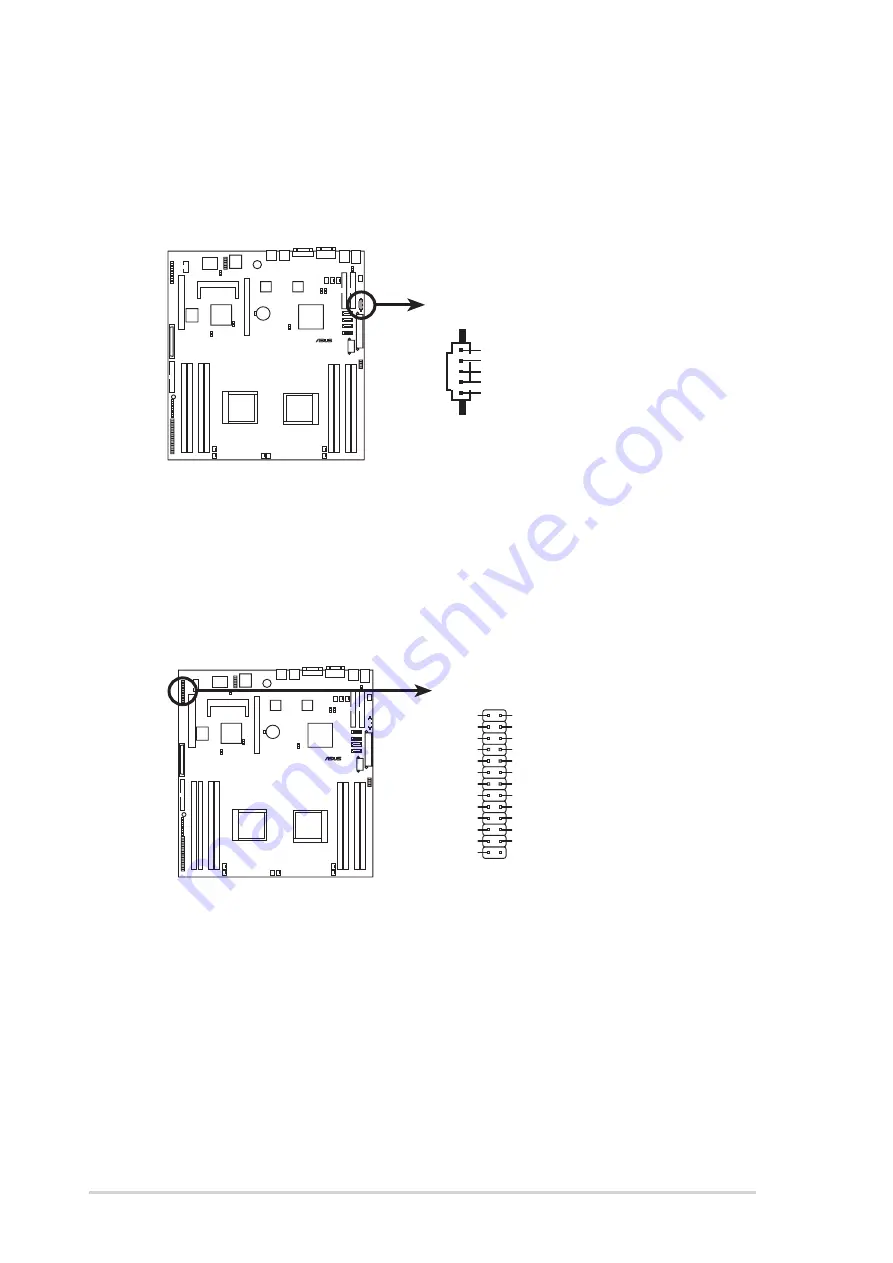
1 0 . Power Supply SMBus connector (5-pin PSUSMB1)

P o w e r   S u p p l y   S M B u s   c o n n e c t o r   ( 5 - p i n   P S U S M B 1 )

P o w e r   S u p p l y   S M B u s   c o n n e c t o r   ( 5 - p i n   P S U S M B 1 )

P o w e r   S u p p l y   S M B u s   c o n n e c t o r   ( 5 - p i n   P S U S M B 1 )

P o w e r   S u p p l y   S M B u s   c o n n e c t o r   ( 5 - p i n   P S U S M B 1 )

This connector allows you to connect SMBus (System Management
Bus) devices to the power supply unit. Devices communicate with an
SMBus host and/or other SMBus devices using the SMBus interface.

1 1 .

1 1 .

1 1 .

1 1 .

1 1 . Parallel port connector (26-1 pin LPT1)

P a r a l l e l   p o r t   c o n n e c t o r   ( 2 6 - 1   p i n   L P T 1 )

P a r a l l e l   p o r t   c o n n e c t o r   ( 2 6 - 1   p i n   L P T 1 )

P a r a l l e l   p o r t   c o n n e c t o r   ( 2 6 - 1   p i n   L P T 1 )

P a r a l l e l   p o r t   c o n n e c t o r   ( 2 6 - 1   p i n   L P T 1 )
This connector is for a parallel port. Connect the parallel port module
cable to this connector, then install the module to a slot opening at
the back of the system chassis.

K8N-DRE

¤

K8N-DRE Power supply SMBus connector

PSUSMB1

+3.3V Remote Sense

GND

NC

PSU_I2CDATA

PSU_I2CCLK

K8N-DRE

¤

K8N-DRE Parallel port connector

LPT1

SPD7

GND

SPD6

GND

SPD5

GND

SPD4

GND

SLCT

PE

GND

BUSY

ACK#

GND

SPD3

GND

SPD2

SLIN#

SPD1

PINIT#

SPD0

ERROR#

STB#

AFD#

GND

Pin 1

Содержание RS161-E2 - 0 MB RAM

Страница 1: ...1U Rackmount Barebone Server 1U Rackmount Barebone Server 1U Rackmount Barebone Server 1U Rackmount Barebone Server 1U Rackmount Barebone Server RS161 E2 PA2 User Guide ...

Страница 2: ...iness loss of use or data interruption of business and the like even if ASUS has been advised of the possibility of such damages arising from any defect or error in this manual or product Specifications and information contained in this manual ae furnished for informational use only and are subject to change at any time without notice and should not be construed as a commitment by ASUS ASUS assume...

Страница 3: ...ter 2 Hardware setup Chapter 2 Hardware setup Chapter 2 Hardware setup Chapter 2 Hardware setup 2 1 Chassis cover 2 2 2 1 1 Removing the cover 2 2 2 1 2 Installing the cover 2 3 2 2 Motherboard information 2 4 2 3 Central Processing Unit CPU 2 5 2 3 1 Overview 2 5 2 3 2 Installing the CPU 2 5 2 3 3 Installing the heatsink and airduct 2 7 2 4 System memory 2 9 2 4 1 Overview 2 9 2 4 2 Memory Config...

Страница 4: ...board information Chapter 4 Motherboard information Chapter 4 Motherboard information Chapter 4 Motherboard information 4 1 Motherboard layout 4 2 4 2 Jumpers 4 4 4 3 Internal connectors 4 8 Chapter 5 BIOS setup Chapter 5 BIOS setup Chapter 5 BIOS setup Chapter 5 BIOS setup Chapter 5 BIOS setup 5 1 Managing and updating your BIOS 5 2 5 1 1 Creating a bootable floppy disk 5 2 5 1 2 AFUDOS utility 5...

Страница 5: ...4 5 Peripheral Devices Configuration 5 25 5 4 6 ACPI Configuration 5 26 5 4 7 APM Configuration 5 27 5 4 8 Hardware Monitor 5 28 5 5 Server menu 5 30 5 6 Security menu 5 32 5 7 Boot menu 5 35 5 7 1 Boot Device Priority 5 35 5 7 2 Boot Settings Configuration 5 36 5 8 Exit menu 5 38 Chapter 6 RAID configuration Chapter 6 RAID configuration Chapter 6 RAID configuration Chapter 6 RAID configuration Ch...

Страница 6: ...on Chapter 7 Driver installation Chapter 7 Driver installation Chapter 7 Driver installation Chapter 7 Driver installation 7 1 RAID driver installation 7 2 Creating a RAID driver disk 7 2 7 3 LAN driver installation 7 4 7 4 Support CD information 7 5 7 4 1 Running the support CD 7 5 7 4 2 Drivers menu 7 6 7 4 3 Management Software 7 7 7 4 4 Utilities 7 8 Appendix Reference information Appendix Ref...

Страница 7: ...ect the interference by one or more of the following measures Reorient or relocate the receiving antenna Increase the separation between the equipment and receiver Connect the equipment to an outlet on a circuit different from that to which the receiver is connected Consult the dealer or an experienced radio TV technician for help Canadian Department of Communications Statement Canadian Department...

Страница 8: ...the power cables are not damaged If any damage is detected contact your dealer as soon as possible To avoid short circuits keep paper clips screws and staples away from connectors slots sockets and circuitry Avoid dust humidity and temperature extremes Place the server on a stable surface This product is equipped with a three wire power cable and plug for the user s safety Use the power cable with...

Страница 9: ...hapter 4 Motherboard information Chapter 4 Motherboard information Chapter 4 Motherboard information This chapter gives information about the motherboard that comes with the server This chapter includes the motherboard layout jumper settings and connector locations 5 5 5 5 5 Chapter 5 BIOS information Chapter 5 BIOS information Chapter 5 BIOS information Chapter 5 BIOS information Chapter 5 BIOS i...

Страница 10: ...his manual WARNING WARNING WARNING WARNING WARNING Information to prevent injury to yourself when trying to complete a task CAUTION CAUTION CAUTION CAUTION CAUTION Information to prevent damage to the components when trying to complete a task IMPORTANT IMPORTANT IMPORTANT IMPORTANT IMPORTANT Instructions that you MUST follow to complete a task NOTE NOTE NOTE NOTE NOTE Tips and information to aid i...

Страница 11: ...US RS161 E2 PA2 RS161 E2 PA2 RS161 E2 PA2 RS161 E2 PA2 RS161 E2 PA2 This chapter describes the general features of the chassis kit It includes sections on front panel and rear panel specifications Chapter 1 Product introduction ...

Страница 12: ... rackmount chassis with ASUS K8N DRE motherboard 500 W power supply SATA backplane PCI Express x8 riser assembly Front I O board Optical drive 7 x System fans 4 x 56 mm 3 x 28 mm 1 x Airduct 2 x Hot swap HDD trays Pre connected device power cables 2 CPU heatsink 3 SATA cables 4 IDE cable 5 Rackmount rail kit 6 Bundled CDs RS161 E2 drivers and utilities CD CA Anti virus software CD 7 User guide Con...

Страница 13: ...y memory 2 x PCI Express x16 slots x8 link 1 x mini PCI socket for ASUS Server Management Board NVIDIA nForce Professional 2200 chipset supports 2 x Ultra DMA 133 100 66 33 IDE drives 2 x SATA II 3Gb s drives RAID 0 RAID 1 and JBOD configurations ASUS Server Web based Management ASWM Voltage temperature and fan speed monitoring Automatic System Restart ASR feature 500 W power supply 100 240 VAC 47...

Страница 14: ...i a l p o r t S e r i a l p o r t S e r i a l p o r t S e r i a l p o r t S e r i a l p o r t V G A p o r t V G A p o r t V G A p o r t V G A p o r t V G A p o r t E x p a n s i o n s l o t E x p a n s i o n s l o t E x p a n s i o n s l o t E x p a n s i o n s l o t E x p a n s i o n s l o t L A N p o r t 2 L A N p o r t 2 L A N p o r t 2 L A N p o r t 2 L A N p o r t 2 Hot swap HDD bays Hot swap...

Страница 15: ...pply 5 Device fans x 3 6 System fans x 4 7 SATA backplane 8 Hot swap HDD tray 1 9 Hot swap HDD tray 2 10 Front I O board hidden 11 Optical drive The barebone server does not include a floppy disk drive Connect an external floppy disk drive USB interface to any of the USB ports on the front or rear panel if you need to use a floppy disk 1 1 1 1 1 3 3 3 3 3 5 5 5 5 5 6 6 6 6 6 7 7 7 7 7 9 9 9 9 9 8 ...

Страница 16: ...us Description Description Description Description Description Power LED ON System power ON HDD Access LED OFF No activity Blinking Read write data into the HDD Message LED OFF System is normal no incoming event Blinking ASWM indicates a HW monitor event Location LED OFF Normal status ON Location switch is pressed Press the location switch again to turn off LAN LEDs OFF No LAN connection Blinking ...

Страница 17: ...ASUS RS161 E2 PA2 ASUS RS161 E2 PA2 ASUS RS161 E2 PA2 ASUS RS161 E2 PA2 2 1 This chapter lists the hardware setup procedures that you have to perform when installing or removing system components Chapter 2 Hardware setup ...

Страница 18: ...rewdriver to remove the screw on each front end of the top cover 4 Firmly hold the cover and slide it toward the rear panel for about half an inch until it is disengaged from the chassis 5 Lift the cover from the chassis 2 Loosen the two thumbscrews on the rear panel to release the top cover from the chassis 1 2 inch distance 1 2 inch distance 1 2 inch distance 1 2 inch distance 1 2 inch distance ...

Страница 19: ...aving a gap of about half an inch from the front panel 3 Slide the cover toward the front until it snaps in place 4 Tighten the thumbscrews on the rear to secure the cover 2 Make sure that the side markings on the cover two on each side are aligned to the grooves on the chassis G r o o v e s G r o o v e s G r o o v e s G r o o v e s G r o o v e s Side markings Side markings Side markings Side mark...

Страница 20: ...herboard already installed The motherboard is secured to the chassis by 10 screws as indicated by the circles in the illustration below Refer to Chapter 4 Motherboard information for detailed information on the motherboard K8N DRE Make sure to unplug the power cord before installing or removing any motherboard component or connection Failure to do so may cause you physical injury and may damage mo...

Страница 21: ...verview Overview Overview Overview Overview The motherboard comes with dual surface mount 940 pin Zero Insertion Force ZIF sockets designed for AMD Opteron 64 processors The 128 bit wide data paths of these processors can run applications faster than processors with only 32 bit or 64 bit wide data paths If installing only one CPU use the CPU socket marked CPU1 Take note of the notched corner on th...

Страница 22: ...gle 5 When the CPU is in place push down the socket lever to secure the CPU The lever clicks on the side tab to indicate that it is locked 6 Repeat steps 1 5 to install a second processor in CPU 2 socket Notched Notched Notched Notched Notched c o r n e r c o r n e r c o r n e r c o r n e r c o r n e r Socket lever Socket lever Socket lever Socket lever Socket lever Make sure that the socket lever...

Страница 23: ...ron 64 processors require a specially designed heatsink to ensure optimum thermal condition and performance To install the CPU heatsink 1 Place the heatsink on top of the installed CPU making sure that the heatsink screw holes match with the support plate stand offs Make sure that you use only qualified heatsink assembly 2 Secure the heatsink with two screws Make sure that the heatsink is not skew...

Страница 24: ... 2 Hardware setup Chapter 2 Hardware setup Chapter 2 Hardware setup Chapter 2 Hardware setup 2 8 2 8 2 8 2 8 2 8 To install the airduct 1 Position the airduct on top of the heatsink 2 Carefully lower the airduct until it fits in place ...

Страница 25: ...ets The following figure illustrates the location of the sockets For CPU 1 For CPU 1 For CPU 1 For CPU 1 For CPU 1 Sockets Sockets Sockets Sockets Sockets Channel A DIMM_A1 and DIMM_A2 Channel B DIMM_B1 and DIMM_B2 For CPU 2 For CPU 2 For CPU 2 For CPU 2 For CPU 2 Sockets Sockets Sockets Sockets Sockets Channel A DIMM_C1 and DIMM_C2 Channel B DIMM_D1 and DIMM_D2 K8N DRE K8N DRE 184 pin DDR DIMM so...

Страница 26: ...e same vendor 4 GB DDR400 registered ECC DIMMs operate in 2000SER 2003SER or 64 bit operating systems Mode Mode Mode Mode Mode DIMM_A1 DIMM_A1 DIMM_A1 DIMM_A1 DIMM_A1 DIMM_A2 DIMM_A2 DIMM_A2 DIMM_A2 DIMM_A2 DIMM_B1 DIMM_B1 DIMM_B1 DIMM_B1 DIMM_B1 DIMM_B2 DIMM_B2 DIMM_B2 DIMM_B2 DIMM_B2 Single channel populated Dual channel populated populated populated populated populated populated Recommended mem...

Страница 27: ...MM_C2 DIMM_C2 DIMM_C2 DIMM_C2 DIMM_D1 DIMM_D1 DIMM_D1 DIMM_D1 DIMM_D1 DIMM_D2 DIMM_D2 DIMM_D2 DIMM_D2 DIMM_D2 Speed Speed Speed Speed Speed Single Single rank DDR400 channel Double rank DDR400 72 bits Single rank DDR400 Double rank DDR400 Single rank Single rank DDR400 Single rank Double rank DDR400 Double rank Single rank DDR400 Double rank Double rank DDR333 Dual Single rank Single rank DDR400 c...

Страница 28: ...1 Release a drive tray by pushing the spring lock to the right then pulling the tray lever outward The drive tray ejects slightly after you pull out the lever 2 Firmly hold the tray lever and pull the drive tray out of the bay 3 Take note of the drive tray holes Each side has three holes to fit different types of hard disk drives Use two screws on each side to secure the hard disk drive 4 Place a ...

Страница 29: ...ctly placed when its front edge aligns with the bay edge 7 Repeat steps 1 to 6 if you wish to install a second SATA drive When installed the SATA connector on the drive connects to the SATA interface on the backplane 8 Connect the bundled SATA cables to the connectors on the SATA backplane Refer to section 2 8 SATA backplane cabling for information on the SATA backplane cable connections SATA inte...

Страница 30: ...ser card bracket to the riser card bracket to the riser card bracket The barebone server comes with a riser card bracket You need to remove the bracket if you want to install PCI Express x16 expansion cards To install the PCI Express x16 expansion cards 1 Firmly hold the riser card bracket then pull it up to detach it from the PCI Express x16 slot on the motherboard 2 Place the riser card bracket ...

Страница 31: ... card bracket Reinstalling the riser card bracket Reinstalling the riser card bracket To reinstall the riser card bracket 1 Take note of the holes on the riser card bay The three pegs on the riser card should match these holes to ensure that the bracket is properly in place 2 Install the riser card bracket with the card into the PCI Express x16 slot on the motherboard 3 Press the riser card bracke...

Страница 32: ...or the expansion card Standard interrupt assignments Standard interrupt assignments Standard interrupt assignments Standard interrupt assignments Standard interrupt assignments These IRQs are usually available for ISA or PCI devices I R Q I R Q I R Q I R Q I R Q Priority Priority Priority Priority Priority Standard Function Standard Function Standard Function Standard Function Standard Function 0 ...

Страница 33: ...4 pin SSI power connector power supply to motherboard 3 SATA backplane power connector from power supply 4 Primary IDE connector from motherboard to optical drive 5 Device fan connector from backplane to device fan 6 SATA connectors from motherboard to SATA backplane board 7 USB connector from motherboard to front I O board 8 Panel connector from motherboard to front I O board 9 Auxiliary panel co...

Страница 34: ... Connects the fan cable Connects the fan cable from FRNT_FAN4 on the MB from FRNT_FAN4 on the MB from FRNT_FAN4 on the MB from FRNT_FAN4 on the MB from FRNT_FAN4 on the MB Connect the system fan cables Connect the system fan cables Connect the system fan cables Connect the system fan cables Connect the system fan cables Connect the SATA HDDs Connect the SATA HDDs Connect the SATA HDDs Connect the ...

Страница 35: ...em fans 2 Device fan 3 Power supply module 4 Optical drive 5 Motherboard 2 9 1 2 9 1 2 9 1 2 9 1 2 9 1 System fans System fans System fans System fans System fans To uninstall the system fans To reinstall the system fan 1 Insert the fan to the fan cage Take note of the airflow directional arrows embossed on the fan side 2 Connect the system fan cable to the fan connector on the backplane board 2 L...

Страница 36: ...vice fan Device fan Device fan To uninstall the device fan 2 Lift the fan then set aside 1 Disconnect the device fan cable from the connector on the motherboard or backplane board To reinstall the device fan 1 Insert the fan to the fan cage Take note of the airflow directional arrows embossed on the fan side 2 Connect the device fan cable to the fan connector on the backplane board or on the mothe...

Страница 37: ...ollow these instructions when replacing this fan 1 Uninstall the fan following the instructions in the previous section 2 Pull the dummy case to the direction of the arrow to disengage its pegs from the device fan 3 Replace the device fan To reinstall the device fan with the dummy case 1 Insert the dummy case pegs into to the device fan holes until they fit in place P e g P e g P e g P e g P e g P...

Страница 38: ... supply module Power supply module To uninstall the power supply module 1 Disconnect all the power cables connected to the motherboard and other system devices 2 Use a Phillips cross screwdriver to remove the screws that secure the front end of the power supply 4 Slide the power supply forward for about half an inch then carefully lift it out from the chassis 3 From the rear panel remove two screw...

Страница 39: ...ive 2 Insert the optical drive emergency eject pin to the emergency eject pin hole until the drive tray ejects 3 Pull out half of the drive tray to remove the tray bezel 1 Disconnect the power and signal cables connected to the rear of the optical drive 4 Pull the center of the bezel outward A then lift the sides B to remove 5 Replace the drive tray Do not apply too much force when removing the be...

Страница 40: ...move two metal bracket screws and screws on the other side of the drive Keep the screws for later use 7 Pull the metal bracket to the direction of the arrow until its pegs disengage from the drive holes 8 Lift the metal bracket then set aside 9 Push the drive inward then lift it out from the chassis 10 Remove the metal rail on the other side of the drive ...

Страница 41: ...ard See section 2 7 Cable connections for illustration 2 Uninstall all the devices from the motherboard including the CPU and heatsink riser card bracket and DDR DIMMs Refer to the corresponding sections for instructions on removing these components 3 Use a Phillips cross screwdriver to remove the screws that secure the motherboard to the base of the chassis Refer to the illustration below for the...

Страница 42: ...by the sides and insert it into the chassis 2 Carefully adjust the motherboard until the rear panel ports fit in place 4 Reconnect all the required cables to the motherboard See section 2 7 Cable connections for illustration 5 Reinstall all the devices that you have previously removed 3 Use a Phillips cross screwdriver to secure the motherboard with 10 screws in the holes as shown in the illustrat...

Страница 43: ...E2 PA2 ASUS RS161 E2 PA2 ASUS RS161 E2 PA2 ASUS RS161 E2 PA2 ASUS RS161 E2 PA2 2 1 This chapter describes how to install the optional components and devices into the barebone server Chapter 3 Installation options ...

Страница 44: ...l the system 2 Match one long and one short rail to your desired length and fix them together using four 4 pairs of nuts and bolts 3 Repeat step 2 to assemble the other rail pair N u t s N u t s N u t s N u t s N u t s B o l t s B o l t s B o l t s B o l t s B o l t s Left pair Left pair Left pair Left pair Left pair Right pair Right pair Right pair Right pair Right pair Front ends Front ends Fron...

Страница 45: ...1U space that corresponds to the front 1U space front 1U space front 1U space front 1U space front 1U space where you attached the rail 6 Remove the screws from the rear 1U space and align the rear end holes 7 Drive in two screws on the outer holes to secure the rear end 8 From the rack front find the corresponding 1U space for the second rail pair 9 Repeat steps 2 to 7 to attach the second rail p...

Страница 46: ... server to the rack 1 Firmly hold the server on both sides and insert the rear panel side to the front end of the rack rail then carefully push the server all the way to the back until the front panel fits the front end of the rack and the rack screws on the server match the middle hole on the rack 2 Tighten the two rack screws to secure the server to the rack Rack screw Rack screw Rack screw Rack...

Страница 47: ...S161 E2 PA2 ASUS RS161 E2 PA2 ASUS RS161 E2 PA2 2 1 This chapter gives information about the motherboard that comes with the server This chapter includes the motherboard layout jumper settings and connector locations Chapter 4 Motherboard info ...

Страница 48: ...ET 940 CPU2 SOCKET 940 CPU1 35 68 34 1 DDR1 DIMM_B2 64 bit 184 pin module DDR1 DIMM_B1 64 bit 184 pin module DDR1 DIMM_D1 64 bit 184 pin module DDR1 DIMM_D2 64 bit 184 pin module DDR1 DIMM_C1 64 bit 184 pin module DDR1 DIMM_C2 64 bit 184 pin module FRNT_FAN2 FRNT_FAN1 FRNT_FAN6 FRNT_FAN5 FRNT_FAN4 FRNT_FAN3 PCI1 PCIE1 PSUSMB1 REAR_FAN2 REAR_FAN3 REAR_FAN4 LAN2 LAN1 COM1 VGA1 KBMS1 USB12 8Mbit BIOS...

Страница 49: ...Internal connectors P a g e P a g e P a g e P a g e P a g e 1 Floppy disk drive connector 34 1 pin FLOPPY1 4 8 2 Primary IDE connectors 40 1 pin PRI_IDE1 SEC_IDE1 4 8 3 Serial ATA connectors 7 pin SATA1 SATA2 SATA3 SATA4 4 9 4 Storage add in card activity LED connector 4 pin HDLED1 4 10 5 Backplane SMBus connector 6 1 pin FPSMB 4 10 6 Front and rear fan connectors 3 pin FRNT_FAN1 FRNT_FAN2 FRNT_FA...

Страница 50: ...ers the RAM data in CMOS which include system setup information such as system passwords To erase the RTC RAM 1 Turn OFF the computer and unplug the power cord 2 Remove the onboard battery 3 Move the jumper cap from pins 1 2 default to pins 2 3 Keep the cap on pins 2 3 for about 5 10 seconds then move the cap back to pins 1 2 4 Reinstall the battery 5 Plug the power cord and turn ON the computer 6...

Страница 51: ...pins 1 2 to activate the Gigabit LAN feature 2 2 2 2 2 Keyboard power 3 pin KBPWR1 Keyboard power 3 pin KBPWR1 Keyboard power 3 pin KBPWR1 Keyboard power 3 pin KBPWR1 Keyboard power 3 pin KBPWR1 This jumper allows you to enable or disable the keyboard wake up feature Set this jumper to pins 1 2 5VSB to wake up the computer when you press a key on the keyboard the default is the Space Bar This feat...

Страница 52: ... the onboard ATI Rage XL video graphics controller Set to pins 1 2 to enable the video graphics controller 4 4 4 4 4 Gigabit LAN2 controller setting 3 pin LAN2_EN1 Gigabit LAN2 controller setting 3 pin LAN2_EN1 Gigabit LAN2 controller setting 3 pin LAN2_EN1 Gigabit LAN2 controller setting 3 pin LAN2_EN1 Gigabit LAN2 controller setting 3 pin LAN2_EN1 This jumper allows you to enable or disable the ...

Страница 53: ...ecover the BIOS 1 Turn OFF your computer and unplug the power cord 2 Move the jumper cap from pins 1 2 default to pins 2 3 3 Insert a floppy disk with the original or updated BIOS file 4 Plug the power cord and turn ON the computer 5 The system searches for the BIOS file in the floppy then reflashes the BIOS 6 When finished shut down your computer 7 Replace the jumper cap from pins 2 3 to pins 1 2...

Страница 54: ...ce by setting its jumper accordingly Refer to the hard disk documentation for the jumper settings The Pin 20 on the IDE connector is removed to match the covered hole on the Ultra DMA cable connector This prevents incorrect insertion when you connect the IDE cable Use the 80 conductor IDE cable for Ultra DMA133 100 66 IDE devices 4 3 Internal connectors 1 1 1 1 1 Floppy disk drive connector 34 1 p...

Страница 55: ...erial ATA hard disk drives that allows up to 3Gb s of data transfer rate If you installed Serial ATA hard disk drives you can create a RAID 0 RAID 1 or JBOD configuration Important note on Serial ATA Important note on Serial ATA Important note on Serial ATA Important note on Serial ATA Important note on Serial ATA The actual data transfer rate depends on the speed of Serial ATA hard disks installe...

Страница 56: ...ces using the SMBus interface 4 4 4 4 4 Storage add on card activity LED connector Storage add on card activity LED connector Storage add on card activity LED connector Storage add on card activity LED connector Storage add on card activity LED connector 4 pin HDLED1 4 pin HDLED1 4 pin HDLED1 4 pin HDLED1 4 pin HDLED1 This connector is for the storage add on card cable connected to the SCSI or SAT...

Страница 57: ...AN3 FRNT_FAN6 REAR_FAN1 REAR_FAN2 REAR_FAN3 REAR_FAN4 REAR_FAN4 REAR_FAN4 REAR_FAN4 REAR_FAN4 The fan connectors support cooling fans of 350mA 2000mA 24 W max or a total of 1A 3 48A 41 76 W max at 12V Connect the fan cables to the fan connectors on the motherboard making sure that the black wire of each cable matches the ground pin of the connector Do not forget to connect the fan cables to the fa...

Страница 58: ...the USB 2 0 specification that supports up to 480 Mbps connection speed 8 8 8 8 8 Serial port connector 10 1 pin COM2 Serial port connector 10 1 pin COM2 Serial port connector 10 1 pin COM2 Serial port connector 10 1 pin COM2 Serial port connector 10 1 pin COM2 This connector is for a serial COM port Connect the serial port module cable to this connector then install the module to a slot opening a...

Страница 59: ...l the connectors completely fit Do not forget to connect the 8 pin ATX 12 V power plug otherwise the system will not boot Use of a PSU with a higher power output is recommended when configuring a system with more power consuming devices The system may become unstable or may not boot up if the power is inadequate Make sure that your power supply unit PSU can provide at least the minimum power requi...

Страница 60: ...th an SMBus host and or other SMBus devices using the SMBus interface 11 11 11 11 11 Parallel port connector 26 1 pin LPT1 Parallel port connector 26 1 pin LPT1 Parallel port connector 26 1 pin LPT1 Parallel port connector 26 1 pin LPT1 Parallel port connector 26 1 pin LPT1 This connector is for a parallel port Connect the parallel port module cable to this connector then install the module to a s...

Страница 61: ...INKACTLED LAN2 link activity LED 2 pin LAN2_LINKACTLED LAN2 link activity LED 2 pin LAN2_LINKACTLED This 2 pin connector is for the LAN2 Activity LED Connect the LAN2 Activity LED cable to this connector This LED blinks during a network activity and lights up when linked Locator LED 1 2 pin LOCATORLED1 Locator LED 1 2 pin LOCATORLED1 Locator LED 1 2 pin LOCATORLED1 Locator LED 1 2 pin LOCATORLED1 ...

Страница 62: ...ite activities of any device connected to the SCSI or SATA add in card causes this LED to light up System warning speaker Orange 4 pin SPKROUT System warning speaker Orange 4 pin SPKROUT System warning speaker Orange 4 pin SPKROUT System warning speaker Orange 4 pin SPKROUT System warning speaker Orange 4 pin SPKROUT This 4 pin connector is for the chassis mounted system warning speaker The speake...

Страница 63: ...1 E2 PA2 ASUS RS161 E2 PA2 ASUS RS161 E2 PA2 ASUS RS161 E2 PA2 Chapter 5 BIOS setup This chapter tells how to change the system settings through the BIOS Setup menus Detailed descriptions of the BIOS parameters are also provided ...

Страница 64: ...either one of the following to create a bootable floppy disk DOS environment a Insert a 1 44MB floppy disk into the drive b At the DOS prompt type format A S then press Enter Windows XP environment a Insert a 1 44 MB floppy disk to the floppy disk drive b Click Start Start Start Start Start from the Windows desktop then select M y M y M y M y M y Computer Computer Computer Computer Computer c Sele...

Страница 65: ... copies the current BIOS file to the floppy disk A afudos oOLDBIOS1 rom AMI Firmware Update Utility Version 1 19 ASUS V2 07 03 11 24BB Copyright C 2002 American Megatrends Inc All rights reserved Reading flash done Write to file ok A Main filename Main filename Main filename Main filename Main filename Extension name Extension name Extension name Extension name Extension name 1 Copy the AFUDOS uti...

Страница 66: ...e using the AFUDOS utility 1 Visit the ASUS website www asus com and download the latest BIOS file for the motherboard Save the BIOS file to a bootable floppy disk A afudos iK8NDRE ROM Write the BIOS filename on a piece of paper You need to type the exact BIOS filename at the DOS prompt A afudos iK8NDRE ROM pbnc AMI Firmware Update Utility Version 1 19 ASUS V2 07 03 11 24BB Copyright C 2002 Americ...

Страница 67: ...pleted Reboot the system from the hard disk drive A afudos iK8NDRE ROM pbnc AMI Firmware Update Utility Version 1 19 ASUS V2 07 03 11 24BB Copyright C 2002 American Megatrends Inc All rights reserved WARNING Do not turn off power during flash BIOS Reading file done Reading flash done Advance Check Erasing flash done Writing flash done Verifying flash done Please restart your computer A ...

Страница 68: ...isk To recover the BIOS from a floppy disk 1 Turn on the system 2 Insert the floppy disk with the original or updated BIOS file to the floppy disk drive 3 The utility displays the following message and automatically checks the floppy disk for the original or updated BIOS file Bad BIOS checksum Starting BIOS recovery Checking for floppy 4 Restart the system after the utility completes the updating ...

Страница 69: ...hen turn on the system 2 Insert the support CD to the optical drive 3 The utility displays the following message and automatically checks the floppy disk for the original or updated BIOS file 4 Restart the system after the utility completes the updating process DO NOT shut down or reset the system while updating the BIOS Doing so can cause system boot failure Bad BIOS checksum Starting BIOS recove...

Страница 70: ...e ASUS Update utility is copied to your system 5 1 4 5 1 4 5 1 4 5 1 4 5 1 4 ASUS Update utility ASUS Update utility ASUS Update utility ASUS Update utility ASUS Update utility The ASUS Update is a utility that allows you to manage save and update the motherboard BIOS in Windows environment The ASUS Update utility allows you to Save the current BIOS file Download the latest BIOS file from the Inte...

Страница 71: ...ernet Updating the BIOS through the Internet To update the BIOS through the Internet 1 Launch the ASUS Update utility from the Windows desktop by clicking Start Start Start Start Start Programs Programs Programs Programs Programs ASUS ASUS ASUS ASUS ASUS ASUSUpdate ASUSUpdate ASUSUpdate ASUSUpdate ASUSUpdate ASUSUpdate ASUSUpdate ASUSUpdate ASUSUpdate ASUSUpdate The ASUS Update main window appears...

Страница 72: ...SUSUpdate ASUSUpdate ASUSUpdate ASUSUpdate ASUSUpdate ASUSUpdate ASUSUpdate ASUSUpdate The ASUS Update main window appears 2 Select Update BIOS from a Update BIOS from a Update BIOS from a Update BIOS from a Update BIOS from a file file file file file option from the drop down menu then click Next Next Next Next Next 4 From the FTP site select the BIOS version that you wish to download Click Next ...

Страница 73: ...l during the Power On Self Test POST to enter the Setup utility otherwise POST continues with its test routines If you wish to enter Setup after POST restart the system by pressing Ctrl Alt Delete or by pressing the reset button on the system chassis You can also restart by turning the system off and then back on Do this last option only if the first two failed The Setup program is designed to mak...

Страница 74: ...er Server For changing the advanced server options Security Security Security Security Security For changing the advanced system security options Boot Boot Boot Boot Boot For changing the system boot configuration Exit Exit Exit Exit Exit For selecting the exit options and loading default settings To select an item on the menu bar press the right or left arrow key on the keyboard until the desired...

Страница 75: ...opposite the item You cannot select an item that is not user configurable A configurable field is enclosed in brackets and is highlighted when selected To change the value of a field select it then press Enter to display a list of options Refer to 5 2 7 Pop up window 5 2 7 5 2 7 5 2 7 5 2 7 5 2 7 Pop up window Pop up window Pop up window Pop up window Pop up window Select a menu item then press En...

Страница 76: ...Floppy A Disabled Floppy A Disabled Sets the type of floppy drive installed Configuration options Disabled 360K 5 25 in 1 2M 5 25 in 720K 3 5 in 1 44M 3 5 in 2 88M 3 5 in Refer to section 5 2 1 BIOS menu screen for information on the menu screen items and how to navigate through them V00 00 C Copyright 1985 2004 American Megatrends Inc BIOS SETUP UTILITY Main Advanced Server Security Boot Exit Use...

Страница 77: ...re the item V00 00 C Copyright 1985 2004 American Megatrends Inc BIOS SETUP UTILITY Main Configuration nVidia RAID ROM RAID Option ROM Disabled Select Screen Select Item Change Field Tab Select Field F1 General Help F10 Save and Exit ESC Exit OnBoard PCI IDE Controller Both OnBoard PCI IDE Controller Both OnBoard PCI IDE Controller Both OnBoard PCI IDE Controller Both OnBoard PCI IDE Controller Bo...

Страница 78: ...secondary master interface as RAID Configuration options Disabled Enabled Secondary Slave as RAID Disabled Secondary Slave as RAID Disabled Secondary Slave as RAID Disabled Secondary Slave as RAID Disabled Secondary Slave as RAID Disabled Sets the secondary slave interface as RAID Configuration options Disabled Enabled Tertiary Master as RAID Disabled Tertiary Master as RAID Disabled Tertiary Mast...

Страница 79: ... if your device is either a ZIP LS 120 or MO drive Configuration options Not Installed Auto CDROM ARMD LBA Large Mode Auto LBA Large Mode Auto LBA Large Mode Auto LBA Large Mode Auto LBA Large Mode Auto Enables or disables the LBA mode Setting to Auto enables the LBA mode if the device supports this mode and if the device was not previously formatted with LBA mode disabled Configuration options Di...

Страница 80: ...ons Auto Disabled Enabled 32Bit Data Transfer Enabled 32Bit Data Transfer Enabled 32Bit Data Transfer Enabled 32Bit Data Transfer Enabled 32Bit Data Transfer Enabled Enables or disables 32 bit data transfer Configuration options Disabled Enabled 5 3 6 5 3 6 5 3 6 5 3 6 5 3 6 System Information System Information System Information System Information System Information This menu gives you an overvi...

Страница 81: ...t ESC Exit V00 00 C Copyright 1985 2004 American Megatrends Inc BIOS SETUP UTILITY Main System Memory Information Total Memory xxxMB Node0 Memory Configuration Speed DDR xxx DIMM01 None DIMM02 None DIMM03 xxxMB DIMM04 None Node1 Memory Configuration Speed N A DIMM05 None DIMM06 None DIMM07 None DIMM08 None Select Screen Select Item Change Field Tab Select Field F1 General Help F10 Save and Exit ES...

Страница 82: ...ion Peripheral Devices Configuration ACPI Configuration APM Configuration Hardware Monitor Select Screen Select Item Change Field Tab Select Field F1 General Help F10 Save and Exit ESC Exit V00 00 C Copyright 1985 2004 American Megatrends Inc BIOS SETUP UTILITY Advanced CPU Configuration MPS Table Version 1 4 MTRR Mapping Continuous Cool n Quiet Enabled Select Screen Select Item Change Field Tab S...

Страница 83: ...ntinuous MTRR Mapping Continuous MTRR Mapping Continuous MTRR Mapping Continuous Determines the method used for programming processor MTRRs when using more than 4GB of system memory Configuration options Continuous Discrete Cool n Quiet Enabled Cool n Quiet Enabled Cool n Quiet Enabled Cool n Quiet Enabled Cool n Quiet Enabled Enables or disables the AMD Cool n Quiet Power Now feature Configuratio...

Страница 84: ...sables the software memory hole Configuration options Disabled Enabled DRAM ECC Enable Enabled Enables or disables the DRAM ECC that allows the hardware to report and correct memory errors automatically Configuration options Disabled Enabled NUMA Function Enabled Enables or disables the non uniform memory access NUMA function Configuration options Disabled Enabled SouthBridge Configuration SouthBr...

Страница 85: ...o Reset ESCD Data No Reset ESCD Data No Reset ESCD Data No Reset ESCD Data No Clears the non volatile RAM NVRAM during boot Configuration options No Yes Plug And Play O S No Plug And Play O S No Plug And Play O S No Plug And Play O S No Plug And Play O S No When set to No BIOS configures all the devices in the system When set to Yes and if you install a Plug and Play operating system the operating...

Страница 86: ...B Devices Enabled USB Devices Enabled USB Devices Enabled USB Devices Enabled USB Devices Enabled items show the auto detected values If no USB device is detected the USB Devices USB Devices USB Devices USB Devices USB Devices Enabled Enabled Enabled Enabled Enabled item shows N o n e N o n e N o n e N o n e N o n e USB Controller Support USB 1 1 USB 2 0 USB Controller Support USB 1 1 USB 2 0 USB ...

Страница 87: ...abled OnBoard Floppy Controller Enabled OnBoard Floppy Controller Enabled Enables or disables the onboard floppy controller Configuration options Disabled Enabled Serial Port1 Address 3F8 IRQ4 Serial Port1 Address 3F8 IRQ4 Serial Port1 Address 3F8 IRQ4 Serial Port1 Address 3F8 IRQ4 Serial Port1 Address 3F8 IRQ4 Allows you to select the Serial Port1 base address Configuration options Disabled 3F8 I...

Страница 88: ...MA3 Appears when the Parallel Port Mode is set to ECP or ECP EPP This item allows you to set the Parallel Port ECP DMA Configuration options DMA0 DMA1 DMA3 Parallel Port IRQ IRQ7 Sets the Parallel port IRQ Configuration options IRQ5 IRQ7 5 4 6 5 4 6 5 4 6 5 4 6 5 4 6 ACPI Configuration ACPI Configuration ACPI Configuration ACPI Configuration ACPI Configuration ACPI 2 0 Features No ACPI 2 0 Feature...

Страница 89: ...m will reboot after an AC power loss When set to Last State the system goes into either off or on state whatever the system state was before the AC power loss Configuration options Power Off Power On Last State Resume By PS 2 Keyboard Enabled Resume By PS 2 Keyboard Enabled Resume By PS 2 Keyboard Enabled Resume By PS 2 Keyboard Enabled Resume By PS 2 Keyboard Enabled Allows you to use specific ke...

Страница 90: ...en Select Item Change Field Tab Select Field F1 General Help F10 Save and Exit ESC Exit CPU1 CPU2 Temperature xxxºC xxxºF CPU1 CPU2 Temperature xxxºC xxxºF CPU1 CPU2 Temperature xxxºC xxxºF CPU1 CPU2 Temperature xxxºC xxxºF CPU1 CPU2 Temperature xxxºC xxxºF MB Temperature xxxºC xxxºF MB Temperature xxxºC xxxºF MB Temperature xxxºC xxxºF MB Temperature xxxºC xxxºF MB Temperature xxxºC xxxºF The onb...

Страница 91: ...rature XXX CPU1 CPU2 Temperature XXX CPU1 CPU2 Temperature XXX CPU1 CPU2 Temperature XXX CPU1 CPU2 Temperature XXX Front1 Temperature XXX Front1 Temperature XXX Front1 Temperature XXX Front1 Temperature XXX Front1 Temperature XXX Allows you to set the CPU and system threshold temperature before the Smart Fan Control is disabled VCORE1 Voltage VCORE2 Voltage 3 3V Voltage 5V VCORE1 Voltage VCORE2 Vo...

Страница 92: ...bles or disables the remote access feature Configuration options Disabled Enabled The following items appear only when the Remote Access Remote Access Remote Access Remote Access Remote Access item is Enabled 5 5 Server menu V00 00 C Copyright 1985 2004 American Megatrends Inc BIOS SETUP UTILITY Main Advanced Server Security Boot Exit Remote Access Configuration Select Screen Select Item Change Fi...

Страница 93: ...ne Hardware Software Redirection After BIOS POST Always Redirection After BIOS POST Always Redirection After BIOS POST Always Redirection After BIOS POST Always Redirection After BIOS POST Always Sets the redirection mode after the BIOS Power On Self Test POST Some operating system may not work when set to Always Configuration options Disabled Boot Loader Always Terminal Type ANSI Terminal Type AN...

Страница 94: ...sword when prompted The message Password Installed appears after you successfully set your password To change the user password follow the same steps as in setting a supervisor password To clear the supervisor password select the Change Supervisor Change Supervisor Change Supervisor Change Supervisor Change Supervisor Password Password Password Password Password then press Enter The message Passwo...

Страница 95: ...ser Password Change User Password Change User Password Change User Password Change User Password Select this item to set or change the user password The User Password User Password User Password User Password User Password item on top of the screen shows the default Not Installed Not Installed Not Installed Not Installed Not Installed After you set a password this item shows Installed Installed In...

Страница 96: ...w the same steps as in setting a user password Password Check Setup Password Check Setup Password Check Setup Password Check Setup Password Check Setup When set to Setup BIOS checks for user password when accessing the Setup utility When set to Always BIOS checks for user password both when accessing Setup and booting the system Configuration options Setup Always ...

Страница 97: ...vice priority sequence from the available devices The number of device items that appears on the screen depends on the number of devices installed in the system Configuration options xxxxx Drive Disabled V00 00 C Copyright 1985 2004 American Megatrends Inc BIOS SETUP UTILITY Main Advanced Server Security Boot Exit Boot Device Priority Boot Settings Configuration Select Screen Select Item Change Fi...

Страница 98: ...ce BIOS Add On ROM Display Mode Force BIOS Add On ROM Display Mode Force BIOS Add On ROM Display Mode Force BIOS Sets the display mode for option ROM Configuration options Force BIOS Keep Current Bootup Num Lock On Bootup Num Lock On Bootup Num Lock On Bootup Num Lock On Bootup Num Lock On Allows you to select the power on state for the NumLock Configuration options Off On PS 2 Mouse Support Auto ...

Страница 99: ...isabled Enabled Hit DEL Message Display Enabled Hit DEL Message Display Enabled Hit DEL Message Display Enabled Hit DEL Message Display Enabled Hit DEL Message Display Enabled When set to Enabled the system displays the message Press DEL to run Setup during POST Configuration options Disabled Enabled Interrupt 19 Capture Disabled Interrupt 19 Capture Disabled Interrupt 19 Capture Disabled Interrup...

Страница 100: ...o ensure the values you selected are saved to the CMOS RAM An onboard backup battery sustains the CMOS RAM so it stays on even when the computer is turned off When you select this option a confirmation window appears Select Ok Ok Ok Ok Ok to save the changes and exit If you attempt to exit the Setup program without saving your changes the program prompts you with a message asking if you want to sa...

Страница 101: ...s Load Setup Defaults Allows you to load the default values for each of the parameters on the Setup menus When you select this option or if you press F5 a confirmation window appears Select Ok Ok Ok Ok Ok to load default values Select Save Changes Exit Save Changes Exit Save Changes Exit Save Changes Exit Save Changes Exit or make other changes before saving the values to the non volatile RAM ...

Страница 102: ...5 40 5 40 5 40 5 40 5 40 Chapter 5 BIOS setup Chapter 5 BIOS setup Chapter 5 BIOS setup Chapter 5 BIOS setup Chapter 5 BIOS setup ...

Страница 103: ...2 ASUS RS161 E2 PA2 ASUS RS161 E2 PA2 ASUS RS161 E2 PA2 ASUS RS161 E2 PA2 Chapter 6 RAID configuration This chapter provides instructions for setting up creating and configuring RAID sets using the available utilities ...

Страница 104: ...AID 1 Data mirroring copies and maintains an identical image of data from one drive to a second drive If one drive fails the disk array management software directs all applications to the surviving drive as it contains a complete copy of the data in the other drive This RAID configuration provides data protection and increases fault tolerance to the entire system Use two new drives or use an exist...

Страница 105: ...ystem user guide 2 Connect a SATA signal cable to the signal connector at the back of each drive and to the SATA connector on the motherboard 3 Connect a SATA power cable to the power connector on each drive 6 1 3 6 1 3 6 1 3 6 1 3 6 1 3 RAID configuration utility RAID configuration utility RAID configuration utility RAID configuration utility RAID configuration utility You can create a RAID set u...

Страница 106: ...r installing the hard disk drives make sure to set the necessary RAID items in the BIOS before setting your RAID configuration To set the BIOS RAID items 1 Enter the BIOS Setup during POST 2 Go to the Main Menu Main Menu Main Menu Main Menu Main Menu select IDE Configuration IDE Configuration IDE Configuration IDE Configuration IDE Configuration then press Enter 3 Set the RAID Option ROM RAID Opti...

Страница 107: ...F10 to display the utility main menu F6 Back F7 Finish TAB Navigate Select ENTER Popup NVIDIA RAID Utility Oct 5 2004 Define a New Array RAID Mode Striping Striping Block Optimal Free Disks Array Disks Loc Disk Model Name Loc Disk Model Name 1 0 M XXXXXXXXXXXXXXXXXX 1 1 M XXXXXXXXXXXXXXXXXX Add 2 0 M XXXXXXXXXXXXXXXXXX 2 1 M XXXXXXXXXXXXXXXXXX Del At the bottom section of the screen are the naviga...

Страница 108: ... Creating a RAID 0 set Stripe Creating a RAID 0 set Stripe To create a RAID 0 set 1 From the Define a New Array Define a New Array Define a New Array Define a New Array Define a New Array menu select RAID Mode RAID Mode RAID Mode RAID Mode RAID Mode then press Enter A pop up menu appears 2 Use the up or down arrow keys to select Striping Striping Striping Striping Striping then press Enter Mirrori...

Страница 109: ...ete all data from the hard disk drives or N to continue creating the RAID set without deleting the data on the disks You will lose all data on the drives if you clear the disk data 9 The utility displays the created RAID 0 set Press Ctrl X to save your settings and exit the utility Ctrl X Exit Select B Set Boot N New Array ENTER Detail NVIDIA RAID Utility Oct 5 2004 Array List Boot Id Status Vendo...

Страница 110: ...ives that you want to add in the RAID set then press the right arrow key to select The selected hard disk drives appear in the Array Disks Array Disks Array Disks Array Disks Array Disks section Repeat the process until all desired hard disk drives are added Clear disk data Y YES N Cancel 7 After selecting the hard disk drives press F7 to create the RAID 1 set A pop up window appears 8 Press Y to ...

Страница 111: ...ou want to rebuild then press F7 A confirmation message appears 4 Press Enter to start rebuilding the array or Esc to cancel The Array List Array List Array List Array List Array List screen displays the RAID set after rebuilding Rebuild array Enter OK Esc Cancel Ctrl X Exit Select B Set Boot N New Array ENTER Detail NVIDIA RAID Utility Oct 5 2004 Array List Boot Id Status Vendor Array Model Name ...

Страница 112: ...roring Striping Width 1 Striping Block 64K Adapt Channel M S Index Disk Model Name Capacity 2 1 Master 0 XXXXXXXXXXXXXXXXX XXX XXGB 1 0 Master 1 XXXXXXXXXXXXXXXXX XXX XXGB 2 When the array details appear press D to delete the RAID set A confirmation message appears 3 Press Y to delete the array or press N to cancel 4 The Define a New Array Define a New Array Define a New Array Define a New Array D...

Страница 113: ...e up or down arrow keys to select a RAID set then press Enter The RAID set details appear Ctrl X Exit Select B Set Boot N New Array ENTER Detail NVIDIA RAID Utility Oct 5 2004 Array List Boot Id Status Vendor Array Model Name No 4 Healthy NVIDIA STRIPING XXX XXG No 3 Healthy NVIDIA MIRRORING XXX XXG R Rebuild D Delete C Clear Disk ENTER Return Array 1 NVIDIA MIRROR XXX XXG Array Detail RAID Mode S...

Страница 114: ...6 12 6 12 6 12 6 12 6 12 Chapter 6 RAID configuration Chapter 6 RAID configuration Chapter 6 RAID configuration Chapter 6 RAID configuration Chapter 6 RAID configuration ...

Страница 115: ...E2 PA2 ASUS RS161 E2 PA2 ASUS RS161 E2 PA2 ASUS RS161 E2 PA2 ASUS RS161 E2 PA2 Chapter 7 Driver installation This chapter provides instructions for installing the necessary drivers for different system components ...

Страница 116: ...RAID driver is required when installing Windows 2000 XP operating system on a hard disk drive that is included in a RAID set You can create a RAID driver disk in DOS using the Makedisk application in the support CD or in Windows environment To create a RAID driver disk in DOS 1 Place the motherboard support CD in the optical drive 2 Restart the computer then enter the BIOS Setup 3 Select the optic...

Страница 117: ...the RAID driver 1 Install an operating system to the selected hard disk drive During installation the computer prompts you to press the F 6 F 6 F 6 F 6 F 6 key if you are installing a third party RAID driver 2 Press F6 then insert the RAID driver disk to the floppy disk drive 3 Follow screen instructions to install the RAID drivers 6 Type the letter of the option you like to select then press Ente...

Страница 118: ... Windows automatically detects the LAN controllers and displays a New Hardware Found New Hardware Found New Hardware Found New Hardware Found New Hardware Found window Click Cancel Cancel Cancel Cancel Cancel to close this window If Autorun Autorun Autorun Autorun Autorun is NOT enabled in your computer browse the contents of the support CD to locate the file ASSETUP EXE from the BIN folder Double...

Страница 119: ... Click an icon to Click an icon to Click an icon to Click an icon to Click an icon to display support display support display support display support display support CD motherboard CD motherboard CD motherboard CD motherboard CD motherboard information information information information information Click an item to install Click an item to install Click an item to install Click an item to install...

Страница 120: ...Gigabit Ethernet Broadcom 5751 NetXtreme Gigabit Ethernet Installs the Broadcom 5751 NetXtreme Gigabit Ethernet driver See page 6 13 for details ATI Rage XL Display Driver ATI Rage XL Display Driver ATI Rage XL Display Driver ATI Rage XL Display Driver ATI Rage XL Display Driver Installs the driver for the ATI Rage XL display controller Broadcom NetXtreme Software Broadcom NetXtreme Software Broad...

Страница 121: ...re menu shows the available server management software applications Install ASWM for Windows 2000 Install ASWM for Windows 2000 Install ASWM for Windows 2000 Install ASWM for Windows 2000 Install ASWM for Windows 2000 Installs the ASUS System Web base Management utility Refer to the application help file for details Install ASUS Network Utility Install ASUS Network Utility Install ASUS Network Uti...

Страница 122: ...US Update ASUS Update ASUS Update The ASUS Update utility that allows you to update the motherboard BIOS in Windows environment This utility requires an Internet connection either through a network or an Internet Service Provider ISP ADOBE Acrobat Reader ADOBE Acrobat Reader ADOBE Acrobat Reader ADOBE Acrobat Reader ADOBE Acrobat Reader The Adobe Acrobat Reader V5 0 is for opening viewing and prin...

Страница 123: ... E2 PA2 ASUS RS161 E2 PA2 ASUS RS161 E2 PA2 ASUS RS161 E2 PA2 ASUS RS161 E2 PA2 Appendix Reference information This appendix includes additional information that you may refer to when configuring the motherboard ...

Страница 124: ... 128 bit 266 333 400 MHz USB2 0 Port x4 BCM5721 Gigabit LAN 2 x IDE Ports Ultra ATA 66 100 133 2 x Serial ATA Ports Raid 0 1 Professional 2200 CPU1 CPU2 2 channel DDR SDRAM 4 x DIMMs 266 333 400 MHz x16 x16 2 0GT s SATA SATA IDE IDE USB USB USB USB ATI RAGE XL PCI Express x1 PCI Express x16 Winbond W83627THF A Super I O 8Mbit BIOS LPC 1xParallel Floppy 2xSerial PS 2 KB Mouse LPC BUS x16 2 0GT s x1...

Отзывы: