background image

ASUS ROG STRIX B350-F GAMING

3-11

Chapter 3

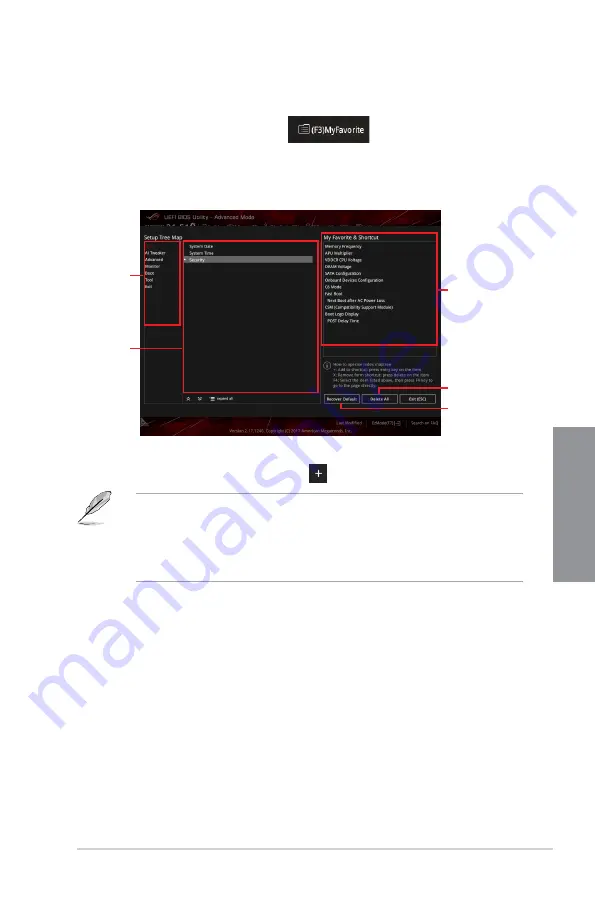
Adding items to My Favorites

To add BIOS items:

1. 

Press <F3> on your keyboard or click 

 from the BIOS screen to open 

Setup Tree Map screen.

2. 

On the Setup Tree Map screen, select the BIOS items that you want to save in My 

Favorites screen.

3. 

Select an item from main menu panel, then click the submenu that you want to save as 
favorite from the submenu panel and click 

 or press <Enter> on your keyboard.

You cannot add the following items to My Favorite items:

• 

Items with submenu options

• 

User-managed items such as language and boot order

• 

Configuration items such as Memory SPD Information, system time and date.

4. 

Click 

Exit (ESC)

 or press <Esc> key to close Setup Tree Map screen.

5. 

Go to My Favorites menu to view the saved BIOS items. 

Main menu panel

Submenu panel

Selected shortcut 

items

Delete all favorite 

items
Recover to default 

favorite items

Содержание ROG STRIX B350-F GAMING

Страница 1: ...Motherboard ROG STRIX B350 F GAMING Motherboard ...

Страница 2: ...ctive companies and are used only for identification or explanation and to the owners benefit without intent to infringe Offer to Provide Source Code of Certain Software This product contains copyrighted software that is licensed under the General Public License GPL under the Lesser General Public License Version LGPL and or other Free Open Source Software Licenses Such software in this product is...

Страница 3: ...Building your PC system 2 1 2 1 1 Motherboard installation 2 1 2 1 2 CPU installation 2 3 2 1 3 CPU heatsink and fan assembly installation 2 4 2 1 4 DIMM installation 2 6 2 1 5 ATX power connection 2 7 2 1 6 SATA device connection 2 8 2 1 7 Front I O connector 2 9 2 1 8 Expansion card installation 2 10 2 1 9 M 2 installation 2 11 2 2 Motherboard rear and audio connections 2 12 2 2 1 Rear I O conne...

Страница 4: ...r menu 3 17 3 8 Boot menu 3 17 3 9 Tool menu 3 19 3 9 1 ASUS EZ Flash 3 Utility 3 19 3 9 2 Secure Erase 3 19 3 9 3 ASUS Overclocking Profile 3 20 3 9 4 ASUS SPD Information 3 20 3 9 5 Graphics Card Information 3 20 3 10 Exit menu 3 21 3 11 Updating BIOS 3 21 3 11 1 EZ Update 3 21 3 11 2 ASUS EZ Flash 3 3 22 3 11 3 ASUS CrashFree BIOS 3 3 24 Chapter 4 RAID Support 4 1 RAID configurations 4 1 4 1 1 ...

Страница 5: ... or your retailer Operation safety Before installing the motherboard and adding devices on it carefully read all the manuals that came with the package Before using the product ensure all cables are correctly connected and the power cables are not damaged If you detect any damage contact your dealer immediately To avoid short circuits keep paper clips screws and staples away from connectors slots ...

Страница 6: ...s are not part of the standard package Conventions used in this guide To ensure that you perform certain tasks properly take note of the following symbols used throughout this manual DANGER WARNING Information to prevent injury to yourself when trying to complete a task CAUTION Information to prevent damage to the components when trying to complete a task IMPORTANT Instructions that you MUST follo...

Страница 7: ...16 slots supports x16 or x8 x4 AMD 7th Generation A series Athlon Processors 1 x PCIe 3 0 x16 slot supports x8 AMD B350 Chipset 1 x PCIe 2 0 x16 slot max at x4 mode 3 x PCIe 2 0 x1 slots PCIeX16_3 slot shares bandwidth with PCIeX1_1 and PCIeX1_3 Graphics Integrated AMD Radeon R Series Graphics in the 7th Generation A series APU Multi VGA output support HDMI and DisplayPort ports Supports HDMI 1 4b...

Страница 8: ...8 Channel audio USB AMD Ryzen 7th Generation A series Athlon Processors 4 x USB 3 0 port s 4 at back panel blue AMD B350 Chipset 2 x USB 3 1 port s 2 at back panel red AMD B350 Chipset 2 x USB 3 0 port s 2 at mid board AMD B350 Chipset 6 x USB 2 0 port s 2 at back panel black 4 at mid board ROG Exclusive Features RAMCache II ROG GameFirst IV ROG Overwolf ROG Clone Drive ROG CPU Z ROG GameFirst IV ...

Страница 9: ... ports 2 x USB 2 0 ports 1 x Optical S PDIF out 5 x Audio jack s Internal I O connectors 1 x CPU fan connector 4 pin 1 x CPU OPT fan connector 4 pin 3 x Chassis Fan connectors 4 pin 1 x AIO Pump Header 1 x 4 pin 1 x System panel header 1 x Front panel audio connector AAFP 1 x USB 3 0 connector supports additional 2 USB 3 0 ports 2 x USB 2 0 connectors support additional 4 USB 2 0 ports 1 x 8 pin E...

Страница 10: ...12 PrintScreen and ASUS DRAM SPD Serial Presence Detect memory information Manageability WfM 2 0 DMI 3 0 WOL by PME PXE Support DVD Drivers ASUS utilities ASUS EZ Update Anti virus software OEM version Operating system support Windows 10 64 bit Form factor ATX Form Factor 12 x 9 6 30 5cm x 24 4cm ROG STRIX B350 F GAMING specifications summary Specifications are subject to change without notice ...

Страница 11: ...ables 4 x SATA 6Gb s cables 1 x Cable for RGB Header 80cm 1 x 4 pin Accessories 1 x I O Shield 1 x M 2 Screw package 1 x ROG cable label 1 x ROG Coaster 1 x Strix sticker 1 x Cable tie black Application DVD Support DVD Documentation User manual If any of the above items is damaged or missing contact your retailer ...

Страница 12: ... components listed above are not included in the motherboard package PC chassis Power supply unit AMD AM4 compatible CPU Fan AMD AM4 CPU DIMM SATA hard disk drive Graphics card Phillips cross screwdriver SATA optical disc drive optional 1 bag of screws ...

Страница 13: ... a safely grounded object or a metal object such as the power supply case to avoid damaging them due to static electricity Hold components by the edges to avoid touching the ICs on them Whenever you uninstall any component place it on a grounded antistatic pad or in the bag that came with the component Before you install or remove any component ensure that the ATX power supply is switched off or t...

Страница 14: ...M_A1 64bit 288 pin module DDR4 DIMM_A2 64bit 288 pin module DDR4 DIMM_B1 64bit 288 pin module DDR4 DIMM_B2 64bit 288 pin module SATA6G_34 SATA6G_56 SATA6G_12 PCIE SATA X4 V USB56 USB3 1_12 LAN_USB3_34 AIO_PUMP CHA_FAN1 CHA_FAN2 CHA_FAN3 CPU_FAN CPU_OPT 30 5cm 12in DIGI VRM COM EATX12V USB3_12 AMD B350 TPM RGB_HEADER2 RGB_HEADER1 PANEL AUDIO USB12 USB34 SOCKET AM4 2 3 4 1 5 6 2 3 11 10 9 14 15 13 1...

Страница 15: ...s 4 pin RGB_HEADER1 2 1 10 4 M 2 Socket 3 1 16 5 AM4 socket 1 4 6 DDR4 DIMM slots 1 5 7 USB 3 0 connector 20 1 pin USB3_12 1 14 8 AMD Serial ATA 6 0Gb s connector SATA6G_1 6 1 15 9 System panel connector 20 5 pin PANEL 1 17 10 Clear RTC RAM 2 pin CLRTC 1 9 11 Thermal sensor connector 2 pin T_SENSOR 1 16 12 USB 2 0 connectors 10 1 pin USB12 USB34 1 14 13 TPM connector 14 1 pin TPM 1 13 14 Serial po...

Страница 16: ...re processors Ensure that all power cables are unplugged before installing the CPU strixb350 FGAMING ROG STRIX B350 F GAMING CPU socket AM4 The AM4 socket has a different pinout from the AM3 AM2 AM2 socket Ensure that you use a CPU designed for the AM4 socket The CPU fits in only one correct orientation DO NOT force the CPU into the socket to prevent bending the pins and damaging the CPU ...

Страница 17: ...Rate 4 Dual Inline Memory Modules DIMM slots Recommended memory configurations A DDR4 module is notched differently from a DDR DDR2 or DDR3 module DO NOT install a DDR DDR2 or DDR3 memory module to the DDR4 slot strix b350 F GAMING ROG STRIX B350 F GAMING 288 pin DDR4 DIMM sockets DIMM_A1 DIMM_A2 DIMM_B1 DIMM_B2 ...

Страница 18: ...annel configuration Any excess memory from the higher sized channel is then mapped for single channel operation Always install DIMMs with the same CAS latency For optimal compatibility we recommend that you install memory modules of the same version or date code D C from the same vendor Check with the retailer to get the correct memory modules Install a 64 bit Windows OS if you want to install 4GB...

Страница 19: ...2 0 x1_2 slot PCIe 3 0 x16_2 slot PCIe 2 0 x1_3 slot PCIe 2 0 x16 slot strixb350 FGAMING PCIEX16_1 PCIEX16_2 PCIEX16_3 PCIEX1_2 PCIEX1_3 PCIEX1_1 1 1 5 Expansion slots Unplug the power cord before adding or removing expansion cards Failure to do so may cause you physical injury and damage motherboard components ...

Страница 20: ... shared SATA Controller shared HD Audio Controller shared Intel LAN shared For AMD AM4 A series Athlon Series processors IRQ assignments for this motherboard For RyzenTM processors A B C D E F G H PCIe X 16_1 shared PCIe X 16_2 shared PCIe X 16_3 shared PCIe X 1_1 shared PCIe X 1_2 shared PCIe X 1_3 shared M 2 shared APU USB3 0 XHCI Controller shared AMD Promonotry Chip XHCI Controller shared SATA...

Страница 21: ...ard battery and short the two pins again to clear the CMOS RTC RAM data After clearing the CMOS reinstall the battery strixb350 FGAMING ROG STRIX B350 F GAMING Clear RTC RAM CLRTC 3V_BAT GND PIN 1 To erase the RTC RAM 1 Turn OFF the computer and unplug the power cord 2 Use a metal object such as a screwdriver to short the two pins 3 Plug the power cord and turn ON the computer 4 Hold down the Del ...

Страница 22: ...the power supply Failure to do so may cause severe damage to the motherboard peripherals or components Actual lighting and color will vary with LED strip If your LED strip does not light up check if the RGB LED extension cable and the RGB LED strip is connected in the correct orientation and the 12V connector is aligned with the 12V header on the motherboard The LED strip will only light up when t...

Страница 23: ...ome unstable or may not boot up if the power is inadequate 1 ATX power connectors 24 pin EATXPWR 8 pin EATX12V These connectors are for ATX power supply plugs The power supply plugs are designed to fit these connectors in only one orientation Find the proper orientation and push down firmly until the connectors completely fit strixb350 FGAMING ROG STRIX B350 F GAMING ATX power connectors EATX12V 1...

Страница 24: ...supports a CPU fan of maximum 1A 12 W fan power AIO_PUMP CHA_FAN1 GND CHA FAN PWR CHA FAN IN 5V GND CHA FAN PWR CHA FAN IN 5V GND CHA FAN PWR CHA FAN IN 5V GND CHA FAN PWR CHA FAN IN 5V A C E F D C D CHA_FAN2 CHA_FAN3 F CPU_OPT CPU_FAN CPU FAN PWM CPU FAN IN CPU FAN PWR GND CPU FAN PWM CPU FAN IN CPU FAN PWR GND B A B E strixb350 FGAMING ROG STRIX B350 F GAMING Fan connectors 3 Serial port connect...

Страница 25: ...IX B350 F GAMING Analog front panel connector AAFP AGND NC SENSE1_RETUR SENSE2_RETUR PORT1 L PORT1 R PORT2 R SENSE_SEND PORT2 L HD audio compliant pin definition PIN 1 5 TPM connector 14 1 pin TPM This connector supports a Trusted Platform Module TPM system which can securely store keys digital certificates passwords and data A TPM system also helps enhance network security protects digital identi...

Страница 26: ...B_P1 USB_P1 GND NC USB 5V USB_P2 USB_P2 GND USB12 PIN 1 USB 5V USB_P3 USB_P3 GND NC USB 5V USB_P4 USB_P4 GND USB34 PIN 1 7 USB 3 0 connector 20 1 pin USB3_12 This connector allows you to connect a USB 3 0 module for additional USB 3 0 front or rear panel ports With an installed USB 3 0 module you can enjoy all the benefits of USB 3 0 including faster data transfer speeds of up to 5Gbps faster char...

Страница 27: ...TA_TXN4 GND RSATA_RXN4 RSATA_RXP4 GND SATA6G_5 GND RSATA_TXP5 RSATA_TXN5 GND RSATA_RXN5 RSATA_RXP5 GND SATA6G_1 GND RSATA_TXP1 RSATA_TXN1 GND RSATA_RXN1 RSATA_RXP1 GND SATA6G_2 GND RSATA_TXP2 RSATA_TXN2 GND RSATA_RXN2 RSATA_RXP2 GND SATA6G_6 GND RSATA_TXP6 RSATA_TXN6 GND RSATA_RXN6 RSATA_RXP6 GND SATA6G_3 GND RSATA_TXP3 RSATA_TXN3 GND RSATA_RXN3 RSATA_RXP3 GND strixb350 FGAMING ROG STRIX B350 F GA...

Страница 28: ...This socket allows you to install M 2 SSD modules strixb350 FGAMING ROG STRIX B350 F GAMING M 2 SOCKET3 M 2 SOCKET3 2280 22110 2260 2242 For AMD Ryzen Processors the M 2 SOCKET3 supports PCIe 3 0 x 4 and SATA mode M key design and type 2242 2260 2280 22110 storage devices For AMD 7th Generation A series Athlon Processors the M 2 SOCKET3 supports PCIE 3 0 x 2 and SATA mode M key design and type 224...

Страница 29: ...drive activity LED 2 pin HDD_LED This 2 pin connector is for the HDD Activity LED Connect the HDD Activity LED cable to this connector The HDD LED lights up or flashes when data is read from or written to the HDD System warning speaker 4 pin SPEAKER This 4 pin connector is for the chassis mounted system warning speaker The speaker allows you to hear system beeps and warnings ATX power button soft ...

Страница 30: ...1 18 Chapter 1 Product Introduction Chapter 1 ...

Страница 31: ... only The motherboard layout may vary with models but the installation steps are the same for all models 2 1 1 Motherboard installation 1 Install the ASUS I O Shield to the chassis rear I O panel Chapter 2 Basic Installation 2 Place the motherboard into the chassis ensuring that its rear I O ports are aligned to the chassis rear I O panel ...

Страница 32: ... Basic Installation Chapter 2 3 Place nine 9 screws into the holes indicated by circles to secure the motherboard to the chassis DO NOT overtighten the screws Doing so can damage the motherboard strix b350 F GAMING ...

Страница 33: ...U installation The AM4 socket is compatibale with AMD AM4 processors Ensure that you use a CPU designed for the AM4 socket The CPU fits in only one correct orientation DO NOT force the CPU into the socket to prevent bending the pins and damaging the CPU ...

Страница 34: ...lation Chapter 2 2 1 3 CPU heatsink and fan assembly installation Apply the Thermal Interface Material to the CPU heatsink and CPU before you install the heatsink and fan if necessary To install the CPU heatsink and fan assembly ...

Страница 35: ...ASUS ROG STRIX B350 F GAMING 2 5 Chapter 2 To uninstall the CPU heatsink and fan assembly ...

Страница 36: ...2 6 Chapter 2 Basic Installation Chapter 2 To remove a DIMM 2 1 4 DIMM installation ...

Страница 37: ...ASUS ROG STRIX B350 F GAMING 2 7 Chapter 2 2 1 5 ATX power connection Ensure to connect the 8 pin power plug ...

Страница 38: ...2 8 Chapter 2 Basic Installation Chapter 2 2 1 6 SATA device connection OR ...

Страница 39: ...STRIX B350 F GAMING 2 9 Chapter 2 2 1 7 Front I O connector USB 2 0 AAFP To install USB 2 0 connector To install front panel audio connector USB 3 0 To install USB 3 0 connector To install front panel connector ...

Страница 40: ...2 10 Chapter 2 Basic Installation Chapter 2 2 1 8 Expansion card installation To install PCIe x16 cards To install PCIe x1 cards ...

Страница 41: ...ASUS ROG STRIX B350 F GAMING 2 11 Chapter 2 2 1 9 M 2 installation ...

Страница 42: ...dset 2 channel 4 channel 6 channel 8 channel Light Blue Line In Line In Line In Side Speaker Lime Line Out Front Speaker Out Front Speaker Out Front Speaker Out Pink Mic In Mic In Mic In Mic In Orange Center Subwoofer Center Subwoofer Black Rear Speaker Out Rear Speaker Out Rear Speaker Out LAN port Speed LED Activity Link LED LAN port LED indications Activity Link LED Speed LED Status Description...

Страница 43: ...ASUS ROG STRIX B350 F GAMING 2 13 Chapter 2 Connect to Headphone and Mic Connect to Stereo Speakers 2 2 2 Audio I O connections Audio I O ports Connect to 2 channel Speakers ...

Страница 44: ...lation Chapter 2 Connect to 4 channel Speakers Connect to 6 channel Speakers If you are using Windows 10 platform use only the light blue audio port for Side Speaker Out in a 6 channel configuration Connect to 8 channel Speakers ...

Страница 45: ... system power LED on the system front panel case lights up For systems with ATX power supplies the system LED lights up when you press the ATX power button If your monitor complies with the green standards or if it has a power standby feature the monitor LED may light up or change from orange to green after the system LED turns on The system then runs the power on self tests POST While the tests a...

Страница 46: ... detected One continuous beep followed by four short beeps Hardware component failure 7 At power on hold down the Delete key to enter the BIOS Setup Follow the instructions in Chapter 3 2 4 Turning off the computer While the system is ON press the power button for less than four seconds to put the system on sleep mode or soft off mode depending on the BIOS setting Press the power button for more t...

Страница 47: ...verclocking settings advanced power management and boot device configuration that are needed for system startup in the motherboard CMOS In normal circumstances the default BIOS settings apply to most conditions to ensure optimal performance DO NOT change the default BIOS settings except in the following circumstances An error message appears on the screen during the system bootup and requests you ...

Страница 48: ...in this section are for reference purposes only and may not exactly match what you see on your screen Ensure that a USB mouse is connected to your motherboard if you want to use the mouse to control the BIOS setup program If the system becomes unstable after changing any BIOS setting load the default settings to ensure system compatibility and stability Select the Load Optimized Defaults item unde...

Страница 49: ...e following sections for the detailed configurations To access the EZ Mode click EzMode F7 or press F7 The default screen for entering the BIOS setup program can be changed Refer to the Setup Mode item in section Boot menu for details Submenu items General help Menu bar Language Hot Keys Qfan Control F6 MyFavorite F3 Scroll bar Configuration fields Last modified settings Go back to EZ Mode Display...

Страница 50: ...e menu items Submenu items A greater than sign before each item on any menu screen means that the item has a submenu To display the submenu select the item and press Enter Language This button above the menu bar contains the languages that you can select for your BIOS Click this button to select the language that you want to display in your BIOS screen My Favorites F3 This button above the menu ba...

Страница 51: ... on the screen Press the Up Down arrow keys or Page Up Page Down keys to display the other items on the screen General help At the bottom of the menu screen is a brief description of the selected item Use F12 key to capture the BIOS screen and save it to the removable storage device Configuration fields These fields show the values for the menu items If an item is user configurable you can change ...

Страница 52: ...system Selects the display language of the BIOS setup program Displays the CPU motherboard temperature CPU voltage output CPU chassis fan speed and SATA information Displays the system properties of the selected mode Click or to switch EZ System Tuning modes Loads optimized default settings Displays the CPU Fan s speed Click the button to manually tune the fans Saves the changes and resets the sys...

Страница 53: ...ally configure the operating speed of your CPU and chassis fans Click to select a fan to be configured Click to activate PWM Mode Click to undo the changes Click to apply the fan setting Click to go back to main menu Select a profile to apply to your fans Click to activate DC Mode Select to manually configure your fans ...

Страница 54: ...ly configure your fans operating speed To configure your fans 1 Select the fan that you want to configure and to view its current status 2 Click and drag the speed points to adjust the fans operating speed 3 Click Apply to save the changes then click Exit ESC Speed points Select to manually configure your fans ...

Страница 55: ...rclock your CPU and DRAM computer usage and CPU fan to their best settings OC Tuning To start OC Tuning 1 Press F11 on your keyboard or click from the BIOS screen to open EZ Tuning Wizard screen 2 Click OC then click Next 3 Select a PC scenario Daily Computing or Gaming Media Editing then click Next OC setup ...

Страница 56: ...ms My Favorites comes with several performance power saving and fast boot related items by default You can personalize this screen by adding or removing items 4 Select a Main Cooling System BOX cooler Tower cooler Water cooler or I m not sure then click Next 5 After selecting the Main Cooling System click Next then click Yes to start the OC Tuning ...

Страница 57: ... that you want to save as favorite from the submenu panel and click or press Enter on your keyboard You cannot add the following items to My Favorite items Items with submenu options User managed items such as language and boot order Configuration items such as Memory SPD Information system time and date 4 Click Exit ESC or press Esc key to close Setup Tree Map screen 5 Go to My Favorites menu to ...

Страница 58: ...configure overclocking related items Be cautious when changing the settings of the Ai Tweaker menu items Incorrect field values can cause the system to malfunction The configuration options for this section vary depending on the CPU and DIMM model you installed on the motherboard Ai Overclock Tuner This item allows you to select the CPU overclocking options to achieve the desired CPU internal freq...

Страница 59: ... menu The Advanced menu items allow you to change the settings for the CPU and other system devices Be cautious when changing the settings of the Advanced menu items Incorrect field values can cause the system to malfunction 3 6 1 AMD fTPM Configuration The items in this menu allow you to configure the TPM settings 3 6 2 CPU Configuration The items in this menu show the CPU related information tha...

Страница 60: ... This item allows you to enable or disable the SATA Device Configuration options Disabled Enabled SATA Mode This item allows you to set the SATA configuration AHCI Set to AHCI when you want the SATA hard disk drives to use the AHCI Advanced Host Controller Interface The AHCI allows the onboard storage driver to enable advanced Serial ATA features that increases storage performance on random worklo...

Страница 61: ...up at any state when the ErP Ready item is enabled Off The LEDs and RGB header s will not light up In Sleep hibernate and soft off states On LEDs will light up in S3 sleep S4 hibernate and S5 soft off states Off LEDs will not light up in S3 sleep S4 hibernate and S5 soft off states Intel LAN Controller This item allows you to enable or disable the Intel LAN controllers Configuration options On Off...

Страница 62: ...y PCI E This item allows you to enable or disable the Wake on LAN function of the onboard LAN controller or other installed PCIe LAN cards Configuration options Disabled Enabled Power On By Ring Disabled Disables Ring to generate a wake event Enabled Enables Ring to generate a wake event Power On By RTC This item allows you to enable or disable the RTC Real Time Clock to generate a wake event and ...

Страница 63: ...ct the lowest speed and configure the minimum duty cycle for each fan 3 8 Boot menu The Boot menu items allow you to change the system boot options Fast Boot Enabled Select to accelerate the boot speed Disabled Select to go back to normal boot speed The following item appears only when you set Fast Boot to Enabled Next Boot after AC Power Loss Normal Boot Returns to normal boot on the next boot af...

Страница 64: ...cy only Allows you to select the type of network devices that you want to launch Configuration options Ignore Legacy only UEFI driver first Boot from Storage Devices Legacy Only Allows you to select the type of storage devices that you want to launch Configuration options Ignore Legacy only UEFI driver first Boot from PCI E Expansion Devices Allows you to select the type of PCI E expansion devices...

Страница 65: ...ls Secure Erase is only supported on AHCI mode Ensure that SATA Mode is set to AHCI Click Advanced PCH Storage Configuration SATA Mode Selection AHCI To launch Secure Erase click Tool Secure Erase on the Advanced mode menu Check the ASUS support site for a full list of SSDs tested with Secure Erase The drive may become unstable if you run Secure Erase on an incompatible SSD The time to erase the c...

Страница 66: ...u to key in a profile name Save to Profile This item allows you to save the current BIOS settings to the BIOS Flash and create a profile Key in a profile number from one to eight press Enter and then select Yes Load Save Profile from to USB Drive This item allows you to load or save profile from your USB drive load and save profile to your USB drive 3 9 4 ASUS SPD Information This item allows you ...

Страница 67: ...EFI Shell application shellx64 efi from one of the available filesystem devices 3 11 Updating BIOS The ASUS website publishes the latest BIOS versions to provide enhancements on system stability compatibility and performance However BIOS updating is potentially risky If there is no problem using the current version of BIOS DO NOT manually update the BIOS Inappropriate BIOS updating may result to s...

Страница 68: ...USB 1 Enter the Advanced Mode of the BIOS setup program Go to the Tool menu to select ASUS EZ Flash Utility and press Enter 2 Insert the USB flash disk that contains the latest BIOS file to the USB port 3 Select via Storage Devices 4 Press Tab to switch to the Drive field 5 Press the Up Down arrow keys to find the USB flash disk that contains the latest BIOS and then press Enter 6 Press Tab to swi...

Страница 69: ...ection 3 10 Exit Menu for details To update the BIOS by Internet 1 Enter the Advanced Mode of the BIOS setup program Go to the Tool menu to select ASUS EZ Flash Utility and press Enter 2 Select via Internet 3 Press the Left Right arrow keys to select an Internet connection method and then press Enter Ensure to load the BIOS default settings to ensure system compatibility and stability Select the L...

Страница 70: ... file download the file at https www asus com support and save it to a USB flash drive Recovering the BIOS To recover the BIOS 1 Turn on the system 2 Insert the motherboard support DVD to the optical drive or the USB flash drive containing the BIOS file to the USB port 3 The utility automatically checks the devices for the BIOS file When found the utility reads the BIOS file and enters ASUS EZ Fla...

Страница 71: ...ew identical hard disk drives is required for this setup RAID 1 Data mirroring copies and maintains an identical image of data from one drive to a second drive If one drive fails the disk array management software directs all applications to the surviving drive as it contains a complete copy of the data in the other drive This RAID configuration provides data protection and increases fault toleran...

Страница 72: ... the RAID driver for the corresponding OS version Click OK 4 Follow the succeeding screen instructions to complete the installation To set up a Windows UEFI operating system under RAID mode ensure to load the UEFI driver for your optical drive 4 1 2 Installing Serial ATA hard disks The motherboard supports Serial ATA hard disk drives For optimal performance install identical drives of the same mod...

Страница 73: ... may cause harmful interference to radio communications However there is no guarantee that interference will not occur in a particular installation If this equipment does cause harmful interference to radio or television reception which can be determined by turning the equipment off and on the user is encouraged to try to correct the interference by one or more of the following measures Reorient o...

Страница 74: ...ada Cet appareil numérique de la classe B respecte toutes les exigences du Règlement sur le matériel brouilleur du Canada Le présent appareil est conforme aux normes CNR d Industrie Canada applicables aux appareils radio exempts de licence Son utilisation est sujette aux deux conditions suivantes 1 cet appareil ne doit pas créer d interférences et 2 cet appareil doit tolérer tout type d interféren...

Страница 75: ...nt to the highest standards for protecting our environment We believe in providing solutions for you to be able to responsibly recycle our products batteries other components as well as the packaging materials Please go to http csr asus com english Takeback htm for detailed recycling information in different regions Regional notice for California WARNING This product may contain chemicals known to...

Страница 76: ...ниям и другим соответствующим условиям соответствующих директив Подробную информацию пожалуйста смотрите на www asus com support Български С настоящото ASUSTeK Computer Inc декларира че това устройство е в съответствие със съществените изисквания и другите приложими постановления на свързаните директиви Пълният текст на декларацията за съответствие на ЕС е достъпна на адрес www asus com support Hr...

Страница 77: ...TIONAL America Address 800 Corporate Way Fremont CA 94539 USA Telephone 1 510 739 3777 Fax 1 510 608 4555 Web site http www asus com us Technical Support Support fax 1 812 284 0883 Telephone 1 812 282 2787 Online support http qr asus com techserv ASUS COMPUTER GmbH Germany and Austria Address Harkort Str 21 23 40880 Ratingen Germany Fax 49 2102 959931 Web site http www asus com de Online contact h...

Страница 78: ...X B350 F GAMING Conforms to the following specifications FCC Part 15 Subpart B Unintentional Radiators Supplementary Information This device complies with part 15 of the FCC Rules Operation is subject to the following two conditions 1 This device may not cause harmful interference and 2 this device must accept any interference received including interference that may cause undesired operation Repr...

Отзывы: