


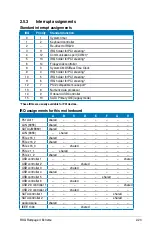


2.4.4
Removing a DIMM
Follow these steps to remove a DIMM.
1. Simultaneously press the
retaining clips outward to unlock
the DIMM.
2. Remove the DIMM from the socket.
Support the DIMM lightly with your fingers when pressing the retaining clips.
The DIMM might get damaged when it flips out with extra force.
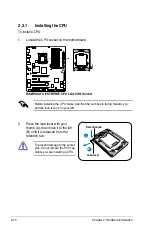
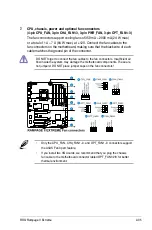
2.4.3
Installing a DIMM
DIMM notch
1
1
2
3. Firmly insert the DIMM into the
socket until the retaining clips snap
back in place and the DIMM is
properly seated.
Make sure to unplug the power supply before adding or removing DIMMs or
other system components. Failure to do so may cause severe damage to both
the motherboard and the components.
A DIMM is keyed with a notch so that it fits in only one direction. DO NOT force
a DIMM into a socket to avoid damaging the DIMM.
Unlocked retaining clip
1
DIMM notch
1. Unlock a DIMM socket by
pressing the retaining clips
outward.
2. Align a DIMM on the socket
such that the notch on the DIMM
matches the break on the socket.
Locked Retaining Clip
2
1
3
ROG Rampage II Extreme
2-21
Содержание Rampage II Extreme
Страница 1: ...Motherboard Rampage II Extreme ...
Страница 16: ...ROG Rampage II Extreme Chapter summary 1 1 1 Welcome 1 1 1 2 Package contents 1 1 1 3 Special features 1 2 ...
Страница 26: ...1 10 Chapter 1 Product Introduction ...
Страница 80: ...2 52 Chapter 2 Hardware information ...
Страница 178: ...ROG Rampage II Extreme Chapter summary 5 5 1 ATI CrossFireX technology 5 1 5 2 NVIDIA SLI technology 5 6 ...
Страница 190: ...5 12 Chapter 5 Multiple GPU technology support ...
Страница 191: ...A Appendix Debug code table The Appendix lists the debug code table for the LCD Poster ...
Страница 192: ...ROG Rampage II Extreme Chapter summary A Debug code table A 1 ...
Страница 196: ...A 4 Appendix Debug code table ...


