


ASUS P9D-I
5-9
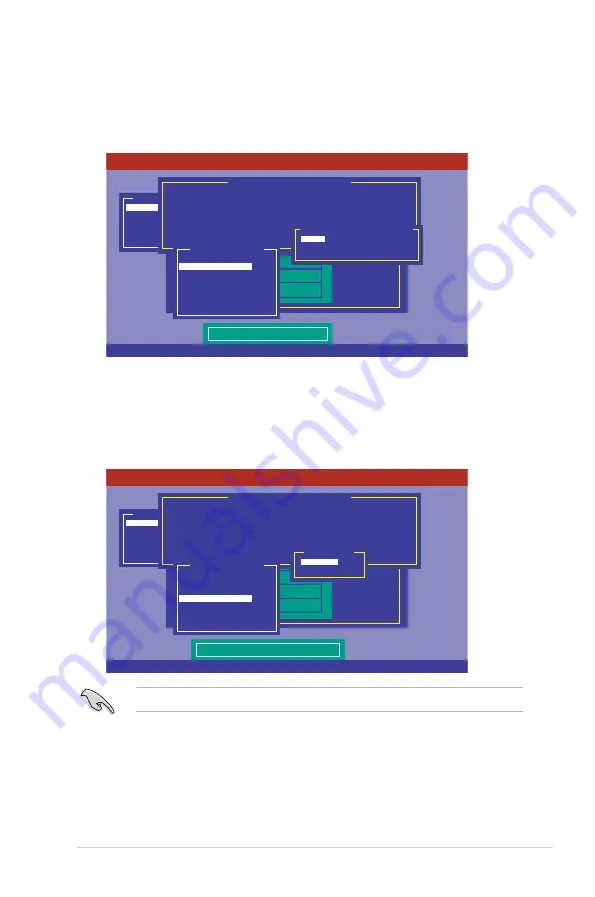
8.
Select
Units
from the
Virtual Drive
sub-menu then press <Enter>.
9.
Select the units for the virtual drive size from the
Select Units For VD Size
sub-menu then
press <Enter>. The virtual drive size is automatically allocated and not configurable.
Enabling DWC can improve the performance, but with the risk of data loss.
When creating a
RAID 0
set, proceed to step 12.
10. When creating a
RAID 1
or a
RAID 10
set, select
DWC
from the
Virtual Drive
menu,
then press <Enter>.
11. Select
On
to enable the
Disk Write Cache (DWC)
setting then press <Enter>.
Use Cursor Keys To Navigate Between Items And Press Enter To Select An Option
LSI Software RAID Configuration Utility Ver C.05 Oct 26,2011
BIOS Version A.11.02090932R
Select Units For VD Size
Configure
Initialize
Objects
Rebuild
Check Consistency
Management Menu
Easy Configuration - ARRAY SELECTION MENU
ONLIN A00-00
ONLIN A00-01
READY
READY
0
1
2
3
PORT #
Virtual Drive(s) Configured
LD RAID Size #Stripes StripSz Status
0 1 148.580GB 2 64KB ONLINE
MB
GB
TB
Select Units For VD Size
RAID = 1
Units= MB
Size = 152146MB
DWC = OFF
RA = On
Accept
SPAN = NO
Virtual Drive 0
Use Cursor Keys To Navigate Between Items And Press Enter To Select An Option
LSI Software RAID Configuration Utility Ver C.05 Oct 26,2011
BIOS Version A.11.02090932R
Disk Write Cache Setting of VD
Configure
Initialize
Objects
Rebuild
Check Consistency
Management Menu
Easy Configuration - ARRAY SELECTION MENU
ONLIN A00-00
ONLIN A00-01
READY
READY
0
1
2
3
PORT #
Virtual Drive(s) Configured
LD RAID Size #Stripes StripSz Status
0 1 148.580GB 2 64KB ONLINE
Off
On
Change DWC
RAID = 1
Units= MB
Size = 152146MB
DWC = OFF
RA = On
Accept
SPAN = NO
Virtual Drive 0
Содержание P9D-I
Страница 1: ...Motherboard P9D I ...
Страница 14: ...xiv ...
Страница 15: ...Chapter 1 Product Introduction ...
Страница 21: ...Chapter 2 Hardware Information ...
Страница 25: ...ASUS P9D I 2 5 2 2 3 Motherboard layout ...
Страница 49: ...Chapter 3 Powering Up ...
Страница 53: ...Chapter 4 BIOS setup ...
Страница 91: ...Chapter 5 RAID Configuration ...
Страница 138: ...5 48 Chapter 5 RAID configuration ...
Страница 139: ...Chapter 6 Driver installation ...
Страница 164: ...6 26 Chapter 6 Driver installation 8 Click Install to continue 9 When done click Finish to complete the installation ...
Страница 169: ...ASUS P9D I 6 31 7 Click NEXT when the installation of driver is complete 8 Click Finish to complete the installation ...
Страница 174: ...6 36 Chapter 6 Driver installation ...
Страница 175: ...Appendix A Reference Information ...
Страница 177: ...ASUS P9D I A 3 A 1 P9D I block diagram ...
Страница 178: ...A 4 Appendix A Reference information ...


