background image

5 - 1 6

5 - 1 6

5 - 1 6

5 - 1 6

5 - 1 6

C h a p t e r   5 :   S o f t w a r e   s u p p o r t

C h a p t e r   5 :   S o f t w a r e   s u p p o r t

C h a p t e r   5 :   S o f t w a r e   s u p p o r t

C h a p t e r   5 :   S o f t w a r e   s u p p o r t

C h a p t e r   5 :   S o f t w a r e   s u p p o r t

S m a r t   J a c k   S e t t i n g

S m a r t   J a c k   S e t t i n g

S m a r t   J a c k   S e t t i n g

S m a r t   J a c k   S e t t i n g

S m a r t   J a c k   S e t t i n g. You can configure the function of the rear panel,
front panel, and digital I/O audio ports from this section. Click the 

 Smart

Jack setting button that corresponds to the port that you wish to
configure.

M o d e   S e l e c t i o n

M o d e   S e l e c t i o n

M o d e   S e l e c t i o n

M o d e   S e l e c t i o n

M o d e   S e l e c t i o n. This section allows you to set the Speaker Tester or the
Digital Signal Processing (DSP). Click the button to change the audio
modes.

S p e a k e r   T e s t e r   a n d   A u d i o   D S P   S e t t i n g

S p e a k e r   T e s t e r   a n d   A u d i o   D S P   S e t t i n g

S p e a k e r   T e s t e r   a n d   A u d i o   D S P   S e t t i n g

S p e a k e r   T e s t e r   a n d   A u d i o   D S P   S e t t i n g

S p e a k e r   T e s t e r   a n d   A u d i o   D S P   S e t t i n g. You can configure your
speaker setup and the audio DSP settings in this section. Click the P l a y  

P l a y  

P l a y  

P l a y  

P l a y   or

the S t o p  

S t o p  

S t o p  

S t o p  

S t o p  button to listen to the speakers or click the V o l u m e  

V o l u m e  

V o l u m e  

V o l u m e  

V o l u m e  button to

adjust the speakers’ volume.

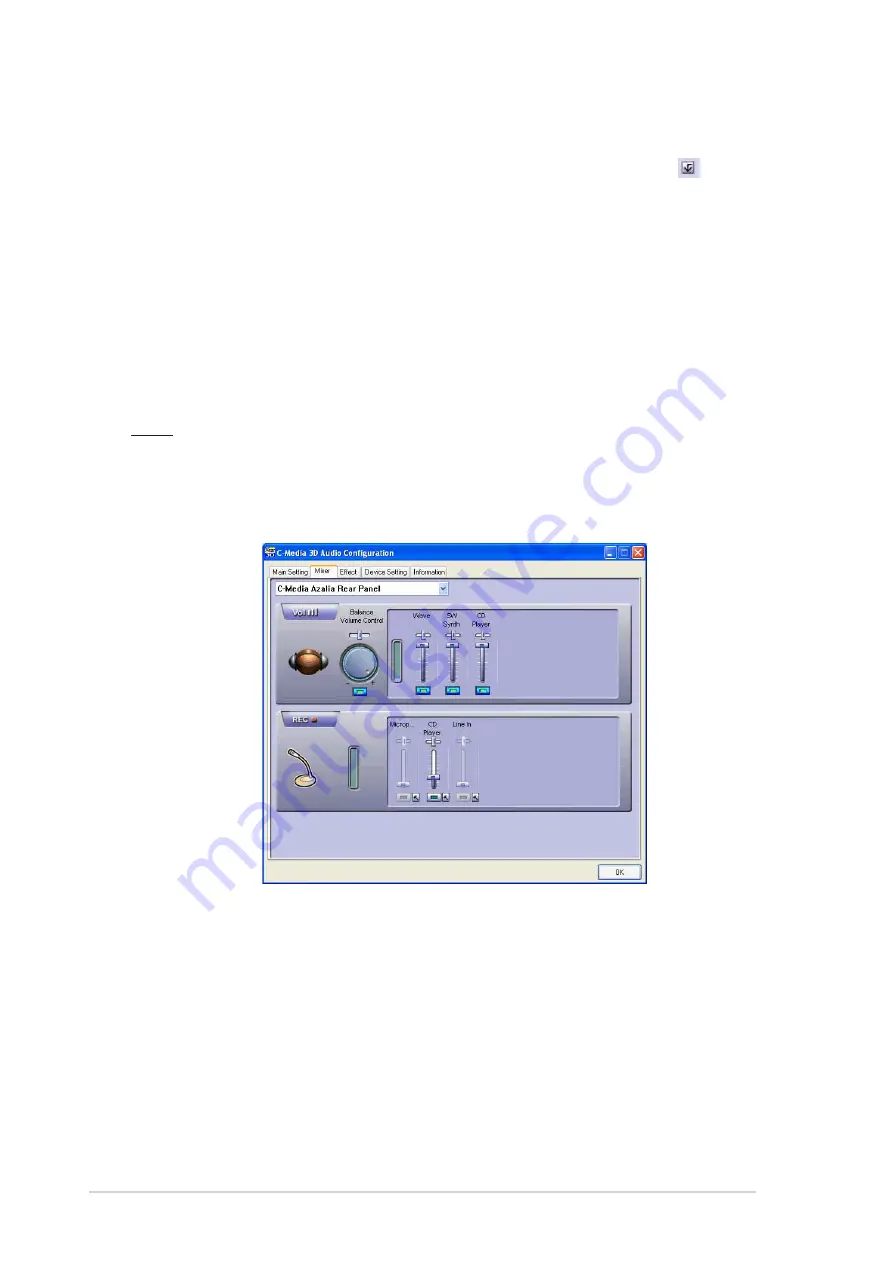
Mixer

The M i x e r  

M i x e r  

M i x e r  

M i x e r  

M i x e r  tab allows you to adjust the audio input and the recording

output volume of devices connected to the system rear panel and front
panel audio ports.

Содержание P5GD2 PREMIUM

Страница 1: ...Motherboard P5GD2 Premium ...

Страница 2: ...EMPLOYEES OR AGENTS BE LIABLE FOR ANY INDIRECT SPECIAL INCIDENTAL OR CONSEQUENTIAL DAMAGES INCLUDING DAMAGES FOR LOSS OF PROFITS LOSS OF BUSINESS LOSS OF USE OR DATA INTERRUPTION OF BUSINESS AND THE LIKE EVEN IF ASUS HAS BEEN ADVISED OF THE POSSIBILITY OF SUCH DAMAGES ARISING FROM ANY DEFECT OR ERROR IN THIS MANUAL OR PRODUCT SPECIFICATIONS AND INFORMATION CONTAINED IN THIS MANUAL ARE FURNISHED FO...

Страница 3: ... 1 3 3 Innovative ASUS features 1 6 Chapter 2 Hardware information Chapter 2 Hardware information Chapter 2 Hardware information Chapter 2 Hardware information Chapter 2 Hardware information 2 1 Before you proceed 2 1 2 2 Motherboard overview 2 2 2 2 1 Placement direction 2 2 2 2 2 Screw holes 2 2 2 2 3 ASUS Stack Cool 2 3 2 2 4 Motherboard layout 2 4 2 2 5 Layout Contents 2 5 2 3 Central Processi...

Страница 4: ...e dual function power switch 3 2 3 3 ASUS POST Reporter 3 3 3 3 1 Vocal POST messages 3 3 3 3 2 Winbond Voice Editor 3 5 Chapter 4 BIOS setup Chapter 4 BIOS setup Chapter 4 BIOS setup Chapter 4 BIOS setup Chapter 4 BIOS setup 4 1 Managing and updating your BIOS 4 1 4 1 1 Creating a bootable floppy disk 4 1 4 1 2 AFUDOS utility 4 2 4 1 3 ASUS CrashFree BIOS 2 utility 4 5 4 1 4 ASUS EZ Flash utility...

Страница 5: ...on 4 27 4 4 7 PCI PnP 4 29 4 4 8 Speech Configuration 4 30 4 5 Power menu 4 31 4 5 1 Suspend Mode 4 31 4 5 2 Repost Video on S3 Resume 4 31 4 5 3 ACPI 2 0 Support 4 31 4 5 4 ACPI APIC Support 4 31 4 5 5 APM Configuration 4 32 4 5 6 Hardware Monitor 4 34 4 6 Boot menu 4 36 4 6 1 Boot Device Priority 4 36 4 6 2 Boot Settings Configuration 4 37 4 6 3 Security 4 38 4 7 Exit menu 4 41 Chapter 5 Softwar...

Страница 6: ...ftware information 5 12 5 4 1 ASUS MyLogo2 5 12 5 4 2 AI NET 2 5 14 Using the Virtual Cable Tester 5 14 5 4 3 C Media 3D audio configuration 5 15 5 5 RAID configurations 5 20 5 5 1 Installing hard disks 5 21 5 5 2 Silicon Image RAID configurations 5 22 5 5 3 Intel RAID configurations 5 32 5 5 4 ITE 8212F RAID configurations 5 36 5 6 Creating a RAID driver disk 5 42 Contents ...

Страница 7: ...e user is encouraged to try to correct the interference by one or more of the following measures Reorient or relocate the receiving antenna Increase the separation between the equipment and receiver Connect the equipment to an outlet on a circuit different from that to which the receiver is connected Consult the dealer or an experienced radio TV technician for help Canadian Department of Communica...

Страница 8: ... correct voltage in your area If you are not sure about the voltage of the electrical outlet you are using contact your local power company If the power supply is broken do not try to fix it by yourself Contact a qualified service technician or your retailer Operation safety Operation safety Operation safety Operation safety Operation safety Before installing the motherboard and adding devices on ...

Страница 9: ...ST messages and ways of shutting down the system Chapter 4 BIOS setup Chapter 4 BIOS setup Chapter 4 BIOS setup Chapter 4 BIOS setup Chapter 4 BIOS setup This chapter tells how to change system settings through the BIOS Setup menus Detailed descriptions of the BIOS parameters are also provided Chapter 5 Software support Chapter 5 Software support Chapter 5 Software support Chapter 5 Software suppo...

Страница 10: ...s and additional information to help you complete a task IMPORTANT IMPORTANT IMPORTANT IMPORTANT IMPORTANT Instructions that you MUST follow to complete a task Bold text Bold text Bold text Bold text Bold text Indicates a menu or an item to select Italics Used to emphasize a word or a phrase Key Keys enclosed in the less than and greater than sign means that you must press the enclosed key Example...

Страница 11: ...ller Hub MCH Southbridge Intel ICH6R 800 533 MHz Dual channel memory architecture 4 x 240 pin DIMM sockets support unbufferred non ECC 533 400 MHz DDR2 memory modules Supports up to 4 GB system memory Native DDR2 600 support 1 x PCI Express x16 slot for discrete graphics card 3 x PCI Express x1 slots 2 x PCI slots Intel ICH6R Southbridge supports 1 x Ultra DMA 100 66 33 4 x Serial ATA with RAID 0 ...

Страница 12: ...NOS Non delay Overclocking System feature ASUS AI Overclocking Intelligent CPU frequency tuner ASUS C P R CPU Parameter Recall CPU Memory and PCI Express voltage adjustable Stepless Frequency Selection SFS from 100 MHz up to 400 MHz at 1 MHz increment Adjustable FSB DDR2 ratio with fixed PCI PCI E frequencies T1 1394b controller supports 2 x IEEE 1394b connectors 1 x IEEE 1394a port Supports up to...

Страница 13: ...nnectors 1 x CPU fan connector 1 x Power fan connector 2 x Chassis fan connector 1 x Serial port connector COM port 1 x 24 pin ATX power connector 1 x 4 pin ATX 12 V power connector 2 x USB 2 0 connectors for 4 additional USB 2 0 ports 1 x Optical drive audio connector 2 x IEEE 1394b connectors 1 x GAME MIDI connector 1 x Chassis intrusion connector 1 x Front panel audio connector 1 x Gigabit LAN ...

Страница 14: ...x i v x i v x i v x i v x i v ...

Страница 15: ...1 Product introduction This chapter describes the motherboard features and the new technologies it supports ...

Страница 16: ...ASUS P5GD2 Premium ASUS P5GD2 Premium ASUS P5GD2 Premium ASUS P5GD2 Premium ASUS P5GD2 Premium Chapter summary 1 1 Welcome 1 1 1 2 Package contents 1 1 1 3 Special features 1 2 ...

Страница 17: ...contact your retailer 1 2 Package contents Check your motherboard package for the following items Motherboard Motherboard Motherboard Motherboard Motherboard ASUS P5GD2 Premium motherboard I O modules I O modules I O modules I O modules I O modules IEEE1394b 2 ports and RJ 45 1 port module Serial port module COM port Serial ATA extension 2 ports module USB 2 0 2 ports and GAME 1 port module Cables...

Страница 18: ...ocessor in the 775 land package with 533 800MHz front side bus FSB dual channel DDR2 at speeds of up to 533MHz and PCI Express x16 lane port for graphics card The Intel 915P MCH platform is compliant to the Direct Media Interface DMI and supports the sixth generation I O Controller Hub ICH6 DDR2 memory support DDR2 memory support DDR2 memory support DDR2 memory support DDR2 memory support The moth...

Страница 19: ...he PCI bus PCI Express features point to point serial interconnections between devices and allows higher clockspeeds by carrying data in packets This high speed interface is software compatible with existing PCI specifications See page 2 18 for details 8 channel high definition audio 8 channel high definition audio 8 channel high definition audio 8 channel high definition audio 8 channel high defi...

Страница 20: ...ology The motherboard implements the Universal Serial Bus USB 2 0 specification dramatically increasing the connection speed from the 12 Mbps bandwidth on USB 1 1 to a fast 480 Mbps on USB 2 0 USB 2 0 is backward compatible with USB 1 1 See page 2 23 and 2 29 for details Dual Gigabit LAN and wireless LAN solutions Dual Gigabit LAN and wireless LAN solutions Dual Gigabit LAN and wireless LAN soluti...

Страница 21: ...IEEE 802 11g compliant wireless LAN adapter that allows data transmission of up to 54 Mbps using the 2 4 GHz frequency band ASUS provides full software application support and a user friendly wizard to help you set up your wireless local area network effortlessly The ASUS WiFi g is backward compatible with IEEE 802 11b devices See page 2 23 AI NOS Non Delay Overclocking System AI NOS Non Delay Ove...

Страница 22: ...upport CD in case when the BIOS codes and data are corrupted This protection eliminates the need to buy a replacement ROM chip See details on page 4 5 ASUS Q Fan 2 technology ASUS Q Fan 2 technology ASUS Q Fan 2 technology ASUS Q Fan 2 technology ASUS Q Fan 2 technology The ASUS Q Fan 2 technology smartly adjusts the fan speeds according to the system loading to ensure quiet cool and efficient ope...

Страница 23: ... Hardware information This chapter lists the hardware setup procedures that you have to perform when installing system components It includes description of the jumpers and connectors on the motherboard ...

Страница 24: ...P5GD2 Premium ASUS P5GD2 Premium ASUS P5GD2 Premium Chapter summary 2 1 Before you proceed 2 1 2 2 Motherboard overview 2 2 2 3 Central Processing Unit CPU 2 7 2 4 System memory 2 13 2 5 Expansion slots 2 16 2 6 Jumpers 2 19 2 7 Connectors 2 22 ...

Страница 25: ...tatic electricity Hold components by the edges to avoid touching the ICs on them Whenever you uninstall any component place it on a grounded antistatic pad or in the bag that came with the component Before you install or remove any component ensure Before you install or remove any component ensure Before you install or remove any component ensure Before you install or remove any component ensure B...

Страница 26: ...rd 2 2 1 2 2 1 2 2 1 2 2 1 2 2 1 Placement direction Placement direction Placement direction Placement direction Placement direction When installing the motherboard make sure that you place it into the chassis in the correct orientation The edge with external ports goes to the rear part of the chassis as indicated in the image below 2 2 2 2 2 2 2 2 2 2 2 2 2 2 2 Screw holes Screw holes Screw holes...

Страница 27: ...y cooling to the motherboard Stack Cool is a mini PCB installed under the motherboard CPU socket to conduct heat away from motherboard components Stack Cool effectively lowers the motherboard temperature by as much as 10ºC Motherboard holes Motherboard holes Motherboard holes Motherboard holes Motherboard holes for the CPU fan and for the CPU fan and for the CPU fan and for the CPU fan and for the...

Страница 28: ... In USB2 0 T USB3 B USB4 Top RJ 45 1394 Top USB1 USB2 Bottom Below Center Subwoofer Center Side Speaker Out Top Rear Speaker Out EATXPWR1 PANEL1 CHASSIS1 GAME1 USB78 USB56 USBPW56 USBPW78 COM1 SEC_RAID1 PRI_RAID1 CLRTC1 SATA4 SATA2 SATA3 SATA1 CHA_FAN1 SATA_RAID1 SATA_RAID2 SATA_RAID3 SATA_RAID4 LAN2 PCIEX1_1 PCIEX1_2 PCIEX1_3 PCI2 PCI3 IE1394B_1 IE1394B_2 Intel 915P Intel ICH6R PARALLEL PORT MS1 ...

Страница 29: ...USBPW34 USBPW56 USBPW78 2 20 3 Keyboard power 3 pin KBPWR1 2 21 Rear panel connectors Rear panel connectors Rear panel connectors Rear panel connectors Rear panel connectors P a g e P a g e P a g e P a g e P a g e 1 Parallel port 2 22 2 IEEE 1394 port 2 22 3 RJ 45 port 2 22 4 Rear Speaker Out port gray 2 22 5 Side Speaker Out port black 2 22 6 Line In port light blue 2 22 7 Line Out port lime 2 22...

Страница 30: ...PU fan connector 4 pin CPU_FAN1 2 28 8 Power fan connector 3 pin PWR_FAN1 2 28 9 Chassis fan connector 3 pin CHA_FAN1 2 28 10 Chassis fan 2 connector 3 pin CHA_FAN2 2 28 11 Serial port connector 10 1 pin COM1 2 29 12 USB headers 10 1 USB56 USB78 2 29 13 ATX power connector 24 pin EATXPWR1 2 30 14 ATX 12V power connector 4 pin ATX12V1 2 30 15 Optical audio connector 4 pin CD 2 31 16 GAME MIDI conne...

Страница 31: ...documentation follow the latter Upon purchase of the motherboard make sure that the PnP cap is on the socket and the socket pins are not bent Contact your retailer immediately if the PnP cap is missing or if you see any damage to the PnP cap socket pins motherboard components ASUS will shoulder the cost of repair only if the damage is shipment transit related Keep the cap after installing the moth...

Страница 32: ...the socket The socket alignment key should fit into the CPU notch Alignment key Alignment key Alignment key Alignment key Alignment key Gold triangle mark Gold triangle mark Gold triangle mark Gold triangle mark Gold triangle mark Load plate Load plate Load plate Load plate Load plate A B 2 Press the load lever with your thumb A and move it to the left B until it is released from the retention tab...

Страница 33: ...XP 2003 Server and Linux 2 4 x kernel and later versions only Under Linux use the Hyper Threading compiler to compile the code If you are using any other operating systems disable the Hyper Threading Technology item in the BIOS to ensure system stability and performance Installing Windows XP Service Pack 1 is recommended Make sure to enable the Hyper Threading Technology item in BIOS before instal...

Страница 34: ...allling the CPU heatsink and fan Installling the CPU heatsink and fan The Intel Pentium 4 LGA775 processor requires a specially designed heatsink and fan assembly to ensure optimum thermal condition and performance Install the motherboard to the chassis before you install the CPU fan and heatsink assembly When you buy a boxed Intel Pentium 4 processor the package includes the CPU fan and heatsink ...

Страница 35: ...y in place 3 Rotate the push pins clockwise to lock 4 When the fan and heatsink assembly is in place connect the CPU fan cable to the connector on the motherboard labeled CPU_FAN1 Do not forget to connect the CPU fan connector Hardware monitoring errors can occur if you fail to plug this connector P5GD2 PREMIUM P5GD2 PREMIUM CPU Fan connector CPU_FAN1 GND CPU FAN PWR CPU FAN IN CPU FAN PWM ...

Страница 36: ... MB and 1 GB unbuffered non ECC DDR2 DIMMs into the DIMM sockets using the memory configurations in this section For dual channel configuration the total size of memory module s installed per channel must be the same DIMM_A1 DIMM_B1 DIMM_A2 DIMM_B2 Always install DIMMs with the same CAS latency For optimum compatibility it is recommended that you obtain memory modules from the same vendor Refer to...

Страница 37: ...MICRON MT16HTF6464AY 53EB2 DS 4FBIID9CHM 512MB MICRON MT16HTF6464AG 53EB1 DS 3TBIIZ9BQT 512MB MICRON MT16HTF6464AG 53EB2 DS 4FBIID9BQM 256MB MICRON N A SS 4DBIIZ9BQT 1024MB MICRON MT16HTF12864AY 53EA1 DS 4JAIID9CRZ 512MB Hynix HYMP564U648 C4 SS HY5PS12821F C4 1024MB Hynix HYMP512U648 C4 DS HY5PS12821F C4 1024MB Hynix HYMP512U648 C4 DS HY5PS12821FP C4 512MB KINGMAX KLBC28K 38MP4 DS 4IBIID9BQM 512MB...

Страница 38: ...53EB2 DS 4FBIID9BQM 1024MB MICRON MT16HTF12864AY 53EA1 DS 4JAIID9CRZ 1024MB Kingston KVR533D2N4 1G DS E5108AB 5C E 256MB Kingston KVR533D2N4 256 SS HYB18T512160AC 3 7 1024MB Hynix HYMP512U648 C4 DS HY5PS12821FP C4 256MB MICRON MT8HTF3264AY 53EB3 SS 4FBIID9CHM 512MB MICRON MT16HTF6464AY 53EB2 DS 4FBIID9CHM Qualified DDR2 533 with 600 MHz overclocking capability Qualified DDR2 533 with 600 MHz overc...

Страница 39: ... 2 4 4 2 4 4 2 4 4 2 4 4 Removing a DIMM Removing a DIMM Removing a DIMM Removing a DIMM Removing a DIMM Follow these steps to remove a DIMM 1 Simultaneously press the retaining clips outward to unlock the DIMM 2 Remove the DIMM from the socket A DDR2 DIMM is keyed with a notch so that it fits in only one direction Do not force a DIMM into a socket to avoid damaging the DIMM The DDR2 DIMM sockets ...

Страница 40: ...a chassis 3 Remove the bracket opposite the slot that you intend to use Keep the screw for later use 4 Align the card connector with the slot and press firmly until the card is completely seated on the slot 5 Secure the card to the chassis with the screw you removed earlier 6 Replace the system cover 2 5 2 2 5 2 2 5 2 2 5 2 2 5 2 Configuring an expansion card Configuring an expansion card Configur...

Страница 41: ...3 8 Numeric Data Processor 14 9 Primary IDE Channel 15 10 Secondary IDE Channel These IRQs are usually available for ISA or PCI devices IRQ assignments for this motherboard IRQ assignments for this motherboard IRQ assignments for this motherboard IRQ assignments for this motherboard IRQ assignments for this motherboard A A A A A B B B B B C C C C C D D D D D E E E E E F F F F F G G G G G H H H H H...

Страница 42: ... 5 2 5 5 2 5 5 2 5 5 2 5 5 PCI Express x16 slot PCI Express x16 slot PCI Express x16 slot PCI Express x16 slot PCI Express x16 slot This motherboard supports PCI Express x16 graphic cards that comply with the PCI Express specifications The figure shows a graphics card installed on the PCI Express x16 slot 2 5 6 2 5 6 2 5 6 2 5 6 2 5 6 PCI Express x1 slot PCI Express x1 slot PCI Express x1 slot PCI...

Страница 43: ...cord 2 Remove the onboard battery 3 Move the jumper cap from pins 1 2 default to pins 2 3 Keep the cap on pins 2 3 for about 5 10 seconds then move the cap back to pins 1 2 4 Re install the battery 5 Plug the power cord and turn ON the computer 6 Hold down the Del key during the boot process and enter BIOS setup to re enter data P5GD2 Premium 1 2 2 3 P5GD2 Premium Clear RTC RAM CLRTC1 Normal Clear...

Страница 44: ...ed system running in low power mode using the connected USB devices Set to 5VSB to wake up from S3 and S4 sleep modes no power to CPU DRAM in slow refresh power supply in reduced power mode The USBPWR12 and USBPWR34 jumpers are for the rear USB ports The USBPWR56 and USBPWR78 jumper is for the internal USB connectors that you can connect to additional USB ports The USB device wake up feature requi...

Страница 45: ...Keyboard power 3 pin KBPWR1 This jumper allows you to enable or disable the keyboard wake up feature Set this jumper to pins 2 3 5VSB if you wish to wake up the computer when you press a key on the keyboard the default is the Space Bar This feature requires an ATX power supply that can supply at least 1A on the 5VSB lead and a corresponding setting in the BIOS P5GD2 Premium P5GD2 Premium Keyboard ...

Страница 46: ... Rear Speaker Out port gray Rear Speaker Out port gray This port connects the rear speakers on a 4 channel 6 channel or 8 channel audio configuration 5 5 5 5 5 Side Speaker Out port black Side Speaker Out port black Side Speaker Out port black Side Speaker Out port black Side Speaker Out port black This port connects the side speakers in an 8 channel audio configuration 6 6 6 6 6 Line In port ligh...

Страница 47: ... S PDIF Out port Optical S PDIF Out port Optical S PDIF Out port Optical S PDIF Out port This port connects an external audio output device via an optical S PDIF cable 15 15 15 15 15 Coaxial S PDIF Out port Coaxial S PDIF Out port Coaxial S PDIF Out port Coaxial S PDIF Out port Coaxial S PDIF Out port This port connects an external audio output device via a coaxial S PDIF cable 16 16 16 16 16 PS 2...

Страница 48: ...IDE connector NOTE Orient the red markings usually zigzag on the IDE ribbon cable to PIN 1 PRI_IDE1 2 7 2 2 7 2 2 7 2 2 7 2 2 7 2 Internal connectors Internal connectors Internal connectors Internal connectors Internal connectors 1 1 1 1 1 Floppy disk drive connector 34 1 pin FLOPPY Floppy disk drive connector 34 1 pin FLOPPY Floppy disk drive connector 34 1 pin FLOPPY Floppy disk drive connector ...

Страница 49: ...N 1 SEC_RAID1 PIN 1 These connectors are set to IDE mode by default In IDE mode you can connect IDE devices to these connectors such as boot data hard disk drives or optical drives If you intend to create an IDE RAID set using these connectors set the ITE8212F Controller ITE8212F Controller ITE8212F Controller ITE8212F Controller ITE8212F Controller item in the BIOS to RAID Mode See section 4 4 6 ...

Страница 50: ...n Serial ATA Important notes on Serial ATA Important notes on Serial ATA These connectors support the Intel Matrix Storage Technology The Serial ATA RAID feature RAID 0 RAID 1 is available only if you are using Windows 2000 XP Install the Windows 2000 Service Pack 4 or the Windows XP Service Pack1 when using Serial ATA Use only 2 Serial ATA RAID connectors for a RAID 0 or RAID 1 set When using the...

Страница 51: ...wise you cannot enter the Silicon Image RAID utility and Serial ATA BIOS setup during POST You can only create a RAID 5 and JBOD configuration using the SATALink Serial ATA RAID Management software See section 5 2 2 Silicon Image RAID Configurations for details The RAID 5 driver is not Windows Hardware Quality Labs WHQL certified All four Serial ATA ports are master ports You can install Serial AT...

Страница 52: ...AN1 CHA_FAN2 CHA_FAN2 CHA_FAN2 CHA_FAN2 CHA_FAN2 The fan connectors support cooling fans of 350mA 2000mA 24 W max or a total of 1A 3 48A 41 76 W max at 12V Connect the fan cables to the fan connectors on the motherboard making sure that the black wire of each cable matches the ground pin of the connector P5GD2 PREMIUM P5GD2 PREMIUM Fan connectors CPU_FAN1 CHA_FAN1 PWR_FAN1 GND Rotation 12V GND Rot...

Страница 53: ...ct a 1394 cable 1394 cable 1394 cable 1394 cable 1394 cable to the USB connectors Doing so will damage the motherboard 8 8 8 8 8 USB connectors 10 1 pin USB56 USB78 USB connectors 10 1 pin USB56 USB78 USB connectors 10 1 pin USB56 USB78 USB connectors 10 1 pin USB56 USB78 USB connectors 10 1 pin USB56 USB78 These connectors are for USB 2 0 ports Connect the USB GAME module cable to any of these co...

Страница 54: ... when configuring a system with more power consuming devices The system may become unstable or may not boot up if the power is inadequate The ATX 12 V Specification 2 0 compliant 350 W PSU passed the motherboard power requirement test with the following configuration CPU Intel Pentium 4 3 6 GHz Memory 512 MB DDR2 x 4 Grpahics card PCI Express x16 Nvidia EN5900 Parallel ATA devices IDE hard disk dr...

Страница 55: ...olts 5 Volts 5 Volts 3 Volts 12 Volts Ground Ground Ground PSON Ground 5 Volts 12 Volts 3 Volts 5 Volts Ground P5GD2 Premium CD audio connector CD Right Audio Channel Left Audio Channel Ground Ground 11 11 11 11 11 GAME MIDI port connector 16 1 pin GAME1 GAME MIDI port connector 16 1 pin GAME1 GAME MIDI port connector 16 1 pin GAME1 GAME MIDI port connector 16 1 pin GAME1 GAME MIDI port connector ...

Страница 56: ...5GD2 Premium P5GD2 Premium IEEE 1394 Connectors IE1394B_2 1 TPA1 GND TPB1 12V GND TPA1 GND TPB1 12V IE1394B_1 1 TPA2 GND TPB2 12V GND TPA2 GND TPB2 12V 13 13 13 13 13 Gigabit LAN port connector 16 pin LAN2 Gigabit LAN port connector 16 pin LAN2 Gigabit LAN port connector 16 pin LAN2 Gigabit LAN port connector 16 pin LAN2 Gigabit LAN port connector 16 pin LAN2 This connector is for a Gigabit LAN RJ...

Страница 57: ...ts 5 Volts 3 Volts 12 Volts Ground Ground Ground PSON Ground 5 Volts 12 Volts 3 Volts 5 Volts Ground P5GD2 Premium Chassis intrusion connector CHASSIS1 5VSB_MB Chassis Signal GND Default 14 14 14 14 14 Front panel audio connector 10 1 pin AAFP Front panel audio connector 10 1 pin AAFP Front panel audio connector 10 1 pin AAFP Front panel audio connector 10 1 pin AAFP Front panel audio connector 10...

Страница 58: ...d 2 pin IDE_LED Hard disk drive activity Red 2 pin IDE_LED Hard disk drive activity Red 2 pin IDE_LED Hard disk drive activity Red 2 pin IDE_LED This 2 pin connector is for the HDD Activity LED Connect the HDD Activity LED cable to this connector The IDE LED lights up or flashes when data is read from or written to the HDD System warning speaker Orange 4 pin SPEAKER System warning speaker Orange 4...

Страница 59: ...3 Powering up This chapter describes the power up sequence the vocal POST messages and ways of shutting down the system ...

Страница 60: ... P5GD2 Premium ASUS P5GD2 Premium ASUS P5GD2 Premium ASUS P5GD2 Premium ASUS P5GD2 Premium Chapter summary 3 1 Starting up for the first time 3 1 3 2 Powering off the computer 3 2 3 3 ASUS POST Reporter 3 3 ...

Страница 61: ...or LED may light up or switch between orange and green after the system LED turns on The system then runs the power on self tests or POST While the tests are running the BIOS beeps see BIOS beep codes table below or additional messages appear on the screen If you do not see anything within 30 seconds from the time you turned on the power the system may have failed a power on test Check the jumper ...

Страница 62: ...dows shuts down If you are using Windows XP 1 Click the Start Start Start Start Start button then select Turn Off Computer Turn Off Computer Turn Off Computer Turn Off Computer Turn Off Computer 2 Click the Turn Off Turn Off Turn Off Turn Off Turn Off button to shut down the computer 3 The power supply should turn off after Windows shuts down 3 2 2 3 2 2 3 2 2 3 2 2 3 2 2 Using the dual function p...

Страница 63: ...led Install a supported processor to the CPU socket See section 2 3 Central Processing Unit CPU for details System failed CPU test Check the CPU if properly installed Call ASUS technical support for assistance See the ASUS contact information on the inside front cover of this user guide System failed memory test Install supported DDR2 DIMMs into the memory sockets Check if the DIMMs on the DIMM so...

Страница 64: ...er you apply power to the system Make sure that your CPU fan supports the fan speed detection function CPU voltage out of range Check your power supply and make sure it is not defective Call ASUS technical support for assistance See the ASUS contact information on the inside front cover of this user guide Computer now booting from operating No action required system You can enable or disable the A...

Страница 65: ...rams Winbond Voice Editor Voice Editor All Programs Winbond Voice Editor Voice Editor All Programs Winbond Voice Editor Voice Editor All Programs Winbond Voice Editor Voice Editor All Programs Winbond Voice Editor Voice Editor The Winbond Voice Editor screen appears Playing the default wave files Playing the default wave files Playing the default wave files Playing the default wave files Playing t...

Страница 66: ...anging the default language Changing the default language To change the default language 1 Click the Load Load Load Load Load button from the Voice Editor main window A window with the available languages appears 2 Select your desired language then click Open Open Open Open Open The event messages for the language you selected appear on the Voice Editor main window Not all events on some languages...

Страница 67: ...on the leftmost column of the screen 2 Prepare your message for each event 3 Use a recording software e g Windows Recorder to record your messages then save the messages as wave files WAV 4 From the Voice Editor screen click the Add Add Add Add Add button to display the Add Wave File Add Wave File Add Wave File Add Wave File Add Wave File window 5 Copy the wave files that you recorded to the datab...

Страница 68: ...Event Sound Editor Event Sound Editor Event Sound Editor Event Sound Editor Event Sound Editor window appears 7 Locate and select your wave file for the event then click on the arrow opposite Voice1 The file you select appears on the space next to it 8 Click OK OK OK OK OK to return to the Voice Editor main window 9 Do steps 6 to 8 for the other events 10 When done click Save Save Save Save Save A...

Страница 69: ...4 BIOS setup This chapter tells how to change the system settings through the BIOS Setup menus Detailed descriptions of the BIOS parameters are also provided ...

Страница 70: ...ASUS P5GD2 Premium ASUS P5GD2 Premium ASUS P5GD2 Premium Chapter summary 4 1 Managing and updating your BIOS 4 1 4 2 BIOS setup program 4 11 4 3 Main menu 4 14 4 4 Advanced menu 4 19 4 5 Power menu 4 31 4 6 Boot menu 4 36 4 7 Exit menu 4 41 ...

Страница 71: ...oppy disk Creating a bootable floppy disk Creating a bootable floppy disk Creating a bootable floppy disk 1 Do either one of the following to create a bootable floppy disk DOS environment a Insert a 1 44MB floppy disk into the drive b At the DOS prompt type format A S then press Enter Windows XP environment a Insert a 1 44 MB floppy disk to the floppy disk drive b Click Start Start Start Start Sta...

Страница 72: ...allows you to copy the current BIOS file that you can use as backup when the BIOS fails or gets corrupted during the updating process Copying the current BIOS Copying the current BIOS Copying the current BIOS Copying the current BIOS Copying the current BIOS To copy the current BIOS file using the AFUDOS utility 1 Copy the AFUDOS utility afudos exe from the motherboard support CD to the bootable f...

Страница 73: ...ty afudos exe from the motherboard support CD to the bootable floppy disk you created earlier 3 Boot the system in DOS mode then at the prompt type afudos i filename where filename is the latest or the original BIOS file on the bootable floppy disk Updating the BIOS file Updating the BIOS file Updating the BIOS file Updating the BIOS file Updating the BIOS file To update the BIOS file using the AF...

Страница 74: ...turn off power during flash BIOS Reading file done Reading flash done Advance Check Erasing flash done Writing flash done Verifying flash done Please restart your computer A 4 The utility reads the file and starts updating the BIOS Do not shut down or reset the system while updating the BIOS to prevent system boot failure A afudos iP5GD2 ROM AMI Firmware Update Utility Version 1 19 ASUS V2 07 03 1...

Страница 75: ...k To recover the BIOS from a floppy disk 1 Turn on the system 2 Insert the floppy disk with the original or updated BIOS file to the floppy disk drive 3 The utility displays the following message and automatically checks the floppy disk for the original or updated BIOS file Prepare the motherboard support CD or the floppy disk containing the updated motherboard BIOS before using this utility Make ...

Страница 76: ... drive then turn on the system 2 Insert the support CD to the optical drive 3 The utility displays the following message and automatically checks the floppy disk for the original or updated BIOS file 4 Restart the system after the utility completes the updating process DO NOT shut down or reset the system while updating the BIOS Doing so can cause system boot failure Bad BIOS checksum Starting BIO...

Страница 77: ... ROM P5GD2 ROM P5GD2 ROM P5GD2 ROM P5GD2 ROM 2 Save the BIOS file to a floppy disk then restart the system 3 Press Alt F2 during POST to display the following EZFlash starting BIOS update Checking for floppy 4 Insert the floppy disk that contains the BIOS file to the floppy disk drive When the correct BIOS file is found EZ Flash performs the BIOS update process and automatically reboots the system...

Страница 78: ...ties Utilities Utilities screen menu 3 The ASUS Update utility is copied to your system 4 1 5 4 1 5 4 1 5 4 1 5 4 1 5 ASUS Update utility ASUS Update utility ASUS Update utility ASUS Update utility ASUS Update utility The ASUS Update is a utility that allows you to manage save and update the motherboard BIOS in Windows environment The ASUS Update utility allows you to Save the current BIOS file Do...

Страница 79: ...nternet Updating the BIOS through the Internet To update the BIOS through the Internet 1 Launch the ASUS Update utility from the Windows desktop by clicking Start Start Start Start Start Programs Programs Programs Programs Programs ASUS ASUS ASUS ASUS ASUS ASUSUpdate ASUSUpdate ASUSUpdate ASUSUpdate ASUSUpdate ASUSUpdate ASUSUpdate ASUSUpdate ASUSUpdate ASUSUpdate The ASUS Update main window appea...

Страница 80: ...SUSUpdate ASUSUpdate ASUSUpdate ASUSUpdate ASUSUpdate ASUSUpdate ASUSUpdate ASUSUpdate The ASUS Update main window appears 2 Select Update BIOS from a Update BIOS from a Update BIOS from a Update BIOS from a Update BIOS from a file file file file file option from the drop down menu then click Next Next Next Next Next 4 From the FTP site select the BIOS version that you wish to download Click Next ...

Страница 81: ...s Del during the Power On Self Test POST to enter the Setup utility otherwise POST continues with its test routines If you wish to enter Setup after POST restart the system by pressing Ctrl Alt Delete or by pressing the reset button on the system chassis You can also restart by turning the system off and then back on Do this last option only if the first two failed The Setup program is designed to...

Страница 82: ...0 19 System Date Thu 03 27 2003 Legacy Diskette A 1 44M 3 5 in Language English Primary IDE Master ST320413A Primary IDE Slave ASUS CD S340 Secondary IDE Master Not Detected Secondary IDE Slave Not Detected Third IDE Master Not Detected Fourth IDE Master Not Detected IDE Configuration System Information Use ENTER TAB or SHIFT TAB to select a field Use or to configure system time Select Screen Sele...

Страница 83: ... that item 4 2 8 4 2 8 4 2 8 4 2 8 4 2 8 Scroll bar Scroll bar Scroll bar Scroll bar Scroll bar A scroll bar appears on the right side of a menu screen when there are items that do not fit on the screen Press the Up Down arrow keys or Page Up Page Down keys to display the other items on the screen 4 2 9 4 2 9 4 2 9 4 2 9 4 2 9 General help General help General help General help General help At the...

Страница 84: ...gacy Diskette A 1 44M 3 5 in Legacy Diskette A 1 44M 3 5 in Legacy Diskette A 1 44M 3 5 in Legacy Diskette A 1 44M 3 5 in Sets the type of floppy drive installed Configuration options Disabled 360K 5 25 in 1 2M 5 25 in 720K 3 5 in 1 44M 3 5 in 2 88M 3 5 in 4 3 4 4 3 4 4 3 4 4 3 4 4 3 4 Language English Language English Language English Language English Language English Allows you to choose the BIO...

Страница 85: ...API Removable Media Device if your device is either a ZIP LS 120 or MO drive Configuration options Not Installed Auto CDROM ARMD LBA Large Mode Auto LBA Large Mode Auto LBA Large Mode Auto LBA Large Mode Auto LBA Large Mode Auto Enables or disables the LBA mode Setting to Auto enables the LBA mode if the device supports this mode and if the device was not previously formatted with LBA mode disable...

Страница 86: ...nfiguration IDE Configuration IDE Configuration IDE Configuration The items in this menu allow you to set or change the configurations for the IDE devices installed in the system Select an item then press Enter if you wish to configure the item IDE Configuration Configure SATA As Standard IDE Onboard IDE Operate Mode Enhanced Mode Enhanced Mode Support On S ATA IDE Detect Time Out Sec 35 Configure...

Страница 87: ...OOTROM Onboard Serial ATA BOOTROM Onboard Serial ATA BOOTROM item appears only when the Configure SATA As Configure SATA As Configure SATA As Configure SATA As Configure SATA As item is set to RAID The ALPE and ASP ALPE and ASP ALPE and ASP ALPE and ASP ALPE and ASP item appears only when the Configure SATA Configure SATA Configure SATA Configure SATA Configure SATA A s A s A s A s A s item is set...

Страница 88: ...S AMI BIOS Displays the auto detected BIOS information Processor Processor Processor Processor Processor Displays the auto detected CPU specification System Memory System Memory System Memory System Memory System Memory Displays the auto detected system memory AMIBIOS Version 08 00 10 Build Date 04 07 04 Processor Type Genuine Intel R CPU 3 20GHz Speed 2800 MHz Count 1 System Memory Size 512MB IDE...

Страница 89: ...locking Auto Allows selection of CPU overclocking options to achieve desired CPU internal frequency Select either one of the preset overclocking configuration options Manual Manual Manual Manual Manual allows you to individually set overclocking parameters Auto Auto Auto Auto Auto loads the optimal settings for the system Standard Standard Standard Standard Standard loads the standard settings for...

Страница 90: ...rclock 20 Overclock 30 FSB888 DDR2 667 FSB900 DDR2 600 FSB950 DDR2 633 FSB1000 DDR2 667 FSB1066 DDR2 533 FSB1066 DDR2 710 The following item appears only when the AI Overclocking item is set to Overclock Profile The following item appears only when the AI Overclocking item is set to AI N O S NOS Mode Auto NOS Mode Auto NOS Mode Auto NOS Mode Auto NOS Mode Auto Sets the Non Delay Overclocking Syste...

Страница 91: ...d by BIOS The values range from 100 to 400 Refer to the following table for the correct Front Side Bus and CPU External Frequency settings Use the and keys to adjust the value Refer to the CPU documentation before setting the CPU VCore voltage A very high Vcore voltage can severely damage the CPU Chipset Core Voltage Auto Chipset Core Voltage Auto Chipset Core Voltage Auto Chipset Core Voltage Aut...

Страница 92: ...133 PCI Clock Synchronization Mode Auto PCI Clock Synchronization Mode Auto PCI Clock Synchronization Mode Auto PCI Clock Synchronization Mode Auto PCI Clock Synchronization Mode Auto Selects the PCI Clock Synchronization mode Configuration options To CPU 33 33MHz Auto Spread Spectrum Auto Spread Spectrum Auto Spread Spectrum Auto Spread Spectrum Auto Spread Spectrum Auto Enables disables or set t...

Страница 93: ...roller Enabled USB 2 0 Controller Enabled USB 2 0 Controller Enabled USB 2 0 Controller Enabled Allows you to enable or disable the USB 2 0 controller Configuration options Disabled Enabled USB 2 0 Controller Mode HiSpeed USB 2 0 Controller Mode HiSpeed USB 2 0 Controller Mode HiSpeed USB 2 0 Controller Mode HiSpeed USB 2 0 Controller Mode HiSpeed Allows you to configure the USB 2 0 controller in ...

Страница 94: ...and the Front Side Bus frequency The default value of this item is auto detected by BIOS Use the or keys to adjust the values VID CMOS Setting 45 VID CMOS Setting 45 VID CMOS Setting 45 VID CMOS Setting 45 VID CMOS Setting 45 Allows you to set the VID CMOS setting at which the processor is to run The default value of this item is auto detected by BIOS Use the or keys to adjust the values Microcode...

Страница 95: ...DRAM Timing by SPD Enabled Hyper Path 2 Auto Booting Graphic Adapter Priori PCI Express PCI PEG Buffer Length Auto Link Latency Auto PEG Link Mode Auto PEG Root Control Auto Slot Power Auto Advanced Chipset Settings Advanced Chipset Settings Advanced Chipset Settings Advanced Chipset Settings Advanced Chipset Settings Configure DRAM Timing by SPD Enabled Configure DRAM Timing by SPD Enabled Config...

Страница 96: ...Adapter Priority PCI Express PCI Booting Graphic Adapter Priority PCI Express PCI Allows selection of the graphics controller to use as primary boot device Configuration options PCI Express PCI PCI PCI Express PEG Buffer Length Auto PEG Buffer Length Auto PEG Buffer Length Auto PEG Buffer Length Auto PEG Buffer Length Auto Sets the PCI Express Graphics card buffer length Configuration options Auto...

Страница 97: ...t type Set this item to Azalia to enable High Definition audio features on the front panel audio connector Configuration options AC97 Azalia Onboard 1394 Controller Enabled Onboard 1394 Controller Enabled Onboard 1394 Controller Enabled Onboard 1394 Controller Enabled Onboard 1394 Controller Enabled Enables or disables the onboard 1394 controller Configuration options Enabled Disabled OnBoard PCIE...

Страница 98: ...1 Address 3F8 IRQ4 Serial Port1 Address 3F8 IRQ4 Serial Port1 Address 3F8 IRQ4 Serial Port1 Address 3F8 IRQ4 Allows you to select the Serial Port1 base address Configuration options Disabled 3F8 IRQ4 3E8 IRQ4 2E8 IRQ3 Serial Port2 Address 2F8 IRQ3 Serial Port2 Address 2F8 IRQ3 Serial Port2 Address 2F8 IRQ3 Serial Port2 Address 2F8 IRQ3 Serial Port2 Address 2F8 IRQ3 Allows you to select the Serial ...

Страница 99: ...vice IRQ 5 assigned to PCI Device IRQ 7 assigned to PCI Device IRQ 9 assigned to PCI Device IRQ 10 assigned to PCI Device IRQ 11 assigned to PCI Device IRQ 14 assigned to PCI Device IRQ 15 assigned to PCI Device Plug and Play O S No Plug and Play O S No Plug and Play O S No Plug and Play O S No Plug and Play O S No When set to No BIOS configures all the devices in the system When set to Yes and if...

Страница 100: ... an ISA graphics device is installed in the system so that the latter can function correctly Configuration options Disabled Enabled PCI IDE BusMaster Enabled PCI IDE BusMaster Enabled PCI IDE BusMaster Enabled PCI IDE BusMaster Enabled PCI IDE BusMaster Enabled Allows BIOS to use PCI bus mastering when reading writing to IDE devices Configuration options Disabled Enabled OffBoard PCI ISA IDE Card ...

Страница 101: ... 2 4 5 2 Repost Video on S3 Resume No Repost Video on S3 Resume No Repost Video on S3 Resume No Repost Video on S3 Resume No Repost Video on S3 Resume No Determines whether to invoke VGA BIOS POST on S3 STR resume Configuration options No Yes 4 5 3 4 5 3 4 5 3 4 5 3 4 5 3 ACPI 2 0 Support No ACPI 2 0 Support No ACPI 2 0 Support No ACPI 2 0 Support No ACPI 2 0 Support No Allows you to add more tabl...

Страница 102: ...wer On the system goes on after an AC power loss When set to Last State the system goes into either off or on state whatever the system state was before the AC power loss Configuration options Power Off Power On Last State Power On By RTC Alarm Disabled Power On By RTC Alarm Disabled Power On By RTC Alarm Disabled Power On By RTC Alarm Disabled Power On By RTC Alarm Disabled Allows you to enable o...

Страница 103: ...ovides at least 1A on the 5VSB lead Configuration options Disabled Enabled Wakeup Password Wakeup Password Wakeup Password Wakeup Password Wakeup Password This item appears only when the Power On By PS 2 Keyboard is set to Enabled Select this item to set or change the keyboard wakeup password The Keyboard Wakeup Password Keyboard Wakeup Password Keyboard Wakeup Password Keyboard Wakeup Password Ke...

Страница 104: ...cts and displays the CPU fan speed in rotations per minute RPM If the fan is not connected to the motherboard the field shows N A CPU Q Fan Control Disabled CPU Q Fan Control Disabled CPU Q Fan Control Disabled CPU Q Fan Control Disabled CPU Q Fan Control Disabled Allows you to enable or disable the ASUS Q Fan feature that smartly adjusts the fan speeds for more efficient system operation Configur...

Страница 105: ...xxRPM or N A The onboard hardware monitor automatically detects and displays the chassis fan speed in rotations per minute RPM If the fan is not connected to the chassis the specific field shows N A Chassis Q Fan Control Disabled Chassis Q Fan Control Disabled Chassis Q Fan Control Disabled Chassis Q Fan Control Disabled Chassis Q Fan Control Disabled Allows you to enable or disable the ASUS Q Fan...

Страница 106: ...6 1 4 6 1 Boot Device Priority Boot Device Priority Boot Device Priority Boot Device Priority Boot Device Priority 1st xxth Boot Device 1st Floppy Drive 1st xxth Boot Device 1st Floppy Drive 1st xxth Boot Device 1st Floppy Drive 1st xxth Boot Device 1st Floppy Drive 1st xxth Boot Device 1st Floppy Drive These items specify the boot device priority sequence from the available devices The number of ...

Страница 107: ...nabled This allows you to enable or disable the full screen logo display feature Configuration options Disabled Enabled Add On ROM Display Mode Force BIOS Add On ROM Display Mode Force BIOS Add On ROM Display Mode Force BIOS Add On ROM Display Mode Force BIOS Add On ROM Display Mode Force BIOS Sets the display mode for option ROM Configuration options Force BIOS Keep Current Bootup Num Lock On Boo...

Страница 108: ...ge Supervisor Password Boot Sector Virus Protection Disabled Enter to change password Enter again to disabled password Change Supervisor Password Change Supervisor Password Change Supervisor Password Change Supervisor Password Change Supervisor Password Select this item to set or change the supervisor password The Supervisor Password item on top of the screen shows the default Not Installed Not In...

Страница 109: ...ng and changing all the fields in the Setup utility Change User Password Change User Password Change User Password Change User Password Change User Password Select this item to set or change the user password The User Password item on top of the screen shows the default Not Installed Not Installed Not Installed Not Installed Not Installed After you set a password this item shows Installed Installe...

Страница 110: ...ord Check Setup Password Check Setup When set to Setup BIOS checks for user password when accessing the Setup utility When set to Always BIOS checks for user password both when accessing Setup and booting the system Configuration options Setup Always Boot Sector Virus Protection Disabled Boot Sector Virus Protection Disabled Boot Sector Virus Protection Disabled Boot Sector Virus Protection Disabl...

Страница 111: ... menu items allow you to load the optimal or failsafe default values for the BIOS items and save or discard your changes to the BIOS items Exit Options Exit Save Changes Exit Discard Changes Discard Changes Load Setup Defaults Exit Discard Changes Exit Discard Changes Exit Discard Changes Exit Discard Changes Exit Discard Changes Select this option only if you do not want to save the changes that ...

Страница 112: ... Setup Defaults This option allows you to load the default values for each of the parameters on the Setup menus When you select this option or if you press F5 a confirmation window appears Select Y e s Y e s Y e s Y e s Y e s to load default values Select Exit Save Changes Exit Save Changes Exit Save Changes Exit Save Changes Exit Save Changes or make other changes before saving the values to the ...

Страница 113: ...5 Software support This chapter describes the contents of the support CD that comes with the motherboard package ...

Страница 114: ... ASUS P5GD2 Premium ASUS P5GD2 Premium Chapter summary 5 1 Installing an operating system 5 1 5 2 Support CD information 5 1 5 3 IEEE 1394b driver information 5 9 5 4 Software information 5 12 5 5 RAID configurations 5 20 5 6 Creating a RAID driver disk 5 42 ...

Страница 115: ...ing the support CD Running the support CD Place the support CD to the optical drive The CD automatically displays the Drivers Drivers Drivers Drivers Drivers menu if Autorun is enabled in your computer Motherboard settings and hardware options vary Use the setup procedures presented in this chapter for reference only Refer to your OS documentation for detailed information Make sure that you instal...

Страница 116: ...e motherboard When installed to the target system this driver provides the method for configuring the chipset components You can install this utility using three different modes interactive silent or unattended preload Installing the driver in interactive mode requires user input during installation User input is not required when installing the driver in silent or unattended preload modes Refer t...

Страница 117: ... and Application Installs the IT8212 driver and application USB 2 0 Driver USB 2 0 Driver USB 2 0 Driver USB 2 0 Driver USB 2 0 Driver Installs the USB 2 0 driver Silicon Image RAID5 Driver Silicon Image RAID5 Driver Silicon Image RAID5 Driver Silicon Image RAID5 Driver Silicon Image RAID5 Driver Installs the Silicon Image 3114R RAID5 driver Make Silicon Image RAID5 Driver Disk Make Silicon Image ...

Страница 118: ... analyzes and reports LAN cable faults and shorts See page 5 14 for details ASUS PC Probe ASUS PC Probe ASUS PC Probe ASUS PC Probe ASUS PC Probe This smart utility monitors the fan speed CPU temperature and system voltages and alerts you of any detected problems This utility helps you keep your computer in healthy operating condition ASUS Update ASUS Update ASUS Update ASUS Update ASUS Update All...

Страница 119: ... the default messages ADOBE Acrobat Reader ADOBE Acrobat Reader ADOBE Acrobat Reader ADOBE Acrobat Reader ADOBE Acrobat Reader Installs the Adobe Acrobat Reader that allows you to open view and print documents in Portable Document Format PDF ASUS Screen Saver ASUS Screen Saver ASUS Screen Saver ASUS Screen Saver ASUS Screen Saver Bring life to your computer screen by installing the ASUS screen sav...

Страница 120: ...ab to display the ASUS contact information You can also find this information on the inside front cover of this user guide 5 2 6 5 2 6 5 2 6 5 2 6 5 2 6 Other information Other information Other information Other information Other information The icons on the top right corner of the screen give additional information on the motherboard and the contents of the support CD Click an icon to display th...

Страница 121: ...owse this CD Browse this CD Browse this CD Browse this CD Displays the support CD contents in graphical format Technical support Form Technical support Form Technical support Form Technical support Form Technical support Form Displays the ASUS Technical Support Request Form that you have to fill out when requesting technical support ...

Страница 122: ...port Chapter 5 Software support Chapter 5 Software support Chapter 5 Software support Chapter 5 Software support Filelist Filelist Filelist Filelist Filelist Displays the contents of the support CD and a brief description of each in text format ...

Страница 123: ...roperties Properties Properties Properties Properties 2 Click the Hardware Hardware Hardware Hardware Hardware tab when the System System System System System Properties Properties Properties Properties Properties window appears 3 Click the Device Device Device Device Device Manager Manager Manager Manager Manager button to display the installed devices on your system then click the sign before th...

Страница 124: ...d Advanced then click Next Next Next Next Next 6 Select the option Don t Don t Don t Don t Don t search I will search I will search I will search I will search I will choose the driver choose the driver choose the driver choose the driver choose the driver to install to install to install to install to install then click Next Next Next Next Next 7 Select the Microsoft 1394 stack driver from the li...

Страница 125: ...iver 9 Open the Device Device Device Device Device Manager Manager Manager Manager Manager window to verify if the Microsoft 1394 stack driver is correctly installed Repeat the process when a question mark or an exclamation point appears before the item After using your DV camcorder revert to the Unibrain IEEE 1394 driver to support other IEEE 1394b a devices For details on the IEEE 1394b refer to...

Страница 126: ...Next Next 3 Check the option Launch MyLogo to replace system boot Launch MyLogo to replace system boot Launch MyLogo to replace system boot Launch MyLogo to replace system boot Launch MyLogo to replace system boot logo before flashing BIOS logo before flashing BIOS logo before flashing BIOS logo before flashing BIOS logo before flashing BIOS then click Next Next Next Next Next 4 Select Update BIOS...

Страница 127: ...Update utility flash the original BIOS to load the new boot logo 10 After flashing the BIOS restart the computer to display the new boot logo during POST 8 Adjust the boot image to your desired size by selecting a value on the Ratio Ratio Ratio Ratio Ratio box 7 When the logo images appear on the right window pane select an image to enlarge by clicking on it ...

Страница 128: ...er Using the Virtual Cable Tester Using the Virtual Cable Tester To use the the Marvell Virtual Cable Tester utility 1 Launch the VCT utility from the Windows desktop by clicking Start All Programs Marvell Virtual Cable Tester Start All Programs Marvell Virtual Cable Tester Start All Programs Marvell Virtual Cable Tester Start All Programs Marvell Virtual Cable Tester Start All Programs Marvell Vi...

Страница 129: ...udio Configuration utility Using the C Media 3D Audio Configuration utility The C Media 3D Audio Configuration interface has five tabs Main Setting Mixer Effect Device Setting and Information Click a tab to display the details Main Setting The Main Setting Main Setting Main Setting Main Setting Main Setting tab allows you to check the audio system status configure the audio ports set the speaker a...

Страница 130: ...s you to set the Speaker Tester or the Digital Signal Processing DSP Click the button to change the audio modes Speaker Tester and Audio DSP Setting Speaker Tester and Audio DSP Setting Speaker Tester and Audio DSP Setting Speaker Tester and Audio DSP Setting Speaker Tester and Audio DSP Setting You can configure your speaker setup and the audio DSP settings in this section Click the Play Play Pla...

Страница 131: ...athroom concert hall underwater and music pub environments Click the corresponding button to set an environment emulation To set other environment emulations click the More Option More Option More Option More Option More Option list box Environment Size Environment Size Environment Size Environment Size Environment Size This section allows you to select the size of your room for an appropriate aud...

Страница 132: ...The Information Information Information Information Information tab displays your 3D audio engine audio CODEC audio driver audio controller and DirectX information Device Setting The Device Setting Device Setting Device Setting Device Setting Device Setting tab allows you to enable the audio CODEC multi streaming feature select a sound playback and sound recording devices ...

Страница 133: ...gital streams CMI9880 CMI9880 CMI9880 CMI9880 CMI9880 C O D E C C O D E C C O D E C C O D E C C O D E C 3 The audio CODEC The audio CODEC The audio CODEC The audio CODEC The audio CODEC processes the streams processes the streams processes the streams processes the streams processes the streams then passes it to an AC 3 then passes it to an AC 3 then passes it to an AC 3 then passes it to an AC 3 ...

Страница 134: ...dundancy data having to be calculated and written With the RAID 0 1 configuration you get all the benefits of both RAID 0 and RAID 1 configurations Use four new hard disk drives or use an existing drive and three new drives for this setup RAID 5 RAID 5 RAID 5 RAID 5 RAID 5 stripes both data and parity information across three or more hard disk drives Among the advantages of RAID 5 configuration in...

Страница 135: ...tall the SATA hard disks into the drive bays 2 Connect the SATA signal cables 3 Connect a SATA power cable to the power connector on each drive If you want to boot the system from a hard disk drive included in a RAID set copy first the RAID driver from the support CD to a floppy disk before you install an operating system to a selected hard disk drive Refer to section 5 6 Creating a RAID driver di...

Страница 136: ... BIOS set the Silicon Image Controller Silicon Image Controller Silicon Image Controller Silicon Image Controller Silicon Image Controller item to RAID Mode See section 4 4 6 Onboard Devices Configuration for details 3 Save your changes and Exit Setup Launching the Silicon Image Array Management Software Launching the Silicon Image Array Management Software Launching the Silicon Image Array Manage...

Страница 137: ...nflicts Resolve Conflicts Resolve Conflicts Resolve Conflicts automatically restores disrupted drives on a RAID set Low Level Format Low Level Format Low Level Format Low Level Format Low Level Format creates a pattern of reference marks on a drive Formatting the disks erases all data previously stored in the drive Logical Drive Info Logical Drive Info Logical Drive Info Logical Drive Info Logical...

Страница 138: ...ng a RAID 0 set Striped Creating a RAID 0 set Striped To create a RAID set 1 From the Silicon Image configuration utility main menu select Create RAID set Create RAID set Create RAID set Create RAID set Create RAID set then press Enter to display an option menu 2 Select RAID 0 RAID 0 RAID 0 RAID 0 RAID 0 then press Enter to display the following 3 Select your desired method of configuration Auto c...

Страница 139: ...N to return to the Main Menu TIP TIP TIP TIP TIP For server systems use of a lower array block size is recommended For multimedia computer systems used mainly for audio and video editing a higher array block size is recommended for optimum performance PHYSICAL DRIVE 0 XXXXXXXXXXX XXXXXXMB 1 XXXXXXXXXXX XXXXXXMB 2 XXXXXXXXXXX XXXXXXMB 3 XXXXXXXXXXX XXXXXXMB Creating a RAID 1 set Mirrored Creating a...

Страница 140: ...he up or down arrow keys to set the RAID size then press Enter c Press Y to confirm or N to return to the Main Menu Auto configuration creates a RAID 1 set without a backup copy of the current source disk data When migrating a single hard disk drive to a RAID 1 set use of the Manual configuration is recommended MAIN MENU Auto configuration Manual configuration Create with data copy Create without ...

Страница 141: ...h data copy copy copy copy copy the following pop up menu appears MAIN MENU Auto configuration Manual configuration online copy offline copy The online copy online copy online copy online copy online copy option automatically copies the data to the target drives on the background while writing to the source drives The offline offline offline offline offline copy copy copy copy copy option allows y...

Страница 142: ...uration Manual configuration Manual configuration a Select Manual Manual Manual Manual Manual configuration configuration configuration configuration configuration and press Enter The following pop up menu appears b Use the up or down arrow keys to select a chunk size appropriate to your drive usage then press Enter TIP TIP TIP TIP TIP For server systems use of a lower array block size is recommen...

Страница 143: ...ss Enter i Press Y to confirm or N to return to the Main Menu The Create with data copy Create with data copy Create with data copy Create with data copy Create with data copy option allows you to copy the current data from the source drive to the mirror drive The Create Create Create Create Create without data copy without data copy without data copy without data copy without data copy option dis...

Страница 144: ...D 3 Select your desired method of configuration Auto configuration Auto configuration Auto configuration Auto configuration Auto configuration a Select Auto Configuration then press Enter b The utility prompts a message to input the RAID size use the up or down arrow keys to set the RAID size then press Enter c Press Y to confirm or N to return to the Main Menu MAIN MENU Auto configuration Manual ...

Страница 145: ...ess Enter f Press Y to confirm or N to return to the Main Menu Creating a JBOD set Spanning Creating a JBOD set Spanning Creating a JBOD set Spanning Creating a JBOD set Spanning Creating a JBOD set Spanning To create a JBOD set 1 From the Silicon Image configuration utility main menu select Create RAID set Create RAID set Create RAID set Create RAID set Create RAID set then press Enter 2 From the...

Страница 146: ...A As Configure SATA As item as RAID See section 4 3 6 IDE Configuration for details 3 Set the OnBoard Serial ATA BOOTROM OnBoard Serial ATA BOOTROM OnBoard Serial ATA BOOTROM OnBoard Serial ATA BOOTROM OnBoard Serial ATA BOOTROM item as Enabled 4 Save your changes and exit Setup Entering the Intel Entering the Intel Entering the Intel Entering the Intel Entering the Intel Application Accelerator R...

Страница 147: ...ame is case sensitive and can not contain special characters Intel R Application Accelerator RAID Option ROM v4 0 0 6211 Copyright C 2003 04 Intel Corporation All Rights Reserved CREATE ARRAY MENU Name RAID_Volume1 RAID Level RAID0 Stripe Disks Select Disk Strip Size 128KB Capacity 149 0GB Change Change TAB Next TAB Next ESC Previous Menu ESC Previous Menu Enter Select Enter Select 2 Key in a uniq...

Страница 148: ...ity The utility prompts a confirmation message press Y Deleting a RAID Volume Deleting a RAID Volume Deleting a RAID Volume Deleting a RAID Volume Deleting a RAID Volume HELP Deleting a volume will destroy the volume data on the drive s and cause any member disks to become available as non RAID disks WARNING EXISTING DATA WITHIN THIS VOLUME WILL BE LOST AND NON RECOVERABLE Intel R Application Acce...

Страница 149: ...ace Selects Enter Selection Complete Enter Selection Complete 2 Use the up or down arrow keys to highlight a RAID drive you wish to reset then press Space 3 Repeat step 2 to select other RAID drives 4 Press Enter to reset RAID drive 5 The utility prompts a confirmation message press Y to confirm or N to return to the configuration Main Menu 2 Press Del to delete the RAID volume The following confi...

Страница 150: ...ID configurations 8212F RAID configurations The ITE 8212F IDE RAID controller supports RAID 0 RAID 1 RAID 0 1 and JBOD configurations Use the IT8212 BIOS Setup Utility or the ATA RAID Manager application to configure a disk array Setting the BIOS RAID items Setting the BIOS RAID items Setting the BIOS RAID items Setting the BIOS RAID items Setting the BIOS RAID items After installing the hard disk...

Страница 151: ...options Auto configuring a RAID array Auto configuring a RAID array Auto configuring a RAID array Auto configuring a RAID array Auto configuring a RAID array This option allows you to select a supported RAID set for the utility to automatically configure To auto configure a RAID set 1 From the IT8212 Setup Utility screen press 1 The following screen appears 2 Use the left or right arrow keys or th...

Страница 152: ...AID array This option allows you to define supported RAID arrays To define a RAID array 1 From the IT8212 Setup Utility screen press 2 The following screen appears 2 Use the up or down arrow keys or the space bar to select a RAID array then press Enter The following sub menu appears IT8212 Setup Utility C Copyright 2002 2004 ITE Inc Define RAID Sub Menu Capacity GB Up Down Space Change Option Ctrl...

Страница 153: ...eleting a RAID array Deleting a RAID array This option allows you to delete an existing RAID array To delete a RAID array 1 From the IT8212 Setup Utility screen press 3 The following screen appears IT8212 Setup Utility C Copyright 2002 2004 ITE Inc Delete RAID Menu Array No Array Mode Drive No Size MB Status Array 0 Stripe 2 XXXXXX Functional Array 1 Mirror 2 XXXX Functional Array 2 Array 3 Capaci...

Страница 154: ...RAID array Rebuilding a RAID array This option allows you to reconstruct an existing RAID array This option applies only to RAID1 Mirrored or RAID 0 1 Striped Mirrored sets To rebuild a RAID array 1 From the IT8212 Setup Utility screen press 4 The following screen appears 2 Use the up or down arrow keys to select a RAID array then press Enter to rebuild The following screen appears IT8212 Setup Ut...

Страница 155: ...X Array 0 U4 Sec D1 XXXXXXXXXXXXXX XXXXXX Array 0 U6 Drive Status 3 Use the up or down arrow keys to select a drive then press Enter Follow succeeding screen instructions 4 Press Esc to exit Viewing your RAID configuration Viewing your RAID configuration Viewing your RAID configuration Viewing your RAID configuration Viewing your RAID configuration This option allows you to view your RAID configur...

Страница 156: ...y Go to Drivers ITE8212 Makedisk exe Drivers ITE8212 Makedisk exe Drivers ITE8212 Makedisk exe Drivers ITE8212 Makedisk exe Drivers ITE8212 Makedisk exe for the ITE 8212F RAID driver disk utility Go to Drivers Sil3114 RAID_Disk Drivers Sil3114 RAID_Disk Drivers Sil3114 RAID_Disk Drivers Sil3114 RAID_Disk Drivers Sil3114 RAID_Disk for the Silicon Image RAID driver disk utility Go to Drivers Chipset...

Отзывы: