background image

2-6

Chapter 2: Setup

If the monitor is up to date with the latest firmware, the following message will 

appear. 

2.8 Announcements

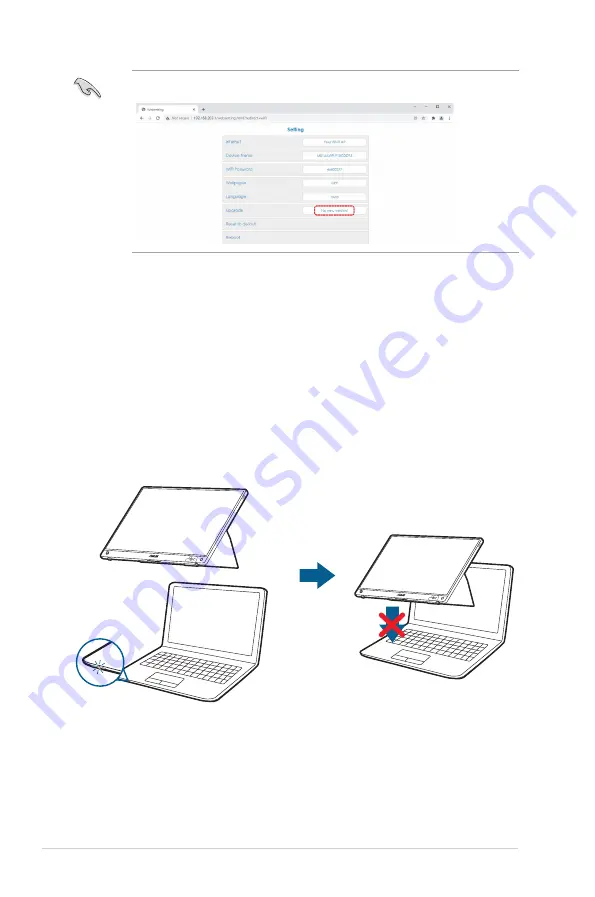
As this product includes magnet in the structure, there could be potential risk to 

cause the damage of computer hard disc and objects that are sensitive to magnet.

Please ensure not to stack the product with the computer when computer is in use 

(power on or standby mode) otherwise the hard drive could possibly be influenced 

by the result of permanent data missing or the computer display could be switched 

off due to computer auto protection mechanism. When placing this product 

together with the computer in a bag, you must have the computer power off to 

avoid possible hard drive damage.

SECS

2

SECS

2

Содержание MB16AWP

Страница 1: ...MB16AWP Wireless Portable Monitor User Guide SECS 2 ...

Страница 2: ...ANTABILITY OR FITNESS FOR A PARTICULAR PURPOSE IN NO EVENT SHALL ASUS ITS DIRECTORS OFFICERS EMPLOYEES OR AGENTS BE LIABLE FOR ANY INDIRECT SPECIAL INCIDENTAL OR CONSEQUENTIAL DAMAGES INCLUDING DAMAGES FOR LOSS OF PROFITS LOSS OF BUSINESS LOSS OF USE OR DATA INTERRUPTION OF BUSINESS AND THE LIKE EVEN IF ASUS HAS BEEN ADVISED OF THE POSSIBILITY OF SUCH DAMAGES ARISING FROM ANY DEFECT OR ERROR IN TH...

Страница 3: ...itions 2 1 2 2 Adjusting the monitor 2 1 2 3 Connecting the cables 2 2 2 4 Turning on the monitor 2 2 2 5 Performing wireless projection 2 3 2 6 Connecting the monitor to the Internet 2 4 2 7 Updating wireless projection firmware 2 5 2 8 Announcements 2 6 Chapter 3 General instructions 3 1 OSD On Screen Display menu 3 1 3 1 1 How to reconfigure 3 1 3 1 2 OSD function introduction 3 2 3 2 Specifica...

Страница 4: ...the equipment off and on the user is encouraged to try to correct the interference by one or more of the following measures Reorient or relocate the receiving antenna Increase the separation between the equipment and receiver Connect the equipment into an outlet on a circuit different from that to which the receiver is connected Consult the dealer or an experienced radio TV technician for help Any...

Страница 5: ...ns IC 6225A P31ASUS Information for the OEMs and Integrators The following statement must be included with all versions of this document supplied to an OEM or integrator but should not be distributed to the end user 1 This device is intended for OEM integrators only 2 Please see the full Grant of Equipment document for other restrictions 5GHz Device STATEMENT MASTER EQUIPMENT The availability of s...

Страница 6: ...Exposure Distance 20 cm with SAR requirement RSS 102 section 2 6 Radio Frequency RF Exposure Information The radiated output power of the Wireless Device is below the Industry Canada IC radio frequency exposure limits The Wireless Device should be used in such a manner such that the potential for human contact during normal operation is minimized This device has been evaluated for and shown compli...

Страница 7: ...only when operated in the frequency band 5150 5250 MHz Ce dispositif est limité à une utilisation en intérieur seulement dans la bande 5150 5250 MHz The WiFi operating in the band 5150 5350MHz shall be restricted to indoor use for country listed below UK Complies with IMDA Standards DB103778 ...

Страница 8: ...r company Use the appropriate power plug which complies with your local power standard Do not overload power strips and extention cords Overloading can result in fire or electric shock Avoid dust humidity and temperature extremes Do not place the monitor in any area where it may become wet Place the monitor on a stable surface Unplug the unit during a lightning storm or if it will not be used for ...

Страница 9: ...as it may drip inside the monitor and cause an electric shock The following symptoms are normal with the monitor You may find slightly uneven brightness on the screen depending on the desktop pattern you use When the same image is displayed for hours an afterimage of the previous screen may remain after switching the image The screen will recover slowly or you can turn off the Power Switch for hou...

Страница 10: ...e Takeback services ASUS recycling and takeback programs come from our commitment to the highest standards for protecting our environment We believe in providing solutions for our customers to be able to responsibly recycle our products batteries and other components as well as the packaging materials Please go to http csr asus com english Takeback htm for detail recycling information in different...

Страница 11: ...icity to your daily life enhancing both of your viewing experience and style 1 2 Package contents Check your package for the following items Wireless portable monitor Quick start guide Warranty card Power adapter Power cord USB Type C to Type C cable HDMI to HDMI mini adapter Sleeve ZenScreen tripod hole cover If any of the above items is damaged or missing contact your retailer immediately ...

Страница 12: ...mode Off Off mode Not charging Red Off mode Charging Green Off mode Finished charging 2 5 way button Turns on the button functions menu Enacts the selected OSD menu item Increases Decreases values or moves your selection up down left right 3 Main Menu Press the 5 way button once to enter the button functions menu when the OSD is off Press this button again to enter the OSD menu 4 Close Move the 5 ...

Страница 13: ...t menu 7 Brightness Move the 5 way button down to enter the Brightness menu 8 Earphone jack 9 Mini HDMI port This port is for connection with an HDMI compatible device 10 USB Type C port This port is for connection with an USB Type C compatible device 11 USB Type C port This port connects the power adapter ...

Страница 14: ...1 4 Chapter 1 Product introduction ...

Страница 15: ... SECS 2 A B SECS 2 2 2 Adjusting the monitor For optimal viewing we recommend that you look at the full face of the monitor then adjust the monitor to the angle that is most comfortable for you Hold the stand to prevent the monitor from falling when you change its angle You can adjust the monitor s angle at 0 70 SECS 2 70 Tilt ...

Страница 16: ...ning on the monitor Press and hold the power button for 2 seconds See page 1 2 for the location of the power button The power indicator lights up in blue to show that the monitor is ON The start up process takes about 30 seconds SECS 2 We suggest you charge the monitor before using it for the first time ...

Страница 17: ...r iOS devices 1 Select MB16AWP in available Wi Fi networks SSID MB16AWP 2 Insert the password shown on the monitor 3 After opening control center press screen mirroring and choose the monitor to start projection For MacOS devices 1 Select MB16AWP in available Wi Fi networks SSID MB16AWP 2 Insert the password shown on the monitor 3 Activate screen mirroring and choose the monitor to start projectio...

Страница 18: ...reless 2 Make sure both or your device and the monitor are in the same subnetwork connecting MB16AWP in the Wi Fi settings on your device 3 Open your web browser and go to the address of the monitor 192 168 203 1 SECS 2 http 192 168 203 1 192 168 203 1 4 Select a WiFi network that you want to join 5 Enter the password if asked ...

Страница 19: ...ned to the monitor and displayed on the upper right corner of the monitor 3 Connect your device to the same WiFi network as the monitor 4 Open the web browser on your device and go to the IP address of the monitor displayed on the upper right corner of the monitor If there s newer version of firmware available click OK to start the update 5 Once confirmed the monitor will start the process and reb...

Страница 20: ...at are sensitive to magnet Please ensure not to stack the product with the computer when computer is in use power on or standby mode otherwise the hard drive could possibly be influenced by the result of permanent data missing or the computer display could be switched off due to computer auto protection mechanism When placing this product together with the computer in a bag you must have the compu...

Страница 21: ...ress the 5 way button twice to activate the OSD menu 2 Move the 5 way button left right up or down to toggle between options in the menu As you move from one icon to another the option name is highlighted 3 To select the highlighted item on the menu push the button 4 Move the 5 way button or to select the desired parameter or adjust the parameter value on the slide bar 5 Move the 5 way button once...

Страница 22: ...s Scenery Mode Best choice for scenery photo display with Splendid Video Enhancement Theater Mode Best choice for movies with Splendid Video Enhancement Game Mode Best choice for game playing with Splendid Video Enhancement Night View Mode Best choice for dark scene games or movies with Splendid Video Enhancement Reading Mode This is the best choice for book reading Darkroom Mode This is the best ...

Страница 23: ...fer to the following to alleviate eye strains Users should take some time away from the display if working for long hours It is advised to take short breaks at least 5 mins after around 1 hour of continuous working at the computer Taking short and frequent breaks is more effective than a single longer break To minimize eye strain and dryness in your eyes users should rest the eye periodically by f...

Страница 24: ... Skin Tone Contains three color modes including Reddish Natural and Yellowish 4 Image Set the image related setting from this menu ASUS MB16AWP 80 Scenery Mode Wireless 1920 x 1080 60Hz Sharpness Trace Free Aspect Control VividPixel ASCR Image Sharpness The adjusting range is from 0 to 100 Trace Free Adjusts the response time of the monitor Aspect Control Adjusts the aspect ratio to Full or 4 3 4 ...

Страница 25: ...age rotation For HDMI USB Type C signal source this function is only working under Windows OS after installing the DisplayWidget software ECO Mode Reduces power consumption Volume The adjusting range is from 0 to 100 GamePlus The GamePlus function provides a toolkit and creates a better gaming environment for users when playing different types of games The crosshair overlay with different crosshai...

Страница 26: ...hoto layout directly on screen without printing test copies Alignment This facilitates designers and users to organize content and layout on one page and achieve a consistent look and feel Alignment Grid 1 Alignment Grid 2 Alignment Grid 1 Alignment Grid 2 Photo The various real photo sizes displayed provides photographers and other users to accurately view and edit their photos in real size on th...

Страница 27: ...way button left for over 5 seconds to cancel the key lock function Wi Fi Setting 5G 2 4G Selects 5GHz or 2 4GHz as the frequency band for the wireless network of the monitor Reset Resetting the Wi Fi settings of the monitor when you want to forget the Wi Fi network This process will take about 30 seconds Information Shows the monitor information Power Indicator Turns the power LED indicator on off...

Страница 28: ... support Available function choices for shortcut Blue Light Filter Splendid Brightness Contrast Auto Rotation Input Select Volume Color Temp QuickFit GamePlus 8 MyFavorite Loads Saves all settings on the monitor ASUS MB16AWP 80 Scenery Mode Wireless 1920 x 1080 60Hz Setting 1 Setting 2 Setting 3 Setting 4 MyFavorite ...

Страница 29: ...Colors Gun metal Power LED Blue On Blue flashing Saving mode Off Off Red Charging Green Finished charging Tilt 0 70 Pivot 90 DC input voltage DC 9V 3A Power consumption Power On 7 6 W Typ Standby 0 5 W Power Off 0 3 W Temperature Operating 0 C 40 C Temperature Non operating 20 C 60 C Dimension W x H x D 357 9 x 224 8 x 11 5 mm 446 x 291 x 139 mm package Weight Esti 1 1 kg net 2 3 kg gross Multi la...

Страница 30: ...HS J MOSS WEEE Windows 10 11 WHQL TUV Low Blue Light PC Recycle UkrSEPRO ICES 3 EU Energy Label VCCI CU CCC KC KCC VN MEPS BIS TUV Flicker Free PSE CEC CEL MEPS E Standby Specifications are subject to change without notice Measuring a screen brightness of 200 nits without audio USB Card reader connection ...

Страница 31: ...ne dimensions 357 9 14 09 224 8 8 85 23 6 0 93 6 2 0 24 6 2 0 24 6 2 0 24 12 7 0 50 8 7 0 34 27 0 1 06 345 6 13 61 344 2 13 55 195 0 7 68 193 6 7 62 29 1 1 14 29 1 1 14 10 5 0 41 70 0 0 135 9 5 35 178 4 7 02 E ASUS MB16ACV Outline Dimension Unit mm inch ...

Страница 32: ... another available monitor to check if the computer is properly working Screen image is too light or dark Adjust the Contrast and Brightness settings via OSD Your device fails to connect to the monitor wirelessly Update your device to the latest operating system Change the Wi Fi Setting to 2 4G via OSD Screen image is too light or dark Adjust the Contrast and Brightness settings via OSD Screen ima...

Страница 33: ...e using it The monitor automatically turns off after there is no wireless source connection for more than 6 minutes to save power consumption The monitor automatically turns off in saving mode for more than 60 minutes to save power consumption without external power supply Poor wireless performance with Windows computer 1 Disconnect your computer from all Wi Fi access points 2 Re connect your comp...

Страница 34: ... 640x480 31 47 N 59 94 N 25 18 800x600 37 88 P 60 32 P 40 1024x768 48 36 N 60 00 N 65 1280x720 45 00 P 60 00 N 74 25 1280x960 60 00 P 60 00 N 108 1280x1024 63 98 P 60 02 P 108 1440x900 55 94 N 59 89 P 106 5 1680x1050 65 29 N 60 00 P 146 25 1920x1080 67 5 P 60 00 P 148 5 P N stands for Positive Negative polarity of incoming H sync V sync input timing ...

Отзывы: