background image

2-18

ASUS AW1500-S5

2.6 Installing a Hard Disk Drive

The server comes with six externally accessible drive bays. In each of the
drive bays is a removable tray for mounting an SCA SCSI hard disk drive.

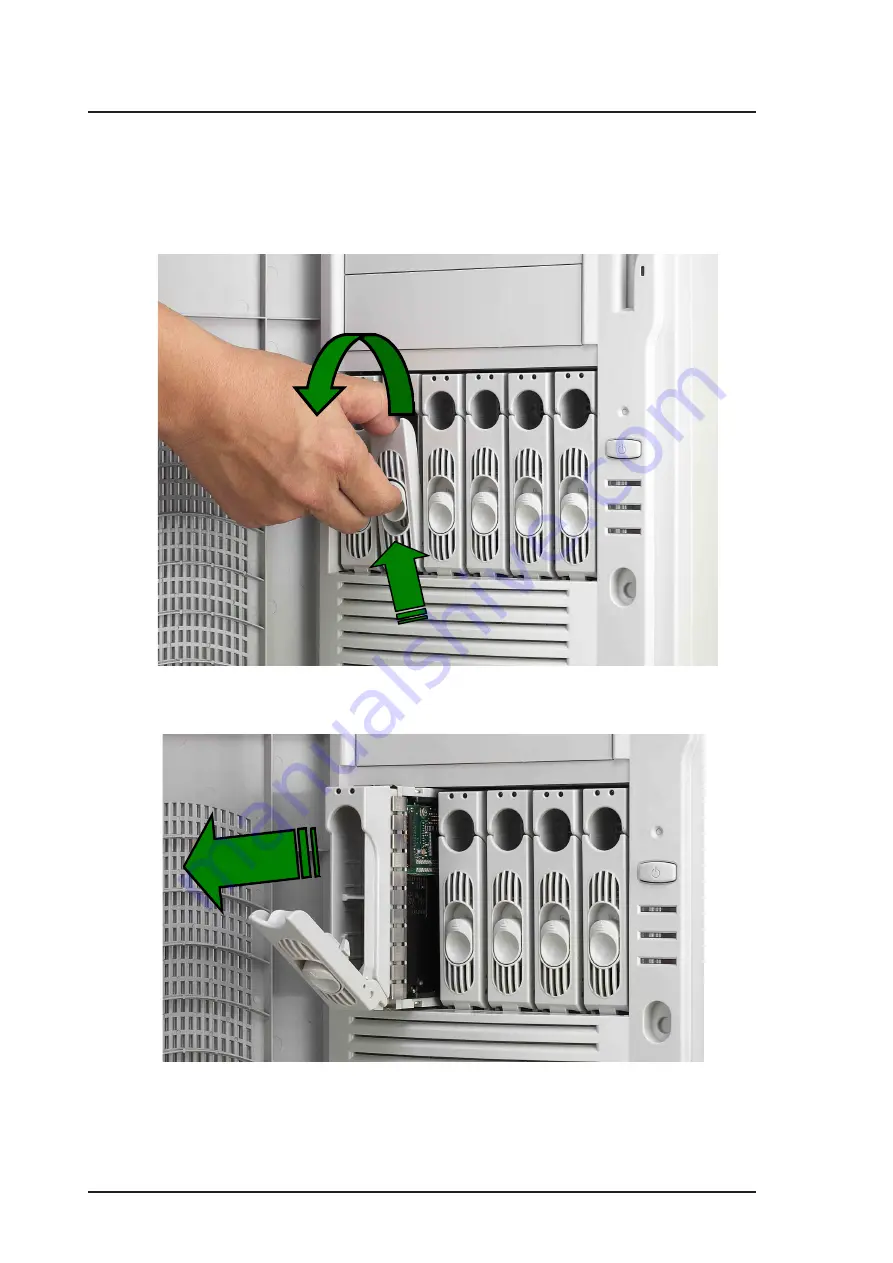
To release the drive bay, follow these steps.

1. Lift the spring lock upwards, then pull the tray lever outwards.

2. When the tray lever is pulled down, the tray will eject slightly. Pull the tray
    outwards on the tray lever.

Содержание AW1500-S5

Страница 1: ...User s Manual Intel Xeon Tower 5U Rackmount Workstation AW1500 S5 with 533MHz FSB support ...

Страница 2: ...on is authorized in writing by ASUS or 2 the serial number of the product is defaced or missing Products and corporate names appearing in this manual may or may not be registered trademarks or copyrights of their respective companies and are used only for identification or explanation and to the owners benefit without intent to infringe The product name and revision number are both printed on the ...

Страница 3: ... Address 44370 Nobel Drive Fremont CA 94538 USA General Fax 1 502 933 8713 General Email tmd1 asus com Technical Support Support Fax 1 502 933 8713 General Support 1 502 995 0883 Notebook Support 1 510 739 3777 x5110 Web Site usa asus com Support Email tsd asus com ASUS COMPUTER GmbH Germany and Austria Address Harkortstr 25 40880 Ratingen BRD Germany General Email sales asuscom de for marketing r...

Страница 4: ...ause harmful interference to radio or television reception which can be determined by turning the equipment off and on the user is encouraged to try to correct the interference by one or more of the following measures Reorient or relocate the receiving antenna Increase the separation between the equipment and receiver Connect the equipment to an outlet on a circuit different from that to which the...

Страница 5: ...3 System Package Contents I 4 Chapter 1 System Overview System Overview 1 1 1 1 System Features 1 2 1 2 Front Panel Features 1 5 1 3 Rear Panel Features 1 6 1 4 Internal Features 1 7 1 5 LED Table 1 8 Chapter 2 Hardware Reference Hardware Reference 2 1 2 1 Removing and installing chassis cover 2 2 2 2 Motherboard Placement 2 4 2 3 Central Processing Unit 2 5 2 4 System Memory 2 9 2 5 Fixed Device ...

Страница 6: ...ve Blower 2 22 2 10 Chassis Fan 2 23 2 11 Connecting Cables 2 24 2 12 SCSI Backplane 2 25 Appendix A Optional chassis roller wheel Chassis Roller wheel Installation A 2 Appendix B Power Modules Power Supply Specifications A 4 Removing Power Supply Case A 5 Appendix C Troubleshooting Troubleshooting A 8 ...

Страница 7: ...ble To avoid short circuits keep paper clips screws and staples away from connectors slots sockets and circuitry Avoid dust humidity and temperature extremes Place the server on a stable surface IMPORTANT IMPORTANT Before installing or removing signal cables ensure that the power cables for the system unit and all attached devices are unplugged To prevent electrical shock hazard disconnect the pow...

Страница 8: ...me or equivalent type recommended by the manufacturer Dispose of used batteries according to the manufacturer s instructions Lithium Ion Battery Warning CLASS 1 LASER PRODUCT CD ROM Drive Safety Warning Electrical hazard do not remove chassis cover This equipment is to be serviced by a trained personnel only ...

Страница 9: ...bout this guide About This Guide introduces the contents of this document This part includes the target audience chapter description and conventions used It also lists other sources of information that are not contained in this manual ...

Страница 10: ... perform when installing system components 4 Appendix A Optional Chassis Roller wheels This appendix contains the installation procedure for the optional chassis roller wheel units for the AW1500 S5 workstation system 5 Appendix B Redundant Power Modules This appendix contains detailed hardware operation and specifications of the AW1500 S5 power module 6 Appendix C Troubleshooting This appendix li...

Страница 11: ... References Refer to the following sources for additional information and for product and software updates 1 ASUS PP DLW Motherboard User s Manual This manual contains detailed information about the PP DLW motherboard 2 ASUS Websites The ASUS websites worldwide provide updated information on ASUS hardware and software products The ASUS websites are listed in the ASUS Contact Information on page ii...

Страница 12: ...ord 1 piece 10 Support CD that include drivers utilities and the PC cillin anti virus software 11 ASUS PXL S30 Ultra320 SCSI controller support CD 12 Motherboard user guide 13 System user guide 14 LSI SCSI controller user guide 15 Chassis roller wheels 4 sets 16 ASUS PCI SCU3 Ultra160 Dual Channel SCSI Card in standard packing LSI MegaRAID 320 1 U320 Single Channel SCSI Card in alternative packing...

Страница 13: ...er s Manual 1 1 Chapter 1 System Overview This chapter describes the general features of the AW1500 S5 system workstation It includes the sections of the front panel rear panel and internal specifications ...

Страница 14: ...tand or roller wheels Motherboard ASUS PP DLW Chipset North Bridge Intel E7505 North Bridge Placer South Bridge Intel 82801DA South Bridge ICH4 64 bit PCI X Bridge Intel 82870P2 P64H2 System Memory Memory Capacity 4 x 184 pin PC2100 DDR RAM sockets Each RAM supports registered ECC unbuffered DDR DIMMs for a total of 2GB up to 8GB maximum capacity Processor Dual Intel XeonTM processor up to 3 06 GH...

Страница 15: ...SB ports 4 x rear USB ports 6 x USB 2 0 ports Integrated PCI ISA IDE Bridge Two channel bus master IDE port supports Ultra DMA 100 and PIO mode 3 4 Drive Bay Available drive includes 1 x 1 44MB FDD 1 x 16X ASUS DVD ROM 2 x 5 25 device empty space 6 x hot swap HDD bay with SCSI backplane support safety function System Management Functions Failure Detection Voltage variation thermal operating system...

Страница 16: ...cooling fan speed CPU and memory utilization storage capacity ASR Automatic Server Restart when OS hangs and remote reboot ASUS SCA SCSI Back Plane Health Monitor SCSI HDD access and power status with the ASUS SCSI back plane Alert Notification SNMP trap record into NT Event Log and Linux System Log Critical Event Actions When the system overheats the system can be shutdown or rebooted depending o...

Страница 17: ...future installation of 5 25 devices there are two drive bays available The front panel of the server is protected by a door and lock for added security 6 Hard Drive Swap Trays DVD ROM Drive Drive Activity LED 3 5 Floppy Drive Reset Button Power Button 2 USB Ports Front Door Lock 2 empty 5 25 bays Power LED HDD Access LED Message LED Drive Status LED For more detailed information of each LED displa...

Страница 18: ...station AC Power IN Connector 12 cm chassis fan 6 Full Length Slots Chassis Lock PS 2 mouse port PS 2 keyboard port 2 x USB ports Serial port 1 Parallel port Serial port 2 Gigabit LAN port You may secure the chassis lock with an additional padlock or other security device for added server system security 2 x USB ports Microphone Line In Line Out Optional AGP card Optional Gb LAN card SCSI card loc...

Страница 19: ...w shows the standard components of the system workstation 1 450W power supply 2 4 x DDR DIMM sockets 3 2 x IDE cable 4 51 4 DVD ROM drive 5 HDD hot swap modules 6 4 x 64 bit 3V PCI X slots 7 CPU sockets 8 Internal 68 pin SCSI cable 9 PCI Long Card support guide 10 12 cm hot swap module blower 11 PP DLW motherboard 12 AGP slot 13 Chassis intrusion sensor 1 4 7 5 10 9 3 8 11 2 6 12 13 ...

Страница 20: ...nd Power status is good Drive Status LED Red HDD Fail Red blinking HDD rebuilding RAID card SAF TE function Blinking HDD Read Write data Drive Activity LED ON System power ON Power LED Blinking Suspend Mode OFF No activity HDD Access LED Blinking Read Write data in HDD OFF Normal No incoming event Message LED Blinking ASMS indicate HW monitor event Icon 1 1 2 3 4 Only RAID cards with SAF TE featur...

Страница 21: ...User s Manual 2 1 Chapter 2 Hardware Setup This chapter lists the hardware setup procedures that you have to perform when installing system components ...

Страница 22: ... easy assembly and disassembly making the installation of internal components very convenient 2 1 1 Removing the chassis cover 1 The side chassis cover is held by two large thumb screws Loosen the screws 2 Slide the chassis cover for about half an inch 3 Release the cover from the chassis ...

Страница 23: ... half an inch towards the front until it fits in place 3 Tighten the thumb screws There are six 6 chassis guide hooks located on the upper side and lower side of the chassis cover make sure all six are aligned properly in place Improper chassis installation can cause the chassis intrusion detector to alarm during POST ...

Страница 24: ...ce it into the chassis in the correct orientation The edge with external ports goes to the rear part of the chassis as indicated in the image below Make sure to unplug the power cord before installing or removing the motherboard Failure to do so may cause you physical injury and damage motherboard components Place this side towards the rear of the chassis Motherboard Screws Place nine 9 screws int...

Страница 25: ...f up to 4 26 GB s Note in the illustration that the CPU has a gold triangular mark on one corner This mark indicates the processor Pin 1 that should match a specific corner of the CPU socket Incorrect installation of the CPU into the socket may bend the pins and severely damage the CPU PP DLW PP DLW Socket 604 Gold Mark Xeon 533 Mhz Processor 1 The motherboard supports either one or two CPUs If yo...

Страница 26: ... sure that the socket lever is lifted up to at least 115 angle otherwise the CPU does not fit in completely The CPU fits only in one correct orientation DO NOT force the CPU into the socket to prevent bending the pins and damaging the CPU 4 When the CPU is in place press it firmly on the socket while you push down the socket lever to secure the CPU The lever clicks on the side tab to indicate that...

Страница 27: ...eatsink and fan assembly on top of the installed CPU making sure that it fits in the screw holes of the heatsink bracket found at the bottom of the CPU socket The heatsink bracket comes factory installed with the motherboard 2 Tighten all four 4 screws Make sure all screws fit properly in place Take caution in tightening screws Do not over tighten screws doing so may damage the motherboard TIP Fol...

Страница 28: ...are monitoring errors may occur if you fail to plug the fan cable 6 Use CPUFAN2 connector for the second CPU heatsink and fan assembly cable 3 When the heatsink and fan assembly is in place connect the fan cable to the fan connector on the motherboard labeled CPUFAN1 The fan cable plug is slotted so it fits only in one orientation If it doesn t fit completely try reversing it System Fan Connector ...

Страница 29: ...memory known as Single Data Rate SDR SDRAM DDR memory however has the ability to perform two data operations in one clock cycle thus providing twice the throughput of SDR memory For example a 200MHz DDR DIMM will support a 100MHz memory bus and a 266MHz DDR DIMM will support a 133MHz memory bus A DDR DIMM has the same physical dimensions as an SDR DIMM but it has a 184 pin footprint compared to th...

Страница 30: ...le allows you to install one DIMM into DDRA1 socket the socket closest to the ATX power connector Installing a single DIMM into any other socket would not work The following table lists the DIMM socket pairs and the memory modules that you can install Memory configuration table DIMM Socket 184 pin ECC DDR DIMM Total Memory DDRA1 SDRAM 128MB 256MB 512MB 1GB 2GB x1 DDRA2 SDRAM 128MB 256MB 512MB 1GB ...

Страница 31: ...n the socket such that the notch on the DIMM matches the break on the socket 3 Firmly insert the DIMM into the socket until the retaining clips snap back in place and the DIMM is properly seated 1 Simultaneously press the retaining clips outward to unlock the DIMM 2 Remove the DIMM from the socket Support the DIMM lightly with your fingers when pressing the retaining clips The DIMM might get damag...

Страница 32: ...cinched by screwless locks for device placement convenience An IDE DVD ROM drive is installed on the uppermost bay and two free bays are available for installation of additional storage devices like optical disc drives or tape drives Screwless fixed device bay locks Front door bezel ...

Страница 33: ...ilure to do so may cause severe damage to both the motherboard and the system components 1 From the side of the drive bay unlock and remove the screwless drive bay lock by turning the knob 45º counter clockwise until it clicks on the reference point near the unlocked icon 2 When released pull out the lock and set it aside Reference points Locked icon Knob Unlock icon ...

Страница 34: ...cover of the bay slot you want to install your device Take caution in removing the front panel cover Do not use too much force when installing or removing items 3 Use thumbs or a flat head screw driver to detach the hooked tabs from the left side of the front panel ...

Страница 35: ...lier 6 a Match the two pegs on the lock to the holes on the drive bay 6 b Turn the knob 45º clockwise until it clicks on the reference point near the locked icon Front Panel plastic bay cover Front Panel door hinges 7 Remove the appropriate plastic bay cover on the front panel 8 Fasten the four 4 front panel hinges to the slotted chassis holes then close the front panel cover ...

Страница 36: ...is cover The following procedures describe how to remove the floppy disk drive tray 1 Remove the front cover panel Perform steps 1 2 and 3 in section 2 5 2 Installing a 5 25 device on page 2 13 3 Pull out and detach the right side chassis cover and set aside 4 Locate the floppy disk drive cable and power connectors ...

Страница 37: ...ual 2 17 4 a Carefully detach the floppy disk drive cable 4 b Carefully detach the floppy disk drive power cable 5 Pull out the floppy disk drive tray while squeezing the two tabs together Floppy disk drive tray ...

Страница 38: ... bays In each of the drive bays is a removable tray for mounting an SCA SCSI hard disk drive To release the drive bay follow these steps 1 Lift the spring lock upwards then pull the tray lever outwards 2 When the tray lever is pulled down the tray will eject slightly Pull the tray outwards on the tray lever ...

Страница 39: ...into the bay 2 Push the tray all the way to the depth of the bay until it fits 3 Push the tray handle back into place 2 6 2 Placing a hard disk drive to hotswap bay Make sure that the HDD tray is completely in place before you push the handle back to avoid damaging the drive and the tray ...

Страница 40: ...l Computer Interface PCI card installation convenience To add or remove expansion cards follow these steps 1 To open push the lever to the left using your thumb to release the spring lock 2 To lock make sure that all expansion cards are properly inserted in the slots then pull the spring lock lever to fasten the expansion cards in place ...

Страница 41: ...th it and make the necessary hardware settings 2 Remove the system chassis cover 3 Remove the bracket opposite the PCI slot Refer to 2 7 Screwless Expansion Card Slot on page 2 20 for more details 4 Align the long card connector with the slot and press firmly until the card is completely seated on the slot 5 Secure the card to the chassis by locking the expansion card slot screwless lock Refer to ...

Страница 42: ...by a blower mounted under the hot swap bays 1 Remove the hard drive blower 3 pin power cable FAN4 from the motherboard 2 9 1 Removing the hard drive blower 2 Pull out the blower housing while squeezing the two tabs together To remove the hard drive blower follow these steps ...

Страница 43: ...ugh the ASUS Server Management Software ASMS 2 10 1 Removing the 12 cm chassis fan To remove the 12 cm chassis fan follow these steps 1 Remove the 12 cm chassis fan 3 pin power cable SYSFAN3 from the motherboard 2 Release all four 4 pin locks by squeezing the pin tail and pushing the pin to the rear panel 3 Pull out the 12 cm chassis fan chassis fan pin locks ...

Страница 44: ...se connectors 1 Chassis fan SYSFAN3 2 8 pin 12V AUX Power 3 24 pin ATX Power 4 Secondary IDE 5 Primary IDE 6 Floppy Disk Drive 1 2 4 3 5 9 8 6 7 7 20 pin system panel cable 8 68 pin HDD Access cable 9 Hard drive blower connector 10 CPU Socket 1 fan FAN1 11 CPU Socket 2 fan FAN2 These are not the names of the connectors Refer to the motherboard user s manual for detailed information on the motherbo...

Страница 45: ...he SCSI backplane assembly defines the distribution of power and signals to the system and its peripherals Also the SCSI backplane provides physical and electrical protection in case the current output tipped over the safety limit Power connectors SCSI cable ...

Страница 46: ...onnectors J1 J2 J3 This configuration allows SCA SCSI hard disk drives to be docked into the server Power connectors SCSI 68 pin connector A SCSI Backplane Frontside Refer to 1 5 LED Table on page 1 8 for detailed SCSI Backplane LED display descriptions B SCSI Backplane Backside SCSI ID 0 Disk Drive 1 HD status LED HD activity LED SCSI ID 1 Disk Drive 2 SCSI ID 2 Disk Drive 3 SCSI ID 3 Disk Drive ...

Страница 47: ...User s Manual A 1 Appendix A Chassis Roller wheel This appendix contains the installation procedure for the optional chassis roller wheel units for the AW1500 S5 server system ...

Страница 48: ...all the roller wheels follow these steps 1 Lay chassis on a side lying position 2 Remove the four 4 rubber foot stands 3 Affix each plastic rubber wheel unit by mounting its screws on designated slots at the bottom of the chassis 4 Make sure the screws are tightened accordingly chassis roller wheel brake locks All the chassis roller wheels can be locked individually with its built in chassis rolle...

Страница 49: ...User s Manual A 3 Appendix B Power Modules This appendix contains detailed hardware operation and specifications of the AW1500 S5 power modules ...

Страница 50: ...le Noise 3 33V 3 16 3 30 3 46 50mVp p 5V 4 8 5 00 5 25 50mVp p 12V 11 52 12 00 12 60 120mVp p 12V 11 4 12 20 13 08 120mVp p 5VSB 4 8 5 00 5 25 50mVp p Output Voltage Min A Max A Max Load W 3 33V 0 5 24 0 79 0 5V 2 0 20 0 100 0 12V 4 0 30 0 360 0 12V 0 0 0 5 6 0 5VSB 0 1 2 0 10 Voltage Min V Max V 3 33V 3 9 4 5 5V 5 7 6 5 12V 13 3 15 0 12V 13 3 15 0 5Vsb 5 7 6 5 ...

Страница 51: ...is bar 2 Disconnect all power cables connected to the floppy disk drive the CD ROM drive s the IDE drive s the ATX power connected to motherboard and SCSI backplane Make sure all power cable connections are disconnected before proceeding to next step 4 Push power case into chassis to release power case from cradle then pull out case from the side of the chassis Take caution when pulling out the po...

Страница 52: ...00 S5 Power case top view 8 7 6 5 4 3 2 1 9 1 24 pin to motherboard ATX connector 2 12V 8 pin to motherboard connector 3 Floppy disk drive 4 reserved 5 reserved 6 DVD ROM 7 SCSI Backplane 8 SCSI Backplane 9 reserved ...

Страница 53: ...appendix lists the common problems that you may encounter while using the AW1500 S5 server system It lists possible causes of the problems and offers solutions You may refer to this part and try to solve simple problems before calling customer support ...

Страница 54: ...ckthekeyboardcableifproperly connected to the keyboard port The mouse does not work Check the mouse cable if properly connected to the mouse port The system does not perform power on self tests POST after it was turned on 1 Check the memory modules and make sure you installed the correct DIMMs the system supports 2 Make sure that the DIMMs are properly installed on the sockets NOTE Some problems t...

Страница 55: ...ockets 3 Check if it has VGA output The message Non system disk or disk error appears 1 Check if a bootable HDD is active 2 Check if the HDDs are properly installed and connected to the SCSI connectors on the backplane Network connection not available 1 Make sure the network cable is connected to the RJ 45 port on the rear panel 2 Make sure that you have installedthenetworkdriversfrom the system s...

Страница 56: ...A 10 ASUS AW1500 S5 ...

Отзывы: