KEMB-8100 & ATX-KLS0 Series
Standard / Extended Temperature Industrial-grade Motherboard in ATX Form Factor with Intel
®
Sky lake /
Kaby Lake S-Series Processors
User’s Guide
Страница 1: ...KEMB 8100 ATX KLS0 Series Standard Extended Temperature Industrial grade Motherboard in ATX Form Factor with Intel Sky lake Kaby Lake S Series Processors User s Guide ...
Страница 2: ...the patent rights of Quanmax nor the rights of others Quanmax is a registered trademark of Quanmax All trademarks registered trademarks and trade names used in this user s guide are the property of their respective owners All rights reserved This user s guide contains information proprietary to Quanmax Customers may reprint and use this user s guide in other publications Customers may alter this u...
Страница 3: ... Maintaining Your Computer 14 Chapter 1 Introduction 17 Overview 17 Product Specifications 18 System Block Diagram 19 Mechanical Dimensions 20 Chapter 2 Hardware Settings 21 Overview 21 Jumper Settings and Pin Definitions 22 Jumper Settings 23 Rear Panel Pin Assignments 26 Main Board Pin Assignments 29 Chapter 3 System Installation 42 Expansion Interfaces 42 Memory Module Installation 42 Chapter 4...
Страница 4: ...Content 4 KEMB 8100 ATX KLS0 Series User s Manual Save Exit Menu 62 Chapter 5 Driver Installation 64 Appendix A DIO Digital I O Sample Code 65 Appendix B WatchDog Timer Sample Code 68 ...
Страница 5: ...lock Diagram 19 Figure 2 Mechanical Dimensions 20 Figure 3 Jumper Connector 21 Figure 4 Jumper and Connector Locations 22 Figure 5 Front Panel IO 26 Figure 6 Spread apart the ejector tabs align the DIMM with the socket and push it straight down until the tabs pop up 43 ...
Страница 6: ...e 15 JP15 Pin 9 Selection for COM1 COM2 25 Table 16 Front Panel Connector List 26 Table 17 CN14 GbE LAN1 USB3 0 Port 3 4 Connector 26 Table 18 CN15 GbE LAN2 USB3 0 Port 1 2 Connector 26 Table 19 CN17 DVI D Connector 27 Table 20 CN18 Line Out MIC In Audio Jacks 27 Table 21 CN19 PS 2 Keyboard Mouse Mini DIN Connector 27 Table 22 CN20 Display Port Connector 27 Table 23 CN21 RS 232 422 485 COM1 Connec...
Страница 7: ...PEG1 PCIE Express x16 Slot 39 Table 51 SATA1 2 3 4 Serial ATA Port 1 2 3 4 Connector 40 Table 52 SIM1 SIM Card Holder for MPCIE1 41 Table 53 BIOS Main Menu 45 Table 54 Advanced Menu 46 Table 55 Advanced Menu Display Configuration 47 Table 56 Advanced Menu Super IO Configuration 48 Table 57 Advanced Menu Super IO Configuration Serial Port 1 Configuration 48 Table 58 Advanced Menu Super IO Configura...
Страница 8: ...nual Table 67 Advanced Menu TPM Configuration Q170 models only 56 Table 68 Advanced Menu DIO Configuration 57 Table 69 Advanced Menu H W Monitor 58 Table 70 Power Menu 59 Table 71 Security Menu 60 Table 72 Boot Menu 61 Table 73 Save Exit Menu 62 ...
Страница 9: ...use bodily harm Use extreme caution when installing or removing components Refer to the installation instructions in this user s guide for precautions and procedures If you have any questions please contact Quanmax Post Sales Technical Support WARNING High voltages are present inside the chassis when the unit s power cord is plugged into an electrical outlet Turn off system power turn off the powe...
Страница 10: ...nector pins Also before connecting a cable make sure both connectors are correctly oriented and aligned CAUTION Do not attempt to service the system yourself except as explained in this user s guide Follow installation and troubleshooting instructions closely Preventing Electrostatic Discharge Static electricity can harm system boards Perform service at an ESD workstation and follow proper ESD pro...
Страница 11: ...le all sensitive components at an ESD workstation If possible use antistatic floor pads and workbench pads Handle components and boards with care Don t touch the components or contacts on a board Hold a board by its edges or by its metal mounting bracket Do not handle or store system boards near strong electrostatic electromagnetic magnetic or radioactive fields ...
Страница 12: ...for damage If there is damage notify Quanmax customer service immediately Refer to Warranty Policy for the return procedure Regulatory Compliance Statements This section provides the FCC compliance statement for Class A devices FCC Compliance Statement for Class A Devices The product s described in this user s guide has been tested and found to comply with the limits for a Class A digital device p...
Страница 13: ...ed by accident acts of God or other causes beyond the control of Quanmax or the manufacturer Neglect misuse and abuse shall include any installation operation or maintenance of the product other than in accordance with the user s guide No agent dealer distributor service company or other party is authorized to change modify or extend the terms of this Limited Warranty in any manner whatsoever Quan...
Страница 14: ... product furnished hereunder Quanmax s liability shall in no event exceed the purchase price of the product purchased hereunder The foregoing limitation of liability shall be equally applicable to any service provided by Quanmax or its authorized agent Maintaining Your Computer Environmental Factors Temperature The ambient temperature within an enclosure may be greater than room ambient temperatur...
Страница 15: ...r perform at reduced efficiency Power Protection The greatest threats to a system s supply of power are power loss power spikes and power surges caused by electrical storms which interrupt system operation and or damage system components To protect your system always properly ground power cables and one of the following devices Surge Protector Surge protectors are available in a variety of types a...
Страница 16: ...provide power to the system for a limited amount of time depending on the UPS system UPS systems range in price from a few hundred dollars to several thousand dollars with the more expensive unit s allowing you to run larger systems for a longer period of time when AC power is lost UPS systems that provide only 5 minutes of battery power let you conduct an orderly shutdown of the system but are no...
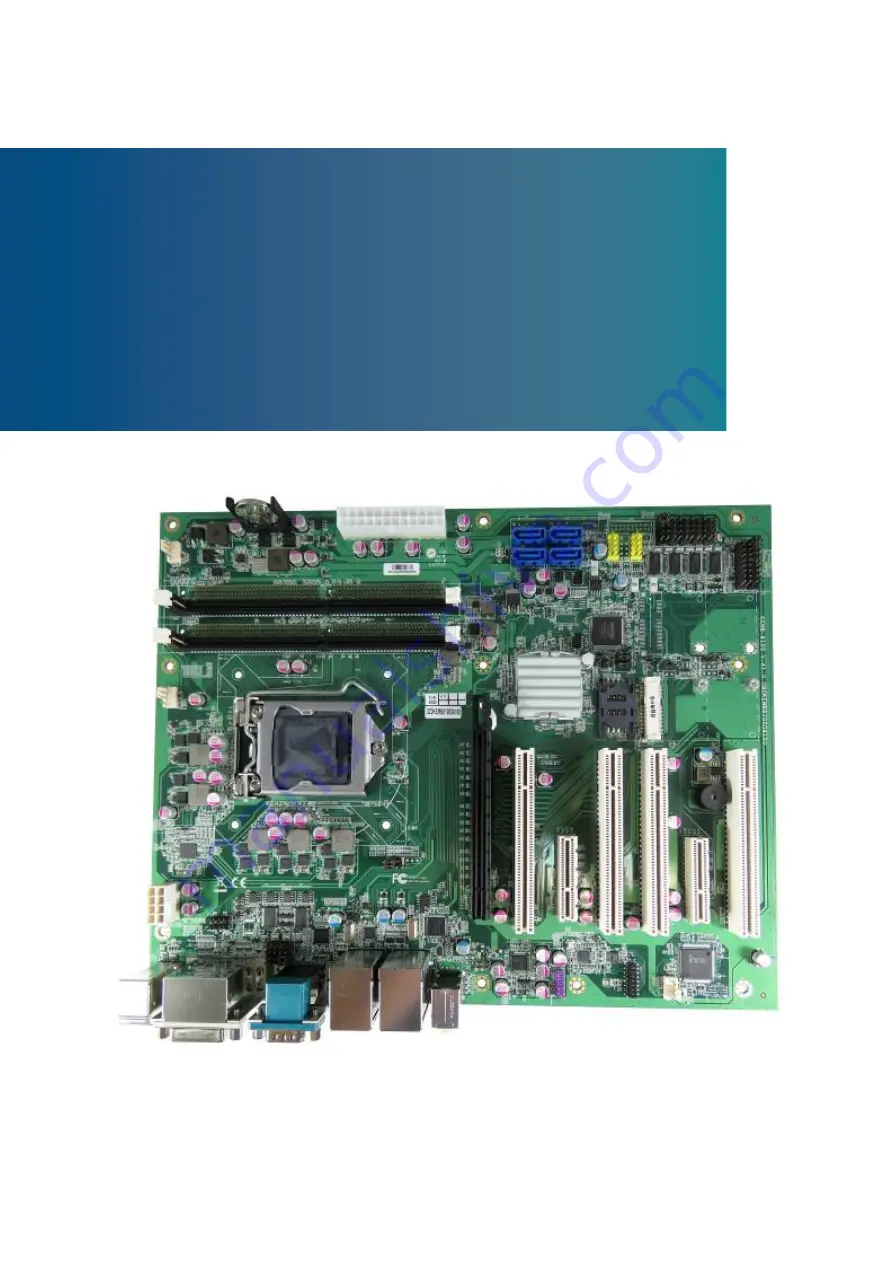
Страница 17: ...SB2 0 6x COM 16 bit DIO 2x PS 2 4x PCI 1x PCIex16 2x PCIex1 or 2x PCIex4 PCIex2 PCIex1 and 1x mPCIe or 2x mPCIe mSATA Checklist Driver Manual CD Quick Installation Guide KEMB 8000 ATX KLS0 Series main board Rear I O Shield Features Intel Skylake Kaby Lake S Series Processors Intel H110 Q170 Chipset 4x DDR3 UDIMM Socket 1x VGA 1x DVI D 1x DP 1x HDMI for display output 2x GbE LAN for Ethernet Up to ...
Страница 18: ...els 4x USB2 0 Type A on rear H110 models 6x USB2 0 Type A on rear Q170 models Storage supported 4x SATA Connector w RAID support for Q170 models only 2x mSATA Socket mixed with mPCIe 1x full size 1x half size Q170 models only Extension supported 4x PCI 32 bit 33MHz 1x PCIex16 2x PCIex1 H110 models 2x PCIex4 PCIex2 PCIex1 Q170 models 1x mPCIe full size H110 models 2x mPCIE mSATA 1x full size 1x hal...
Страница 19: ...C Power One 2x12 pin pitch 4 2mm Wafer ATX power DC input One 2x4 pin pitch 4 2mm Wafer for CPU Core power supply Operation Temp 0ºC 60ºC 32ºF 140ºF Standard 20ºC 70ºC 4ºF 158ºF Standard Certifications CE FCC Class A Table 1 Product Specifications System Block Diagram Figure 1 Block Diagram ...
Страница 20: ...Chapter 1 20 KEMB 8100 ATX KLS0 Series User s Manual Mechanical Dimensions Figure 2 Mechanical Dimensions ...
Страница 21: ...operation Figure 3 Jumper Connector For a three pin jumper see Figure 3 the jumper setting is designated 1 2 when the jumper connects pins 1 and 2 The jumper setting is designated 2 3 when pins 2 and 3 are connected and so on You will see that one of the lines surrounding a jumper pin is thick which indicates pin No 1 To move a jumper from one position to another use needle nose pliers or tweezers...
Страница 22: ...Chapter 3 22 KEMB 8100 ATX KLS0 Series User s Manual Jumper Settings and Pin Definitions For jumper and connector locations please refer to the diagrams below Figure 4 Jumper and Connector Locations ...
Страница 23: ...ity Override Selection JP7 AT ATX Power Mode selection JP8 ME F W selection JP9 mPCIE mSATA Selection for MPCIE1 Q170 models only JP12 PCIE Configuration Setting for PEG1 Q170 models only JP13 Terminator Selection for COM1 JP14 Terminator Selection for COM2 JP15 Pin 9 Selection for COM1 COM2 Table 3 JP1 Pin 9 Selection for COM3 COM4 10 1 9 2 Jumper Setting Description 1 1 3 Short COM3 Pin 9 12V 3 ...
Страница 24: ... Description 1 2 Short mSATA 2 3 Short mPCIE Pitch 2 54mm Table 8 JP6 ME F W Selection 1 2 Jumper Description 1 2 Open Normal Operation 1 2 Short ME F W disabled Pitch 2 54mm Table 9 JP7 AT ATX Power Mode Selection 2 3 1 Jumper Description 1 2 Short ATX Mode 2 3 Short AT Mode Pitch 2 54mm Table 10 JP8 Clear ME Register 2 3 1 Jumper Description 1 2 Short Normal 2 3 Short Clear ME Register Pitch 2 5...
Страница 25: ...4 Short Terminator is enabled between TX TX 3 4 Open Terminator is disabled Pitch 2 54mm Table 14 JP14 Terminator Selection for COM2 4 1 Jumper Description 1 2 Short Terminator is enabled between RX RX 1 2 Open Terminator is disabled 3 4 Short Terminator is enabled between TX TX 3 4 Open Terminator is disabled Pitch 2 54mm Table 15 JP15 Pin 9 Selection for COM1 COM2 10 1 9 2 Jumper Setting Descrip...
Страница 26: ...nal Pin Signal L1 VCT U1 USBVCC U10 USBVCC L2 MDI 0 U2 USB_A U11 USB_A L3 MDI 0 U3 USB_A U12 USB_A L4 MDI 1 U4 GND U13 GND L5 MDI 1 U5 USB3_SSRX U14 USB3_SSRX L6 MDI 2 U6 USB3_SSRX U15 USB3_SSRX L7 MDI 2 U7 GND U16 GND L8 MDI 3 U8 USB3_SSTX U17 USB3_SSTX L9 MDI 3 U9 USB3_SSTX U18 USB3_SSTX L10 GND Table 18 CN15 GbE LAN2 USB3 0 Port 1 2 Connector Pin Signal Pin Signal Pin Signal L1 VCT U1 USBVCC U1...
Страница 27: ... Name GREEN LINE OUT PINK MIC IN Table 21 CN19 PS 2 Keyboard Mouse Mini DIN Connector Pin Signal Function 1 KBDAT Keyboard Data 2 NC No Connect 3 GND Ground 4 KB5V 5VSB Power Source 5 KBCLK Keyboard Clock 6 NC No Connect 7 MSDAT Mouse Data 8 NC No Connect 9 GND Ground 10 MS5V 5VSB Power Source 11 MSCLK Mouse Clock 12 NC No Connect Table 22 CN20 Display Port Connector Pin Signal Name Pin Signal Nam...
Страница 28: ...Signal Name C1 DCD C2 RXD C3 TXD C4 DTR C5 GND C6 DSR C7 RTS C8 CTS C9 RI C10 NC Table 24 CN22 HDMI Port Connector Pin Signal Pin Signal 1 TMD_DATA2 11 GND 2 GND 12 TMD_CLK 3 TMD_DATA2 13 CEC 4 TMD_DATA1 14 RESERVED 5 GND 15 DDC_CLK 6 TMD_DATA1 16 DDC_DATA 7 TMD_DATA0 17 GND 8 GND 18 5V 9 TMD_DATA0 19 HPET 10 TMD_CLK ...
Страница 29: ... Pin Header CN13 VGA Header CN16 Front Panel Audio Pin Header DIMM1 Channel A DIMM 0 DDR4 DIMM Slot DIMM2 Channel A DIMM 1 DDR4 DIMM Slot Q170 models only DIMM3 Channel B DIMM 0 DDR4 DIMM Slot DIMM4 Channel B DIMM 1 DDR4 DIMM Slot Q170 models only FAN1 System FAN Wafer FAN2 CPU FAN Wafer FAN3 AUX FAN Wafer FP1 Front Panel Pin Header 1 FP2 Front Panel Pin Header 2 MPCIE1 Full Size mPCIE mSATA Socke...
Страница 30: ...21 5V 10 12V 22 5V 11 12V 23 5V 12 3 3V 24 GND Pitch 3 96mm Table 27 ATX2 2x4 Pin ATX Power Supply Wafer Pin Signal Name 1 GND 2 GND 3 GND 4 GND 5 12V 6 12V 7 12V 8 12V Pitch 4 2mm Table 28 CN1 Sata Express Header Q170 models only Pin Signal Name Pin Signal Name S1 GND S8 GND S2 PETP0 S9 PETP1 S3 PETN0 S10 PETN1 S4 GND S11 GND S5 PERN0 S12 PERN1 S6 PERP0 S13 PERP1 S7 GND S14 GND P1 RESERVED P3 DEV...
Страница 31: ... 232 COM3 Pin Header 9 2 1 Pin Signal 1 DCD Data carrier detect 2 RXD Receive data 3 TXD Transmit data 4 DTR Data terminal ready 5 GND ground 6 DSR Data set ready 7 RTS Request to send 8 CTS Clear to send 9 RI Ring indicator 12V 5V 10 NC Key Pitch 2 54mm Selected by JP1 Table 31 CN4 RS 232 COM4 Pin Header 9 2 1 Pin Signal 1 DCD Data carrier detect 2 RXD Receive data 3 TXD Transmit data 4 DTR Data ...
Страница 32: ...arrier detect 2 RXD Receive data 3 TXD Transmit data 4 DTR Data terminal ready 5 GND ground 6 DSR Data set ready 7 RTS Request to send 8 CTS Clear to send 9 RI Ring indicator 10 NC Key Pitch 2 54mm Table 34 CN7 USB2 0 Port 7 8 Pin Header 6 1 3 10 4 5 2 8 7 Pin Signal Name Pin Signal Name 1 VBUS_A 2 VBUS_B 3 USB_A 4 USB_B 5 USB_A 6 USB_B 7 GND_A 8 GND_B 9 KEY 10 GND Pitch 2 54mm Table 35 CN8 USB2 0...
Страница 33: ...O_12 11 DIO_5 12 DIO_13 13 DIO_6 14 DIO_14 15 DIO_7 16 DIO_15 17 5V 18 GND Pitch 2 54mm Table 38 CN12 RS 232 422 485 COM2 Pin Header 9 2 1 Pin RS 232 RS 422 Half Duplex RS 485 Full Duplex RS 485 1 DCD TX DATA TX 2 RXD TX DATA TX 3 TXD RX N A RX 4 DTR RX N A RX 5 GND GND GND GND 6 DSR N A N A N A 7 RTS N A N A N A 8 CTS N A N A N A 9 RI 5V 12V RI 5V 12V RI 5V 12V RI 5V 12V 10 Key Key Key Key Pitch ...
Страница 34: ...4 PWM Pitch 2 54mm Table 43 FAN3 AUX FAN Wafer 1 4 Pin Signal 1 GND 2 12V 3 SENSE 4 PWM Pitch 2 54mm Table 44 FP1 Front Panel Pin Header 1 SPKR 7 8 HLED 2 1 RSTBTN Pin Signal Pin Signal 1 Reset Button 2 Speaker 3 Reset Button 4 NC 5 HDD LED 6 Internal Speaker 7 HDD LED 8 Speaker Pitch 2 54mm Note Internal Buzzer is enabled when Pin6 8 is shorted Table 45 FP2 Front Panel Pin Header 2 SM_DATA SM_ALE...
Страница 35: ...nd 15 16 UIM_VPP Reserved 17 18 Ground Reserved 19 20 W_Disable Ground 21 22 PERST PERn0 SATA_RX 23 24 3 3VSB PERp0 SATA_RX 25 26 Ground Ground 27 28 1 5V Ground 29 30 SMB_CLK PETn0 SATA_TX 31 32 SMB_DATA PETp0 SATA_TX 33 34 Ground Ground 35 36 USB_D Ground 37 38 USB_D 3 3VSB 39 40 Ground 3 3VSB 41 42 LED_WWAN Ground NC 43 44 LED_WLAN Reserved 45 46 LED_WPAN Reserved 47 48 1 5V Reserved 49 50 Grou...
Страница 36: ...14 Reserved Ground 15 16 Reserved Reserved 17 18 Ground Reserved 19 20 W_Disable Ground 21 22 PERST PERn0 SATA_RX 23 24 3 3VSB PERp0 SATA_RX 25 26 Ground Ground 27 28 1 5V Ground 29 30 SMB_CLK PETn0 SATA_TX 31 32 SMB_DATA PETp0 SATA_TX 33 34 Ground Ground 35 36 USB_D Ground 37 38 USB_D 3 3VSB 39 40 Ground 3 3VSB 41 42 LED_WWAN Ground NC 43 44 LED_WLAN Reserved 45 46 LED_WPAN Reserved 47 48 1 5V Re...
Страница 37: ...5V 17 Ground GNT 18 REQ Ground 19 5V PME 20 AD 31 AD 30 21 AD 29 3 3V 22 Ground AD 28 23 AD 27 AD 26 24 AD 25 Ground 25 3 3V AD 24 26 C BE 3 IDSEL0 27 AD 23 3 3V 28 Ground AD 22 29 AD 21 AD 20 30 AD 19 Ground 31 3 3V AD 18 32 AD 17 AD 16 33 C BE 2 3 3V 34 Ground FRAME 35 IRDY Ground 36 3 3V TRDY 37 DEVSEL Ground 38 Ground STOP 39 LOCK 3 3V 40 PERR SMB_CLK 41 3 3V SMB_DAT 42 SERR Ground 43 3 3V PAR...
Страница 38: ... 12V 3 NC 12V 4 Ground Ground 5 SMB_CLK NC 6 SMB_DAT NC 7 Ground NC 8 3 3V NC 9 NC 3 3V 10 3 3VSB 3 3V 11 WAKE RST 12 NC Ground 13 Ground REFCLK 14 PETX0 REFCLK 15 PETX0 Ground 16 Ground PERX0 17 PRSNT2 1 PERX0 18 Ground Ground 19 PETX1 NC 20 PETX1 Ground 21 Ground PERX1 22 Ground PERX1 23 PETX2 Ground 24 PETX2 Ground 25 Ground PERX2 26 Ground PERX2 27 PETX3 Ground 28 PETX3 Ground 29 Ground PERX3 ...
Страница 39: ...P1 Reserved 20 HSON1 Ground 21 Ground HSIP1 22 Ground HSIN1 23 HSOP2 Ground 24 HSON2 Ground 25 Ground HSIP2 26 Ground HSIN2 27 HSOP3 Ground 28 HSON3 Ground 29 Ground HSIP3 30 Reserved HSIN3 31 PRSNT2 Ground 32 Ground Reserved 33 HSOP4 Reserved 34 HSON4 Ground 35 Ground HSIP4 36 Ground HSIN4 37 HSOP5 Ground 38 HSON5 Ground 39 Ground HSIP5 40 Ground HSIN5 41 HSOP6 Ground 42 HSON6 Ground 43 Ground HS...
Страница 40: ...d 68 Ground HSIP12 69 Ground HSIN12 70 HSOP13 Ground 71 HSON13 Ground 72 Ground HSIP13 73 Ground HSIN13 74 HSOP14 Ground 75 HSON14 Ground 76 Ground HSIP14 77 Ground HSIN14 78 HSOP15 Ground 79 HSON15 Ground 80 Ground HSIP15 81 PRSNT2 HSIN15 82 Reserved Ground Table 51 SATA1 2 3 4 Serial ATA Port 1 2 3 4 Connector Pin Signal Name 1 GND 2 TX 3 TX 4 GND 5 RX 6 RX 7 GND DIP SATA 7P 180D CONN BLUE doubl...
Страница 41: ...Chapter 3 41 KEMB 8100 ATX KLS0 Series User s Manual Table 52 SIM1 SIM Card Holder for MPCIE1 Pin Signal Name 1 UIM_PWR 2 UIM_RST 3 UIM_CLK 4 GND 5 UIM_VPP 6 UIM_DATA ...
Страница 42: ...ngs for the expansion card such as jumpers switches or BIOS configuration Memory Module Installation Carefully follow the steps below in order to install the DIMMs 1 To avoid generating static electricity and damaging the DIMM ground yourself by touching a grounded metal surface or use a ground strap before you touch the DIMM 2 Do not touch the connectors of the DIMM Dirt or other residue may caus...
Страница 43: ... the tabs pop up 6 Check to see if the DIMM is correctly seated and tight Removing a DIMM To remove the DIMM use your fingers to carefully spread apart the tabs that secure either side of the DIMM Lift it out of the socket Make sure you store the DIMM in an anti static bag The socket must be populated with memory modules of the same size and manufacturer ...
Страница 44: ...oduct please contact Quanmax AMI s ROM BIOS provides a built in Setup program which allows the user to modify the basic system configuration and hardware parameters The modified data will be stored in a battery backed CMOS so that data will be retained even when the power is turned off In general the information saved in the CMOS RAM will not need to be changed unless there is a configuration chan...
Страница 45: ...Table 53 BIOS Main Menu BIOS SETUP UTILITY M a i n A d v a n c e d P o w e r S e c u r i t y B o o t S a v e E x i t Product Information Select Screen Select Item Enter Select Change Opt F1 General Help F2 Previous Values F3 Optimized Defaults F4 Save Reset ESC Exit Product Name KEMB 8101 BIOS Version R0 06 x64 BIOS Build Date 01 15 2016 ME FW Version 11 0 0 1178 CPU Information Intel Core i7 6700...
Страница 46: ...Boot Disabled Onboard LAN2 Controller Enabled Onboard LAN2 Boot Disabled Audio Controller Enabled Display Configuration Super IO Configuration CPU Chipset Configuration SATA Configuration USB Configuration AMT Configuration TPM Configuration DIO Configuration H W Monitor Version 2 17 1254 Copyright C 2016 American Megatrends Inc Onboard LAN 1 Controller Options Disabled Enabled Onboard LAN 1 Boot ...
Страница 47: ... Save Reset ESC Exit Primary Display UMA Frame Buffer Size Auto 256 MB DVMT Pre Allocated 64M DVMT Total Gfx Mem 256 M Primary IGFX Boot Display VBIOS Default Version 2 17 1254 Copyright C 2016 American Megatrends Inc Primary Display Options Auto IGFX PEG PCIE UMA Frame Buffer Size Options 128MB 256MB 512MB DVMT Pre Allocated Options 32M 64M 96M 128M 160M 192M 224M 256M 288M 320M 352M 384M 416M 44...
Страница 48: ...rican Megatrends Inc Table 57 Advanced Menu Super IO Configuration Serial Port 1 Configuration BIOS SETUP UTILITY M a i n A d v a n c e d P o w e r S e c u r i t y B o o t S a v e E x i t Serial Port 1 Configuration Select Screen Select Item Enter Select Change Opt F1 General Help F2 Previous Values F3 Optimized Defaults F4 Save Reset ESC Exit Serial Port Enabled Device Settings IO 3F8h IRQ 4 Chan...
Страница 49: ... Opt F1 General Help F2 Previous Values F3 Optimized Defaults F4 Save Reset ESC Exit Serial Port Enabled Device Settings IO 2F8h IRQ 3 Change Settings Auto Serial Port 2 Type RS232 Version 2 17 1254 Copyright C 2016 American Megatrends Inc Serial Port Options Disabled Enabled Change Settings Options Auto IO 2F8h IRQ 3 IO 3F8h IRQ 3 4 5 6 7 9 10 11 12 IO 2F8h IRQ 3 4 5 6 7 9 10 11 12 IO 3E8h IRQ 3 ...
Страница 50: ...en Select Item Enter Select Change Opt F1 General Help F2 Previous Values F3 Optimized Defaults F4 Save Reset ESC Exit Serial Port Enabled Device Settings IO 3E8h IRQ 5 Change Settings Auto Version 2 17 1254 Copyright C 2016 American Megatrends Inc Serial Port Options Disabled Enabled Change Settings Options Auto IO 3E8h IRQ 7 IO 3E8h IRQ 3 4 5 6 7 9 10 11 12 IO 2E8h IRQ 3 4 5 6 7 9 10 11 12 IO 2F...
Страница 51: ...E8h IRQ 3 4 5 6 7 9 10 11 12 IO 2E8h IRQ 3 4 5 6 7 9 10 11 12 IO 2F0h IRQ 3 4 5 6 7 9 10 11 12 IO 2E0h IRQ 3 4 5 6 7 9 10 11 12 Table 61 Advanced Menu Super IO Configuration Serial Port 5 Configuration BIOS SETUP UTILITY M a i n A d v a n c e d P o w e r S e c u r i t y B o o t S a v e E x i t Serial Port 5 Configuration Select Screen Select Item Enter Select Change Opt F1 General Help F2 Previous...
Страница 52: ...en Select Item Enter Select Change Opt F1 General Help F2 Previous Values F3 Optimized Defaults F4 Save Reset ESC Exit Serial Port Enabled Device Settings IO 2E0h IRQ 5 Change Settings Auto Version 2 17 1254 Copyright C 2016 American Megatrends Inc Serial Port Options Disabled Enabled Change Settings Options Auto IO 2E0h IRQ 7 IO 3E8h IRQ 3 4 5 6 7 9 10 11 12 IO 2E8h IRQ 3 4 5 6 7 9 10 11 12 IO 2F...
Страница 53: ...abled VT d Enabled Active Processor Cores All Limit CPUID Maximum Disabled Execute Disable Bit Enabled Intel Virtualization Technology Disabled Intel TXT LT Support Disabled Version 2 17 1254 Copyright C 2016 American Megatrends Inc EIST Options Disabled Enabled Turbo Mode Options Disabled Enabled Hyper threading Options Disabled Enabled VT d Options Disabled Enabled Active Processor Cores Options...
Страница 54: ...nabled Serial ATA Port 2 Empty Port 2 Enabled Serial ATA Port 3 Empty Port 3 Enabled Serial ATA Port 4 Empty Port 4 Enabled mSATA Port 1 Empty Port 1 Enabled mSATA Port 2 Empty Port 2 Enabled Version 2 17 1254 Copyright C 2016 American Megatrends Inc SATA Controller s Options Enabled Disabled SATA Mode Selection Options AHCI RAID Serial ATA Port 1 Port 1 Options Disabled Enabled Serial ATA Port 2 ...
Страница 55: ...4 Copyright C 2016 American Megatrends Inc Legacy USB Support Options Enabled Disabled XHCI hand off Options Enabled Disabled USB Mass Storage Driver Support Options Disabled Enabled Table 66 Advanced Menu AMT Configuration Q170 models only BIOS SETUP UTILITY M a i n A d v a n c e d P o w e r S e c u r i t y B o o t S a v e E x i t AMT Configuration Select Screen Select Item Enter Select Change Op...
Страница 56: ... e r S e c u r i t y B o o t S a v e E x i t TPM Configuration Select Screen Select Item Enter Select Change Opt F1 General Help F2 Previous Values F3 Optimized Defaults F4 Save Reset ESC Exit Security Device Support Disabled Current Status Information Version 2 17 1254 Copyright C 2016 American Megatrends Inc Security Device Support Options Disabled Enabled ...
Страница 57: ...nge Opt F1 General Help F2 Previous Values F3 Optimized Defaults F4 Save Reset ESC Exit User Configuration Disabled DIO_0 Value 1 DIO_1 Value 1 DIO_2 Value 1 DIO_3 Value 1 DIO_4 Value 1 DIO_5 Value 1 DIO_6 Value 1 DIO_7 Value 1 DIO_8 Value 1 DIO_9 Value 1 DIO_10 Value 1 DIO_11 Value 1 DIO_12 Value 1 DIO_13 Value 1 DIO_14 Value 1 DIO_15 Value 1 Version 2 17 1254 Copyright C 2016 American Megatrends...
Страница 58: ...ning Temperature Disabled Smart FAN Configuration CPU Temperature 19 C System Temperature 22 C CPU Fan Speed 4326 RPM SYS Fan Speed N A AUX Fan Speed N A VCORE 0 997 V 12V 12 164 V 5V 4 986 V VMEM 1 221 V 3 3VSB 3 296V 3 3V 3 376 V VRTC 3 280 V 1 05V 1 080 V Version 2 17 1254 Copyright C 2016 American Megatrends Inc CPU Warning Temperature Options Disabled 80 C 85 C 90 C 95 C Smart FAN Configurati...
Страница 59: ...abled Resume By PCI E Device Disabled Resume By Ring Device Disabled Resume By RTC Alarm Disabled WatchDog Timer Configuration Version 2 17 1254 Copyright C 2016 American Megatrends Inc ACPI Sleep State Options Suspend Disabled S3 Suspend to RAM Restore AC Power Loss Options Power Off Power On Last State Power Saving Mode Options Disabled EUP Enabled DeepSx Enabled Resume from S3 By PS 2 Keyboard ...
Страница 60: ...sked for when entering Setup If ONLY the User s password is set then this is a power on password and must be entered to boot or enter Setup In Setup the User will have Administrator rights The password length must be in the following range Minimum Length 3 Maximum length 20 Administrator Password User Password Select Screen Select Item Enter Select Change Opt F1 General Help F2 Previous Values F3 ...
Страница 61: ... Previous Values F3 Optimized Defaults F4 Save Reset ESC Exit Full Screen LOGO Display Disabled Setup Prompt Timeout 1 Bootup NumLock State On CSM Support Enabled Boot Option Filter Legacy only Boot Option Priorities Version 2 17 1254 Copyright C 2016 American Megatrends Inc Full Screen LOGO Display Options Disabled Enabled Bootup Numlock State Options On Off CSM Support Options Enabled Disabled B...
Страница 62: ... e r S e c u r i t y B o o t S a v e E x i t Save Changes and Reset Discard Changes and Reset Save Options Save Changes Discard Changes Restore Defaults Select Screen Select Item Enter Select Change Opt F1 General Help F2 Previous Values F3 Optimized Defaults F4 Save Reset ESC Exit Version 2 17 1254 Copyright C 2016 American Megatrends Inc ...
Страница 63: ...rd the BIOS asks for a confirmation before exiting Discard Changes Discards changes done so far to any of the setup values This option allows you to discard the selections you made and restore the previously saved values After selecting this option a confirmation appears Select Yes to discard any changes and load the previously saved values Load Optimal Defaults Load Optimal Default values for all...
Страница 64: ... and connected the appropriate power source power it up using the power supply and install the desired operating system You can download the drivers for the KEMB 8100 ATX KLS Series from the Quanmax website at www quanmax com and install as instructed there For other operating systems please contact Quanmax NOTE When the system reboots without connecting the CRT there might be no image on screen w...
Страница 65: ...IO_0 GP30 DIO_8 GP40 DIO_1 GP31 DIO_9 GP41 DIO_2 GP32 DIO_10 GP42 DIO_3 GP33 DIO_11 GP43 DIO_4 GP34 DIO_12 GP44 DIO_5 GP35 DIO_13 GP45 DIO_6 GP36 DIO_14 GP46 DIO_7 GP37 DIO_15 GP47 include stdio h define INDEX_PORT 0x2E define DATA_PORT INDEX_PORT 1 void Set_SIO_Reg int REG int DATA outportb INDEX_PORT REG outportb DATA_PORT DATA int Get_SIO_Reg int REG int Result outportb INDEX_PORT REG Result in...
Страница 66: ...7 outportb INDEX_PORT 0x87 Set GPIO LDN7 Set_SIO_Reg 0x07 0x07 Set DIO_0 15 as Input Set_SIO_Reg 0xEC 0xFF Set_SIO_Reg 0xF0 0xFF Read DIO_0 15 value RetVal Get_SIO_Reg 0xED printf Read DIO_0 15 value n for i 0 i 8 i Temp RetVal i 0x01 printf DIO_ d d n i Temp RetVal Get_SIO_Reg 0xF1 for i 0 i 8 i Temp RetVal i 0x01 printf DIO_ d d n 8 i Temp ...
Страница 67: ... 15 as Output Set_SIO_Reg 0xEC 0x00 Set_SIO_Reg 0xF0 0x00 set DIO_0 7 to High printf Set DIO_0 15 to High n Set_SIO_Reg 0xED 0xFF Set_SIO_Reg 0xF1 0xFF system pause set DIO_0 7 to Low printf Set DIO_0 15 to Low n Set_SIO_Reg 0xED 0x00 Set_SIO_Reg 0xF1 0x00 system pause return 0 ...
Страница 68: ...ilized the program include stdio h define SIO_CONFIG_INDEX 0x2e define SIO_CONFIG_DATA SIO_CONFIG_INDEX 1 void UnlockSIO outp SIO_CONFIG_INDEX 0x87 outp SIO_CONFIG_INDEX 0x87 void LockSIO outp SIO_CONFIG_INDEX 0xAA void SetLDN int LDN outp SIO_CONFIG_INDEX 0x07 outp SIO_CONFIG_DATA LDN void main int value 0 UnlockSIO SetLDN 0x08 Enable WDT outp SIO_CONFIG_INDEX 0x30 ...
Страница 69: ... unit 0xF0 bit3 0 1sec 1 60 sec of watchdog timer by setting this bit outp SIO_CONFIG_INDEX 0xF0 value inp SIO_CONFIG_DATA outp SIO_CONFIG_DATA value 0xF7 set unit sec Set Timer Value 0xF1 Time of watchdog timer outp SIO_CONFIG_INDEX 0xF1 outp SIO_CONFIG_DATA 0x14 set to 20 sec 0x14 LockSIO ...