


ROG STRIX Z370-H GAMING
2-15
Chapter 2
2.2
Motherboard rear and audio connections
2.2.1
Rear I/O connection
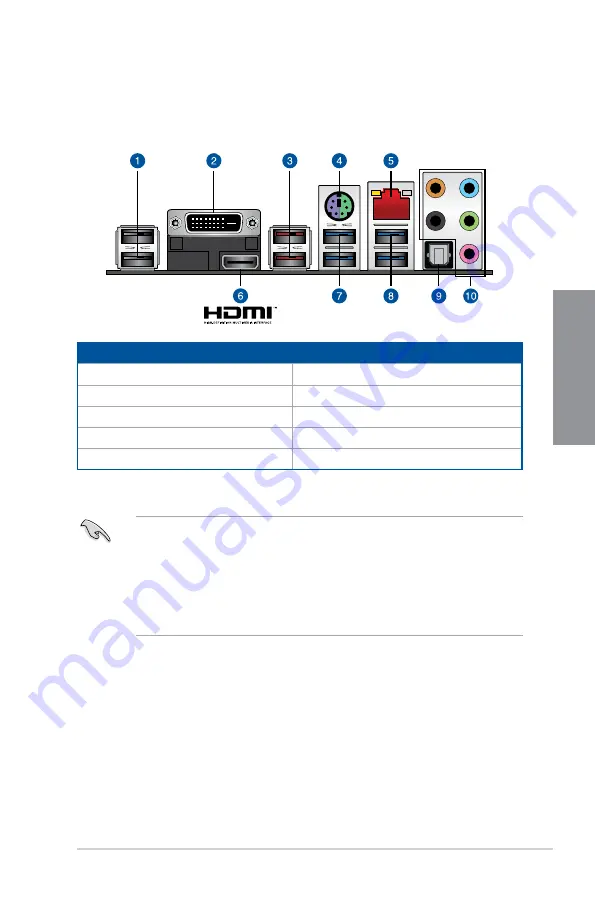
Rear panel connectors
1.
USB 2.0 ports 1314
6.
HDMI 1.4b
2.
DVI-D port
7.
USB 3.1 Gen 1 ports 12
3.
USB 3.1 Gen 2 Type-A port E12
8.
USB 3.1 Gen 1 ports 34
4.
PS/2 keyboard/mouse combo port
9.
Optical S/PDIF Out port
5.
Intel
®
LAN port (LAN1)*
10.
Audio I/O ports**
* and ** : Refer to the tables on the next page for LAN port LEDs and audio port definitions.
•
The plugged USB 3.1 Gen 1 device may run on xHCI mode or EHCI mode, depending
on the operating system’s setting.
•
USB 3.1 Gen 1 devices can only be used as data storage only.
•
We strongly recommend that you connect your devices to ports with matching data
transfer rate. Please connect your USB 3.1 Gen 1 devices to USB 3.1 Gen 1 ports and
your USB 3.1 Gen 2 devices to USB 3.1 Gen 2 ports for faster and better performance
for your devices.
Содержание 90MB0VJ0-M0EAY0
Страница 1: ...Motherboard ROG STRIX Z370 H GAMING ...
Страница 34: ...1 20 Chapter 1 Product Introduction Chapter 1 ...
Страница 38: ...2 4 Chapter 2 Basic Installation Chapter 2 To uninstall the CPU heatsink and fan assembly ...
Страница 41: ...ROG STRIX Z370 H GAMING 2 7 Chapter 2 To remove a DIMM 2 1 4 DIMM installation ...
Страница 42: ...2 8 Chapter 2 Basic Installation Chapter 2 2 1 5 ATX power connection Ensure to connect the 8 pin power plug ...
Страница 43: ...ROG STRIX Z370 H GAMING 2 9 Chapter 2 2 1 6 SATA device connection OR ...
Страница 46: ...2 12 Chapter 2 Basic Installation Chapter 2 To install HYPER M 2 x4 card The SSD card is purchased separately ...
Страница 47: ...ROG STRIX Z370 H GAMING 2 13 Chapter 2 2 1 9 M 2 installation ...
Страница 54: ...2 20 Chapter 2 Basic Installation Chapter 2 ...
Страница 84: ...3 30 Chapter 3 BIOS Setup Chapter 3 ...


