background image

4.


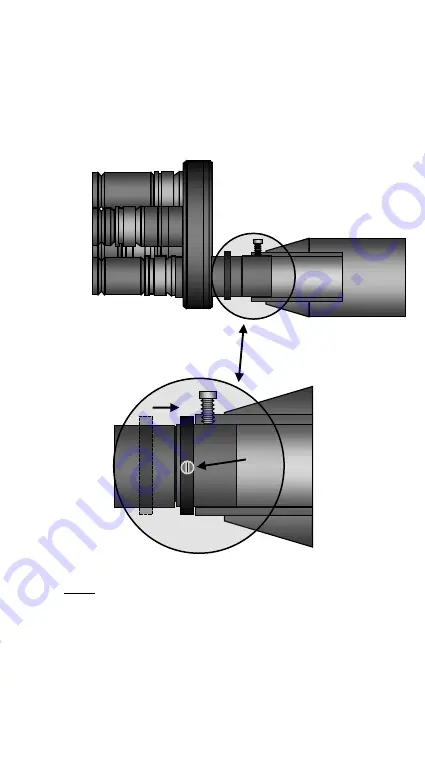
Once you have reached the optimum position of the 
ROTARION on the 2 "female of your telescope's focus, 
use  the  2"  movable  retaining  ring  (A)  in  the  lower 
drawing,  unscrewing  and  re-screwing  the  micro 
screws (B) to “memorize” the correct position of the 
ROTARION in your telescope’s focuser.


NOTE: After adjusting the position of the ROTARION within 
the  2”  female  draw-tube  of  your  focuser,  your  telescope 
must allow the focus of the 4 eyepieces by the exclusive 
use of the wheel or motor of your focuser. Due to the large 
number of types and models of 2" telescopes and focusers 
on the market, it is possible that you may not reach focus 
with all eyepieces. It can happen with some Newton type 
reflecting telescopes or also in some refractor models. In 
your usual astronomy store you can find Barlow lenses and 

A. 

A. 

B. 

Содержание ROTARION EyepieceWheel

Страница 1: ......

Страница 2: ...y Automatic quick and precise without touching the telescope therefore avoiding disturbances in the positioning or misalignment of the optical axis between eyepieces No more searching in the dark for...

Страница 3: ...al and follow the assembly instructions step by step If you follow the assembly instructions correctly even if the assembly is initially laborious the use of ROTARION is very simple and easy All this...

Страница 4: ...ug adapter 4 units Baader Click Lock 1 25 eyepiece adapter 3 units rings Extenders M42 5mm focal length to adjust eyepiece heights 3 units rings Extenders M42 10mm focal length to adjust eyepiece heig...

Страница 5: ...box A telescope with a 2 focuser A A mount and telescope tripod or column that supports the weight of the telescope the weight of your 4 eyepieces to be used and 2Kg extra B 4 eyepieces of 1 25 with...

Страница 6: ...ROTARION 5 ROTARION REMOTE CONTROL screen 6 Setup screen 7 ROTARION REMOTE CONTROL ports 8 Warning Messages C Using the ROTARION and ROTARION REMOTE CONTROL Software 1 CAUTION MOVING PARTS 2 Observing...

Страница 7: ...your eyepieces for the ROTARION Choose 4 of your favorite eyepieces based on a scaling provided by the mm indicated in each eyepiece From a large field of view eyepiece with the lowest magnification a...

Страница 8: ...you may exceed the maximum outside diameter of 50mm at your discretion and your responsibility 3 Mounting your eyepieces in the ROTARION Remove the ROTARION from the box and observe the 4 ports Port P...

Страница 9: ...y combining the 5mm 10mm and 20mm M42v0 75 Extenders supplied in the ROTARION threaded to 3 of the 4 supplied Baader Click Locks You select the largest height eyepiece in this case the 17mm correspond...

Страница 10: ...2 Thread the Baader Click Lock back on the ROTARION 3 Mount the highest height eyepiece in this example 17mm in the Baader Click Lock 17mm m 28mm 17mm m 8mm 40mm m 1 Remove 2...

Страница 11: ...the following eyepieces of lowest height matching the height of the eyepiece with the necessary Extenders Following the example you proceed to mount the eyepiece of lowest height in this case the eye...

Страница 12: ...the 5mm Extender and the 10mm Extender Once the eyepiece has been installed in its Baader Click Lock you proceed to hold the eyepiece by turning the central part of the Click Lock in the clockwise di...

Страница 13: ...ber of mm and greatest field of view the 40mm eyepiece in port PORT 1 of the ROTARION corresponding to Hour 12 of a traditional watch If necessary you will use the spare Extenders In this example you...

Страница 14: ...ON it is possible that you must perform a fine tuning of all final heights to accurately match the height of the 4 eyepieces mounted on the ROTARION To do this you will use the helical adjustment of t...

Страница 15: ...eyepieces to equal the height of the 17mm eyepiece Note the small difference in height of the 40mm eyepiece Baader Click Lock before and after the fine adjustment indicated by an arrow 10 The result i...

Страница 16: ...eight adjustment of your eyepieces an easy method is to place the ROTARION and its eyepieces face down on a flat surface for example a table ensuring that the eyepieces are firmly attached to the Baad...

Страница 17: ...you should be able to purchase additional Extenders M42x0 75 of different heights since it is a standard component 4 Mounting the ROTARION on your telescope If you have not mounted your four 1 25 eye...

Страница 18: ...er screws of your telescope 3 If you do not find the correct focus point with your telescope unscrew the fastening screws of your focuser A and move the ROTARION position on the 2 female draw tube of...

Страница 19: ...ng the position of the ROTARION within the 2 female draw tube of your focuser your telescope must allow the focus of the 4 eyepieces by the exclusive use of the wheel or motor of your focuser Due to t...

Страница 20: ...al Point Extenders and Path Correctors with focal length extension should be installed by replacing the A 2 barrel in the ROTARION AstronSCIENTIFIC cannot recommend specific optics B to increase focal...

Страница 21: ...the Tele Vue 2 Everbrite Diagonal for Rotarion 5 Finally with the ROTARION mounted on your telescope you must balance the telescope There are many videos on YouTube where you can learn how to balance...

Страница 22: ...hat file and follow the instructions to install the program The program will be located in the Windows Start menu under Programs ROTARION ROTARION REMOTE CONTROL No need to install drivers for the ROT...

Страница 23: ...B port can be used to control the ROTARION The Eyepiece Wheel Then the only required connection is a USB cable included in the box between the USB port of the ROTARION EyepieceWheel 3 and a USB port o...

Страница 24: ...necessary to connect the 12 volt power supply to the input 1 Connection ROTATION HAND CONTROL It can also be controlled via a handset via the serial connection 2 ROTARION HAND CONTROL is available fro...

Страница 25: ...the first time Press the SETUP button 7 to open close the Setup panel Select the port you are using USB port or COM port from the drop down menu 10 Press the QUERY key 13 to manually connect to the R...

Страница 26: ...ements in one direction and the opposite direction during which it performs a calibration and determines the number of available ports When the process is finished it stops at the PORT 1 port It is re...

Страница 27: ...erfere with the turning of the ROTARION carousel before pressing the RESET Button By pressing the RESET button 6 the ROTARION does full rotations in one direction and the opposite direction during whi...

Страница 28: ...up when it has reached the port The labels of these buttons can be changed on panel 17 by pressing SETUP to access that screen Panel Orientation By pressing the Horizontal Vertical orientation icon 8...

Страница 29: ...tically connect to it Revers With box 9 de activated the ROTARION EyepieceWheel rotates in counter clock wise direction only Activating this box the rotation movement is bidirectional but it limits th...

Страница 30: ...essary to press it since when the program is started it is connected automatically But if you change the communication port the connection is stopped and it will necessary to start the connection manu...

Страница 31: ...ER CONFIG Panel you can activate the checkbox indicated on the previous page MINI CONTROL so that the AUTOFOCUS Control appears at the bottom of the main screen of the ROTARION REMOTE CONTROL program...

Страница 32: ...eached the keys are unlocked and the selected port lights up PORT 1 It is the initial port of the ROTARION once the RESET has been made In it you must have installed the eyepiece with least power or m...

Страница 33: ...th a higher power than the previous PORT 2 The objects appear larger and the visual field is smaller but you have the object in the field of view You can focus on it again PORT 5 This port is not avai...

Страница 34: ...tton The LED 4 flashes green Port Error For safety reasons when the ROTARION does not find the next selected port it interrupts the rotation movement it partially inverts the rotation movement to rele...

Страница 35: ...omputer com port It cannot find ROTARION through the serial connection Verify that you are properly connected and powered Verify that you have selected a correct COM port Starting Rotarion The ROTARIO...

Страница 36: ...other nearby objects B that may interfere with the movement of the ROTARION EyepieceWheel carouse l before you order a turn or an eyepiece or lens change in the ROTARION REMOTE CONTROL software If any...

Страница 37: ...REMOTE CONTROL software at all times WARNING Do not point your ROTARION and telescope to the sun Viewing the sun through a telescope without proper solar filters will cause severe and permanent eye d...

Страница 38: ...elow The user who uses the left eye A to visualize must place the ROTARION to his left The user who uses the right eye to visualize must position the ROTARION EyepieceWheel to his right B In both case...

Страница 39: ...gnification and less visual field If you have followed these instructions correctly your lower power or magnification eyepiece should be placed in the port PORT 1 of your ROTARION with a larger number...

Страница 40: ...elescope again The observed image should be larger and have less visual field Center the image again in the eyepiece B PORT 2 Centered NOT OK PORT 2 Centered OK B Afterwards you can increase the magni...

Страница 41: ...scope with 1000mm focal length and a 20mm eyepiece Magnification X 1000mm 20mm 50X Which would give us 50 magnifications but if you change to a 10mm eyepiece it would be 100 magnifications There is a...

Страница 42: ...elocate the object by pressing PORT 1 to change to the eyepiece with the largest number in mm the lowest power or magnification and greater field of view C A B C D Once the object has been relocated r...

Страница 43: ...0 1 Norm for Safety requirements for electrical equipment for measurement control and laboratory use in compliance with the Bureau Veritas Consumer Products Services Germany GmbH corporation based at...

Страница 44: ...wer Supply Input 100 240Vac 50 60Hz 0 55A Output 12Vdc 2A Limited Power Source Disconnect the Power Supply unit from the ROTARION The Power Supply unit must be freely accessible and must not be covere...

Страница 45: ...t separate disposal at your regional offices The directive 2012 19 EU on waste electrical and electronical equipment WEEE is applicable in the European Union member states Serial Number or PN ________...

Страница 46: ...od we will remedy any defect in the operation of the product due to its manufacture whether repairing replacing parts or providing a new product provided that the option chosen is feasible and not eco...

Страница 47: ...ons will not be covered by this guarantee This warranty does not cover any product that has been altered or repaired by any person other than AstronSCIENTIFIC S L repair personnel or any product whose...

Отзывы: