background image

Configuration via the web interface

Operating manual HDQ 1 V2 - Version 07-2021A

page 22

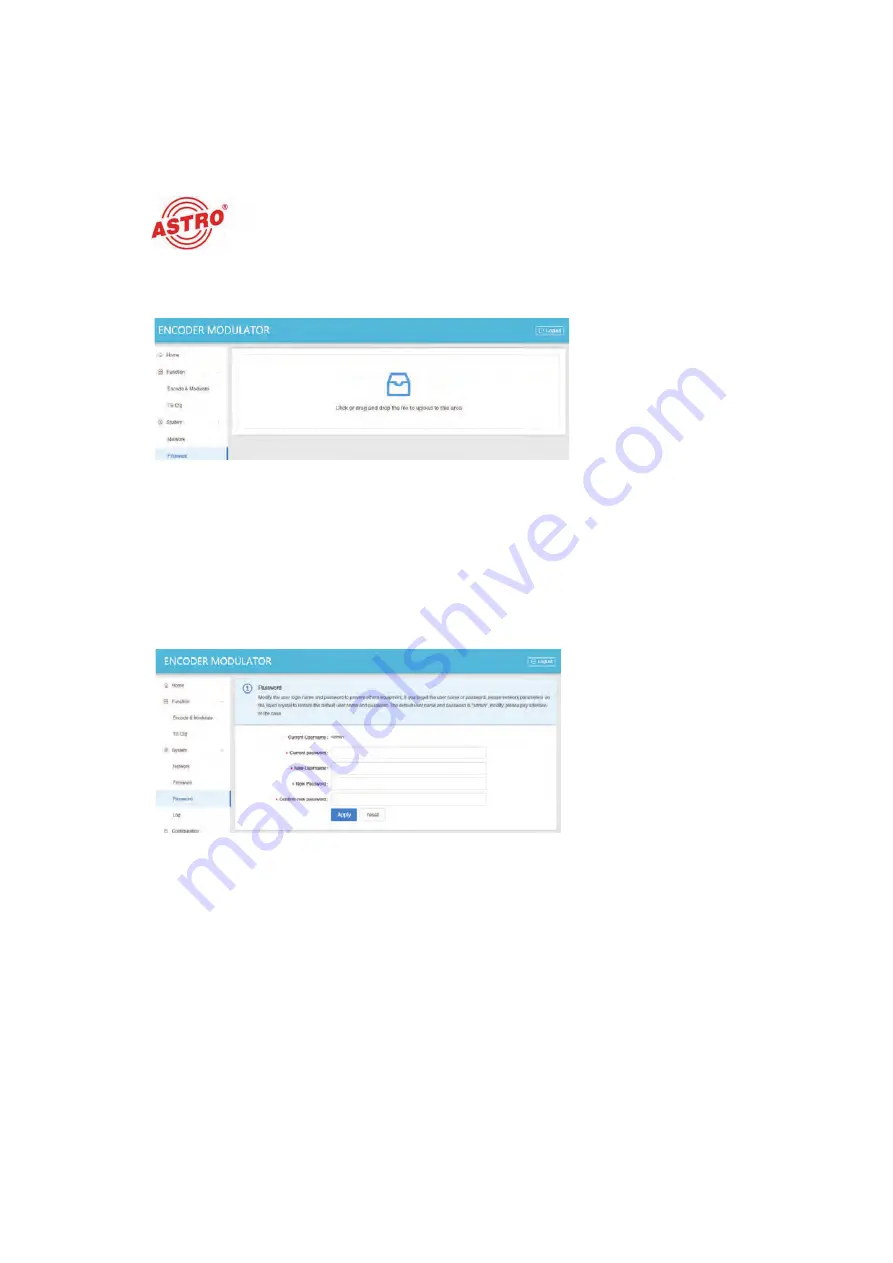
To perform a firmware update, click on the “Firmware” item in the main menu on the left. The 
following view appears:

Fig. 11: Updating the firmware

After you have downloaded the file required for a firmware update from the ASTRO website, drag 
and drop the file into the marked area to start the update process automatically. Once the update 
process is complete, reboot the device to complete the update.

Changing password and user name

If you want to change your password and/or user name, click on the “Password” item in the main 
menu on the left. The following input form will now appear:

Fig. 12: Changing password

Enter your current password and the new password here, as well as a new user name if necessary.

When you have set all parameters as desired, click on the “Apply” button underneath the input form.

N

OTE

:  

To save the selected settings permanently, first select the “Configuration” item in 

the main menu on the left. Then click on the “save” button in the Save section. The selected 
settings will then be available again even after restarting the device. 

DRAFT VERSION

Содержание 380 288

Страница 1: ...Version 07 2021A DRAFT VERSION ...

Страница 2: ...p this operating manual for future use and for handover in the event of a change of owner or operator A PDF version of this manual can be downloaded on the ASTRO website there may be a more recent version The ASTRO company confirms that the information in this manual was correct at the time of printing but it reserves the right to make changes to the specifications the operation of the device and ...

Страница 3: ...ual page 05 Device description page 06 Important safety information page 07 Warranty conditions page 11 Performance description page 11 Disposal page 11 Suggested installation page 12 Connection and start up page 13 Configuration via the web interface page 15 Troubleshooting page 28 Maintenance and repair page 28 Technical data page 29 DRAFT VERSION ...

Страница 4: ...ectrical voltage and non obser vance of the instructions in this manual pose a risk of fatal injuries Warning about various dangers to health the environment and material Recycling symbol indicates components or packaging materials which can be recycled cardboard inserts plastic film and bags Used batteries must be disposed of at approved recycling points Batteries must be completely discharged be...

Страница 5: ...ration The target group for installation and starting operation of the ASTRO headend technology are qualified experts who have training enabling them to perform the work required in accordance with EN 60728 11 and EN 62368 1 Unqualified persons are not permitted to install and operate the device Device configuration The target group for the configuration of the ASTRO headend are persons who have r...

Страница 6: ...ng manual 1 Fastening plates for wall mounting 2 RF input 3 RF output 4 Power supply socket 5 LAN socket 6 CC no function 7 HDMI socket 8 Earth connection Fig 1 HDQ 1 V2 signal converter The HDQ 1 V2 signal converter has a CE marking This confirms that the product complies with the relevant EC directives and adheres to the requirements specified therein 1 1 2 3 4 5 6 7 8 DRAFT VERSION ...

Страница 7: ... conditions and maintenance of the device Keep this operating manual for future use and for handover in the event of a change of owner or operator A PDF version of this manual can be downloaded on the ASTRO website there may be a more recent version Check the packaging and the device for transport damage immediately Do not operate a device that has been damaged Carrying the device by the power cab...

Страница 8: ...ble to avoid exceeding the maximum permitted ambient temperature Do not place any objects on the device or on the external power supply unit The subscriber network must be earthed in accordance with EN 60728 11 and must remain earthed even when the device is removed The device and the power supply unit do not provide protection against water and may therefore only be operated and connected in dry ...

Страница 9: ...he required information from the manufacturer do not operate the device In rooms in which the climatic conditions vary e g due to sunlight the device may only be operated if the permissible ambient temperature can be maintained Do not install the device and external power supply unit in loca tions with excessive dust formation as this may impair the isolation from the mains voltage Electromagnetic...

Страница 10: ...vice Repair Repairs may only be performed by the manufacturer Improp erly performed repairs may result in considerable dangers for the user If malfunctions occur the device must be disconnected from the mains and authorised experts must be consulted The device may need to be sent to the manufacturer General information Store or use the device in a safe location well out of reach of small children ...

Страница 11: ...e 100 1 000 MHz RF output level range 46 93 dBµV QAM signal is fed out via the F socket Different resolutions Operation and configuration via web interface Power supply via 12 V plug in power supply unit Wall mounting Disposal All of our packaging materials cardboard boxes inserts plastic film and bags are completely recyclable After use this device must be disposed of in an orderly manner as elec...

Страница 12: ... holes are to be drilled according to the position of the fastening plates on the device The following describes how to install the device TASK 1 Place the back of the device against the mounting surface so that its attachment points are exactly above the four screw heads The RF connection sockets of the device must point downwards 2 Now push the housing slightly downwards until the upper edges of...

Страница 13: ...nnect the LAN socket of your laptop or PC to the LAN socket 5 of the device 6 Connect the device to the included plug in power supply via the power supply socket 4 Plug the power supply into a wall socket that supplies a mains voltage that corresponds to the specifications of the power supply RESULT The device is now connected and you can start the configuration see next section Configuration ATTE...

Страница 14: ...ction example with cascade connection of two HDQ 1 V2 devices In order to create additional capacities for input signals several HDQ 1 V2 can be interconnected To do this you must connect the RF output of one device to the RF input of an other Fig 4 Connection example with cascade connection 12 V DC HDMI Terr Signal TV TV Cam DVD IRD HDMI DVB C 12 V DC 12 V DC DRAFT VERSION ...

Страница 15: ...the device to your PC or laptop via an Ethernet cable and use the ping diagnostic tool ping command to determine whether the HDQ 1 V2 and your PC laptop are on the same network If this is the case enter the IP address of the HDQ 1 V2 in the address line of the browser and press the Enter key You should now see the login screen see figure 5 below Fig 5 login screen Enter your user name and password...

Страница 16: ...Version 07 2021A page 16 Status overview After logging in the interface displays a status overview see figure 6 Fig 6 Status overview On the status page you can find information about the software and hardware the amount of free space system time etc DRAFT VERSION ...

Страница 17: ...Encoder and modulator settings In the input form on the right you will see the Encode Modulate section at the top Here you can enter the parameters for the encoding and the QAM modulation into input fields or select them from drop down lists The following parameters can be changed for the encoding Bitrate Enter a value from 1 20 Mbps here Audio format Here you can select the desired audio encoding...

Страница 18: ... 50 and 1000 ms are possible TS ID Enter the transport stream ID here ON ID Enter the ON ID for identifying the transport stream here CC Switch Enable the closed caption function if desired by turning this switch on Program Number Enter the program number here Program Provider The program provider can be entered here Program Name Enter the program name here PMT PID Enter the PID for the program ma...

Страница 19: ...on the Apply button underneath the input form NOTE To save the selected settings permanently first select the Configuration item in the main menu on the left Then click on the save button in the Save section The selected settings will then be available again even after restarting the device If you do not save the settings in this way the settings activated by pressing the Apply button will only be...

Страница 20: ...e the preset value Private Data It is recommended that you do not change the preset value Chan List Name Name of the channel list It is recommended that you do not change the preset name When you have set all parameters as desired click on the Apply button underneath the input form NOTE To save the selected settings permanently first select the Configuration item in the main menu on the left Then ...

Страница 21: ...oes not have a hardware reset function and can only be configured using this data if the network settings are changed When you have set all parameters as desired click on the Apply button underneath the input form NOTE To save the selected settings permanently first select the Configuration item in the main menu on the left Then click on the save button in the Save section The selected settings wi...

Страница 22: ...e the update Changing password and user name If you want to change your password and or user name click on the Password item in the main menu on the left The following input form will now appear Fig 12 Changing password Enter your current password and the new password here as well as a new user name if necessary When you have set all parameters as desired click on the Apply button underneath the i...

Страница 23: ...the device is switched off or disconnected from the mains Downloading log files To download current log files click on the Log item in the main menu on the left The following input form will now appear Fig 13 Downloading log files A list of the latest log files is displayed here You can select and download them by clicking on the Get button If you want to delete a file click on the Delete button D...

Страница 24: ...rating manual HDQ 1 V2 Version 07 2021A page 24 Modifying the configuration To change the configuration click on the Configuration item in the main menu on the left The following view appears Fig 14 Modifying the configuration DRAFT VERSION ...

Страница 25: ... config uration even after a reboot you must then click the save button in the Save section to save it permanently Remove the configuration Click the delete button to delete the configuration This action cannot be undone Backup Click the backup button to save the current configuration to a local file It is a good idea to save to a file for example before performing a firmware update Load Click the...

Страница 26: ... The power indicator if present only shows whether the DC current which supplies the device components has been disconnected from the mains voltage If the power indicator for the power supply unit or the device does not light up this does not mean that the device has been fully disconnected from the mains voltage There may still be voltages in the external power supply unit that are dangerous to t...

Страница 27: ...rate Mbps 1 000 20 000 Audio Audio encoding MPEG I layer 2 AAC AC3 Sample rate kHz 48 Bit rate kbps MPEG I layer 2 192 kbps AAC VBR AC3 128 kbps DVB C Modulation Standard J 83A DVB C J 83B Bandwidth J 83A 8M J 83B 6M Constellation J 83A 16 32 64 128 256 QAM J 83B 64 256 QAM Symbol rate Msps 3 000 7 000 MER dB 35 RF Frequency MHz 100 1000 1 kHz steps RF output level dBm 63 16 46 93 dBμV 1 dB steps ...

Страница 28: ...without prior agreement of the ASTRO company These operating instructions have been written by ASTRO Strobel Kommunikationssysteme GmbH Olefant 3 D 51427 Bergisch Gladbach Bensberg Germany Phone 49 2204 405 0 Fax 492204 405 10 eMail kontakt astro kom de Internet www astro kom de All the information contained in this document has been checked in good faith The ASTRO company cannot be held liable fo...

Отзывы: