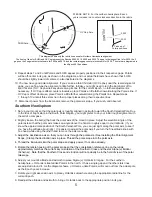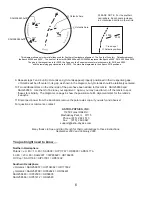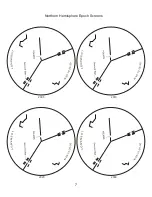
9. Repeat steps 7 and 8 until Polaris and UMi appear properly positioned in their respective gaps. Polaris
will be off-center in its gap, as shown in the diagrams, and our actual field tests have shown that UMi
should be slightly inward of centered - also illustrated in the diagrams.
10.You now have good polar alignment. If you can see a faint third star (OV Cephei) near the remaining set of
gaps, you can fine-tune the alignment a little further. Initially, you might need to turn the illuminator off to
spot this star. If OV Cephei lies anywhere along its line for the current Epoch, no further adjustment is
necessary. If OV Cep is offset counter-clockwise, place Polaris a little farther inward along the Polaris line. If
OV Cep is offset clockwise, place Polaris a little farther outward along the Polaris line. Repeat steps
7 through 10 until all three stars lie in their proper places along their respective lines.
11.Disconnect power from the illuminator, remove the polar axis scope, if you wish, and observe!
Southern Hemisphere
1. Set up your mount so that the polar axis is roughly aligned in azimuth toward the South Celestial Pole. Due
to the lack of bright stars in the South Polar Region, you might prefer to do your initial rough alignment with
the aid of a compass.
2. Slightly loosen the bolt(s) that lock the polar axis of the mount in place. Adjust the elevation angle of the
polar axis so that the polar axis makes an angle above the horizon roughly equal to your latitude. (If you
know the approximate position of the South Celestial Pole, you can just sight along the polar axis to see if
you have the altitude about right.) It is easier to adjust the polar axis if you turn the fine altitude knob with
one hand while using the other hand to move the axis manually.
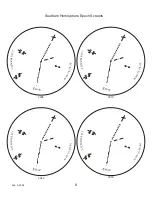
6. Adjust your mount's altitude and azimuth to place Sigma ( ) Octantis in its gap. For the southern
hemisphere,
F
Octantis is treated like Polaris in the north. It has a single gap and the other stars lines
are adjusted around it. As the diagram shows,
F
Octantis, unlike Polaris, will move out from the actual pole
as the Epoch years increase.
7. Rotate your right ascension axis to place
P
Octantis somewhere along the appropriate radial line for the
current Epoch.
8. Readjust the altitude and azimuth to bring
F
Octantis back to the appropriate position in its gap.
*
*
3. Adjust the declination axis so that you can look through the polar axis. (See Installing the Polar Alignment
Scope.) Clamp the declination axis in place. Thread the polar scope into the polar axis.
4. Thread the illuminator into the polar scope and apply power, if not done already.
5. Rotate the reticle housing of the polar scope so that the constellation reference line on the reticle
approximately matches the current sky orientation of the Southern Cross and the star Alpha (
"
) Eridani
(Achernar). Note that the Southern Cross and
"
Eridani will not actually be in the field of view of the polar
telescope.
F
5
*
UMi here
OV Cep here
2005
2030
Close-up of
Polaris positions
2005
2005
2030
2030
PLEASE NOTE: For the northern hemisphere, Epoch
years increase in a counter-clockwise direction in the reticle.
This diagram shows only the reticle lines used for Northern Hemisphere alignment.
The 4 sets of lines for
*
UMi and OV Cep represent the Epochs 2005, 2010, 2020 and 2030. The gap in the longest line is for 2020, the 2
gaps on the 2 segments clockwise are for 2005 and 2010, and the remaining gap counter-clockwise is for 2030. The stars are diagramed in
their Epoch 2010 positions.


