
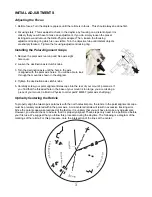
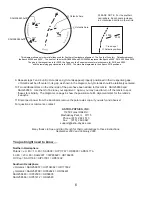

With the Polar Scope Installed in Your Mount
1. Using your mount's azimuth adjustment knobs and altitude fine adjustment, aim your polar axis scope at a
distant object, placing the object in the center of the field where the reticle lines meet. Choose some discrete
point, such as the top of a telephone pole. Be careful not to lower the altitude enough for the motor housing
to hit the mount when turning the right ascension axis. Tighten the adjustment knobs.
2. Rotate the reticle housing within the collar. The object should remain centered at the crossed lines. If the
object moves off the reticle lines and travels in a circle, your polar scope needs adjustment. Try to imagine
where the center of that circle is.
3. Using the Allen wrench provided, adjust by
gently
loosening and tightening the three aligning-adjustment
setscrews on the reticle housing until the point where the reticle lines meet reaches the center of the
imagined circle described in the previous step.
This process must be done very carefully so that the
setscrews do not damage the reticle. ALWAYS loosen the 2 setscrews that the reticle is going to
move towards before you push the reticle with the remaining screw. Use small increments - this is
fine tuning! REMEMBER - If the setscrews are tightened too much (beyond barely snug), the reticle
will crack.
At the time of this writing (2-8-06) there are
NO
replacement reticles available. Be sure all
three setscrews are very gently snugged when finished. They should really just barely touch the glass.
4. Repeat steps 2 and 3 until an object placed where the reticle lines meet remains stationary when the polar
scope is rotated in the collar.
5. Don't forget to turn off the illuminator when you're finished. You're now ready for nighttime polar
alignment.
With a V-block or other holding device
You can also align the polar scope by supporting the Astro-Physics adapter and collar in a stationary position
while rotating the reticle housing. This can be accomplished with a v-block or other holding device in the
daytime prior to installation in your mount. Focus on a distant object and follow steps 2-5 from the previous
section.
Confirm the alignment when the Polar Scope is installed in your mount.
USING YOUR POLAR AXIS TELESCOPE
Northern Hemisphere
1. Set up your mount so that the polar axis (also called RA or Right Ascension Axis) is roughly aligned in
azimuth toward Polaris.
2. Slightly loosen the bolt(s) that lock the polar axis of the mount in place. Adjust the elevation angle of the
polar axis so that the polar axis is roughly pointed at Polaris in altitude. It is easier to adjust the polar axis if
you turn the fine altitude knob with one hand while using the other hand to move the axis manually.
3. Adjust the declination axis (also called Dec. Axis) so that you can look through the polar axis. (See Installing
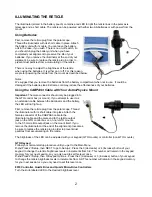
the Polar Alignment Scope.) Clamp the declination axis in place. Thread the polar scope into the polar axis.
4. Thread the illuminator into the polar scope and apply power, if not done already.
*
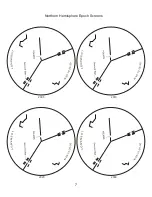
5. Rotate the reticle housing of the polar scope so that the constellation reference lines on the reticle
approximately match the current sky orientation of the Big Dipper and Cassiopeia. Note that these
constellations will not actually be visible through the polar scope.
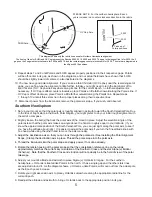
6. Use the mount's azimuth adjustment knobs and altitude fine-adjustment knob to move Polaris into the gap in
its reticle line. Place Polaris approximately as shown in the appropriate diagrams (top of next page and page
7), not in the center of the gap. Polaris is given a single gap, because the other stars used in the alignment
process are all positioned relative to it to arrive at the true pole. Polaris must move within its gap from epoch
to epoch because it and the actual pole are approaching each other. In other words, Polaris' declination is
increasing during the 2005 - 2030 time interval.
7. Rotate the right ascension axis to put Delta ( ) Ursae Minoris (marked "Second Star" in the reticle)
somewhere along the appropriate radial line for the current Epoch.
8. Readjust the altitude and azimuth to bring Polaris back to the appropriate position in its gap.
4


