A
Pump
Handle
1
B
Pump Spout
1
C
Small Platform
1
D
Large Platform
1
E
Small Tub
1
F
Large Tub
1
G
Clear Tube
2
H
Large Screw
3
I
Small Screw
2
J
Electric Pump
1
K
Medium Screw
8
L
Support Post
1
ELECTRICAL SAFETY INSTRUCTIONS
WARNING!
ELECTRICAL SHOCK.
Read and understand all instructions. Failure to follow all
instructions listed below, may result in electrical shock, fire and/or serious personal injury.
Grounding Instructions
This fountain must be plugged into a 3-wire, 3-prong outlet that is properly working and has
been installed and grounded in accordance with all local, state or federal codes and ordinances.
DANGER:
IMPROPER INSTALLATION OF THE GROUNDING PLUG CAN RESULT IN A RISK OF
ELECTRICAL SHOCK.
Check with a qualified electrician or serviceman if the grounding instructions
are not completely understood, or if doubt as to weather the product is properly grounded. Do not
modify the plug provided; if it will not fit the outlet, have a proper outlet installed by a qualified
electrician. Do not use any type of adapter with this product.
PARTS & HARDWARE LIST
PART #
DESCRIPTION
QUANTITY
Carefully remove the contents from the package. If any parts are missing do not
attempt to use the product until they have been obtained and correctly installed.
CAUTION:
Do not over tighten fasteners.
ASSEMBLY INSTRUCTIONS
C
B
I
E
H
F
A
J
G
Figure 3
Figure 4
Figure 1
1
2
K
Figure 2
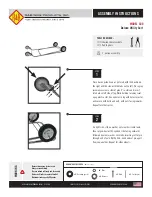
1.
(SEE FIGURE 1)
Attach the small platform (C)
to smal tub (E) using medium screw (K) as
shown. Attach small tub (E) to the large
platform (D) using small screw (I) as shown.
2.
(SEE FIGURE 2)
Attach support post (L) to the
underneath of the large platform (D). Attach
the large platform (D) to the large tub (F)
using medium screws (K) in 4 places as
shown.
4
.
(SEE FIGURE 4)
Attach the clear tube (G) to
bottom of the pump spout (B) and place the
other end of the clear tube through the bottom
of the small tub (E) and large platform (D).
Attach the end of the clear tube (G) to the
electric pump (J) at the opening on the top
of the pump as shown.
3.
(SEE FIGURE 3)
Attach the pump spout (B) to
small platform (C) using large screws (H)
and medium screws (K) in four places as shown.
Attach pump handle (A) to pump spout (B)
using one medium screw (K).
D
D
C
C
E
I
J
G
B
E
F
K
K
D
A
B
H
H
C
F
E
Parts Detail
K
H
K
K
E
D
Outdoor Use Extension Cords.
1. When product is used outdoors, use only extension cords marked for outdoor use.
2. Use only UL listed extension cords. Never use damaged or altered extension cords.
3. Follow extension cord manufacturer safety instruction.
Extension Cords
1. Make sure your extension cord is in good condition.
2. When using extension cords, be sure to use one heavy enough to carry the current your product
requires. An undersized cord will cause a drop in line voltage resulting in power loss and
overheating. Reference Table 1 on the bottom of next page for the correct size to use depending
on cord length and nameplate Ampere rating. If in doubt, use the next heavier gage. The smaller
the gage number, the heavier the cord.
AMP Load
Volts Extension Cord Length
120V
25'
50' 100'
150'
AWG
1-5
18
16
16
14
6-10
18
16
14
12
10-12
14
14
14
12
12-16
14
12
Not recommended
Table 1. Minimum Recommended
Extension Cord Gauge (AWG) Chart
L
L