7
ED7800 Series
Installation Instructions
Concealed Vertical Rod Exit Devices
FM466 04/20
Copyright © 2018, 2020, ASSA ABLOY Access and Egress Hardware Group, Inc. All rights reserved. Reproduction in whole or
in part without the express written permission of ASSA ABLOY Access and Egress Hardware Group, Inc. is prohibited.
For installation assistance contact Corbin Russwin
1-800-543-3658 • [email protected]
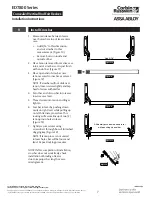
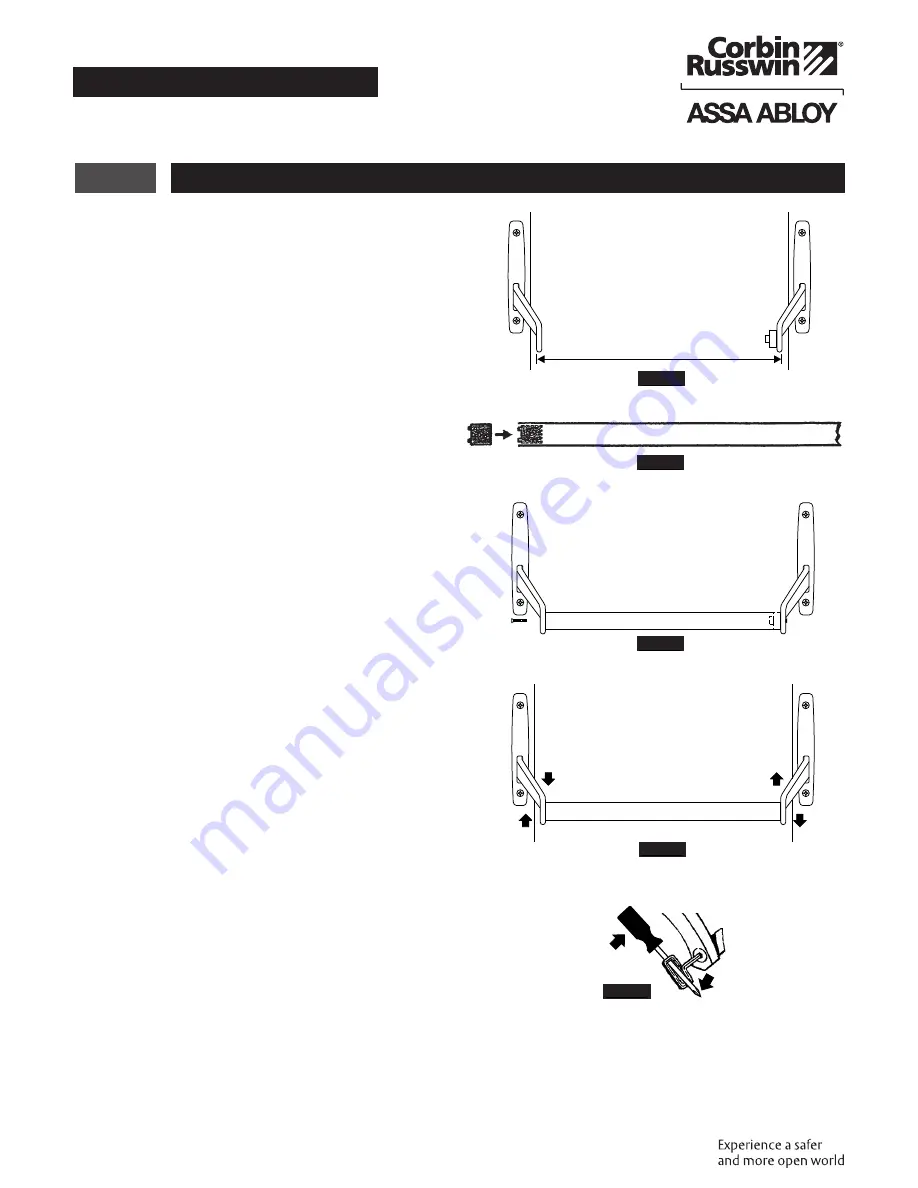
1. Measure distance between levers
near hole where top of lever enters
case.
• Add 3/16" to this dimension
and cut crossbar to this
measurement. (Figure 10)
• Remove burrs on inside and
outside of bar.
2. Place tenon removed from active case
into end of crossbar so it is just flush
with end of bar. (Figure 11)
3. Place open end of crossbar over
tenon secured to inactive case lever.
(Figure 12)
NOTE: If crossbar will not slide over
tenon, loosen screw slightly and tap
head of screw with mallet.
4. Set other end of crossbar into recess
in active case lever.
5. Thread screw into tenon and finger
tighten.
6. Seat bar in lever by pushing down
easily on right lever while pulling up
on left. Alternate procedure. This
rocking will assure lineup of two (2)
tenon pins in holes in lever.
(Figure 13)
7. Tightly secure screws using
screwdriver through bow of furnished
dogging key. (Figure 14)
NOTE: If tenon pins are not seated
in lever holes, bar will be loose and
twist. Repeat rocking procedure.
NOTE: If after completion of installation,
crossbar does not work freely, check
installation of binding of levers
due to improper bar length or case
misalignment.
9
Install Crossbar
Figure 10
Figure 11
Figure 12
Figure 13
Figure 14
Add 3/16"
Alternately push down on one lever
while pushing up on other.


