background image

3 4

3 4

3 4

3 4

3 4

3.4

3.4

3.4

3.4

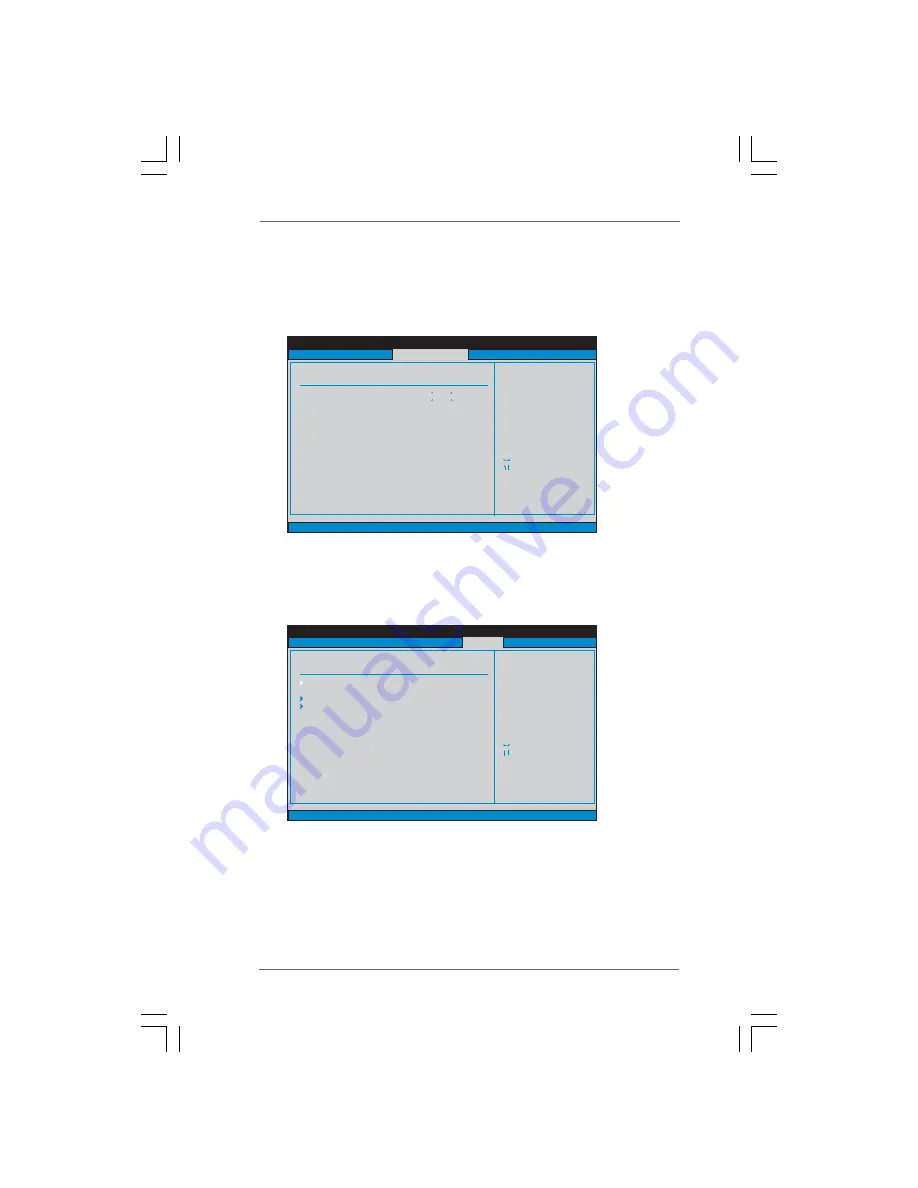
3.4 Hardware Health Event Monitoring Screen

Hardware Health Event Monitoring Screen

Hardware Health Event Monitoring Screen

Hardware Health Event Monitoring Screen

Hardware Health Event Monitoring Screen

In this section, it allows you to monitor the status of the hardware on your system,

including the parameters of the CPU temperature, motherboard temperature, CPU fan

speed, chassis fan speed, and the critical voltage.

3.5

3.5

3.5

3.5

3.5 Boot Screen

Boot Screen

Boot Screen

Boot Screen

Boot Screen

In this section, it will display the available devices on your system for you to config-

ure the boot settings and the boot priority.

BIOS SETUP UTILITY

Hardware Health Event Monitoring

Select Screen
Select Item

F1

General Help

F9

Load Defaults

F10

Save and Exit

ESC

Exit

v02.54 (C) Copyright 1985-2003, American Megatrends, Inc.

CPU Temperature
M / B Temperature

CPU Fan Speed
Chassis Fan Speed

Vcore
+ 3.30V
+ 5.00V
+ 12.00V

: 37 C / 98 F

: 2463 RPM
: N / A

: 1.629V
: 3.306V
: 5.067V
: 11.890V

: 31 C / 87 F

Main

Advanced

Boot

Security

Exit

H/W Monitor

BIOS SETUP UTILITY

Main

Advanced

H/W Monitor

Security

Exit

Boot Settings

Configure Settings
during System Boot.

Select Screen
Select Item

Enter Go to Sub Screen
F1

General Help

F9

Load Defaults

F10

Save and Exit

ESC

Exit

v02.54 (C) Copyright 1985-2003, American Megatrends, Inc.

Boot

Boot Settings Configuration

Boot Device Priority
Removable Drives

Содержание 775VM8

Страница 1: ...1 1 1 1 1 775VM8 User Manual Version 1 0 Published April 2005 Copyright 2005 ASRock INC All rights reserved...

Страница 2: ...ASRock ASRock assumes no responsibility for any errors or omissions that may appear in this manual With respect to the contents of this manual ASRock does not provide warranty of any kind either expr...

Страница 3: ...isks Installation 20 2 10 Hot Plug and Hot Swap Functions for SATA HDDs 20 2 11 Installing Windows 2000 Windows XP Windows XP 64 bit With RAID Functions 21 2 11 1 Installing Windows 2000 Windows XP Wi...

Страница 4: ...Screen 36 3 7 Exit Screen 37 4 Software Support 4 Software Support 4 Software Support 4 Software Support 4 Software Support 38 38 38 38 38 4 1 Install Operating System 38 4 2 Support CD Information 38...

Страница 5: ...ted the content of this manual will be subject to change without notice In case any modifications of this manual occur the updated version will be available on ASRock website without further notice Yo...

Страница 6: ...Mode 6 Supports up to 4 IDE devices Serial ATA 2 SATA connectors Support up to 1 5Gb s data transfer rate Floppy Port Supports up to 2 floppy disk drives Audio 5 1 channels AC 97 Audio OnBoard VGA S3...

Страница 7: ...tem will automatically shutdown Before you resume the system please check if the CPU fan on the motherboard functions properly and unplug the power cord then plug it back again To improve heat dissipa...

Страница 8: ...3 1 2 7 8 9 10 11 12 13 18 14 15 16 17 19 20 21 22 23 24 25 26 27 28 29 1 PS2_USB_PWR1 Jumper 16 Chassis Speaker Header SPEAKER 1 2 ATX 12V Connector ATX12V1 17 USB 2 0 Header USB67 Blue 3 ATX Power...

Страница 9: ...Plus 1 4 ASRock I O PlusTM TM TM TM TM 1 Parallel Port 7 USB 2 0 Ports USB01 2 RJ 45 Port 8 USB 2 0 Ports USB23 3 Line In Light Blue 9 VGA Port 4 Line Out Lime 10 PS 2 Keyboard Port Purple 5 Microphon...

Страница 10: ...2 2 Pre installation Precautions 2 2 Pre installation Precautions 2 2 Pre installation Precautions 2 2 Pre installation Precautions Take note of the following precautions before you install motherboar...

Страница 11: ...ion is found Otherwise the CPU will be seriously damaged Step 1 Open the socket Step 1 1 Disengaging the lever by depressing down and out on the hook to clear retention tab Step 1 2 Rotate the load le...

Страница 12: ...e PnP Cap Pick and Place Cap Use your left hand index finger and thumb to support the load plate edge engage PnP cap with right hand thumb and peel the cap from the socket while pressing on center of...

Страница 13: ...or proper installation please kindly refer to the instruction manuals of your CPU fan and heatsink Below is an example to illustrate the installation of the heatsink for 775 LAND CPU Step 1 Apply ther...

Страница 14: ...adding or removing DIMMs or the system components Step 1 Unlock a DIMM slot by pressing the retaining clips outward Step 2 Align a DIMM on the slot such that the notch on the DIMM matches the break on...

Страница 15: ...d It may cause permanent damage For the voltage information of your AGP card please check with the AGP card vendors Installing an expansion card Installing an expansion card Installing an expansion ca...

Страница 16: ...20 JL1 see p 8 No 20 Note If the jumpers JL1 and JR1 are short both the front panel and the rear panel audio connectors can work Clear CMOS CLRCMOS1 2 pin jumper see p 8 No 11 Note CLRCMOS1 allows you...

Страница 17: ...DE device on this motherboard please set the IDE device as Master Please refer to the instruction of your IDE device vendor for the details Besides to optimize compatibility and performance please con...

Страница 18: ...io input CD1 see p 8 No 22 from sound sources such as AUX1 see p 8 No 23 a CD ROM DVD ROM TV tuner card or MPEG card Front Panel Audio Header This is an interface for the front 9 pin AUDIO1 panel audi...

Страница 19: ...onnector and see p 8 No 29 match the black wire to the ground pin ATX Power Connector Please connect an ATX power 20 pinATXPWR1 supply to this connector see p 8 No 3 ATX 12V Connector Please note that...

Страница 20: ...P4 Connect the other end of the SATA data cable to the SATA hard disk 2 10 Hot Plug and Hot Swap F 2 10 Hot Plug and Hot Swap F 2 10 Hot Plug and Hot Swap F 2 10 Hot Plug and Hot Swap F 2 10 Hot Plug...

Страница 21: ...on appears Please select CD ROM as the boot device C When you see the message on the screen Do you want to generate Serial ATA driver diskette YN press Y D Then you will see these messages Please inse...

Страница 22: ...s from the Support CD again so that VIA RAID Tool will be installed to your system as well 2 12 2 12 2 12 2 12 2 12 Installing Windows 98 ME 2000 XP XP 64 bit Installing Windows 98 ME 2000 XP XP 64 bi...

Страница 23: ...button on the system chassis You may also restart by turning the system off and then back on Because the BIOS software is constantly being updated the following BIOS setup screens and descriptions are...

Страница 24: ...his item to specify the system time System Date Day Month Date Year Use this item to specify the system date BIOS SETUP UTILITY Main Advanced H W Monitor Boot Security Exit System Overview System Time...

Страница 25: ...OS SETUP UTILITY Main H W Monitor Boot Security Exit Advanced Settings WARNING Setting wrong values in below sections may cause system to malfunction Configure CPU Select Screen Select Item Enter Go t...

Страница 26: ...Chipset Configuration DRAM Frequency Flexibility Option DRAM CAS Latency DRAM Command Rate DRAM Voltage AGP Voltage Primary Graphics Adapter AGP Aperture Size AGP Mode AGP Fast Write Onboard AGP Share...

Страница 27: ...alue of this feature is set to Auto If you install an 8X AGP card on this motherboard you may select Auto 8X or 4X as the AGP mode If the installed AGP card is a 4X AGP card then you may set the AGP m...

Страница 28: ...e AC power resumes and the sys tem starts to boot up when the power recovers Ring In Power On Use this item to enable or disable Ring In signals to turn on the system from the power soft off mode PCI...

Страница 29: ...Block Multi Sector Transfer PIO Mode DMA Mode S M A R T 32Bit Data Transfer Auto Auto Auto Auto Auto Disabled Disabled Device Vendor Size LBA Mode Block Mode PIO Mode Async DMA Ultra DMA S M A R T Har...

Страница 30: ...Device such as MO LBA Large Mode Use this item to select the LBA Large mode for a hard disk 512 MB under DOS and Windows for Netware and UNIX user select Disabled to disable the LBA Large mode Block...

Страница 31: ...uration Floppy Configuration In this section you may configure the type of your floppy drive BIOS SETUP UTILITY PCI PnP Configuration Value in units of PCI clocks for PCI device latency timer register...

Страница 32: ...f the parallel port The default value is ECP EPP If this option is set to ECP EPP it will show the EPP version in the following item EPP Version Configuration options Normal Bi Directional and ECP EPP...

Страница 33: ...he support to emulate legacy I O devices such as mouse keyboard etc Or you may select Auto so that the system will start to auto detect if there is no USB device connected Auto option will disable the...

Страница 34: ...tem for you to config ure the boot settings and the boot priority BIOS SETUP UTILITY Hardware Health Event Monitoring Select Screen Select Item F1 General Help F9 Load Defaults F10 Save and Exit ESC E...

Страница 35: ...you may specify the boot sequence from the available devices in your system BIOS SETUP UTILITY Boot Settings Configuration To enable or disable the boot from network feature Select Screen Select Item...

Страница 36: ...or Password Change User Password Security Settings Supervisor Password Not Installed User Password Not Installed 3 6 3 6 3 6 3 6 3 6 Security Screen Security Screen Security Screen Security Screen Sec...

Страница 37: ...hen you select this option it will pop out the following message Dis card changes Select OK to discard all changes Load Optimal Defaults When you select this option it will pop out the following messa...

Страница 38: ...s if the system detects installed devices Please install the necessary drivers to activate the devices 4 2 3 Utilities Menu 4 2 3 Utilities Menu 4 2 3 Utilities Menu 4 2 3 Utilities Menu 4 2 3 Utiliti...

Отзывы: