background image

4

1
2


1

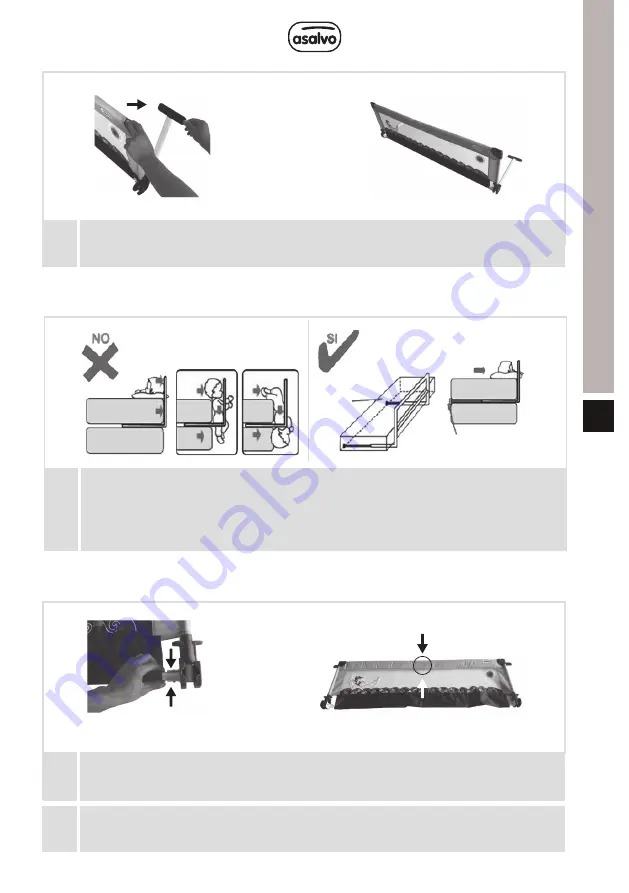
Infine aprire i piedini corti (Fig. 7- Fig. 8)

aperto                                                                finito

FUNZIONE

Posizionando la barriera letto: una volta montato il muro, mettere le gambe 

sotto il materasso. Tirare il nastro al lato opposto del materasso in modo che

 il nastro di plastica è supportato ciascun

PLEGANDO BARRIERA

premi il bottone

Premere il pulsante per rimuovere i tubi. (Fig.11)

Premere il pulsante centrale per piegare la barriera. (Fig.12)

ISTRUZIONI

IT

Fig. 7

Fig. 8

Fig. 9

Fig. 11

Fig. 12

Fig. 10

Содержание 151504

Страница 1: ...atentamente las instrucciones de uso y guarde este manual en un lugar seguro Si no hace esto puede poner en peligro la salud de su b b Ponga especial atenci n a los consejos sobre lavado y cuidado del...

Страница 2: ...s Bot n de bloqueo Fig 2 Fig 4 ENSAMBLAJE Abra la barrera y aseg rese de que el bot n de bloqueo Fig 2 funciona correctamente Fig 1 Fig 2 Conecte ambos tubos e ins rtelos en los huecos destinados a ta...

Страница 3: ...ARRERA Presione en el bot n de los tubos para quitarlos Fig 11 Presione el bot n central para plegar la barrera Fig 12 1 2 Fig 9 Fig 10 Colocaci n de la barrera de cama Una vez montada la barrera pong...

Страница 4: ...n a la seguridad de cualquier mecanismo de cierre y las bisagras que se utilizan en el producto Todas las piezas adicionales y de remplazo s lo se deben obtener del fabricante de 600 mm del suelo Ins...

Страница 5: ...amos contentes de ter seu uso Por favor leia atentamente as instru es e guarde este manual em um local seguro N o fazer isso pode comprometer a sa de do seu b b Preste especial aten o s dicas sobre la...

Страница 6: ...ASSEMBLEIA Abrir a barreira e certi que se o bot o de bloqueio g 2 funciona corretamente Fig 1 Fig 2 Ligue ambos os tubos e inseri los nos furos previstos para o efeito no tecido inferior Fig 3 Fig 4...

Страница 7: ...ot o Fig 11 Fig 12 DOBRANDO A BARREIRA Pressione o bot o para remover os tubos Fig 11 Pressione o bot o central para dobrar a barreira Fig 12 1 2 Fig 9 Fig 10 Depois de instalar a parede coloque as pe...

Страница 8: ...seguran a como um ber o A espessura m xima do colch o da cama que de barreira adequado o 20 cm A barreira de cama deve ser instalado de modo que o seu lado quando na posi o de montagem toca o lado do...

Страница 9: ...bedguard We are glad you have chosen instructions carefully and keep this manual in a safe place Failure to do so may jeopardize the health of your baby Pay special attention to the tips on washing a...

Страница 10: ...il body Open Pic 1 Pic 3 2 pcs tubes Locking button Pic 2 Pic 4 ASSEMBLY Open the handrail and make sure the locking button work well Pic1 Pic2 Connect 2 tubes and put it into the cloth cover Pic3 Pic...

Страница 11: ...he button on tubes to remove the tubes Pic 11 Press on the locking button to close the handrail Pic 12 1 2 Pic 9 Pic 10 PLACING BED RAIL After installing the bed rail put the legs under the mattress P...

Страница 12: ...he mattress place securely attached to both the bed and or the mattress and the bedguard should be checked to ensure that it is The bedguard should be periodically checked for its general condition wi...

Страница 13: ...iamo che siete soddisfatti con il suo uso Si prega di leggere attentamente le istruzioni e conservare questo manuale in un luogo sicuro In caso contrario si pu mettere la salute del vostro bambino a r...

Страница 14: ...onnettori NELLA SCATOLA ASSEMBLEA Aperto Pulsante di bloccaggio Aprire il Fouad e assicurarsi che il blocco pulsante lavoro bene Collegare Inserire Collegare 2 tubi e metterlo in telo di copertura Fig...

Страница 15: ...ttere le gambe sotto il materasso Tirare il nastro al lato opposto del materasso in modo che il nastro di plastica supportato ciascun PLEGANDO BARRIERA premi il bottone Premere il pulsante per rimuove...

Страница 16: ...eve essere controllato per assicurarsi che sia correttamente montato e sicuro La spondina dovrebbe essere controllato periodicamente per sua condizione generale con particolare riferimento alla sicure...

Страница 17: ...nd froh dass Sie sich f r eines unserer Produkte entschieden haben und hoffen dass Sie zufrieden mit der Anwendung sind Bitte lesen Sie die Anweisungen sorgf ltig durch und bewahren Sie diese Bedienun...

Страница 18: ...AUFBAU Offen Schaltfl che Sperren Verbinden Legen Sie Verbinden Sie beide Stangen und f gen Sie sie in die L cher an der Textil Unterseite Foto 3 Foto 4 Pressen Pressen ffnen Sie das Gitter und stell...

Страница 19: ...m die Stangen zu entfernen Foto11 Dr cken Sie auf die Sperren Schaltfl che um das Bettgitter zu falten Foto 12 Foto 9 Foto 11 Foto 12 Foto 10 Nein JA Wenn das Bettgitter aufgebaut ist platzieren Sie d...

Страница 20: ...als 60 cm vom Boden entfernt ist Waschanleitung f r die Gewebeelemente Handw sche bei 20 C Nicht geeignet f r die Verwendung mit lteren oder kranken Erwachsenen oder f r die Verwendung in einer nicht...

Страница 21: ...isfait de son usage Nous vous recommendons de lire attentivement les instructions d usage et gardez ce manuel dans un endroir s r Dans le cas contraire vous pouvez mettre en peril la sant de votre b b...

Страница 22: ...ton de blocage Ouvrir la barri re et assurez vous que le bouton de blocage photo2 fonctionne correctement Photo1 photo 2 Joindre Inserez Joindre les deux tubes et insertez les dans les ori ces destin...

Страница 23: ...gles vers le cot oppos du matelas de mani re que la pi ce de plastique de chaque sangle reste appuy e entre le matelas et le sommier comme montr dans la photo 10 PLIAGE DE LA BARRIERE presionnez le bo...

Страница 24: ...ut m canisme et charni res qui s utilisent pour le produit Toutes les pi ces additionnelles et de remplacement doivent tre obtenues du fabricant La barri re de lit ne doit pas tre utilis e sur des sup...

Страница 25: ...ZABEZPIECZENIE DO ZKA INSTRUKCJA OBS UGI BS 7972 2001 A1 2009 WAZNE ZACHOWAJ JA NA PRZYSZ OSC REF 151505 151504 16553 18786 18793...

Страница 26: ...tworzyc zabezpieczenie i upewnic sie ze przycisk blokady dzia a prawid owo zdj 1 zdj 2 Po aczyc obie rury i wsunac je do otwor w wskazanych na zdjeciu zdj 3 zdj 4 1 2 Nacisnac Nacisnac Zdj 5 Zdj 6 Nac...

Страница 27: ...R Nacisnij przycisk aby usunac rury rys 11 Nacisnij srodkowy przycisk aby z ozyc bariere Rys 12 1 2 Zdj 9 Zdj 10 Umieszczenie zabezpieczenia na zku Po zamontowaniu do sciany po ozyc nogi pod materacem...

Страница 28: ...szkodzona czesc 250 mm 250 mm To nie powinno byc stosowane chyba ze zaczepy sa zamocowane do zka i lub materaca i sciany Raz zainstalowane w miejscu Zabezpieczenie do zka powinno byc okresowo sprawdza...

Страница 29: ...BEDHEKJE Gebruiksaanwijzing BS 7972 2001 A1 2009 BELANGRIJK VOOR RAADPLEGING IN DE TOEKOMST BEWAREN REF 151505 151504 16553 18786 18793...

Страница 30: ...werkt a 1 a 2 Sluit beide buizen op elkaar aan en steek ze in de daarvoor bestemde gaten in het onderste textiel a 3 a 4 1 2 Indrukken Indrukken Afb 5 Afb 6 Kies een willekeurige kant van de buis en d...

Страница 31: ...ze te verwijderen afb 11 Druk de middelste knop in om het hekje in te klappen afb 12 1 2 Afb 9 Afb 10 Aanbrengen van het bedhekje Plaats de poten nadat het hekje in elkaar is gezet onder het matras Tr...

Страница 32: ...nagekeken Daarbij moet in het bijzonder gelet worden op de veiligheid van de sluitmechanismen en scharnieren die in het product worden gebruikt Er mogen alleen aanvullende en reserveonderdelen van de...

Отзывы: