background image

SPECIFICATIONS 

39 

SPECIFICATIONS 

T

ANK AND 

F

RAME


  Capacity of mixing tank: .......................................................................50bu/62.23cu ft. or 75bu/93.34cu ft. 

  Height (variable with tire size): ..................................................................... 

95” (JR50) - 110” (JR75)  

  Width without auger feeder: ........................................................................................... 

90” 

  Overall length:............................................................................................................... 

122” 

  Weight: .................................................................................................... 2750lbs (JR50) - 3000lbs (JR75) 

D

ISCHARGE 

A

UGER


  Auger diameter: .............................................................................................................. 7

” 

  Auger tube diameter: ...................................................................................................... 8

” 

  Vertical operating arc: .......................................................................... 75° Left and 75° Right (from vertical) 

A

UGER 

F

EEDER


  Auger length: ........................................................................................................... 100 inches. 

  Auger diameter: ........................................................................................................ 10 inches. 

  Hopper width open: .................................................................................................. 43 inches. 

  Height of hopper from ground in down position:.................................................... 16-1/2 inches. 

  Height of hopper from ground in up position: ........................................................... 60 inches. 

M

IXING 

A

UGER


  Auger width ............................................................................................................... 12 inches. 

  Mixing base............................................................................................................... 24 inches. 

S

UPPLEMENT 

H

OPPER


  Auger diameter .......................................................................................................... 7 inches. 

  Hopper size..................................................................................................... 21 inches X 24 inches 

  Height from ground ................................................................................................... 41 inches 

H

AMMERMILL


  Width of mill ........................................................................................................... Full 20 inches 

  Screen area .............................................................................................................. 600 sq. in. 

  Operating speed ........................................................................................................ 540 RPM 

  Operating speed of mill ..................................................................................... 2,800 to 3,000 RPM 

  Screen sizes available ............................................................................ 1/8, 5/32, 3/16, 1/4, 3/8, 1/2, 5/8, 


3/4, 1, 1-1/4, 1-1/2, and 2 inch 

  Type drive ........................................................................................ Six double banded 3V belts for 540 RPM 

P

OWER 

R

EQUIRED


  Tractor ..................................................................................................................... 30-100 HP

Содержание JR Series

Страница 1: ...O P E R A T O R S M A N U A L Art s Way Manufacturing Co Inc JR SERIES Grinder Mixer Operator s Manual 642560 Issued 07 2020 ...

Страница 2: ...R READS AND UNDERSTANDS THE OPERATOR S MANUAL FOR THIS MACHINE IMPROPER OPERATION OF THIS MACHINE CAN CAUSE INJURY OR DEATH BEFORE STARTING THE ENGINE DO THE FOLLOWING 1 READ THE OPERATOR S MANUAL 2 READ ALL SAFETY DECALS ON THE MACHINE 3 CLEAR THE AREA OF OTHER PERSONS LEARN AND PRACTICE SAFE USE OF MACHINE CONTROLS IN A SAFE AND CLEAR AREA BEFORE YOU OPERATE THIS MACHINE ON A JOB SITE It is your...

Страница 3: ...ations are to be made without the written permission of Art s Way Manufacturing Co Inc Any modification made without the written permission of Art s Way Mfg Co shall void the warranty of this product In the interest of continued safe operation of this JR Series Grinder Mixer pay particular attention to the safety alert symbol s throughout this Manual ART S WAY MANUFACTURING CO INC STATEMENT OF PRO...

Страница 4: ...d serial number ready This will allow the dealer to fill your order as quickly as possible For your convenience we have provided this space for you to record your model number serial number and the date of purchase as well as your dealer s name and address Owner s Name Owner s Address Purchase Date Dealership Name Dealership Address Dealership Phone No Figure 1 Serial Number Placard Figure 2 Seria...

Страница 5: ...OOKMARK NOT DEFINED UNLOADING AUGER HOOD 23 AUGER FEED OPERATION 23 AUGER FEED POSITIONER 24 AUGER FEED POSITIONER LOCKING PLATE ERROR BOOKMARK NOT DEFINED AUGER FEED CONTROLS 24 GRINDER MIXER ADJUSTMENTS 25 DRIVE CHAIN ADJUSTMENTS 25 MAIN DRIVE CHAIN 25 MAIN DRIVE BELTS 25 HAMMER MILL DOOR 26 HYDRAULIC SWING ADJUSTMENT ERROR BOOKMARK NOT DEFINED SWIVEL STOP ERROR BOOKMARK NOT DEFINED SWIVEL STOP ...

Страница 6: ...ONS 39 TANK AND FRAME 39 DISCHARGE AUGER 39 AUGER FEEDER 39 MIXING AUGER 39 SUPPLEMENT HOPPER 39 HAMMERMILL 39 POWER REQUIRED 39 SPECIFICATIONS SELF CONTAINED HYDRAULICS ERROR BOOKMARK NOT DEFINED PUMP ERROR BOOKMARK NOT DEFINED HYDRAULIC RESERVOIR ERROR BOOKMARK NOT DEFINED FILTERS STRAINERS BREATHERS INDICATORS ERROR BOOKMARK NOT DEFINED HYDRAULIC MOTORS ERROR BOOKMARK NOT DEFINED MANIFOLD VALVE...

Страница 7: ...TABLE OF CONTENTS 5 ...

Страница 8: ...rds at the time of manufacturing A safety conscious equipment operator makes an effective accident prevention program complete Safety features and instructions for the Grinder Mixer are detailed in the section of this Operator s Manual It is the responsibility of the owner to ensure that all operators read and understand the manual before they are allowed to operate the Grinder Mixer Occupational ...

Страница 9: ...ADJUSTMENTS WAIT FOR ALL MOVEMENT TO STOP BEFORE APPROACHING THE MACHINE DURING OPERATION Keep hands feet hair and clothing away from moving parts Keep all guards doors and shields in place and in good working condition Keep all bystanders especially children away from the grinder mixer while in operation Do not allow riders while the grinder mixer is in operation Do not attempt to unclog clean or...

Страница 10: ...0 mph 32 km h when transporting the grinder mixer Always reduce speed on rough roads and surfaces or when going down inclines Use caution when turning and always use the turn signals on the tractor to indicate your turning intentions to the other traffic The weight of the trailed machine should NEVER exceed the weight of the towing vehicle Check all clearances carefully whenever the machine is tow...

Страница 11: ...low easy access to all sides of the machine Use only forklifts lift cranes jacks and tools with sufficient capacity for the loads Do not allow spectators especially children in the working area Remember The Best Operator is a Safe Operator ...

Страница 12: ...fety awareness is the responsibility of each operator of the grinder mixer Keep safety decals and signs clean and legible and be sure replacement parts display the current safety decals and signs as well Remember Always replace missing damaged or illegible safety decals New decals and signs are available from an authorized dealer Figure 4 Generic GM Safety Decal Locations NOTE Keep all decals clea...

Страница 13: ...Figure 5 Safety Decals 2 DANGER Shield Missing 467430 4 DANGER Auger Feeder Hazard 383990 6 DANGER Electrocution Hazard 384000 NOTE Keep all decals clean and free of dirt for maximum visibility Replace all individual decals that are no longer legible Read and obey all safety decals and be familiar with their meaning ...

Страница 14: ...383970 8 WARNING Moving Flywheel Hazard 368350 10 CAUTION Safety Instructions 368040 12 CAUTION Do Not Open 377280 Figure 6 Safety Decals NOTE Keep all decals clean and free of dirt for maximum visibility Replace all individual decals that are no longer legible Read and obey all safety decals and be familiar with their meaning ...

Страница 15: ...r mixer select and install the screen size desired Sizes are available from 1 8 to 2 inch openings For screen selection guidelines refer to OPERATION OF GRINDER MIXER Hammer mill Screens All types of grain can be ground with the hammer mill Hay can be ground with a minimum of 1 3 mixer of grain Material is fed into the hammer mill where it is ground until it can pass through the screen size select...

Страница 16: ...standard equipment on the Art s Way JR Series Grinder Mixer including JR50 75 1 9 5L x 15 8 ply tires 2 Magnet in the hammer mill throat 3 Tongue jack 4 Discharge auger hood with spring loaded relief door 5 Tractor run hydraulics to power the unloading auger Below is a list of optional attachments available 1 Auger feeder hydraulic Figure 8 Model JR50 Without Auger Feeder 2 Electronic scale with d...

Страница 17: ...xtension hydraulic auger feeder or roll feed refer to OPERATION OF GRINDER MIXER Unloading Auger Hood and Auger Feed Operation sections as well as the ATTACHMENTS section for instructions TIRES Keep tires properly inflated Lack of pressure can result in torn valve stems fabric breaks and uneven tread wear Too much pressure can cause undue strain on fabric excessive tread wear and allows the tire t...

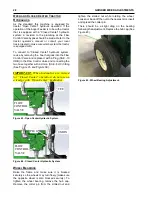
Страница 18: ...rinder mixer is designed to attach to any SAE ASAE standardized tractor drawbar Adjust the drawbar so it is 13 to 17 inches above the ground See Figure 12 Extend or shorten the tractor drawbar so the horizontal distance from the end of the tractor PTO shaft to the center of the hitch pin hole is 14 inches for 540 RPM Lock the drawbar in its crossbar parallel with the centerline of the PTO Place lo...

Страница 19: ...lement shield chain located in the main shield base slot and the tractor shield chain to the tractor drawbar BEFORE GRINDING New machines should be operated before preparing feed A few hundred pounds of coarse material such as shelled corn or ground cobs should be ran through the grinder mixer This will remove the protective oil coating from the mixer cone and any metal particles that may be in th...

Страница 20: ...ovided in the mill throat with a rubber baffle removed for roll feed installation behind it See Figure 17 The feed gate should be set to the lowest possible position to allow material to flow into the hammer mill evenly Figure 17 Feed Gate at Throat of the Hammer mill HAY RETARD BOLTS The hay retard bolts will help maintain uniform feeding while grinding hay See Figure 18 The degree of the retard ...

Страница 21: ...S CAUTION DISENGAGE ALL THE DRIVES SHUT OFF THE TRACTOR ENGINE AND PLACE THE KEY IN YOUR POCKET BEFORE INSTALLING OR CHANGING HAMMERMILL SCREENS NEVER OPEN THE HAMMERMILL COVER UNTIL THE HAMMERMILL HAS COME TO A COMPLETE STOP To install or change the screen open the hammer mill door and remove the screen with the hook provided See Figure 19 Figure 19 Changing Screens The screen support rack will d...

Страница 22: ...EEP HANDS AND FEET CLEAR OF AUGER MAKE SURE GRATE IS ALWAYS IN PLACE Note For best results add the concentrate or supplement before grinding operation Do not add ingredients to the supplement hopper while grinding this will over load the auger Figure 21 Supplement Hopper Located on Center Rear Right Hand Side of Machine If micro ingredients are to be added to the feed the best results are obtained...

Страница 23: ...he mixing tank windows If the top window is covered this does not mean the tank is full as the mixing auger throws material away from the center of the tank Continue loading until the top window clears feed drops and then becomes covered again about half way See Figure 23 Stop feeding material into the processor at this point but continue operating until the processor has had time to clear Do not ...

Страница 24: ...nished feed may be unloaded into storage bins wagons or feeders Positioning of the auger is done manually and the drive of the unloading auger is controlled hydraulically Figure 25 Unloading Auger DISCHARGE GATE FUNCTION When the discharge auger is in position to unload the tank the gate is opened and closed manually Once the desired opening is achieved with the discharge gate use the aluminum win...

Страница 25: ...rope Remove the clip pin holding the Auger Feeder folding hopper up and then swing the hopper down Figure 29 Auger Feeder Installed on JR75 DANGER TO PREVENT PERSONAL INJURY 1 USE THE GRATE OVER THE AUGER WHENEVER POSSIBLE 2 KEEP HANDS AND FEET OUT OF THE HOPPER AREA AND DO NOT CLIMB ON OR OVER THE HOPPER AT ANY TIME 3 KEEP CHILDREN AND BYSTANDERS AWAY FROM THE MACHINE WHILE THE MACHINE IS IN OPER...

Страница 26: ...auger feeder housing To shut off the auger feeder pull the handle at the hopper area or move the flow control valve to off See Figure 32 and Figure 33 Figure 32 Hydraulic Auger Feeder Controls Shown in Off and Transport Position Throttle Controls White Arrow and Emergency Shutoff Red Arrow Figure 33 Hydraulic Auger Feeder Control Shown in Full Off Position See Arrow To start the auger feeder the f...

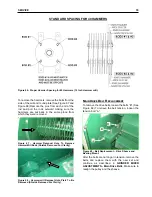
Страница 27: ...re 35 Drive Chain Adjustment Shields Removed for Clarity MAIN DRIVE BELTS Belts on the new machines have been properly tensioned at the factory To re tension the belts on a machine which has been in operation Loosen bolts B and C See Figure 36 Place a scale at the midway point of the double v belts on the pulleys Adjust bolt A See Figure 36 until 15 pounds of pull on the scale raises the top of on...

Страница 28: ...lt Pulley Alignment HAMMER MILL DOOR To increase the hammer mill door pressure on the screen adjust the length of the T handle threaded end Check the adjustment and tighten the locking nuts in place against the pivot block See Figure 40 Figure 40 Hammer Mill Door Pressure DISCHARGE AUGER DRIVE ADJUSTMENT There is only one location for the Discharge Auger Drive chains See Figure 41 The Discharge Au...

Страница 29: ...GRINDER MIXER ADJUSTMENTS 27 Figure 42 Discharge Auger Drive Chain Shield Removed for Clarity A B C D B C D ...

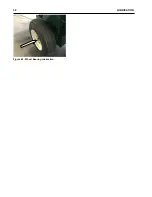
Страница 30: ...connecting the two hose together with a Union SAE 8 JIC fitting See Figure 43 and Figure 44 IMPORTANT When hydraulics are revised for Closed Center operation do not use on a tractor with Open Center hydraulics Figure 43 Open Center Hydraulic System Figure 44 Closed Center Hydraulic System WHEEL BEARINGS Raise the frame and make sure it is blocked securely so the wheels may turn freely make sure th...

Страница 31: ...s accessible through cutout slots in spin shields See Figure 46 Figure 46 PTO Driveline Shaft See Arrow Grease the bearing crosses and plastic shaft bearings every 20 hours The bearing cross zerk can be accessed through round hole in PTO spin shield See Figure 47 Figure 47 PTO Driveline Cross Bearing Left Arrow and Plastic Shaft Bearings Right Arrow HAMMER MILL SHAFT BEARINGS Grease the front and ...

Страница 32: ... Removed For Clarity Figure 52 Mixer Drive Shaft Bearing Front Figure 53 Mixer Drive Shaft Bearing Rear Shield Removed For Clarity CHAINS Chains should be lubricated at frequent intervals Apply light engine oil 10wt to the chain or aerosol chain lube Oil the chain on the inside located in the upper side of lower the strand See Figure 54 The chains should also be cleaned regularly Remove the chains...

Страница 33: ...ated on rear base housing of mixer See Figure 57 Figure 57 Gearbox Lubrication Upper Bearing Remote Location LOWER VERTICAL MIXING AUGER Refill the grease seal at the bottom of the vertical mixing auger every six months with SAE multi purpose type grease Access to this fitting can be gained through the clean out door in the mixing tank cone below the large bottom flight of the mixing auger See Fig...

Страница 34: ...32 LUBRICATION Figure 60 Wheel Bearing Lubrication ...

Страница 35: ...5 Bolts SHEAR BOLTS WARNING SHEAR BOLTS MAKE A LOUD NOISE WHEN SHEARED IMMEDIATELY SHUT THE TRACTOR IGNITION OFF AND DETERMINE THE CAUSE OF SHEARING Shear bolts will make a loud noise when they shear This is your warning to turn off the tractor ignition immediately and determine the cause of the shear When replacing sheared bolts always tighten them securely using lock nuts The shear bolts must be...

Страница 36: ...GED HAMMERS Hammers must be replaced in pairs to maintain proper balance This is accomplished by replacing the hammers opposite of each other 180 degrees apart using a matched pair REVERSING THE HAMMERS CAUTION MAKE SURE THE HAMMER MILL HAS STOPPED ROTATING BEFORE THE HAMMER MILL DOOR IS OPENED SHUT THE TRACTOR OFF AND PLACE THE KEY IN YOUR POCKET SAFELY DISENGAGE ALL DRIVES There are four rows of...

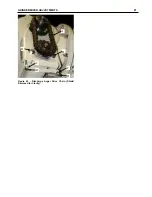
Страница 37: ... 67 Hammer Removal Hole To Remove Hammer Mill Rods Shields Removed For Clarity Figure 68 Hammer mill Removal Hole Plate To Be Removed Shields Removed For Clarity MAIN DRIVE BELT REPLACEMENT To remove the drive belts loosen the bolts B See Figure 82 To relieve the belt tension loosen the tension bolt A Figure 69 Belt Replacement Drive Sheave and Bearing Mount After the belts are no longer in tensio...

Страница 38: ...it is in operation Turning the mixer too sharply Avoid sharp turns Low volume from hammer mill Hammer mill is not operating at optimum speed Before grinding set tractor throttle to rated PTO speed 540 rpm Hammer mill screens and or hammers are worn Reverse and or replace the screens and hammers if necessary Hammer mill is not level Find level surface if at all possible Mill drive belts are slippin...

Страница 39: ...TO and or check shear bolts Discharge auger will not engage Discharge auger drive chain s broken or slipping Replace and or retighten chain s Discharge auger drive hydraulic motor not working Check hydraulic system Discharge auger slows down or stalls Feed overloading discharge auger Lower gate to reduce feed flow to rate discharge auger can handle Reduced hydraulic fluid flow to motors Increase h...

Страница 40: ...ined Complete installation and operating instructions are included with the attachment Figure 70 Scale Head Attachment 640 Shown DISCHARGE UNLOADING AUGER EXTENSIONS 3 foot and 6 foot bolt on discharge auger extensions are available For unloading height obtainable with various extensions added to the unloading auger system refer to Error Reference s ource not found For unloading auger instructions...

Страница 41: ... inches Hopper width open 43 inches Height of hopper from ground in down position 16 1 2 inches Height of hopper from ground in up position 60 inches MIXING AUGER Auger width 12 inches Mixing base 24 inches SUPPLEMENT HOPPER Auger diameter 7 inches Hopper size 21 inches X 24 inches Height from ground 41 inches HAMMERMILL Width of mill Full 20 inches Screen area 600 sq in Operating speed 540 RPM Op...

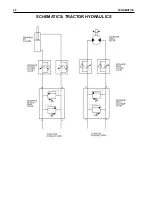
Страница 42: ...40 SCHEMATICS SCHEMATICS TRACTOR HYDRAULICS ...

Страница 43: ...odel and Serial Number so your local dealer can provide the correct manuals for your machine Art s Way Manufacturing Co Inc reserves the right to make improvements in design or changes in specifications at any time without incurring any obligation to install them on units previously sold Except as expressly authorized no part of this manual may be reproduced copied transmitted disseminated downloa...

Страница 44: ...Art s Way Manufacturing Co Inc Hwy 9 West PO Box 288 Armstrong IA 50514 U S A ...

Отзывы: