


GRINDER MIXER ADJUSTMENTS
79
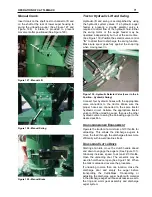
Figure 149 - Roll Scraper Adjustment Bolts
Repeat this procedure for the opposite roll. To
check for actual scraper clearance, remove the side
panels of the mill and measure the clearance with a
feeler gage.
NOTE:
Do not adjust rolls scrapers with the tractor
PTO engaged. Roll to scraper contact with the PTO
engaged will severely damage the rolls and
scrapers.
M
ANUAL
U
NLOADING
A
UGER
S
WING
C
RANK
A
DJUSTMENT
F
OR
S
PROCKET
E
NGAGEMENT
Adjust by loosening the three bolts shown (See
Figure 150) and moving the assembly up to engage
the teeth of the sprocket with the disk.
Figure 150 - Manual Unloading Auger Swing Crank
Adjustment
M
ANUAL
U
NLOADING
A
UGER
S
WING
B
RAKE
A
DJUSTMENT
Tighten or loosen nut and bolt, to maintain tension
to hold unloading auger (See Figure 151).
Figure 151
– Manual Brake Adjustment
M
ANUAL
L
IFT
A
DJUSTMENT
If the chain becomes loose, loosen bolts on the
crank shaft and position chain to the proper tension
(See Figure 152).
Figure 152 - Crank Shaft Chain Adjustment Bolts
H
YDRAULIC
S
WING
D
RIVE
A
DJUSTMENT
If any problem is encountered with the hydraulic
swing adjustment drive, adjust and/or check as
follows: (See Figure 153.)
Содержание CATTLEMAXX 6105
Страница 7: ...TABLE OF CONTENTS 5 ...
Страница 14: ...12 INTRODUCTION Figure 5a Safety Decals ...
Страница 22: ...20 PREPAIRING THE GINDER MIXER FOR OPERATION Figure 15 PTO Support ...
Страница 27: ...OPERATION OF GRINDER MIXER 25 cleaned out Keep all bystanders away from the machine ...
Страница 42: ...40 LUBRICATION Figure 70 Hammermill engaging pin shields removed for clarity ...
Страница 49: ...SERVICE 47 Figure 96 Belt Removal Shields Removed For Clarity B C ...
Страница 78: ...76 OPERATION OF CATTLEMAXX Figure 143 Hopper Inspection Window ...


