


PREPARING THE CATTLEMAXX FOR OPERATION
61
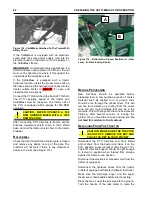
Figure 111 - SAE Bolt Identification.
IMPORTANT:
Shear bolts must be replaced with
bolts of the same grade.
See “Service” section on
page 88.
Lubricate the CattleMaxx at regular intervals as
instructed in the lubrication sections. (Refer to the
LUBRICATION section page 83)
P
REPARING
T
HE
T
RACTOR
The tractor must be equipped with a 540 RPM PTO
to match the CattleMaxx as described in the
previous section. Make sure the CattleMaxx and
the tractor are equipped and set for the proper
RPM.
CAUTION: NEVER OPERATE A 540 RPM
CATTLEMAXX WITH A 1000 RPM
TRACTOR PTO.
T
RACTOR
H
ITCH
The hitch for the CattleMaxx is designed to attach
to any SAE
– ASAE standardized tractor drawbar.
Adjust the drawbar so it is 13 to 17 inches above
the ground (See Figure 112). Extend or shorten the
tractor drawbar so the horizontal distance from the
end of the tractor PTO shaft to the center of the
hitch pin hole is 14 inches for 540 RPM drives.
Lock the drawbar in its crossbar, parallel with the
centerline of the PTO. Place locking pins on each
side of the drawbar. If the tractor has an offset
drawbar, the offset should be down for PTO work.
IMPORTANT:
An improperly located hitch point
may cause damage to the universal joints
(U-Joints) of the PTO driveline.
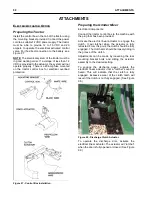
Figure 112 - Hitch Point Locations
A
TTACHING
T
O
T
HE
T
RACTOR
NOTE:
Height of the unloading auger tube needs to
be checked. Move the saddle on the side of the
mixing tank so the tube will properly clear the tractor
and cab.
Carefully back the tractor up to the hitch. Use the
crank of the jack to raise or lower the CattleMaxx
hitch into position to engage the tractor drawbar.
Fasten the CattleMaxx hitch to the drawbar with a
hitch pin that cannot bounce out. Raise the jack and
lock into the transport position (See Figure 113).
Attach the safety chain from the grinder mixer to the
tractor (See Figure 114).
CAUTION: ALWAYS FOLLOW STATE
AND
LOCAL
REGULATIONS
REGARDING A SAFETY CHAIN WHEN
TOWING
FARM
EQUIPMENT
ON
PUBLIC HIGHWAYS.
Figure 113 - Jack in Transport Position
Содержание CATTLEMAXX 6105
Страница 7: ...TABLE OF CONTENTS 5 ...
Страница 14: ...12 INTRODUCTION Figure 5a Safety Decals ...
Страница 22: ...20 PREPAIRING THE GINDER MIXER FOR OPERATION Figure 15 PTO Support ...
Страница 27: ...OPERATION OF GRINDER MIXER 25 cleaned out Keep all bystanders away from the machine ...
Страница 42: ...40 LUBRICATION Figure 70 Hammermill engaging pin shields removed for clarity ...
Страница 49: ...SERVICE 47 Figure 96 Belt Removal Shields Removed For Clarity B C ...
Страница 78: ...76 OPERATION OF CATTLEMAXX Figure 143 Hopper Inspection Window ...


