background image

Software Installation

BeMicro Max 10 Getting Started User Guide, Version 14.0

6

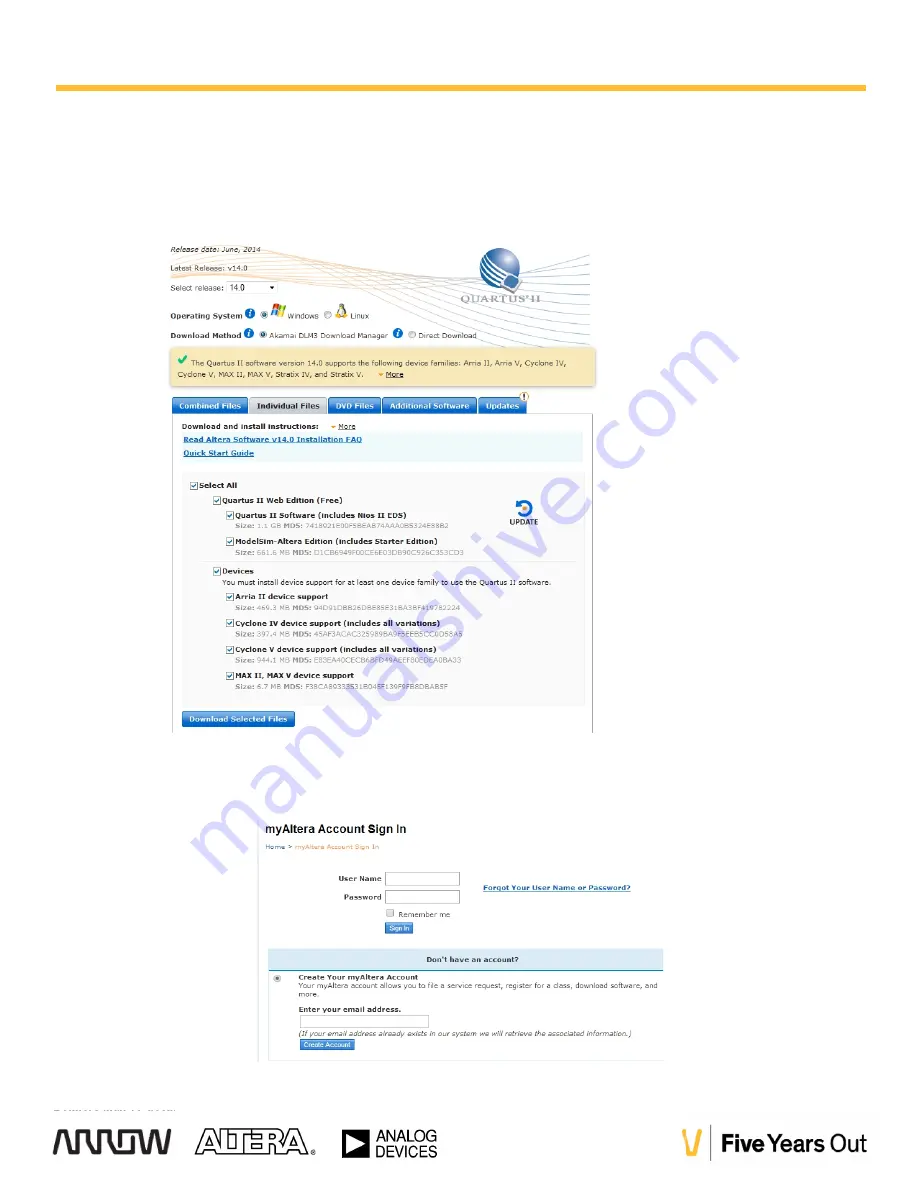
Click on the “

Download

” button next to “

Quartus II Web Edition

Ensure that the release of

Quartus II Web Edition

is set to

14.0

and select your operating system:

Select the

“Individual Files”

Tab

Select the

“ Download Selected Files”

Button

Download

the Quartus II software files onto your computer.

Login to

myAltera

account. Use your

existing login

, or

Create Your myAltera account.

Содержание BeMicro Max 10

Страница 1: ...Max 10 Kit Example Project 15 3 PINOUT INFORMATION FOR MAX 10 FPGA I O 16 3 1 Analog Devices External Peripherals 16 3 1 1 Accelerometer 3 Axis SPI interface ADXL362 16 3 1 2 DAC 12 bit SPI interface AD5681 16 3 1 3 Temperature sensor I2C interface ADT7420 17 3 2 External Memory Devices 17 3 2 1 8MB SDRAM 17 3 2 2 Serial Flash 18 3 3 User Interaction 18 3 3 1 LEDs 18 3 3 2 Push Buttons 19 3 4 MAX ...

Страница 2: ...n connectivity The kit retains the 80 pin edge connector interface used on previous Arrow BeMicro kits Users can migrate their designs from BeMicro SDK or BeMicro CV easily and take advantage of the new features Altera offers in the MAX 10 FPGA device such as an ADC block temperature sense diode and flash memory 1 1 Board Features One MAX 10 FPGA 10M08DAF484 o 8 000 LEs o 414 Kbit Kb on chip memor...

Страница 3: ...alog input header o One 80 pin BeMicro card edge connector Power via USB or via user provided 5V supply 1 2 Block Diagram Below is a block diagram of the board Figure 1 1 BeMicro Max 10 Block Diagram Clocks Clock 50 MHz Clock 24 MHz GPIO 2x PMOD 2x6 2x Pin Headers 2x20 80 pin Edge Connector Sensors Accelero meter Photo Sensor Temp Sensor Thermal Resistor 8 MB SDRAM USB Blaster Mini USB MAX V FT240...

Страница 4: ... Your BeMicro Max10 is preloaded with a simple design which can be used to confirm that your kit is operational upon power up Connect your BeMicro Max10 board to any USB power source PC or USB charger and watch the LED1 shine Put your finger on the Analog Devices ADT7420 temperature sensor and watch the LEDs change intensity Your finger need to be somewhat close to body temperature The temperature...

Страница 5: ...nthesis and compilation tool that includes the IP Catalog and QSys integration tools You will first install the full installation of version 14 0 This installation will not contain support for MAX 10 FPGA so it will need to be updated to 14 0 2 or newer Web Edition is a free version of the software with no licensing required NOTE Subscription Edition which requires a paid license can be used in pl...

Страница 6: ...II Web Edition Ensure that the release of Quartus II Web Edition is set to 14 0 and select your operating system Select the Individual Files Tab Select the Download Selected Files Button Download the Quartus II software files onto your computer Login to myAltera account Use your existing login or Create Your myAltera account Software Installation BeMicro Max 10 Getting Started User Guide Version 1...

Страница 7: ...uide Version 14 0 7 Select a download folder may have to Make New Folder The files will then be downloaded via the Download Manager After the file is downloaded on the computer select the exe file and install the software Accept the license agreement then Next Software Installation BeMicro Max 10 Getting Started User Guide Version 14 0 7 Select a download folder may have to Make New Folder The fil...

Страница 8: ...n Next Software Installation BeMicro Max 10 Getting Started User Guide Version 14 0 8 Select the default installation directory then Next Select all of the defaults for the installation then Next Software Installation BeMicro Max 10 Getting Started User Guide Version 14 0 8 Select the default installation directory then Next Select all of the defaults for the installation then Next ...

Страница 9: ...Edition Software Installation BeMicro Max 10 Getting Started User Guide Version 14 0 9 The installation of QII Web Edition will begin The installation will continue with ModelSim Starter Edition Software Installation BeMicro Max 10 Getting Started User Guide Version 14 0 9 The installation of QII Web Edition will begin The installation will continue with ModelSim Starter Edition ...

Страница 10: ... Launch USB Blaster II driver installation select Finish The BeMicro Max 10 has an integrated USB Blaster which is different than the USB Blaster II and has a separate driver The USB Blaster driver will be installed in a later step when the BeMicro Max 10 is connected to the PC Select Finish Software Installation BeMicro Max 10 Getting Started User Guide Version 14 0 10 Uncheck the Launch USB Blas...

Страница 11: ...ch includes the MAX 10 FPGA device family support Return to the Altera Download web page at https www altera com download dnl index jsp This time select the Updates tab Select Quartus II Software v14 0 Update 2 Click on the Download Selected Files button and the follow the instructions to download and install the update Software Installation BeMicro Max 10 Getting Started User Guide Version 14 0 1...

Страница 12: ...ich is sent over a Secure Sockets Layer SSL connection to Altera By enabling TalkBack this will enable useful features such as the SignalTap II Logic Analyzer SignalProbe and multiprocessor compilation support Select All Programs Altera 14 0 0 200 Web Edition Quartus II Web Edition 14 0 0 200 64 bit Quartus II 14 0 64 bit Enable Talkback 2 3 Install USB Blaster Driver Connect your BeMicro Max 10 k...

Страница 13: ... Windows driver installation will not find a driver Click Close Launch the Windows Device Manager by clicking on the Windows Start button and selecting Control Panel then double clicking on the Device Manager icon Right click on the USB Blaster which will be listed under Other Devices Software Installation BeMicro Max 10 Getting Started User Guide Version 14 0 13 The Windows driver installation wi...

Страница 14: ...e the Windows couldn t find driver software for your device dialog box Click Browse and browse to the C altera 14 0 quartus drivers usb blaster directory o Note Do not select the x32 or x64 directories Click OK Select the Include subfolders option and click Next If you are prompted Windows can t verify the publisher of this driver software select Install this driver software anyway in the Window S...

Страница 15: ...ble to assist you in getting started The projects can be found online at the AlteraWiki http www alterawiki com wiki BeMicro_MAX_10 Create a folder C altera 14 0 kits bemicro_m10 on your PC Download and extract the files for one of the project examples to the folder you just created CONGRATULATIONS You have just completed all the setup and installation requirements and are now ready to begin your ...

Страница 16: ...l the pins for a given connector or peripherals the tables in this section focus on the FPGA signals needed for FPGA pin assignment and compilation The Signal Name column in the tables throughout this section indicates the naming of the signal in the Quartus projects QSF1 file provided in the various FPGA projects 3 1 Analog Devices External Peripherals 3 1 1 Accelerometer 3 Axis SPI interface ADX...

Страница 17: ...AM device which is connected to the MAX 10 FPGA and provides 8MB of memory which can be accessed by an FPGA design Signal Name MAX 10 Pin SDRAM_A 0 T20 SDRAM_A 1 T19 SDRAM_A 2 T18 SDRAM_A 3 AA21 SDRAM_A 4 AA22 SDRAM_A 5 U22 SDRAM_A 6 T22 SDRAM_A 7 R22 SDRAM_A 8 P20 SDRAM_A 9 P22 SDRAM_A 10 U21 SDRAM_A 11 P19 SDRAM_A 12 N20 SDRAM_BA 0 R20 SDRAM_BA 1 T21 SDRAM_CASn N21 SDRAM_CKE N22 SDRAM_CLK M22 SD...

Страница 18: ...bit The BeMicro MAX 10 contains a 16 Mbit SPI interface serial NOR flash device Micron M25P16 VMN6 which can be used for off chip storage in case a design s flash storage needs are larger than the internal MAX 10 FPGA User Flash Memory UFM Signal Name MAX 10 Pin SFLASH_ASDI R11 SFLASH_CSn R10 SFLASH_DATA P10 SFLASH_DCLK P11 3 3 User Interaction 3 3 1 LEDs Board Label Signal Name MAX 10 Pin D1 USER...

Страница 19: ... Pin MAX 10 ADC channel number Board Connection Point AIN 0 F5 Ch 1 2x2 header J11 pin 1 AIN 1 E4 Ch 9 2x2 header J11 pin 2 AIN 2 F4 Ch 2 testpoint TP12 silkscreen AIN3 on back AIN 3 E3 Ch 16 testpoint TP13 silkscreen AIN4 on back AIN 4 J8 Ch 3 testpoint TP15 silkscreen AIN5 on back AIN 5 G4 Ch 11 testpoint TP14 silkscreen AIN6 on back 3 4 2 Photo Resistor In addition the BeMicro Max 10 board cont...

Страница 20: ...0 Pin EG_P1 C1 EG_P2 D2 EG_P3 D1 EG_P4 D3 EG_P5 E1 EG_P6 F2 EG_P7 F1 EG_P8 G1 EG_P9 H1 EG_P10 J1 EG_P11 K2 EG_P12 L2 EG_P13 N2 EG_P14 P3 EG_P15 P1 EG_P16 R3 EG_P17 T2 EG_P18 R4 EG_P19 T5 EG_P20 Y1 EG_P21 Y2 EG_P22 AA1 EG_P23 AA2 EG_P24 Y3 EG_P25 Y4 EG_P26 AB6 EG_P27 AB7 EG_P28 AA8 EG_P29 AB8 Signal Name MAX 10 Pin EG_P35 E11 EG_P36 E10 EG_P37 D9 EG_P38 E9 EG_P39 E8 EG_P40 D8 EG_P41 E6 EG_P42 D7 EG...

Страница 21: ...DIFF_RX_P 3 H14 33 DIFF_RX_P 3 n J13 34 DIFF_RX_P 4 C14 31 DIFF_RX_P 4 n C13 32 DIFF_RX_P 5 A14 27 DIFF_RX_P 5 n B14 28 DIFF_RX_P 6 D14 25 DIFF_RX_P 6 n E13 26 DIFF_RX_P 7 E12 23 DIFF_RX_P 7 n D13 24 DIFF_RX_P 8 H12 21 DIFF_RX_P 8 n J11 22 DIFF_RX_P 9 B10 19 DIFF_RX_P 9 n C9 20 DIFF_RX_P 10 A9 17 DIFF_RX_P 10 n B8 18 DIFF_RX_P 11 A7 15 DIFF_RX_P 11 n A8 16 Signal Name MAX 10 Pin J4 Pin I2C_SDA AA1...

Страница 22: ... 3 E18 Signal Name MAX 10 Pin PMOD_B 0 E19 PMOD_B 1 F18 PMOD_B 2 F20 PMOD_B 3 G19 Signal Name MAX 10 Pin PMOD_C 0 U18 PMOD_C 1 U17 PMOD_C 2 R18 PMOD_C 3 P18 Signal Name MAX 10 Pin PMOD_D 0 R14 PMOD_D 1 R15 PMOD_D 2 P15 PMOD_D 3 P14 3 6 Clock Inputs The clocking on the BeMicro Max 10 is provided by a 50 MHz oscillator and a 24 MHz oscillator which connect to the MAX 10 FPGA s clock input pins The 5...

Страница 23: ...Version 14 0 23 3 7 Boot Select Jumper J3 is used to strap the MAX 10 FPGA device s BOOT_SEL pin The 10M08 device supports holding two FPGA images is its Configuration Flash Memory The BOOT_SEL pin can be used to allow the user to select which image is loaded by default on power up Pinout Information for MAX 10 FPGA I O BeMicro Max 10 Getting Started User Guide Version 14 0 23 3 7 Boot Select Jump...

Страница 24: ... com wiki BeMicro_MAX_10 Some of the tutorials available which can be found on the above AlteraWiki site are Intro to FPGAs Lab designed to get someone familiar with the basics of FPGA design by building a simple design from scratch Temperature Sensor Lab another simple lab to show using the MAX10 ADC and temp sensor Embedded System Lab advanced lab to show building a QSys and Nios II system This ...

Отзывы: