background image

23

TO REMOVE WHEEL (See Fig.  33)

•  Block up axle securely.
• 

Remove axle cover, retaining ring and washers to allow 

wheel removal (rear wheel contains a square key - Do 

not lose).

•  Repair tire and reassemble.
•  On rear wheels only:  align grooves in rear wheel hub 

and axle.  Insert square key.

•  Replace washers and snap retaining ring securely in 

axle groove.

•  Replace axle cover.

NOTE: 

To seal tire punctures and prevent flat tires due 

to slow leaks, tire sealant may be purchased from your 

local parts dealer. Tire sealant also prevents tire dry rot 

and corrosion.

FRONT WHEEL TOE-IN/CAM BER

Your new tractor front wheel toe-in and camber is set at the 

factory and is normal. The front wheel toe-in and camber 

are not adjustable.  If damage has occurred to affect the 

factory set front wheel toe-in or camber, contact a qualified 

service center.

Fig. 33

RE TAIN ING 

RING

WASH ERS

SQUARE KEY (REAR 

WHEEL ONLY)

AXLE 

COVER

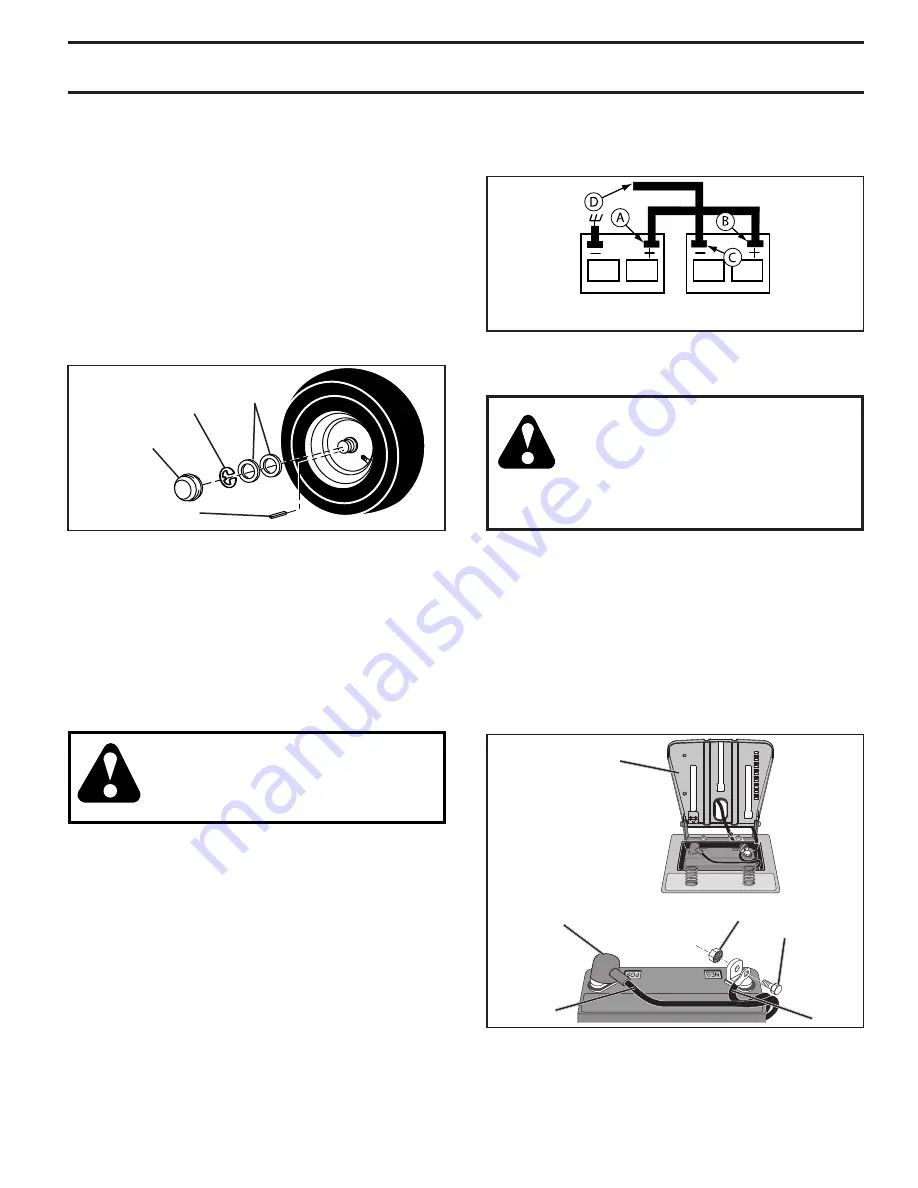
TO START ENGINE WITH A WEAK BATTERY 

(See Fig. 34) 

WARNING:  Lead-acid batteries gen er ate 

ex plo sive gases.  Keep sparks, flame and 

smoking ma te ri als away from bat ter ies.  

Always wear eye pro tec tion when around 

batteries.

If your battery is too weak to start the engine, it should be 

recharged. (See "BATTERY" in the MAINTENANCE sec-

 tion of this man u al).
If “jumper ca bles” are used for emer gen cy starting, follow 

this pro ce dure:

IMPORTANT

:  YOUR TRACTOR IS EQUIPPED WITH A 12 

VOLT SYSTEM. THE OTHER VEHICLE MUST ALSO BE A 12 

VOLT SYSTEM. DO NOT USE YOUR TRACTOR BATTERY TO 

START OTHER VEHICLES. 

TO ATTACH JUMPER CABLES -

 •  Connect one end of the RED cable to the POSITIVE 

(+) terminal of each battery(A-B), taking care not to 

short against tractor chassis.

  •  Connect one end of the BLACK ca ble to the NEGA TIVE 

(-) terminal (C) of fully charged battery.

 •  Connect the other end of the BLACK cable (D) to good 

chassis ground,  away from fuel tank and bat tery.

WEAK OR 

DEAD BATTERY

FULLY CHARGED

BATTERY

Fig. 34

TO REMOVE CABLES, REVERSE ORDER -

 •  BLACK cable first from chassis and then from the fully 

charged battery.

 •  RED cable last from both batteries.

SERVICE AND ADJUSTMENTS

REPLACING BATTERY (See Fig. 35)

WARNING:  Do not short battery ter mi-

 nals by allowing a wrench or any other 

object to contact both terminals at the 

same time. Before connecting battery, 

remove metal bracelets, wristwatch 

bands, rings, etc.  Positive terminal 

must be connected first to prevent 

sparking from ac ci den tal grounding.

•  Lift seat pan to raised position.
• 

Disconnect BLACK battery cable first then RED battery 

cable and carefully remove battery from tractor.

•  Install new battery with terminals in same position as 

old battery.

• 

First connect RED battery cable to positive (+) terminal 

with bolt and nut as shown. Tighten securely. Slide 

terminal cover over terminal.

•  Connect BLACK grounding cable to negative (-) ter-

 mi nal with remaining bolt and nut. Tighten se cure ly.

•  Lower seat pan.

Fig. 35

02603

SEAT PAN

NUT

POSITIVE 

(RED) 

CABLE

NEGATIVE 

(BLACK) 

CABLE

BOLT

TERMINAL 

COVER

Содержание A22A46

Страница 1: ...utyl ether is acceptable for use in this machine The use of any gasoline exceeding 10 ethanol E10 or 10 MTBE will void the product warranty 581 75 92 32 Rev 1 21548145 10 30 12 Printed in the U S A EN...

Страница 2: ...ope Keep all movement on the slopes slow and gradual Do not make sudden changes in speed or direction which could cause the machine to roll over Use extra care while operating machine with grass catch...

Страница 3: ...se extra care when approaching blind corners shrubs trees or other objects that may block your view of a child IV TOWING Tow only with a machine that has a hitch designed for towing Do not attach towe...

Страница 4: ...ipment PPE while operating this machine including at a minimum sturdyfootwear eyeprotection andhearingprotection Do not mow in shorts and or open toed footwear Always let someone know you are outside...

Страница 5: ...l itmeans when you are in the operating position seated behind the steering wheel TO CHECK BATTERY See Fig 1 Lift seat to raised position NOTE If this battery is put into service after month and year...

Страница 6: ...ections are still secure and wires are properly clamped Before driving tractor be sure freewheel control is in transmission engaged position see TO TRANS PORT in the Operation section of this manual W...

Страница 7: ...ty inform ation about hazards which can result in death serious injury and or property damage DANGER indicates a hazard which if not avoided will result in death or serious injury WARNING indicates a...

Страница 8: ...ke position D THROTTLE CHOKE CONTROL Used for starting and controlling engine speed E ATTACHMENT CLUTCH LEVER Used to engage the mower blades or other attachments mounted to your tractor F IGNITION SW...

Страница 9: ...TLE CONTROL D See Fig 6 Always operate engine at full speed fast Operating engine at less than full speed fast reduces the engine s operating efficiency Full speed fast offers the best mower performan...

Страница 10: ...rforwardtravelonly J K L TO OPERATE MOWER Your tractor is equipped with an operator presence sensing switch Any attempt by the operator to leave the seat with the engine running and the attachment clu...

Страница 11: ...hut off the engine unless ignition key is placed in the ROS ON position WARNING Backing up with the attachment clutch en gaged while mowing is strongly discouraged Turning the ROS ON to allow reverse...

Страница 12: ...ine has run out of fuel it will take extra cranking time to move fuel from the tank to the engine Besurefreewheelcontrolisinthetransmissionengaged position Sit on seat in operating position depress br...

Страница 13: ...AUTION Never engage or disengage freewheelleverwhiletheengineisrunning To ensure proper operation and performance it is recom mended that the transmission be purged before operating tractor for the fi...

Страница 14: ...RECOMMENDATIONS The warranty on this tractor does not cover items that have beensubjectedtooperatorabuseornegligence Toreceive full value from the warranty operator must maintain tractor as instructe...

Страница 15: ...reverse should shut off the engine When the engine is running with the ignition switch in the ROS ON position and the attachment clutch engaged any attempt by the operator to shift into reverse should...

Страница 16: ...avoid possible engine damage from running low on oil Change the oil after every 50 hours of operation or at least once a year if the tractor is not used for 50 hours in one year Check the crankcase oi...

Страница 17: ...es and wheels free of all gasoline oil etc Protect painted surfaces with automotive type wax We do not recommend using a garden hose or pressure washer to clean your tractor unless the engine and tran...

Страница 18: ...ensuring connection is secure 5 Turn the water on 6 While sitting in the operator s position on the tractor re start the engine and place the throttle lever in the Fast position IMPORTANT Recheck the...

Страница 19: ...ect mower suspension arm A from chassis pin B and rear lift link C from rear mower bracket D remove retainer springs and washers CAUTION AFTER REAR LIFT LINKS ARE DISCONNECTED THE ATTACH MENT LIFT LEV...

Страница 20: ...Repeat on opposite side of tractor ATTACH REAR LIFT LINKS C Lift rear corner of mower and position slot in link assembly over pin D on rear mower bracket and secure with washer and retainer spring Ins...

Страница 21: ...nut will change mower height about 3 16 Test your adjustment by mowing some uncut grass and visually checking the appearance Readjust if necessary until you are satisfied with the results PRECISION SI...

Страница 22: ...STALL MOWER in this section of manual Fig 31 MANDREL PULLEY IDLER PULLEYS MANDREL PULLEY TO REPLACE MOTION DRIVE BELT See Fig 32 Park the tractor on level surface Engage parking brake For assistance t...

Страница 23: ...ED WITH A 12 VOLT SYSTEM THE OTHER VEHICLE MUST ALSO BE A 12 VOLT SYSTEM DO NOT USE YOUR TRACTOR BATTERY TO START OTHER VEHICLES TO ATTACH JUMPER CABLES Connect one end of the RED cable to the POSITIV...

Страница 24: ...procedure ENGINE TO ADJUST THROTTLE CONTROL CABLE The throttle control has been preset at the factory and adjustment should not be necessary If adjustment is nec essary see engine manual TO ADJUST CH...

Страница 25: ...LFUELSYSTEMPARTSSUCH AS CARBURETOR FUEL FILTER FUEL HOSE OR TANK DURING STORAGE ALSO EXPERIENCE INDICATES THAT ALCOHOL BLENDED FUELS CALLED GASOHOL OR USING ETHANOLORMETHANOL CANATTRACTMOISTUREWHICH L...

Страница 26: ...ng 7 Faulty ignition switch 7 Check replace ignition switch 8 Faulty solenoid or starter 8 Check replace solenoid or starter 9 Faulty operator presence switch es 9 Contact an authorized service center...

Страница 27: ...ed 9 Reinstall blades sharp edge down 10 Improper blades used 10 Replace with blades listed in parts manual 11 Cloggedmowerdeckventholesfrombuildup of grass leaves trash around mandrels 11 Clean aroun...

Страница 28: ...shed 4 The Warranty period for any products used for rental or commercial purposes is limited to 90 days from the date of original purchase 5 This Warranty applies only to products which have been pro...

Страница 29: ...never across the face Do not mow slopes greater than 15 degrees Make turns gradually to prevent tipping or loss of control Exercise extreme caution when changing direction on slopes 1 Fold this page a...

Страница 30: ...st Ryan Street Brillion WI 54110 1072 1 877 257 6920 www ariens com WARNING The engine exhaust from this product contains chemicals known to the State of California to cause cancer birth defects or ot...

Страница 31: ...contient des produits chimiques reconnus par l tat de Californie comme tant la cause de cancer malformations la naissance ou autres troubles de la reproduction Ariens Company 655 West Ryan Street Bri...

Страница 32: ...N DES PENTES AFIN D AM LIORER LA S CURIT D UTILISATION TONDEZ LES PENTES EN MONTANT OU EN DESCENDANT MAIS JAMAIS EN TRAVERS 15 DEGR S MAX P L I E Z S U I V A N T L E S P O I N T I L L S C E C I E S T...

Страница 33: ...opri e 4 La p riode de garantie applicable aux produits propos s en location ou des fins commerciales est limit e quatre vingt dix 90 jours compter de la date d achat initiale 5 Cette garantie ne s ap...

Страница 34: ...u bo tier de tondeuse 8 La courroie d entra nement de tondeuse est us e 8 Remplacez la courroie d entra nement de tondeuse 9 Les lames n ont pas t correctement mont es 9 R installez les lames avec le...

Страница 35: ...6 Le c blage est l che ou endommag 6 V rifiez tout le c blage 7 Le contacteur d allumage est d fectueux 7 V rifiez remplacez le contacteur d allumage 8 Le sol no de ou le d marreur est d fectueux 8 V...

Страница 36: ...E R SERVOIR D ESSENCE PENDANT L ENTREPOSAGE L EXP RIENCE D MONTRE QUE LES CARBURANTS QUI SONT M LANG S AVEC DE L ALCOOL THANOL OU M THA NOL ET PARFOIS APPEL S GASOHOL PEUVENT ATTIRER L HUMIDIT QUI CAU...

Страница 37: ...ms avec le car bu ra teur veuillez apporter la tondeuse gazon au centre d entretien autoris le plus proche pour faire la r aration et ou le r glage TRANS MIS SION ENLEVEMENT REMPLACEMENT Si votre tran...

Страница 38: ...CTEUR EST MUNI D UN SYST ME DE 12 VOLTS L AUTRE V HICULE DOIT AUSSI AVOIR UN SYST ME DE 12 VOLTS N UTILISEZ PAS LA BATTERIE DU TRACTEUR POUR D MARRER LES AUTRES V HICULES POUR ATTACHER LES C BLES DE D...

Страница 39: ...LIES DE GALET TEN DEUR POULIE DE MAN DRIN POUR REMPLACER LA COURROIE D ENTRA NEMENT Voir la Fig 32 Stationnez le tracteur sur une surface de niveau Actionnez le frein de stationnement En cas de besoin...

Страница 40: ...contre crou A d abord A A A 02948 Tournez l crou la gauche pour baisser la tondeuse Tournez l crou la droite pour soulever la tondeuse POUR AJUSTER LE NIVEAU LA TONDEUSE Assurez vous que les pneus soi...

Страница 41: ...Soulevez le coin arri re de la tondeuse et positionnez la rainure du bras sur la tige D du support arri re de la tondeuse et fixez fermement l aide d une rondelle et d un ressort arr toir R p tez de...

Страница 42: ...de un m canisme ressort Tenez fermement le levier le levage abaissez le lentement et enclenchez le sa position la plus basse REMARQUE Assurez vous que les bras de suspension lat raux de la tondeuse A...

Страница 43: ...RTANT Tirer le tuyau d arrosage pour vous assurer que le raccordement est s curis 5 Ouvrez le robinet d eau 6 Prenez place sur le si ge du tracteur relancez le moteur et mettez le levier d acc l ratio...

Страница 44: ...es de gomme s ch s SYST ME DE VENTILATION Pour assurer le refroidissement correct assurez vous que le tamis d air les ailettes de refroidissement et les autres surfaces ex t rieu res du moteur soient...

Страница 45: ...de vidange Apr s que l huile se soit coul e compl tement serrez et verrouillez la soupape de vidange en poussant vers l in t rieur et en tournant dans le sens des aiguilles d une montre jusqu ce que l...

Страница 46: ...e PAS ENTRETIEN DES LAMES Pour obtenir les meilleurs r sultats les lames de tondeuse doi vent toujours tre tranchantes Remplacez les lames cour b es ou endommag es ENLEVER LA LAME Voir la Fig 15 Rellv...

Страница 47: ...e batterie Nettoyez la batterie et les bornes V rifiez le niveau d huile du moteur Remplacez l huile du moteur avec un filtre Nettoyez le filtre air Nettoyez le tamis air Inspectez le silencieux Pare...

Страница 48: ...n correcte et le ren de ment il est re com man d que la trans mis sion soit purg e avant d utiliser le tracteur pour la premi re fois Ce proc d enl vera l air em pri son n l int rieur de la trans mis...

Страница 49: ...etien de ce manuel POUR D MARRER LE MOTEUR Voir la Fig 3 Si vous d marrez le moteur pour la premi re fois ou si le moteur est sans essence il faut plus de temps pour d placer l essence du r servoir au...

Страница 50: ...e ROS Si l op rateur tente de circuler en marche arri re avec l embrayage de l accessoire engag il provoquera l arr t du moteur moins que la clef d allumage soit plac e dans la position ROS ON AVERTIS...

Страница 51: ...ropri comme indiqu et serrez fond R p tez de l autre c t Installez la roue dans le m me trou r glable POUR UTILISER LA TONDEUSE Votre tracteur est muni d un interrupteur de d tection de pr sen ce d un...

Страница 52: ...p da le frein la position Frein D placez le levier de commande de d placement J la po si tion point mort MOTEUR Placez la commande des gaz en position D interm diaire entre rapide et lent REMARQUE Si...

Страница 53: ...N Permet le fonctionnement de la plate forme de faucheuse ou de tout autre attachement actionn tandis qu l envers H L INTERUPTEUR DES LUMI RES permet d allumer teindre les phares du tracteur J LEVIER...

Страница 54: ...s pour identifier les informations de s curit propos des risques qui peuvent avoir pour r sultats la mort de s rieuses blessures et ou endommager votre propri t DANGER indique un risque qui s il n est...

Страница 55: ...ust une position confortable et il a t serr fond Tous les pneus ont t correctement gonfl s Les pneus ont t surgonfl s pour l exp dition Assurez vous que le carter de tondeuse ait t correctement nivel...

Страница 56: ...n Rel chez du levier pour assurer le si ge en position Fig 2 REMARQUE Procidez comme suit pour retirer le tracteur de la palette AVERTISSEMENT avant le d marrage nous vous prions de lire comprendre et...

Страница 57: ...paration de ce tracteur Veuillez lire et conserver ce manuel Les instructions qu il con tient vous permettront de monter et d entretenir cor rec te ment votre tracteur Observez toujours les R GLES DE...

Страница 58: ...act du bord du r servoir d essence ou de l ouverture du r cipient jusqu la fin de l op ration de remplissage N utilisez pas de dispositif de verrouillage de la buse ouverte Si du carburant tombe sur v...

Страница 59: ...des tondeuses autoport es sont plus fr quents chez les op rateurs de plus de 60 ans Ces personnes doivent valuer leur capacit de conduire une tondeuse en garantissant un niveau de s curit ad quat eux...

Страница 60: ...RACTEUR AUTOMATIQUE Mod les A22A46 46 Tracteur Automatique Vous pouvez utiliser de l essence contenant jusqu 10 d thanol E10 ou de MTBE ther m thyl tertiobutylique avec cet appareil L utilisation d es...

Отзывы: