Ariens 920006 Скачать руководство пользователя страница 33

ARIENS COMPANY

GRAVELY

®

 | STENS

®

 | LOCKE

®

 | NATIONAL

®

 |  BYNORM

®

 | EVERRIDE

®

 | GREAT DANE

®


Snow_2010

33

Three-Year Limited Sno-Thro

®


Warranty

Ariens Company (Ariens) warrants to the original purchaser that Ariens Sno-Thro products will be free from 
defects in material and workmanship for a period of three years after the date of purchase. An authorized 
Ariens dealer will repair any defect in material or workmanship, and repair or replace any defective part, 
subject to the conditions, limitations and exclusions set forth herein. Such repair or replacement will be free of 
charge to the original purchaser (labor and parts), except as noted below.
The duration of this warranty applies only if the product is put to personal use around a household or 
residence. If the product is put to any business use, agricultural, commercial, or industrial, then the duration 
of this warranty shall be 90 days after the date of purchase, or one year after the date of purchase if the 
product is labeled as a Pro, Professional, or Commercial Product. If any product is rented or leased, then the 
duration of this warranty shall be 90 days after the date of purchase. It is the owner’s responsibility to perform 
correctly the maintenance and minor adjustments explained in the owner’s manual.

Two-Year Limited Warranty on AMP™ Series Battery Packs and Subassemblies

The battery pack and/or battery subassemblies on AMP series electric Sno-Thro products is/are war-
ranted to the original purchaser for two years from the date of purchase. Ariens will replace, free of 
charge to the original purchaser, any battery pack and/or battery subassembly that fails due to defect in 
material or workmanship for one year after the date of purchase. For the next 12 months, Ariens will 
cover the prorated cost of replacing a battery pack and/or battery subassembly that fails due to defect 
in material or workmanship. This warranty does not apply to battery packs or battery subassemblies 
that fail due to accident, neglect, abuse, improper maintenance, improper storage or improper charging 
procedures.

Service Parts and Accessories Warranty

Genuine Ariens or Gravely brand service parts and accessories are warranted to be free from defects 
in material and workmanship for a period of 90 days after the date of purchase. An authorized Ariens 
dealer will repair or replace any such part or accessory free of charge, except for labor, during that 
period.

 Exceptions, Limitations, Exclusions

Customer Responsibilities

Register the product immediately at the time of sale. If the dealer does not register the product, the 
customer must complete the product registration card in the literature package and return it to the Ariens 
Company, or register the unit online at www.ariens.com or www.gravely.com.
To obtain warranty service, the original purchaser must:

Perform the maintenance and minor adjustments explained in the owner’s manual.

Promptly notify Ariens or an authorized Ariens or Gravely service representative of the need for 
warranty service.

Transport the product to and from the place of warranty service.

Have the warranty service performed by an authorized Ariens or Gravely service representative.

To find an Ariens or Gravely authorized service representative, contact Ariens at:

655 W. Ryan Street

Brillion, WI 54110

(920) 756 - 2141

www.ariens.com

www.gravely.com

Содержание 920006

Страница 1: ...Owner Operator Manual Manuel Du Propri taire Utilisateur Models 920006 Compact 24 920007 Compact 20 920010 Compact 24 Sno Thro 03882500C 2 10 Printed in USA ENGLISH FRAN AIS...

Страница 2: ...uipement Les manuels imprim s dans des langues diff rentes de l anglais sont galement disponibles en t l chargement gratuit sur notre site Web http www ariens com MANUALS Before operation of unit care...

Страница 3: ...Dealer go to www ariens com on the internet DISCLAIMER Ariens reserves the right to discontinue make changes to and add improvements upon its products at any time without public notice or obligation...

Страница 4: ...as instructed by the seller on safe and proper operation If unit is to be used by someone other than original purchaser loaned rented or sold ALWAYS provide this manual and any needed safety training...

Страница 5: ...Thrown objects can cause injury Check for weak spots on docks ramps or floors Avoid uneven work areas and rough terrain Stay alert for hidden hazards Read Owner Operator Manual Keep people away from...

Страница 6: ...this unit Fumes from engine exhaust can cause injury or death DO NOT run engine in an enclosed area Always provide good ventilation ALWAYS disengage attachment stop unit and engine remove key and all...

Страница 7: ...nk indoors Replace fuel cap securely and clean up spilled fuel Never fill containers inside a vehicle or on a truck or trailer bed with a plastic liner Always place containers on the ground away from...

Страница 8: ...sition NOTE Be careful not to damage cable spring hooks when rotating handlebars upward 5 Install and tighten the hardware on the handlebar assembly and shift rod ASSEMBLY WARNING AVOID INJURY Read an...

Страница 9: ...the control panel 2 Connect the chute crank to the pinion gear on chute with spring clip pin Check Function of Dual Handle Interlock Without the engine running press down engage both clutch levers Rel...

Страница 10: ...un attachment for about 15 minutes 3 Stop unit wait for all moving parts to stop and remove spark plug wire 4 Adjust belt finger if necessary See Attachment Drive Belt Replacement on page 22 5 Adjust...

Страница 11: ...Oil Fill and Dipstick 14 Gas Tank and Cap 15 Electric Starter 16 Recoil Starter Handle 17 Primer Bulb 18 Throttle Engine Stop 19 Ignition Switch Push Pull 20 Choke 21 Axle Lock Pin 22 Skid Shoe s 23...

Страница 12: ...handlebar 1 to engage attachment Release both clutch levers 2 to disengage power and apply brake to attachment IMPORTANT If the belt squeals when the attachment clutch lever is engaged the impeller ma...

Страница 13: ...hokes off air to engine for easier start 2 Choke Open position allows for normal operation IMPORTANT Gradually open choke after engine starts Throttle The throttle controls the engine speed To increas...

Страница 14: ...he rear to throw snow higher IMPORTANT If Chute Deflector does not stay in set position adjust as directed in SERVICE AND ADJUSTMENTS on page 20 or repair before operation Discharge Chute Discharge ch...

Страница 15: ...Never mix oil and gasoline NOTE All gasoline is not the same If the engine experiences starting or performance problems after using a new gasoline switch to a different fuel provider or fuel brand IM...

Страница 16: ...gravel surfaces 6 Check Engine Fuel Crankcase Oil Check and add fuel if required Check that the engine crankcase oil is full using dipstick Refer to Engine Manual for detailed instructions TO STOP IN...

Страница 17: ...tation to outside temperature or travel Set throttle to Fast position for normal operation Shut Off 1 Release Traction Drive Clutch Lever and allow unit to come to a complete stop 2 Run Impeller a few...

Страница 18: ...ne running press down engage both clutch levers Release attachment clutch lever Attachment clutch should remain engaged until traction clutch lever is released then both clutches must disengage CHECK...

Страница 19: ...PRESSURE Keep tires at pressure listed on the tire sidewall see Check Tire Pressure on page 10 CHECK AUGER GEARCASE IMPORTANT Proper oil level must be maintained Gear cases are filled to the correct...

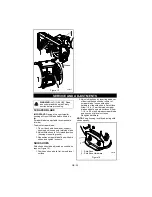
Страница 20: ...ed as conditions require Figure 14 1 Position unit on a hard flat smooth level surface 2 Adjust skid shoes by inserting a spacer of desired thickness under center of scraper blade loosen skid shoe har...

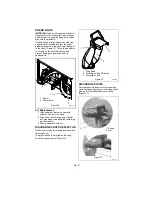
Страница 21: ...oles in auger with shear bolt holes in the shaft 2 Drive shear bolt through hole if shear bolt was broken this will drive remaining part from shaft 3 Secure shear bolt with nut DISCHARGE CHUTE DEFLECT...

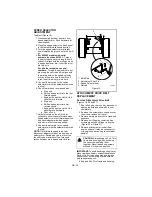
Страница 22: ...elector is in first forward position and travels backward when speed selector is in first reverse position 8 Connect the pivot pin to the speed selector arm with the hardware removed in step 1 NOTE If...

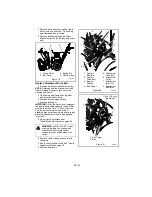
Страница 23: ...t but not touching the belt or belt grabbing may occur causing impeller to rotate while the attachment clutch is disengaged Figure 21 5 Adjust clutch per Attachment Clutch Brake Adjustment on page 24...

Страница 24: ...o stop hole in frame Reinstall swing gate spacer NOTE Make sure drive plate spring remains connected to the frame and drive plate 5 Replace attachment drive belt See Replace Attachment Drive Belt on p...

Страница 25: ...e Figure 26 If roller is 1 2 7 8 in 12 7 22 2 mm from frame go to Adjust the Attachment Clutch Cable Spring Extension on page 26 If roller is less than 1 2 in 12 7 mm from frame loosen idler adjustmen...

Страница 26: ...With clutch lever engaged brake pad must be more than 1 16 in 1 6 mm from belt If there is more than 1 16 in 1 6 mm gap go to Check Belt Finger Clearance Figure 29 on page 27 If there is less than 1...

Страница 27: ...1 2 8 in 19 0 20 3 cm adjust the traction clutch To adjust traction clutch Figure 31 1 With the traction drive clutch lever disengaged loosen the jam nut on the cable adjuster Turn adjustment barrel...

Страница 28: ...n disc and carrier bearing Torque to 5 6 lbf ft 6 8 8 13 N m 13 Insert new friction disc assembly into frame Install washers onto carrier bearing and slide into speed selector arm 14 Slide hex shaft t...

Страница 29: ...lity fuel stabilizer to the fuel Follow the recommended mix ratio found on the fuel stabilizer container To treat the fuel system for storage 1 Add fuel stabilizer according to manufacturers s instruc...

Страница 30: ...disc not adjusted properly 2 Traction belt not functioning 3 Speed selector not adjusted properly 1 Repair or replace friction disc see Friction Disc Replacement on page 28 2 Repair or replace tractio...

Страница 31: ...0 61 0 Gear Case Aluminum Aluminum Aluminum Auger Diameter in cm 11 0 27 9 11 0 27 9 11 0 27 9 Impeller Impeller Diameter in cm 12 0 30 5 12 0 30 5 12 0 30 5 Impeller Speed RPM 1320 1320 1320 Impeller...

Страница 32: ...GB 32...

Страница 33: ...er any battery pack and or battery subassembly that fails due to defect in material or workmanship for one year after the date of purchase For the next 12 months Ariens will cover the prorated cost of...

Страница 34: ...bulbs Any misuse alteration improper assembly improper adjustment neglect or accident which requires repair is not covered by this warranty This warranty applies only to products purchased in the Uni...

Страница 35: ...Ariens Company 655 West Ryan Street Brillion WI 54110 1072 920 756 2141 www ariens com...

Отзывы: