background image

37

YT170

YT090A

13. Install the intake pipe/carburetor assembly onto the

cylinder head using a new O-ring. Tighten the flange

nuts to 7 ft-lb.

Left-Side Components

NOTE: For efficiency, it is preferable to remove and

disassemble only those components which need to be

addressed and to service only those components. The

technician should use discretion and sound judgment.

NOTE: The engine/transmission does not have to be

removed from the frame for this procedure.

Removing Left-Side 

Components

A. V-BELT COVER
B. V-BELT/DRIVE CLUTCH/DRIVEN

PULLEY

C. CENTRIFUGAL CLUTCH
D. GEAR POSITION SWITCH
E. STARTER ONE-WAY CLUTCH

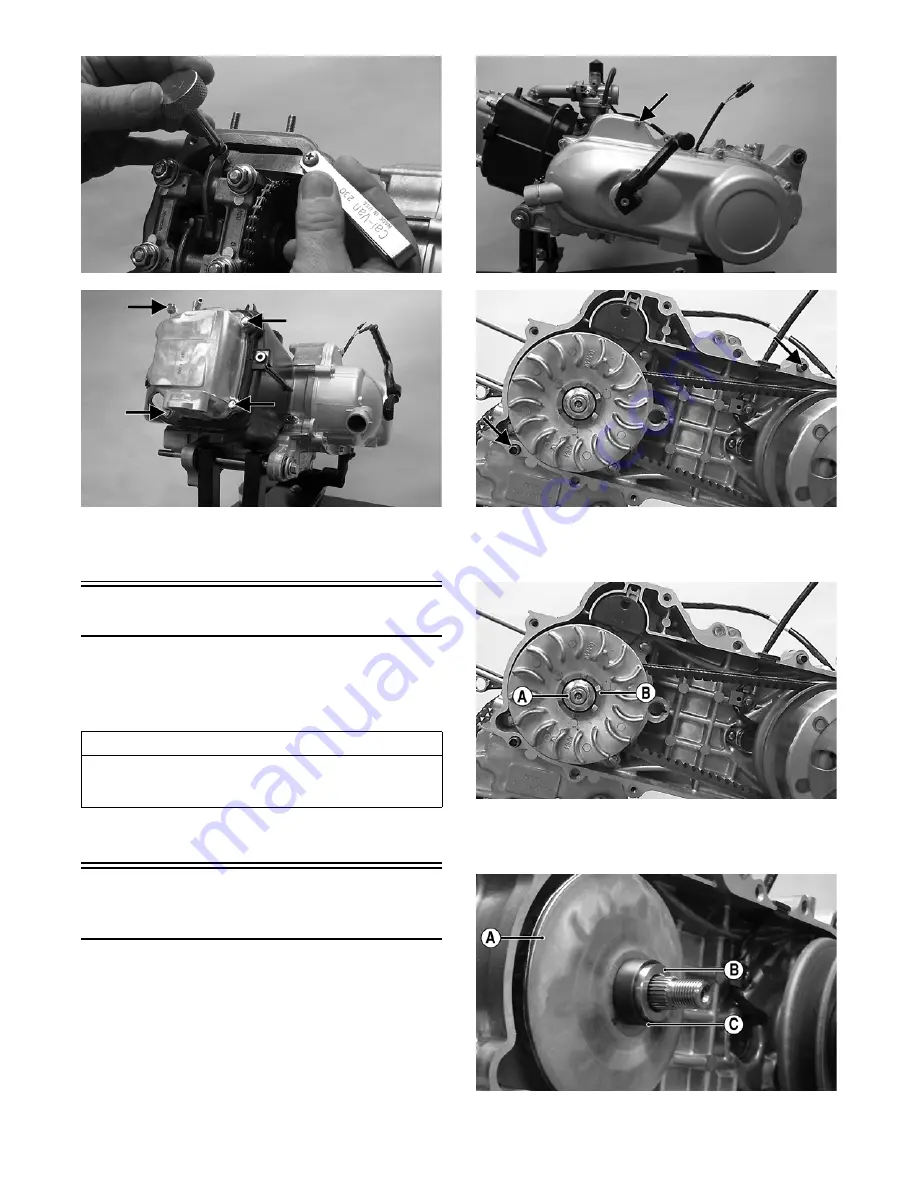
1. Remove the V-belt cover noting the location of the

different-lengthed cap screw and the location of the

alignment pins. Account for a gasket.

YT099A

YT160A

2. Remove the flange nut (A) securing the fixed drive

face to the crankshaft. Account for the kick-start

ratchet (B).

YT160B

3. Remove the V-belt; then remove the movable drive

face (A). Account for a bushing (B) and speed lim-

iter spacer (C).

YT021A



AT THIS POINT

To service any one specific component, only limited dis-
assembly of components may be necessary. Note the
AT THIS POINT information in each sub-section.

Содержание 2016 DVX 90

Страница 1: ...www arcticcat com SERVICE MANUAL www arcticcat com ...

Страница 2: ...ide Components 37 Removing Left Side Components 37 Installing Left Side Components 38 Right Side Components 40 Removing Right Side Components 40 Servicing Right Side Components 44 Installing Right Side Components 45 Center Crankcase Components 47 Disassembling Crankcase Halves 47 Servicing Crankcase Components 48 Assembling Crankcase Half 49 Installing Engine Transmission 50 Troubleshooting 52 Fue...

Страница 3: ...mentary information worthy of particular attention The symbol AT THIS POINT directs the tech nician to certain and specific procedures to promote effi ciency and to improve clarity At the time of publication all information photographs and illustrations were technically correct Some photo graphs used in this manual are used for clarity purposes only and are not designed to depict actual conditions...

Страница 4: ...haust Pipe Cylinder Head 7 Muffler Frame 32 BRAKE SYSTEM COMPONENTS Brake Banjo Fitting Caliper 25 Brakeline Hose Master Cylinder 20 Rear Brake Caliper Rear Axle Housing 22 ELECTRICAL COMPONENTS Stator Stator Plate 8 STEERING COMPONENTS Wheel Front Rear Hub 30 Front Wheel Hub Spindle Axle 45 Handlebar Cap Lower Clamp 10 Steering Post Outer Bearing Cap Inner Bearing Clamp 20 Steering Post Frame 51 ...

Страница 5: ...rt of the engine or air intake 3 Either drain the gas tank or add a fuel stabilizer to the gas in the gas tank 4 Clean the interior of the air filter housing 5 Drain the carburetor float chamber ft lb N m ft lb N m ft lb N m ft lb N m 1 1 4 26 35 4 51 69 4 76 103 4 2 2 7 27 36 7 52 70 7 77 104 7 3 4 1 28 38 1 53 72 1 78 106 1 4 5 4 29 39 4 54 73 4 79 107 4 5 6 8 30 40 8 55 74 8 80 108 8 6 8 2 31 4...

Страница 6: ...ree riding Arctic Cat recommends the following procedure to pre pare the ATV 1 Clean the ATV thoroughly 2 Clean the engine Remove the cloth from the exhaust system 3 Check all control wires and cables for signs of wear or fraying Replace if necessary 4 Change the transmission lubricant 5 Charge the battery then install 6 Connect the battery cables making sure to connect the positive cable first 7 ...

Страница 7: ... to remove excess solvent Do not twist or wring the filter or it will develop cracks 5 Dry the filter 6 Put the filter in a plastic bag then pour in air filter oil and work the oil into the filter 7 Compress the filter to remove excess oil 8 Clean any dirt or debris from inside the air cleaner Make sure no dirt enters the carburetor 9 Install the air filter Install air filter housing cover and sec...

Страница 8: ...nd rotate the tappet adjuster screw until the clearance is within specifications Tighten each jam nut securely after completing the adjustment CD659 YT170 6 Check the valve tappet clearance after the jam nut has been tightened to ensure the clearance did not change CD658 7 Install the valve cover and tighten the four cap screws to 7 ft lb using a crisscross pattern then install the breather tube 8...

Страница 9: ...ndicates the plug and air fuel ratio are correct A white or dark insulator indicates that the engine may need to be serviced or the carburetor may need to be adjusted To maintain a hot strong spark keep the plug free of carbon ATV 0051 Adjust the gap to 0 6 0 7 mm 0 024 0 028 in for proper ignition Use a feeler gauge to check the gap ATV 0052A A new spark plug should be tightened 1 2 turn once the...

Страница 10: ...t distance 6 Turn the engine off and wait approximately one min ute Remove the level and recheck the lubricant level The level should be visible at the level hole If lubricant is not visible add recommended lubricant until the level is visible at the level hole 7 Inspect the area around the drain plug for leaks Engine Oil 1 Move the ATV outdoors and start and warm up the engine Shut the engine off...

Страница 11: ...hould be checked for proper operation The brakes must be maintained to be fully functional CHECKING FRONT WHEEL BRAKE 1 With the engine off compress the right side front brake lever and attempt to move the ATV If the front wheels are locked it is adjusted properly 2 If the front wheels are not locked or if only one wheel locks adjustment is necessary CHECKING REAR WHEEL BRAKE 1 With the engine off...

Страница 12: ... the brake disc from the brake pads after adjusting MEASURING REPLACING BRAKE SHOES PADS Removing Front Brake Shoes 1 Support the ATV on a support stand 2 Remove both front wheels and account for the cap screws 3 Remove the cotter pins castle nuts and washers then remove the brake drums wheel hubs 4 Loosen the brake shoe return spring then remove the brake shoes MD2042 Removing Rear Brake Pads 1 R...

Страница 13: ... procedure 1 Remove the brake fluid reservoir cover and fill the reservoir with DOT 4 brake fluid 2 Install and secure the cover 3 Remove the protective cap from the bleed screw and connect one end of a clear hose to the bleed screw and direct the other end into a suitable container KC562A 4 Slowly compress the brake lever several times then while holding slight pressure on the brake lever open th...

Страница 14: ...ccurate measurement The V belt must be at least 28 5 mm at any point INSTALLING 1 If removed place the gasket and two alignment pins into position on the crankcase 2 Spread the faces of the driven clutch with a suitable pry bar or wedge then when the faces are separated insert the drive belt CD624 NOTE If the drive belt has an arrow stamped on the outer face it should point forward direction of ro...

Страница 15: ... be necessary 1 Shift the transmission into reverse then remove the cap screw securing the linkage to the transmission shift arm 2 Verify the transmission is in reverse the ignition switch is in the ON position the reverse indicator light is illuminated and the shift lever is fully in the reverse position then loosen the upper and lower jam nuts on the shift linkage and adjust the linkage to align...

Страница 16: ...n pull the CDI connec tor main relay and main fuse case through the main body panel YT223 3 Disconnect both left and right headlight connectors YT224 4 Remove both left and right footwells by removing the Phillips head screws and cap screws 5 On the 90 Utility remove both front and rear racks Note the spacers installed in the rubber grommets of the main body panel 6 Remove the two cap screws and p...

Страница 17: ...e main body panel onto the vehicle Route the battery cables through the plastic Install the gas tank cap 2 Install but do not tighten the five main body cap screws underneath the seat YT228A 3 Install the remaining main body caps screws two cap screws from under the front fenders two cap screws from under the rear fenders Tighten the cap screws and the cap screws from step 4 to 86 in lb 4 On the 9...

Страница 18: ...ntrol cables from the handlebar then route them through the metal loop on the steering post and out of the way YT226 MD2431 3 Remove the handlebar cover bracket and the han dlebar MD2139 4 Disconnect the handlebar switch assembly and brake switch connectors then route them through the metal loop on the steering post and out of the way YT218 5 Remove the cap screws securing the body panel On the Ut...

Страница 19: ...ly a low temperature grease to the ends 2 Inspect the tie rods for damaged threads or wear 3 Inspect the tie rods for cracks or unusual bends 4 Inspect all welded areas for cracks or deterioration 5 Inspect the steering post and brackets for cracks bends or wear 6 Inspect the plastic bearing halves and bearing caps for cracks or wear 7 Inspect the handlebar tube for cracks wear or unusual bends IN...

Страница 20: ...k in Fuel Lubrication MD2405 6 Install handlebar with marks aligned with the handle bar mounting clamps Install the caps then tighten the cap screws to 10 ft lb KM060A MD2429 7 Install the control cables onto the handlebar MD2439 8 Make sure the cables brake and throttle are routed down and away so there is no sticking or binding WARNING Make sure there is maximum right left steering capabil ity a...

Страница 21: ... air pressure while twisting the grip back and forth until it slides off the handlebar MD2448 INSPECTING 1 Inspect the grip for wear cuts or cracks 2 Inspect the grip for deterioration INSTALLING NOTE Before installing a handlebar grip use con tact spray or alcohol to clean the inside of the grip and the handlebar of glue residue oil or any other con taminant 1 Apply a liberal amount of Handlebar ...

Страница 22: ...he han dlebar Tighten the screw securely MD2436 KM544 2 Connect the handlebar switch assembly wiring con nector YT218 Hand Brake Lever Assemblies REMOVING 1 Remove the right handlebar grip 2 Remove the cover from the throttle control housing exposing the throttle cable then remove the cable WARNING After removing and installing brake related components ALWAYS check and adjust brakes as necessary b...

Страница 23: ...r MD2450 5 Place a suitable container beneath the left hand brake master cylinder 6 Remove the brakeline hose bolt then drain brake fluid into the container Account for two copper washers KM208B 7 Remove the cap screws securing the hand brake lever assembly to the handlebar and remove the hand brake master cylinder assembly KM208A MD2442 INSTALLING 1 Slide the right brake lever assembly onto the h...

Страница 24: ...ner under the master cylinder and compress the lever slowly Brake fluid should flow from the loose connection 8 Tighten the brakeline hose bolt to 20 ft lb from step 5 then check the rear brake operation The brake lever should be firm and the rear brake should stop the wheels NOTE If the brake is not firm the system must be bled see Brake Systems in Periodic Maintenance Tune Up section NOTE Before...

Страница 25: ...e 1 8 turn Remove the bulb YT219 2 Install the new bulb then align the connector to the housing Push forward then rotate the connector clockwise until it is fully seated Brakelight Taillight Rotate the ignition switch to the ON position and com press both brake levers The brakelight should illuminate To replace the brakelight bulb use the following proce dure 1 Remove the two screws and remove the...

Страница 26: ...ends 6 Replace tires 7 Replace bushings 8 Tighten bolts nuts Problem Steering pulling to one side Condition Remedy 1 Tires inflated unequally 2 Front wheel alignment incorrect 3 Wheel hub bearings worn broken 4 Frame distorted 5 Shock absorber defective 1 Adjust pressure 2 Adjust alignment 3 Replace bearings 4 Repair replace frame 5 Replace shock absorber Problem Steering impaired Condition Remedy...

Страница 27: ...Instruct the customer to follow the proper break in procedure as described in the Operators Manual Removing Engine Transmission 1 Turn the gas tank valve to the OFF position then remove the seat and disconnect the negative battery cable securing it away from the battery CD643 KM853A 2 Drain the transmission lubricant NOTE The drain plug is located on the bottom of the transmission YT215A 3 Drain t...

Страница 28: ...oling duct from the front of the V belt housing then disconnect the gear shift position switch connectors 12 Remove the cap screws securing the front engine mounting brackets to the frame then remove the through bolts and brackets 13 Slide the engine transmission forward sufficiently to clear the rear mounting brackets then swing the rear of the assembly out the left side and remove the engine tra...

Страница 29: ...he fan shroud then remove the cylinder cylinder head shroud Note the location of the carbu retor float bowl drain hose clip YT016A YT017A 3 Remove the cylinder head cover Account for the gasket 4 Rotate the engine to top dead center TDC on the compression stroke then remove the cam chain ten sioner assembly YT095 YT098A 5 Remove the cylinder head nuts on top of the cam shaft holder Account for fou...

Страница 30: ...and two alignment pins 11 Remove the cam chain tensioner pivot bolt then remove the chain tensioner YT114A 12 Using a needle nose pliers remove the circlip secur ing the piston pin in the piston then remove the pis ton pin and piston Take care not to drop the circlip into the crankcase CAUTION Do not rotate the crankshaft without keeping tension on the cam chain or engine damage could occur AT THI...

Страница 31: ...ement or valve seat grinding REMOVING VALVES NOTE Keep all valves and valve components as a set Note the original location of each valve set for use during installation Return each valve set to its origi nal location during installation 1 Using a valve spring compressor compress the valve springs and remove the valve cotters Account for an upper spring retainer CC391D 2 Remove the valve seal and t...

Страница 32: ... a spring retainer over the valve springs then using the valve spring compressor compress the valve springs and install the valve keepers YT138 PISTON ASSEMBLY NOTE Whenever a piston rings or pin are out of tolerance they must be replaced Inspecting Piston 1 Inspect the piston for cracks in the piston pin boss top and skirt areas 2 Inspect the piston for seizure marks or scuffing If piston is scor...

Страница 33: ...r Clearance 1 Measure the cylinder front to back in six places YT137 2 Measure the corresponding piston diameter at a point 15 mm above the piston skirt at a right angle to the piston pin bore Subtract this measurement from the measurement in step 1 The difference clearance must be within specifications Installing Piston Rings 1 Install ring expander 4 in the bottom groove of the piston then insta...

Страница 34: ... the cylinder for pitting scoring scuffing warping and corrosion If marks are found repair the surface using a cylinder hone 3 Place the cylinder on the surface plate covered with 400 grit wet or dry sandpaper Using light pressure move the cylinder in a figure eight motion Inspect the sealing surface for any indication of high spots A high spot can be noted by a bright metallic finish Correct any ...

Страница 35: ...D 4 At this point repeat step 1 and if any measurement exceeds the limit the cylinder must be replaced Measuring Camshaft Lobe Height 1 Using a micrometer measure each cam lobe height YT129 2 The lobe heights must exceed minimum specifica tions Inspecting Camshaft Bearing Sprocket 1 Inspect the camshaft bearings for roughness during rotation or signs of discoloration YT128 2 Inspect the timing spr...

Страница 36: ... CAMSHAFT D CAMSHAFT HOLDER ROCKER ARMS NOTE Steps 1 3 in the preceding sub section must precede this procedure 4 While keeping tension on the cam chain place the front cam chain guide into the cylinder YT112 5 Place a new gasket into position on the cylinder Place the alignment pins into position then place the head assembly into position on the cylinder making sure the cam chain is routed throug...

Страница 37: ...lat washers A and four nuts B Tighten in a crisscross pattern to 15 ft lb YT172A 9 Install the two cap screws securing the left side of the cylinder head and cylinder to the crankcase and tighten to 7 ft lb YT098B 10 Install the cam chain tensioner assembly into the cyl inder using a new gasket then secure with two cap screws and tighten to 7 ft lb YT098C 11 Using a small flat screwdriver release ...

Страница 38: ...ponents A V BELT COVER B V BELT DRIVE CLUTCH DRIVEN PULLEY C CENTRIFUGAL CLUTCH D GEAR POSITION SWITCH E STARTER ONE WAY CLUTCH 1 Remove the V belt cover noting the location of the different lengthed cap screw and the location of the alignment pins Account for a gasket YT099A YT160A 2 Remove the flange nut A securing the fixed drive face to the crankshaft Account for the kick start ratchet B YT160...

Страница 39: ...sing two wrenches as illustrated tighten the push bolt until the one way clutch is free of the crankshaft YT104 NOTE It may be necessary to strike the head of the bolt sharply with a hammer after tightening to free the one way housing from the crankshaft 8 Make sure the transmission is in neutral then remove the gear position switch noting the orienta tion of the drive pin Account for an O ring YT...

Страница 40: ...rter countershaft housing then install the starter one way clutch cover Tighten the cap screws securely YT023A 5 Install the driven pulley centrifugal clutch assembly onto the transmission input shaft then install the centrifugal clutch housing and secure with a flange nut coated with red Loctite 271 Tighten to 40 ft lb YT147 6 Install the movable drive face bushing and speed limiter spacer YT164 ...

Страница 41: ...ssed and to service only those components The technician should use discretion and sound judgment NOTE The engine transmission does not have to be removed from the frame for this procedure Removing Right Side Components A COOLING FAN B ROTOR FLYWHEEL C STATOR COIL D OIL PUMP 1 Remove the intake pipe carburetor Account for an O ring in the intake pipe 2 Remove the cooling fan shroud then remove the...

Страница 42: ...magneto housing to the crankcase then remove the housing Account for two alignment pins and a gasket NOTE Some engine oil will spill when the cap screws are loosened YT032A 7 Remove the oil pump baffle then remove the nut from the oil pump shaft and remove the driven gear and drive chain YT032 8 Remove the oil pump assembly being careful not to drop the oil pump driveshaft YT033 E TRANSMISSION Rem...

Страница 43: ...ft shaft to leave components in the transmission case Account for two alignment pins and gasket YT038 YT041A NOTE The driveshaft thrust washer may be stuck to the cover Make sure to install it on the driveshaft and keep together for assembly Disassembling NOTE For steps 4 8 refer to illustration YT041B 4 Remove the output driveshaft A then remove the shift fork shaft G YT041B 5 Remove the main sha...

Страница 44: ...FT NOTE If not absolutely necessary to replace com ponents do not disassemble the main shaft To disassemble the main shaft components use the fol lowing procedure 1 Remove the forward gear spacer and thrust washer then remove the forward gear Account for the for ward gear bushing and washer YT063 YT085 2 Remove the forward reverse shift dog YT081 3 Remove the reverse gear snap ring and splined was...

Страница 45: ...wear 5 Inspect the shift shaft and shift cam detent assembly for wear chipping or broken spring 6 Rotate all bearings to check for roughness discolor ation or looseness in the transmission case or cover YT065 7 Inspect the detent spring and ball Replace any worn or broken component 8 Examine the transmission case and cover for cracks discoloration or chipped bearing bosses YT064B OIL PUMP 1 Inspec...

Страница 46: ...ear thrust washer H and the spacer I B TRANSMISSION Assembling 1 Install new oil seals in the transmission case and cover then coat the inner surfaces of the seals with multi purpose grease 2 Making sure the bearing is properly aligned in the transmission case drive the input driveshaft and bearing into place with a plastic mallet YT047 3 Install the countershaft with thrust washer into the transm...

Страница 47: ...7 8 Place the alignment pins in the correct locations then install a new gasket on the transmission case YT041A 9 Making sure the input driveshaft thrust washer is installed carefully install the transmission case cover YT039A YT078 10 Secure the cover with the cap screws and tighten using the pattern shown to 22 ft lb then install the shift detent ball spring and plug and tighten securely CAUTION...

Страница 48: ...isassemble only those components which need to be addressed and to service only those components The technician should use discretion and sound judgment Disassembling Crankcase Halves 1 Remove one remaining cap screw from the right side crankcase half then tap the right side crankcase half from the left side leaving the crankshaft in the left side Account for a gasket and two alignment pins YT118A...

Страница 49: ...rankshaft assembly on a set of V blocks then using a dial indicator measure crankshaft runout Runout must not exceed 0 10 mm YT133 4 Using an appropriate caliper measure crankshaft web to web distance Measurement must not exceed 45 15 45 20 mm YT136 5 Examine crankcase halves for discoloration in bear ing bosses cracks or signs of warping YT122A 6 Replace all oil seals with new seals and coat wear...

Страница 50: ... the oil pump into the crankcase with the arrow and dot directed upward then secure with two cap screws and tighten to 7 ft lb YT151A 4 Install the oil pump drive chain and driven gear and secure the gear to the pump shaft with the nut tight ened to 7 ft lb then install the oil pump baffle and secure with the cap screws Tighten securely YT152A 5 Install the inner magneto housing using a new gasket...

Страница 51: ...forward to clear the frame member YT014 2 Install the two front engine mounting brackets on the frame and tighten the cap screws securely then install the two front through bolts Do not tighten at this time YT012 3 Install the rear engine mounting through bolt and nut then tighten the front and rear nuts to 32 5 ft lb 4 Install the drive sprocket and chain and secure with the spline lock then inst...

Страница 52: ...t position switch connectors to the main harness and secure to the frame with a nylon tie 10 Install the left side footwell mounting plate to the frame then install the left and right footwells and secure to the mountings and fenders Tighten all hardware securely 11 Pour the recommended quantity of engine oil into the crankcase then install the level stick and fill the transmission with the recomm...

Страница 53: ...om piston Condition Remedy 1 Piston cylinder worn 2 Combustion chamber carbon buildup 3 Piston pin piston pin bore worn 4 Piston rings ring groove s worn 1 Replace service piston cylinder 2 Clean chamber 3 Replace service pin bore 4 Replace rings piston Problem Engine noisy Noise seems to come from clutch Condition Remedy 1 Clutch shoe s worn 2 Driven clutch hub warped worn 1 Replace clutch shoe s...

Страница 54: ...ustment 6 Air filter element obstructed 7 Intake manifold leaking air 8 Brake s dragging 9 Drive axle bent worn bearings 10 Drive chain sprockets stretched worn 1 Replace service rings cylinder 2 Clean replace plug 3 Adjust gap replace plug 4 Clean jets 5 Adjust float arm height 6 Clean element 7 Tighten replace manifold 8 Adjust brake s 9 Straighten replace axle 10 Replace sprocket chain Problem ...

Страница 55: ...fold then remove the carburetor CD592 5 Unscrew the carburetor cap then lift the cap remov ing the throttle valve spring and jet needle Account for a gasket a needle clip plate and a needle clip CD594 6 Disconnect the choke assembly connector then remove the carburetor YT222 DISASSEMBLING 1 Remove the two Phillips head screws securing the choke assembly then remove the assembly Account for the was...

Страница 56: ... the jet holder CD604 CD605 7 Remove the slow jet CD606 CLEANING AND INSPECTING 1 Place all metallic components in a wire basket and submerge in carburetor cleaner 2 Soak for 30 minutes then rinse with fresh parts cleaning solvent 3 Wash all non metallic components with soap and water Rinse thoroughly WARNING When drying components with compressed air always wear safety glasses CAUTION DO NOT plac...

Страница 57: ...nstall the slow jet CD606 2 Install the main jet by threading it into the jet holder then install the jet holder into the carburetor Tighten both components securely CD604 3 Install the pilot screw with spring and O ring NOTE A thin application of lightweight oil will help to seat the O ring properly CD608 NOTE Turn the pilot screw clockwise until it is lightly seated then turn it counterclockwise...

Страница 58: ...ottle valve Release tension on the spring to hold the throt tle cable INSTALLING 1 Install the throttle valve into the carburetor with the machined groove engaging the guide pin then install the jet needle needle clip needle clip plate and gas ket 2 Thread the carburetor cap onto the carburetor then tighten securely CD594 3 Connect the choke assembly connector YT222 4 Install the carburetor onto t...

Страница 59: ...Turn the idle adjustment screw in or out until the engine idles at 1700 RPM YT015B Gas Tank REMOVING 1 Turn the gas tank valve to the OFF position 2 Remove the gas hose from the carburetor by remov ing the spring clamp then funnel the gas hose into an appropriate container of sufficient size to catch all the gas from the gas tank 3 Turn the gas tank valve to the RES position and drain the gas from...

Страница 60: ... the ON position the normal operating position gasoline will flow from the tank to the carburetor In this position 1 3 L 0 34 U S gal of gasoline will remain in the tank as a reserve quantity Moving the valve to the RES position will allow the operator to use the remaining gasoline in the tank When turning the valve to any of the three positions be sure the indicator is pointed directly at the pos...

Страница 61: ...st pilot screw 4 Adjust float arm height Problem Medium or high speed impaired Condition Remedy 1 Main jet obstructed 2 Needle jet obstructed 3 Throttle valve not operating properly 4 Filter obstructed 5 Float level incorrect 1 Clean main jet 2 Clean needle jet 3 Check throttle valve operation 4 Clean filter 5 Adjust float arm height Problem Overflow and fuel level fluctuations Condition Remedy 1 ...

Страница 62: ...ry usage are also reasons for battery discharge Maintenance Charging NOTE Arctic Cat recommends the use of the CTEK Multi US 800 or the CTEK Multi US 3300 for battery maintenance charging Maintenance charging is required on all batteries not used for more than two weeks or as required by battery drain 800E 1 When charging a battery in the vehicle be sure the ignition switch is in the OFF position ...

Страница 63: ...h The connector is accessible below the front fender panel in front of the steering post VOLTAGE NOTE Perform this test on the harness side of the connector 1 Set the meter selector to the DC Voltage position 2 Connect the red meter lead to the red wire then con nect the black meter lead to a suitable ground 3 Meter must read battery voltage NOTE If the meter reads no battery voltage trou bleshoot...

Страница 64: ...s not read as specified replace the switch component connector or switch harness RESISTANCE Emergency Stop 1 Set the meter selector to the OHMS position 2 Connect the red tester lead to the blue yellow wire then connect the black tester lead to the green wire 3 With the switch in the OFF position the meter must read an open circuit 4 With the switch in the RUN position the meter must read less tha...

Страница 65: ...re 3 The meter must read less than 1 ohm Regulator Rectifier The regulator rectifier is located near the front left top shock mount VOLTAGE 1 Set the meter selector to the DC Voltage position 2 Connect the red tester lead to the red wire and the black tester lead to the green wire with the regula tor rectifier plugged in 3 With the engine running at a constant 3000 RPM the meter must read 12 1 15 ...

Страница 66: ...correct gasoline 3 Clean element 4 Replace plug with proper heat range Problem Spark plug electrodes overheat or burn Condition Remedy 1 Spark plug incorrect too hot 2 Engine overheats 3 Spark plug loose 1 Replace plug 2 Check cooling fan air intake blockage damage to fan cool ing shroud 3 Tighten plug Problem Magneto does not charge Condition Remedy 1 Lead wires connections shorted loose open 2 M...

Страница 67: ...oo low 3 Battery run down damaged 4 Electrolyte contaminated 1 Replace battery 2 Charge battery 3 Replace battery 4 Replace battery Problem Battery discharges too rapidly Condition Remedy 1 Electrolyte contaminated 2 Specific gravity too high 3 Charging system charging operation not set properly 4 Cell plates overcharged damaged 5 Battery short circuited 6 Specific gravity too low 7 Electrolyte co...

Страница 68: ...er nut B on the adjusting bolt until approximately 30 mm 1 18 in of slack is pres ent at mid span of the chain KM218A 3 Tighten the four cap screws REMOVING DRIVE CHAIN 1 Remove the drive chain master link clip MD2357 2 Remove the link plate and link noting the position of the O rings then remove the chain KM238A INSTALLING DRIVE CHAIN 1 Place the drive chain into position on the sprockets 2 Makin...

Страница 69: ...KET 1 Secure the ATV on a support stand to elevate the rear wheels 2 Remove the cotter pins from the axle shaft and dis card then apply the rear brake and remove the castle nuts from the axle Account for the flat washer YT175A 3 Remove the left and right rear wheels 4 Remove the two axle nuts securing the brake hub to the axle then remove three cap screws securing the rear sprocket to the sprocket...

Страница 70: ...f using a clicker or elec tronic torque wrench install the torque wrench at a 90 angle away from the opening of the axle nut wrench T Torque wrench reading to be calculated Ts Specified torque value 86 ft lb Ls Tool offset length center to center L Length of torque wrench handle pivot to headcenter ATV2189 4 Install the outer axle nut and tighten to 86 ft lb 5 Adjust the chain 6 Install the rear w...

Страница 71: ...OTE Do not remove more components than nec essary to perform the intended service The axle hous ing will separate from the swing arm with all components attached if necessary 4 Remove the four cap screws A securing the axle hous ing to the swing arm then remove the axle housing KM217B KM212A AT THIS POINT If the technician s objective is to service replace the drive axle the axle housing does not ...

Страница 72: ...axle hous ing then using a plastic mallet install the second bearing NOTE It may be helpful to insert the axle through the previously installed bearing and into the axle housing to align the center axle housing spacer with the bearing bore Axle installation may be difficult if the spacer is offset from the bearing bore 3 Apply a light coat of axle bearing grease to the inside mating surface of the...

Страница 73: ...cotter pin should be installed 3 Remove the castle nut securing the hub Account for a washer MD2133 4 Remove the hub assembly Account for outer hub spacer 5 Repeat procedure for other hub CLEANING AND INSPECTING 1 Clean all hub components 2 Inspect all threads for stripping or damage 3 Inspect the brake shoes for excessive wear or gouges 4 Inspect the sealing area of the hub for pits 5 Inspect the...

Страница 74: ...ng a plastic mallet install the inner and outer seals into the hub MD2380 4 Repeat procedure for the other hub INSTALLING HUB 1 Lightly lubricate the seals with bearing grease then install the hub assembly 2 Install the outer spacer washer and castle nut Tighten the castle nut to 45 ft lb then install a new cotter pin MD2388 MD2354 3 Install wheel Tighten the four cap screws to 30 ft lb 4 Repeat p...

Страница 75: ...ace master link Problem Clutch slipping Condition Remedy 1 Clutch shoes worn damaged 1 Replace clutch shoes Problem Clutch dragging Condition Remedy 1 Clutch return springs weak 2 Clutch worn damaged 1 Replace return springs 2 Replace clutch Problem Braking poor Condition Remedy 1 Brake shoe s pad s worn 2 Lever free play excessive 3 Brake drum s worn 1 Replace brake shoe s pad s 2 Adjust free pla...

Страница 76: ...ers REMOVING REAR SHOCK ABSORBER 1 Secure the ATV on a support stand to elevate the wheels and to release the load on the suspension 2 Remove the cap screw securing the rear shock absorber to the frame MD2314 3 Remove the cap screw securing the rear shock absorber to the swing arm then remove the rear shock absorber MD2315 4 Compress the shock absorber spring and remove the spring retainer Remove ...

Страница 77: ... 29 ft lb MD2314 MD2315 3 Remove the ATV from the support stand A Arm REMOVING 1 Secure the ATV on a support stand to elevate the front wheel then remove the wheel 2 Remove the cotter pin castle nut and washer then remove the hub assembly MD2133 3 Slide brake backing plate assembly off the spindle shaft and secure it out of the way 4 Remove the cotter pin from the outer tie rod end then while hold...

Страница 78: ...9 Remove the A arm MD2119 CLEANING AND INSPECTING 1 Clean all A arm components in parts cleaning solvent 2 Clean the tie rod mounting hole of all residual Loc tite grease oil or dirt for installing purposes 3 Inspect the A arm for bends cracks and worn bushings 4 Inspect the tie rod mounting holes for cracks or damage 5 Inspect the frame mounts for signs of damage or wear INSTALLING NOTE During in...

Страница 79: ... nut Tighten the castle nut to 45 ft lb then install a new cotter pin Install the wheel and tighten the cap screws to 30 ft lb 7 Remove the ATV from the support stand Swing Arm REMOVING 1 Secure the ATV on a support stand to elevate the rear wheels then remove the wheels 2 Remove two cap screws securing the brake caliper to the axle housing KM207 3 Remove drive chain hubs spacers and axle as nec e...

Страница 80: ...G 1 Clean all swing arm components in parts cleaning solvent 2 Inspect all swing arm welds for cracks or unusual bends 3 Inspect all tubing for cracks or unusual bends 4 Inspect the pressed in bushings for damage 5 Inspect the rubber swing arm guard for damage 6 Inspect the seals for damage INSTALLING 1 Lubricate the pressed in swing arm bushings with a light coat of grease then install the spacer...

Страница 81: ...es of a different type or size TIRE INFLATION PRESSURE Front and rear tire inflation pressure should be 0 21 kg cm2 3 0 psi REMOVING 1 Secure the ATV on a support stand to elevate the wheels 2 Remove the four cap screws securing each wheel then remove the wheels NOTE Keep left side and right side wheels sepa rated for installing them on their proper sides CAUTION Do not tighten the cap screw beyon...

Страница 82: ...easurements with the tires on the opposite side If pulling is noted during braking only check and adjust the brakes as necessary and recheck operation see Periodic Maintenance Tune Up 4 Increase the air pressure in the tires with the smallest circumference measurement until all tires are equal in circumference 5 Repeat steps 3 4 as necessary to ensure proper handling Troubleshooting WARNING Do not...

Страница 83: ...82 NOTES ...

Страница 84: ...Printed in U S A Trademarks of Arctic Cat Inc Thief River Falls MN 56701 p n 2260 585 Effective September 2015 2015 Arctic Cat Inc ...

Отзывы: