Arconic 2022 Series Скачать руководство пользователя страница 8

8

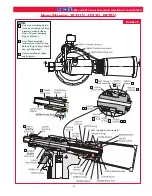
2022 and ERT9 series Pneudraulic Installation Tools (HK1021)


GEnERAl

The operating efficiency of your tool is directly related 

to the performance of the entire system. Regular 

inspection and the immediate correction of minor 

problems  will  keep  the  tool  operating  efficiently, 

and prevent downtime. A schedule of “preventive” 

maintenance of the tool, nose assembly, hoses, trigger 

and control cord, and POWERIG

®

 will ensure your 

tool’s proper operation and extend its life.

nOTE: 

This Huck tool should be serviced only by 

personnel who are thoroughly familiar with its 

operation.

• 

Service the tool in a clean, well-lighted area. Take 

special care to prevent contamination of pneumatic 

and hydraulic systems.

• 

Have available all necessary hand tools (standard 

and special), a brass drift and wood block, and a 

soft-jaw vise. See 

Kits & Accessories

.

• 

Carefully handle all parts. Before reassembly, 

examine them for damage and wear.

• 

Disassemble and assemble tool components in a 

straight line. Do nOT bend, cock, twist, or apply 

undue force.

• 

Have the appropriate Spare Parts Service Kit 

(2022KIT or ERT9KIT) available when servicing the 

tool; it includes important perishable parts. Other 

components, as experience dictates, should also be 

available. See 

Kits & Accessories

.

• 

Apply loctite

®

 243 Threadlocker (Huck P/n 508567) 

to gland threads. Apply loctite

®

 271-05 (Huck P/n 

503657) to nuts and locknut (P/n 505420); torque 

to 25–30 ft.-lbs.

• 

Smear lUBRIPlATE

®

 130-AA (Huck P/n 502723) or 

SUPER-O-lUBE

®

 (Huck P/n 505476) on rings and 

mating parts to ease assembly.

• 

Apply Parker Threadmate

®

, loctite

®

 567, or Slic-

Tite

®

 (per manufacturer’s instructions) to male pipe 

threads and quick-disconnect fittings.

For supplementary information, see 

Troubleshooting

, and the 

Disassembly

 and 

Assembly


procedures in this manual.

DAIly

•  Huck recommends using a filter-regulator-

lubricator unit. If one is not being used, uncouple 

the air disconnects and add a few drops of 

hydraulic fluid or a light-weight oil to the air inlet 

of the tool.

nOTE: 

If the tool is in continuous use, add a few 

drops of fluid every 2–3 hours.

• 

Before connecting an air hose to the tool, clear the 

air lines of dirt and water.

• 

Check all hoses and couplings for damage and air 

leaks; tighten or replace if necessary.

• 

Check the tool and nose assembly for damage and 

air or hydraulic leaks; tighten, repair, or replace if 

necessary.

• 

Inspect the tool, hoses, and POWERIG during 

operation to detect abnormal heating, leaks, or 

vibration.

• 

Clean nose assemblies in mineral spirits to clear 

jaws and rinse metal chips and dirt. For a more 

thorough cleaning, disassemble the nose assembly. 

Use a pointed “pick” to remove imbedded particles 

from the pull grooves of the jaws.

Clean all parts of any assembly with UnITIzED

TM


jaws in mineral spirits or isopropyl alcohol only; do 

not let jaws come in contact with other solvents. 

Do not let jaws soak; dry them 

immediately

 after 

cleaning. Huck recommends drying other parts 

before re-assembling.

WEEKly

• 

Disassemble, clean, and re-assemble nose assembly 

in accordance with applicable instructions.

• 

Check the tool and all connecting parts for damage 

and 

fluid

/air leaks; tighten or replace if necessary.

Loctite

 is a registered trademark of Henkel Corporation, U.S.A.

LUBRIPLATE

 is a registered trademark of Fiske Brothers Refining Co.

SUPER-O-LUBE

 is a registered trademark of Parker Hannifin Corp.

Threadmate

 is a registered trademark of Parker Intangibles, LLC.

Slic-tite

 is a registered trademark of LA-CO Industries, Inc.

Teflon

 is a registered trademark of E. I. du Pont de Nemours and 

Company.

Maintenance

CAUTIOn: Replace all seals, wipers, and 

rings when the tool is disassembled for any 

reason, and at regular intervals, depending 

on severity and duration of use.

CAUTIOn: Do not use TEFlOn

®

 tape on pipe 

threads. Tape can shred and break free into 

fluid lines, resulting in malfunctions.

CAUTIOn: Damaged jaw teeth, or debris 

packed between teeth, will result in 

fasteners not being installed or being 

improperly installed.

Содержание 2022 Series

Страница 1: ...stallation Tools Declaration of Conformity 2 Safety Instructions 3 Specifications 4 6 Principle of Operation 7 Preparation for Use 7 Operating Instructions 8 Maintenance 8 Disassembly Instructions 9 10 Assembly Instructions 11 12 Fill and Bleed 13 Measuring Tool Stroke 14 Components Drawings 14 17 Kits and Accessories 18 Troubleshooting 18 ...

Страница 2: ...2 2022 and ERT9 series Pneudraulic Installation Tools HK1021 ...

Страница 3: ...7 Avoid unsuitable postures as it is likely for these not to allow counteracting of normal or unexpected tool movement 8 If the assembly power tool is fixed to a suspension device make sure that fixation is secure 9 Beware of the risk of crushing or pinching if nose equipment is not fitted IV Repetitive motion hazards 1 When using assembly power tool the operator can experience discomfort in the h...

Страница 4: ...ire resistant fluid may be used if it is an ester based fluid such as Quintolubric HFD or equivalent Water based fluid shall NOT be used as serious damage to equipment will occur DEXRON is a registered trademark of General Motors Corp MERCON is a registered trademark of Ford Motor Corp Quintolubric is a registered trademark of Quaker Chemical Corp 12 5 31 8 4 3 11 1 5 3 13 7 0 8 2 0 9 2 23 4 1 5 4...

Страница 5: ...hrough the muffler As the hydraulic piston rod moves upward a column of pressurized fluid is forced into head which moves the pull piston rearward The attached nose assembly moves with the pull piston to start fastener installation RETURN STROKE When fastener installation is completed the trigger is released Air pressure with the assistance of a spring sends the throttle valve to the up RETURN pos...

Страница 6: ...e 567 or Slic Tite per manufacturer s instructions to quick disconnect fittings screw the quick disconnect fitting into the air inlet connector 3 Set the air pressure on the regulator to 90 psi 6 2 bar and connect the air hose to the air inlet connector and the tool 4 Press and release the trigger a few times to cycle the tool 5 Disconnect the air hose from the tool and remove the retaining nut Se...

Страница 7: ...d off the fastener and ready for the next installation cycle For complete safety information see page 4 CAUTIONS To avoid structural and tooI damage be sure there is sufficient clearance for the nose assembly at full stroke Remove excess gap from between the sheets to permit proper fastener installation and prevent jaw damage ALL jaw teeth must engage the pintail to avoid damaging the teeth CAUTIO...

Страница 8: ...onnects and add a few drops of hydraulic fluid or a light weight oil to the air inlet of the tool NOTE If the tool is in continuous use add a few drops of fluid every 2 3 hours Before connecting an air hose to the tool clear the air lines of dirt and water Check all hoses and couplings for damage and air leaks tighten or replace if necessary Check the tool and nose assembly for damage and air or h...

Страница 9: ...ad Figure 2 carefully pry on screws to remove head 9 Pull on lock nut with vise grips to remove the air piston from cylinder Remove the piston Quad ring NOTE Do NOT disassemble the air piston and rod assembly If the locknut loosens apply Loctite 271 05 and tighten to 25 30 ft lbs 10 Remove the bumper from the gland assembly Unscrew the gland assembly with a 1 3 8 socket wrench and extension 11 Rem...

Страница 10: ...m disassembly This procedure is applicable to models 2022V 2022LV and ERT9V only it should be used in conjunction with the previous sections General and Head Handle For component identification see Figures 5 6 15 1 Reach through the window of pintail bottle and remove the retaining ring and washer Figure 5 2 Remove the pintail bottle and then disconnect the tube from the tubing connector Figure 15...

Страница 11: ... the head Figure 8 4 Assemble the piston Polyseal washer and retaining ring Note the orientation of the Polyseal in Figure 7 5 Assemble the front gland O ring Back up ring Polyseal wiper and gland cap Note the orientation of the wiper and Polyseal in upper part of Figure 7 6 Thread the Piston Assembly Tool P Ns in Figure 7 onto the piston Slide the complete gland assembly and wiper the onto piston...

Страница 12: ...le valve into the cylinder 12 Place the ball end of the throttle cable into the end of the throttle arm then slide the throttle arm into the slot on the cylinder Figure 14 13 Snap the lever guard in place and install the pivot screw in the cylinder to retain the throttle arm 14 Models 2022 2022L Push the pintail deflector onto the end cap Model ERT9 Position the adapter and pintail bottle on the e...

Страница 13: ...on full forward 6 Disconnect the tool from the air line Lay the tool on its side and remove the fill bottle Top off the fluid in the fill port and install and tighten the bleed plug 7 Connect the air line to the tool and measure the stroke as described in Measuring Tool Stroke If the stroke is less than specified remove the bleed plug and add fluid Re insert the bleed plug and recheck the stroke 8...

Страница 14: ... and measure X 2 Cycle and hold the piston back and measure Y Stroke X Y If the stroke is less than 1 026 in 2 61 cm follow the steps at the end of the Fill and Bleed procedure Figure 13 2022 2022V 1 Cycle the piston all the way forward and measure X 2 Cycle and hold the piston back and measure Y Stroke Y X If the stroke is less than 1 026 in 2 61 cm follow the steps at the end of the Fill and Ble...

Страница 15: ...shown Detail of sticker locations Note orientation Tighten and torque to 36 66 ft lbs NOTES Cylinder Head Assembly 123778 1 Cylinder Head not sold separately 500864 O ring Throttle Valve Assembly 125472 2 Throttle Valve not sold separately 507396 O ring qty 3 Cylinder Assembly 125733 includes Cylinder not sold separately 505496 Dowel Pin 500782 O ring 125466 Upper Bushing 115503 Lower Bushing Figu...

Страница 16: ...is not sold separately It can be purchased as Piston Assembly which includes Piston Polyseal Retaining Ring and Washer Front Gland Assembly includes Front Gland O ring Back up Ring Polyseal Gland Cap and Wiper Seal Note orientation of Wipers and Polyseals NOTES 123775 Front Gland Assembly Figure 15 ...

Страница 17: ...Assembly Piston is not sold separately It can be purchased as Piston Assembly which includes Piston Polyseal Retaining Ring and Washer Front Gland Assembly includes Front Gland O ring Back up Ring Polyseal Gland Cap and Wiper Seal Note orientation of Wipers and Polyseals NOTES 123775 Front Gland Assembly Figure 16 ...

Страница 18: ... Hydraulic fluid leaks at front of pull piston a Worn or damaged part in front gland Inspect Polyseal O ring and Back up ring Replace if necessary 7 Pull piston will not return a Throttle valve stuck lubricate O rings b Throttle arm cable or trigger binding 8 Air leaks at air cylinder head a Worn or damaged O ring Replace if necessary Kits Accessories KITS Service Kits 2022KIT ERT9KIT Assembly Too...

Страница 19: ...mal in service wear or as part of a complete overhaul Determination is made on a case by case basis upon return of parts to Huck International Inc for evaluation Tooling Part s and Other Items not manufactured by Huck HUCK makes no warranty with respect to the tooling part s or other items manufactured by third parties HUCK expressly disclaims any warranty expressed or implied as to the condition ...

Страница 20: ... São Paulo SP Brazil Tel 55 11 3583 7061 Suzhou Operations 58 Yinsheng Road SIP Suzhou Jiangsu 215126 China Tel 86 512 62863800 8888 Telford Operations Unit C Stafford Park 7 Telford Shropshire England TF3 3BQ Tel 44 0 1952 290011 Fax 44 0 1952 207701 thisales arconic com Tokyo Operations Japan and Korea 1013 Hibiya U 1 Bldg Uchisaiwai cho 1 1 7 Chiyoda ku Tokyo 100 0011 Japan Tel 81 3 3539 6594 F...

Отзывы: