


INSTALLATION/OPERATION/MAINTENANCE INSTRUCTIONS FOR
ARCHON MODELS WD2010L, WD2010, WD2010H WASHDOWN STATIONS
Installation: 1004 Rev 4
Issued: February 7, 2013
14
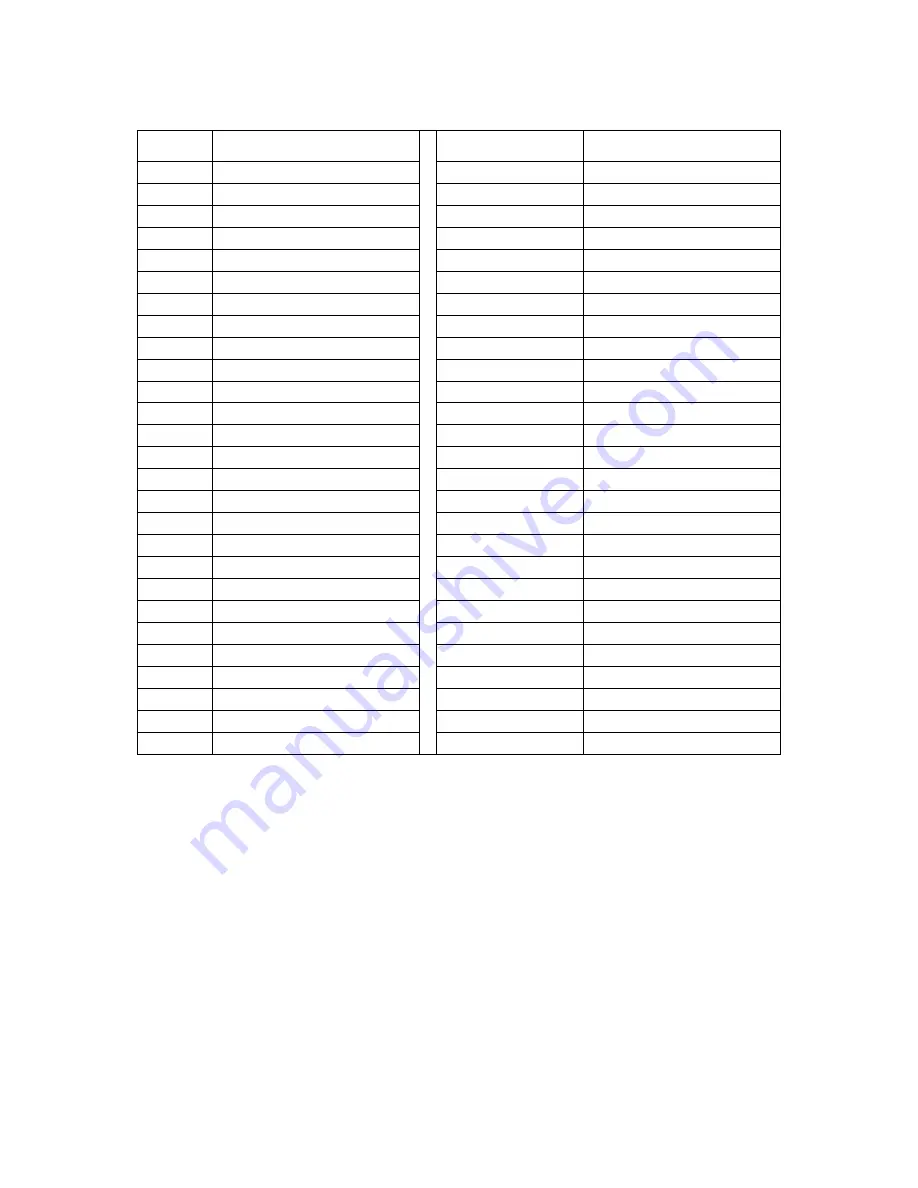
REF.NO DESCRIPTION
REF.NO DESCRIPTION
4 Nut,
Nozzle
91
Thermometer
4A
Nut, Rack 7/16”
98
Tee
4B
Nut, Flange 1/2”
99
Tailpipe
4C
Nut, Stem 5/16’
99A
Nut, Tailpipe
11 Body
100 Bolt,
1/2”
17
Stem assembly
***100A
Screw, 3/8”
**17A Stem
100B Screw,
1/4"
**17B
Acorn nut
100C
Screw, #8
**17C Teflon
seal
100D
Screw,
1/4”
19 Gland,
Packing
103
Connector
*25
Packing, Teflon Ring Set
116
Check Valve Retainer
*39
O-Ring, Body/ Nozzle
116A
Diaphragm Retainer
*39A O-Ring,
Flange
*125
Wave
Washer
*39B O-Ring,
Extension
*125A
Washer
*39D
O-Ring, Packing
*140
Water Check Spring
*39E
O-Ring, Connector
*140A
Steam Check Spring
*39V
O-Ring, Nozzle / Jet
*140D
Diaphragm Spring
45 Casing,
Upper
Diaphragm
148
Bushing
61 Nozzle
171
Tube,
Z
74 Extension
172
Tube,
L
75W Valve,
Water
Shut-off
*182
Diaphragm
75S
Valve, Steam Shut-off
206
Fitting, Straight
75A
Valve, Check
207
Fitting, Elbow
75B
Valve, Check
217
Diaphragm Piston
***79
Spacer Nipple
244
Orifice Body
82 Jet
***245 Anchor
90
Casing, Lower Diaphragm
246
Hose Rack
* These parts make up our Standard Repair kit (RK-WD2010-A).
** RK-WD2010-B includes all items in RK-WD2010-A, plus these items.
** These parts are discontinued and not included with our Washdown unit or Repair kit.