background image

Using your remote control

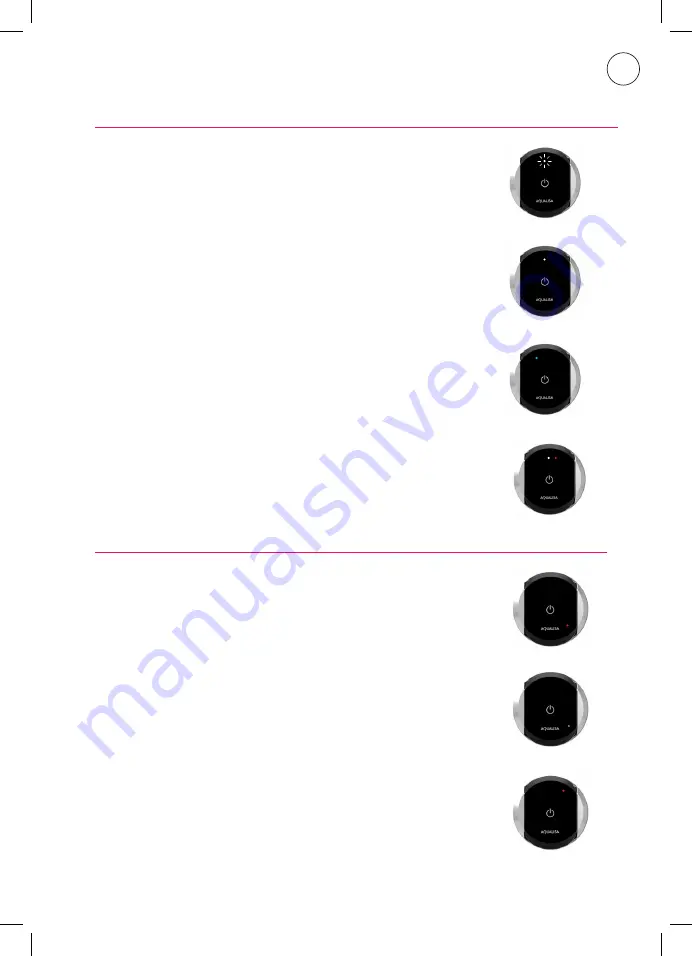
SWITCHING SHOWER ON
To switch on your shower, press the button on the remote control. 
The white LED light will light up and start to flash. It will continue 
to flash until the water has reached temperature. Once the water 
has reached temperature, the white LED light will stop flashing 
and remain on for a further 5 seconds. Sudden temperature 
change or disruption of signal can affect this function and LED 
status.

SELECTING OUTLET
If you have a divert model, you can switch outlets with the remote 
control by pressing and holding the button until the blue LED 
lights up to indicate an alternative outlet has been selected.

OUT OF RANGE
Your remote will display white and red LED lights to indicate a 
weak signal, when the button is pressed.

Before you use the remote control for the first time, you will 
need to charge the battery. 
The remote control is supplied with a micro USB charging cable. 
This is suitable for use with any CE marked USB mains charger.

Whilst charging, a red LED light will be illuminated. 

A green LED light indicates that the battery is fully charged.

The battery should last about 90 days, depending on usage.

LOW BATTERY WARNING
When the battery is low a red LED light will illuminate when the 
button is pressed.

Charging the battery

Shower ready

Shower warming up

Diverting shower

Out of range

Battery charged

Battery charging

Low battery

UK

Содержание AQLS

Страница 1: ...AFSTANDSBEDIENING TÉLÉCOMMANDE USER GUIDE GEBRUIKERSHANDLEIDING MODE D EMPLOI ENGLISH NEDERLANDS FRANÇAIS UK NL FR WIRELESS REMOTE ...

Страница 2: ......

Страница 3: ......

Страница 4: ...in the mounting bracket position in the desired location and operate the remote To fix to the wall peel off the backing paper from the mounting bracket and position it in the desired location Press it to the wall for 2 to 3 seconds to ensure it is securely fitted We recommend charging the battery prior to pairing the remote When you are ready to pair your remote control wake up the controller and ...

Страница 5: ...up to indicate an alternative outlet has been selected OUT OF RANGE Your remote will display white and red LED lights to indicate a weak signal when the button is pressed Before you use the remote control for the first time you will need to charge the battery The remote control is supplied with a micro USB charging cable This is suitable for use with any CE marked USB mains charger Whilst charging...

Страница 6: ...trekt u het afdekpapier van de houder af en plaatst u deze op de gewenste plaats Druk hem 2 tot 3 seconden tegen de muur om ervoor te zorgen dat hij goed vastzit Wij raden u aan de batterij volleidg op te laden voordat u de afstandsbediening gaat koppelen Wanneer u klaar bent om uw afstandsbediening te koppelen schakelt u de Touch controller in en navigeert u naar het instellingsmenu Navigeer met ...

Страница 7: ... het blauwe LED lampje gaat branden om aan te geven dat er een andere uitgang is geselecteerd BUITEN BEREIK Een wit en rood LED lampje toont aan dat de afstand te ver is Dit ziet u als u de douche wilt aanzetten met de afstandsbediening Klaar Opwarmen Wijzig stand Buiten bereik NL Vooraleer de afstandsbediening te gebruiken raden wij aan om het eerst volledig op te laden De afstandsbediening wordt...

Страница 8: ...fixer au mur retirez le papier support de montage et positionnez le à l endroit souhaité Appuyez sur le mur pendant 2 à 3 secondes pour vous assurer qu elle est bien fixée Nous recommandons de charger la batterie avant de connecter la télécommande Lorsque vous êtes prêt à connecter votre télécommande démarrez votre commande et naviguez vers le menu Réglages Selectionner Connecter la télécommande l...

Страница 9: ...u à ce que la LED bleue s allume pour indiquer qu une autre sortie a été sélectionnée HORS DE PORTÉE Votre télécommande affichera des LED blancs et rouges pour indiquer un signal faible lorsque le bouton est appuyé La douche est prête La douche se prépare Choisir une douche Hors de portée FR Avant d utiliser la télécommande pour la première fois vous devrez charger la batterie La télécommande est ...

Страница 10: ...ovisions of the Low Voltage Directive 2014 35 EU the EMC Directive 2014 30 EU and the RED Directive 2014 53 EU Declaration of confirmity Onderhoud Gebruik een zachte doek met productvriendelijke waszeep Gebruik geen zware detergenten Hulp nodig of bezoek aqualisainternational com Contacteer uw regionele Aqualisa verdeler Aqualisa producten worden geleverd met 2 jaar garantie op onderdelen Bewaar u...

Страница 11: ...nt Conservez votre reçu d achat ou votre facture d installation pour valider Contactez votre distributeur Aqualisa local pour plus de détails visitez aqualisainternational com Votre garantie Aqualisa Products Limited déclare que la télécommande rechargeable sans fil et les commandes pour l appariement en combinaison avec l Aqualisa SmartValve sont conformes aux critères essentiels et aux autres cl...

Страница 12: ...inhoud kunnen steeds gewijzigd aangevuld of verwijderd worden zonder vooraf te verwittigen Nous nous réservons le droit d altérer de changer ou de modifier les spécifications du produit sans avertissement préalable Registered Trademark Aqualisa Products Limited Q5040 Part No 705084 Issue 01 Mar 20 THE FLYERS WAY WESTERHAM KENT TN16 1DE ...

Отзывы: