AquaCraft Rio 51 Скачать руководство пользователя страница 12

12

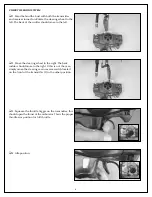
Understanding your carburetor and learning how to adjust it:

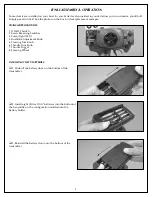
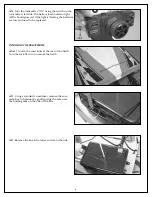
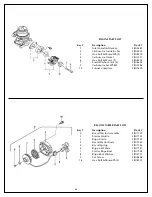
A.  High-Speed Needle (HSN). The needle located on the 

right side of the carburetor when viewing the boat
from behind.

B.  Low-Speed Needle (LSN). The needle located on the 

left side of the carburetor.

C.  Idle Adjustment Needle. It is located near the top of

the carburetor.

D. Primer Bulb, located under the carburetor.
E.  Choke lever, located on the front of the carburetor.
F. Fuel Inlet.
G. Fuel Return.

It is not necessary to change the needle settings if the 
engine runs smoothly. Normally only the (A) high-speed 
needle (A, HSN) will need adjustment from time to time 
and only by a small amount.

Factory carburetor settings are:

A.  HSN 1-1/4 turns from the closed position
B.  LSN 2-1/2 turns from the closed position 

If you run into problems tuning your engine settings, it is best 
to re-set the needles to the above settings and start over.

IDLE STOP ADJUSTMENT

IMPORTANT: The idle adjustment needle (C) is set from 
the factory to allow the boat to shut off when the throttle 
trigger is pushed back. Do not adjust your idle using the 
idle adjustment needle located on the motor. You must 
use the throttle trim knob (#6, TH.TRIM) located on the 
front of the transmitter to set the idle.

TROUBLESHOOTING

Problem:

The engine hesitates when accelerated rapidly.
The RPM increases at idling.

Solution: 

Your (B) LSN is adjusted to lean. Open it up about 1/8th of 
a turn and try again.

Problem:

The idle is not steady.

Solution: 

Your (B) LSN is adjusted is too rich. Close it 1/8th of a turn 
and try again.

Problem:

Engine stops at full throttle.
Engine sags when accelerated rapidly.
Engine sags with the boat at full speed

Solution:


Your (A) HSN is too lean. Open it up 1/16th of a turn and
try again.

Problem:

Your engine does not reach full RPM.
Carbon build-up appears consistently on your spark plug.

Solution:


Your (A) HSN is too rich. Turn it in 1/16th of a turn and
try again.

MAINTAINING THE RIO 51

When you are through operating your boat for the day, 
be sure to perform these basic maintenance procedures. 
This will prolong the life of the Rio 51 and help to ensure 
trouble-free running. 

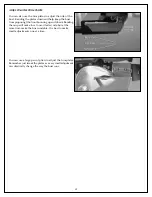
ENGINE MAINTENANCE AND STORAGE

After a day of running, start your engine and choke it 
while it is running to get a lot of fuel into the engine. Run 
it for about 30 seconds, constantly choking the engine. 
Afterwards it is a good idea to cover the inlet to the 
carburetor to keep foreign materials out and moisture 
from entering the motor. 

For long term (winter) storage it is a good idea to flood the 
engine as described above as well as coating the inside of 
the engine with GrimRacer After Run Oil 8 oz (AQUB9551)

Before transporting your model, remove all of the gasoline 
from the tank and lines and make sure your oil line shut 
off clip is locked.

RADIO BOX MAINTENANCE

When finished running, open the radio box and leave the 
radio box lid off overnight to allow any water to evaporate.

Should moisture gain access to the radio box, all 
connections should be dried thoroughly. Hobbico 
“Duster” Compressed Air (HCAR5500) will provide a blast 
of air capable of blowing moisture out of connectors.

12

12

Содержание Rio 51

Страница 1: ...o not recommend using a rubber blow up raft 5 The engine and exhaust system become very hot during operation Avoid coming in contact with any part of the motor cooling system or exhaust during or afte...

Страница 2: ...rolled by radio signals which are susceptible to possible interference from other R C transmitters paging systems or other electrical noise Before turning your radio transmitter and receiver on make s...

Страница 3: ...e and proof of purchase date please include a complete written explanation detailing the problem s Please include your name return address and daytime phone number so that you may be reached if needed...

Страница 4: ...power full throttle for extended periods of time while breaking in your engine It s best to break in the engine using a variety of throttle settings Make sure that the engine has adequate cooling Wit...

Страница 5: ...1 ON OFF Switch 2 Servo Reversing Switches 3 Power Light LED 4 Dual Rate Adjustment Knob 5 Steering Trim Knob 6 Throttle Trim Knob 7 Throttle Trigger 8 Steering Wheel INSTALLING THE TX BATTERIES 1 Sli...

Страница 6: ...e batteries are low and need to be replaced INSTALLING THE RX BATTERIES 1 Locate the cowl locks at the rear of the hatch Turn the lock 1 4 turn to remove the hatch 2 Using a standard screwdriver remov...

Страница 7: ...the antenna in to the point it is even with the back side of the cover 6 Place four 4 new AA batteries into the receiver battery holder Be sure to follow the polarity diagram molded into the battery h...

Страница 8: ...screwdriver carefully pry the retainer over the tabs INSTALLING THE RUDDER BLADE 1 Remove the 3mm and 4mm nuts and bolts from the rudder pivot bracket 2 Insert the rudder into the rudder control arm a...

Страница 9: ...ove the steering wheel to the right The back rudder should move to the right If this is not the case simply move the steering servo reverse switch located on the front of the transmitter 2 to the othe...

Страница 10: ...osition Note You might have to readjust the position of the throttle arm of the throttle servo to properly get the carburetor to match the pictures INSTALLING THE PROPELLER 1 Use a 10mm wrench to remo...

Страница 11: ...or left Adjust the steering trim knob 5 on your transmitter until the boat runs in a straight line when the steering wheel is at neutral When finished running push back on the throttle trigger to stop...

Страница 12: ...n Your B LSN is adjusted is too rich Close it 1 8th of a turn and try again Problem Engine stops at full throttle Engine sags when accelerated rapidly Engine sags with the boat at full speed Solution...

Страница 13: ...inner strut assembly with shaft out of the boat Wipe away any oil and grease Re grease the shaft using GrimRacer Speed Grease Re install the shaft and inner strut housing making sure the two 4mm screw...

Страница 14: ...ng on the type of handling you are looking to achieve Neutral PropellerThrust This setting provides thrust without letting it affect the ride attitude of the hull the bow s tendency to ride up or down...

Страница 15: ...osing the front bouncing up and down Bending them up will make for a looser faster ride but at the same time make the boat unstable It is best to make small adjustments one at a time You can use a lar...

Страница 16: ...a corner are especially dangerous Cutting across a wake when entering a corner can cause the boat to hook spin out Racing other boats through a corner may be a competitor s greatest challenge especia...

Страница 17: ...nation to make the races more interesting Usually smaller courses will provide more action and excitement The length of the races can be determined by a set number of laps around the buoys for example...

Страница 18: ...Up Bracket AQUB9270 Tank Bungee Cord AQUB9275 Transom Hardwood Mounting Plates AQUB9523 Rear View Mirrors AQUB9524 1 4 Drive Dog AQUB9525 Water Cooled Manifold 26 to 28cc AQUB9526 Turn Fin Transom Lar...

Страница 19: ...r the Fuji Imvac BT 28M use the order numbers in the Replacement Parts Lists that follow Replacement parts are available only as listed Replacement parts are not available from Product Support but can...

Страница 20: ...Washer 5mm 2 FJIG8605 9 Carburetor Set WT822 FJIG3286 10 Funnel Complete FJIG7640 RECOIL STARTER PARTS LIST Key Description Stock 0 Recoil Starter Assembly FJIG7149 2 Starter Handle FJIG7143 3 Rope Gu...

Страница 21: ...Purge Cover FJIG3020 10 Diaphragm Cover FJIG4520 11 Priming Body FJIG6210 12 Valve Spring FJIG8525 13 Needle Valve FJIG6240 15 Valve Hinge FJIG7540 16 Hinge Pin Set Screw FJIG5130 17 Hinge Pin FJIG510...

Страница 22: ...luded 2 channel radio are factory installed And AquaCraft adds many premier accessories from their GrimRacer line a machined aluminum surface drive strut assembly adjustable anodized FE rudder stainle...

Страница 23: ...he factory installed strut assembly it can be angled slightly or moved up and down The aluminum turn fin and deep water rudder are strong and lightweight and a water pick up in the rudder channels coo...

Страница 24: ...visit our web site at www aquacraftmodels com or call www aquacraftmodels com or call 1 800 682 8948 and mention code 99K36 1 800 682 8948 and mention code 99K36 www aquacraftmodels com www aquacraft...

Отзывы: