background image

8

If  these  pumps  are  being  used  in  salt  water, 

they must be checked regularly for buildup of 

calcium and other deposits.

To  maximise  the  life  of  your  pump,  it  is 

recommended  to  clean  the  pump  casing  and 

the impeller every 6-8 weeks or earlier if flow 

has decreased significantly.

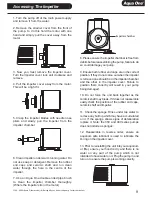
Prior to cleaning, disconnect the pump from the 

electrical power supply.

The casing of the pump and the strainer can be 

cleaned  with  a  firm  brush.  DO  NOT  USE 

DETERGENTS AS THE USE OF THESE WILL 

BE  POTENTIALLY  LETHAL  TO  AQUARIUM 

INHABITANTS. Any  objects  on  or  around  the 

strainer or inlet should be removed to prevent 

potential blockages in the pump or damage to 

the impeller.

LOW WATER FLOW

1.  Check  strainer,  impeller  and  impeller 

chamber for calcium buildup or other deposits 

or blockages.

2. Ensure all taps or flow control valves are fully 

open.

3. Clean plumbing lines to and from the pump.

NO WATER FLOW

1. Ensure all taps or flow control valves are fully 

open.

2.  Check  that  maximum  head  height  has  no 

been  exceeded.  Consider  all  bends  and 

horizontal  plumbing  when  calculating  head 

height.

3. Check impeller and shaft for damage.

PUMP IS NOISY

1. Ensure suction cups are correctly positioned.

2.  Check  for  blockages  on  the  pump  inlet. 

Restriction of inlet can cause vibration.

3. Check for damage to impeller or shaft. 

Before installation ensure the correct materials 

have  been  prepared  and  the  most  suitable 

pump  position  has  been  selected. As  with  all 

water pumps, the greatest flow efficiency will be 

created  through  the  shortest  length  of 

pipe/hose  and  with  the  fewest  number  of 

bends. Avoid reducing the size of the plumbing 

as this will greatly reduce flow. 
Note:  flow  is  reduced  less  through  2  x  45° 

bends than through a single 90° bend.
Flexible hose is recommended over rigid pipe 

as this will reduce vibration of the pump. If using 

rigid  plumbing,  a  short  piece  of  flexible  hose 

between  the  pump  and  the  pipes  will  help  to 

reduce vibration.
If there is a requirement to adjust the flow on 

your pump, it is essential that in-line taps are 

used only on the pressure (outlet) side of the 

pump. Restriction of the suction (inlet) side of 

the  pump  can  cause  the  motor  to  overheat 

causing damage to the pump.

It is recommended that the strainer is used to 

prevent fish or large objects from entering the 

motor unit and damaging the impeller. Ensure 

the pump is fully submersed to prevent air from 

entering  the  pump  which  can  result  in 

significant  loss  of  flow  and  potentially  cause 

damage to the motor.
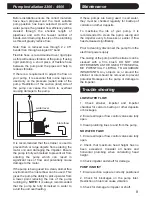
If the pump is being used in a clean, animal free 

environment the inlet elbow can be used. This 

gives the pump the ability to pick up water from 

a  lower  point  reducing  the  risk  of  the  pump 

running dry. 

NOTE:

 it is always recommended 

that  the  pump  be  fully  immersed  in  water  to 

avoid the unit overheating.  

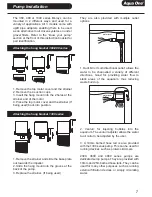
Pump Installation 2300 - 4900

Maintenance 

Trouble shooting 

water level

inlet elbow

Содержание moray 1300

Страница 1: ...Models 360 480 1300 2300 3600 4900 Moray Instruction Manual ...

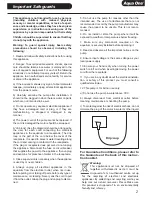
Страница 2: ...sible for their safety Children should be supervised to ensure that they do not play with the appliance Warning To guard against injury basic safety precautions should be observed including the following 1 Read and follow all safety instructions before using this appliance 2 Danger To avoid possible electric shocks special care should be taken since water is employed in the use of aquarium equipme...

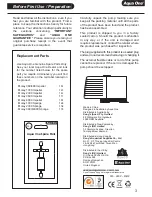
Страница 3: ... 17i Moray 4900 Impeller 18i Moray 1300 Sponge 12s Moray 2300 Sponge 13s Moray 3600 4900 Sponge 17s Aqua One Spare Parts 14i Carefully unpack the pump making sure you keep all the packing material until all the parts of the product have been found and the product has been assembled This product is shipped to you in a factory sealed carton Should the product malfunction in any way or if the unit is...

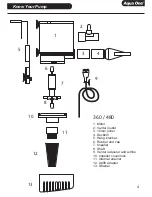
Страница 4: ...12mm joiner 4 Duckbill 5 Hang bracket 6 Rubber end cap 7 Impeller 8 Shaft 9 Venturi adjuster and airline 10 Impeller cover lock 11 Internal strainer 12 Uplift adapter 13 Strainer 360 480 Know Your Pump 6 1 2 7 8 3 4 5 9 10 11 12 13 ...

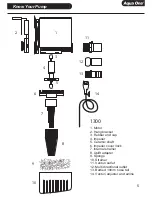
Страница 5: ...1 Motor 2 Hang bracket 3 Rubber end cap 4 Impeller 5 Ceramic shaft 6 Impeller cover lock 7 Internal strainer 8 Uplift adapter 9 Sponge 10 Strainer 11 Venturi outlet 12 Multi directional outlet 13 Barbed 19mm hose tail 14 Venturi adjuster and airline 1300 ...

Страница 6: ...r end cap 4 Impeller 5 Ceramic shaft 6 Impeller cover 7 Impeller lock 8 Internal strainer 9 Sponge 10 Strainer 11 Barbed 25mm hose tail 12 Threaded reducer 13 Barbed 19mm hose tail 14 Inlet elbow 2300 3600 4900 1 3 4 2 5 6 7 8 9 10 11 12 13 14 ...

Страница 7: ...al filtration devices or simply circulating water The 360 480 or 1300 series Morays can be mounted in 2 different ways and used for a variety of applications All 3 models come with uplift pipe adapters enabling them to be used as an alternative to air driven systems on under gravel filters Refer to the know your pump section at the front of this instruction booklet for part identification 1 Remove...

Страница 8: ...ect materials have been prepared and the most suitable pump position has been selected As with all water pumps the greatest flow efficiency will be created through the shortest length of pipe hose and with the fewest number of bends Avoid reducing the size of the plumbing as this will greatly reduce flow Note flow is reduced less through 2 x 45 bends than through a single 90 bend Flexible hose is ...

Страница 9: ...nstalling the unit into your aquarium or filter ensure your hand is dry and there is no water on any part of the pump which is not intended to have water on it Plug the pump in and turn on to ensure the pump is working corectly 1 Turn the pump off at the main power supply and remove it from the water 2 Remove the strainer cover from the front of the pump To do this hold the motor with one hand and...

Страница 10: ...ions specifications or this Guarantee Aqua One reserves the right to terminate Extended Guarantee for such goods and will provide written notice to the purchaser 3 0 Exclusions and Limitations Where permitted by local law the following exclusions and limitations apply in regard to the Guarantee 3 1 Goods claims where fault is due to but not limited by a misuse b neglect c abuse d fire or flood e n...

Страница 11: ...fications Notes W 220 240V 50Hz Moray 360 600 L hr 0 86m 6 5W Moray 480 720 L hr 0 96m 8 5W Moray 1300 1100 L hr 1 4m 14 6W Moray 2300 2200 L hr 2 2m 30W Moray 3600 3600 L hr 3 4m 79W Moray 4900 4800 L hr 3 6m 100W h ...

Страница 12: ... in the most efficient and superior aquarium products The Aqua One range includes a wide range of curved glass aquariums air pumps filters power heads heaters reflectors under water lighting along with fish foods cleaning and maintenance accessories and decorations Keep an eye out for these Aqua One products at your local retailer Instruction Version 18 04 09 ...

Отзывы: