background image


9

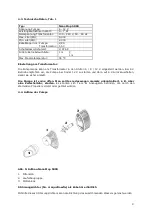
4.3. Technische Daten, Tab. 1


Typ: 

NanoProp 5000 

Spannung Pumpe: 

6 - 12 V  

Leistungsaufnahme in Watt: 

4 – 7 W 

Netzspannung Transformator: 

100 – 240 V, 50 – 60 Hz  

Max. Liter/Std.: 

5.000 

Min. Liter/Std.: 

2.000                    

Kabellänge in m: Pumpe: 
                         Transformator: 

2,80 
1,50 

Schutzklasse/Schutzart: 

1/ IP 68 

Größte Betriebstauchtiefe: 

1 m       


             1m 

Max. Medientemperatur: 

35 °C 

 
Einstellung am Transformator: 
 

Die  Pumpmenge  kann  am  Transformator  in  den  Stufen  6  /  9  /  12  V  eingestellt  werden.  Bei  6  V 
Betrieb empfehlen wir, die Pumpe bei 9 oder 12 V zu starten und dann auf 6 V zurückzuschalten, 
damit sie sicher anläuft. 
 

Die  Pumpe  ist  vorne  offen.  Man  sollte  sie  deswegen  niemals  unkontrolliert,  z.  B.  über 
eine  Zeitschaltuhr,  starten.

  Es  könnten  sich  Tiere  im  Ansaugkorb  befinden,  die  durch  den 

startenden Propeller verletzt oder getötet würden. 

 
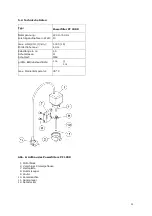
4.4. Aufbau der Pumpe


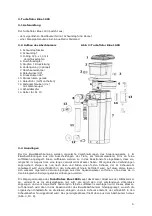
Abb. 5: Aufbau NanoProp 5000 


1.  Filterkorb 
2.  Läuferbaugruppe 
3.  Motorblock 

 
Strömungsrichter (Nr. 4: aquaflowfix) als Zubehör erhältlich 
 

Mit Hilfe dieses Strömungsrichters kann die Richtung des ausströmenden Wassers gelenkt werden. 

Содержание Percula 100

Страница 1: ...asseraquarium PERCULA ist ein Komplettsystem mit Unterschrank Abschäumer Filteranlage und Beleuchtung AB Aqua Medic GmbH Gewerbepark 24 49143 Bissendorf Germany __________________________________________________________________________________________ ...

Страница 2: ...ne Steckdosenleiste Die Leistung des benötigten Heizstabes richtet sich nach der Umgebungstemperatur des Aquariums Erfolgt die Aufstellung in einem unbeheizten Raum sollte er eine Leistung von etwa 250 Watt haben In beheizten Wohnräumen reichen 100 150 Watt beim Percula 100 150 300 Watt Percula 125 aus 2 Aufbau des Unterschrankes siehe Abb 1 Die Montage ist entsprechend der beigefügten Zeichnung v...

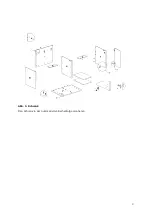
Страница 3: ...3 Abb 1 Schrank Den Schrank in der nummerierten Reihenfolge montieren ...

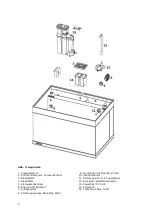
Страница 4: ...wamm herausnehmbar 10 Überlaufkamm 3 Rieselplatte 11 Strömungsrohr mit Kugelgelenk 4 Rieselfilter 12 Druckrohr Rückförderpumpe 5 Klarwasserkammer 13 Powerfilter PF 1000 6 Bohrung für Rücklauf 14 Filterkorb 7 Auflagegitter 15 Turboflotor Blue 1000 8 Strömungspumpe NanoProp 5000 ...

Страница 5: ...Reaktionsrohr eingeblasen dass sie möglichst im Gegenstrom eine lange Verweilzeit im Wasser haben Mit organischen Verbindungen angereichert steigen sie nun nach oben und bilden einen festen Schaum der im Schaumrohr entwässert wird und schließlich in den Schaumtopf hinein befördert wird Auf diese Weise lassen sich wirksam organische Verunreinigungen aus dem Aquarienwasser entfernen ohne dass sie in...

Страница 6: ...ulierung Der Abschäumer ist so konstruiert dass das Luft Wasser Gemisch automatisch richtig eingestellt ist Am Durchflussregler Abb 3 Nr 4 kann der Wasserstand im Abschäumer reguliert werden Ist der Schaum zu feucht Regler weiter öffnen Luftblasen Wird der Abschäumer bei einem bestehenden Aquarium nachgerüstet kann es sein dass im Wasser hohe Mengen organische Stoffe gelöst sind Dies führt zu extr...

Страница 7: ...stens 1 bis 2 mal im Jahr gereinigt zu werden In diesen Intervallen sollte auch die Dispergatorpumpe ausgebaut und gereinigt werden damit die Luftleistung nicht beeinträchtigt wird Dazu wird die Pumpe ausgebaut und das gesamte Kreiselgehäuse und das Fadenrad mit sauberem Wasser ausgespült Auch die Lufteinzugsdüse sollte dann gereinigt und mit frischem Wasser gespült werden 3 8 Störungen Störungen ...

Страница 8: ...instellbar von 6 12 V 4 2 Eigenschaften Die Magnetkreiselpumpe der NanoProp zeichnet sich spätestens nach einem Tag Einlaufzeit durch eine besondere Laufruhe aus Sie besitzt einen gekapselten Synchronmotor Alle Materialien sind meerwasserbeständig Die Pumpe wird mit 12 V Sicherheitsspannung betrieben der Transformator ist im Lieferumfang enthalten Der Antriebspropeller ist als Dreiflügler ausgeleg...

Страница 9: ...2 V eingestellt werden Bei 6 V Betrieb empfehlen wir die Pumpe bei 9 oder 12 V zu starten und dann auf 6 V zurückzuschalten damit sie sicher anläuft Die Pumpe ist vorne offen Man sollte sie deswegen niemals unkontrolliert z B über eine Zeitschaltuhr starten Es könnten sich Tiere im Ansaugkorb befinden die durch den startenden Propeller verletzt oder getötet würden 4 4 Aufbau der Pumpe Abb 5 Aufbau...

Страница 10: ...wasser strömt über einen Kamm Abb 2 Nr 10 in die Zulaufkammer Von der Zulaufkammer läuft das Wasser über den Rieselfilter Dort befinden sich zwei Filterkörbe die mit Aktivkohle oder Phosphatabsorbern gefüllt werden können Auf den Rieselfilter folgt die Klarwasserkammer Abb 2 Nr 5 in der sich die Pumpe PF 1000 befindet die das Wasser in das Aquarium zurück befördert Der Wasserstand im PERCULA darf ...

Страница 11: ...r Std l min Förderhöhe max 1 000 16 1 0 m Kabellänge in m Schutzklasse Schutzart 1 5 II IP68 größte Betriebstauchtiefe 1 m 1m max Medientemperatur 35 C Abb 6 Aufbau des Powerfilters PF 1000 1 Motorblock 2 Verschluss Kreiselgehäuse 7 Halteplatte 8 Gummisauger 9 Läufer 10 Keramikachse 11 Gummilager 12 Netzstecker ...

Страница 12: ... in Filterbeuteln eingebracht werden Kohle und Phosphatentferner müssen in regelmäßigen Abständen erneuert werden Der Schwamm Abb 2 Nr 2 ist ebenfalls bei Bedarf auszuwaschen der Kamm Abb 2 Nr 10 von Algen und Schmutzresten zu befreien 7 Abdeckung mit Lüftern nicht enthalten bei offener Version Die Lüfter werden über ein Y Verbindungskabel an den mitgelieferten Transformator angeschlossen Die Lüft...

Страница 13: ...hoher Reinheit zusammengesetzt Auf diese Weise unterstützen sie den Aquarianer bei seinen Bemühungen den Gehalt der oben angeführten Stoffe möglichst niedrig zu halten Die Befestigung von Steinen und Korallen gelingt problemlos mit dem Unterwasserkleber Reef Construct 9 Garantie AB Aqua Medic GmbH gewährt eine 12 monatige Garantie ab Kaufdatum auf alle Material und Verarbeitungsfehler des Gerätes ...

Страница 14: ... PERCULA is a complete ready to use system with integrated internal filtration protein skimmer lighting and cabinet AB Aqua Medic GmbH Gewerbepark 24 49143 Bissendorf Germany __________________________________________________________________________________________ ...

Страница 15: ...a timer and a socket board The power of the required heater stick depends on the temperature of the aquarium environment If it is installed in an unheated room it should have a power output of approx 250 watt In heated rooms 100 150 watt are sufficient for Percula 100 or 150 300 watt for Percula 125 2 Cabinet s assembly refer to Fig 1 The assembly of the cabinet is done according to the following ...

Страница 16: ...16 Fig 1 Cabinet Assemble the cabinet in the numbered sequence ...

Страница 17: ...Removable pre filter sponge 10 Overflow comb 3 Trickle plate 11 Current pipe with ball joint 4 Trickle filter 12 Pressure pipe for return pump 5 Clean water compartment 13 Powerfilter PF 1000 6 Bore hole for backflow 14 Filter basket 7 Grate 15 Turboflotor Blue 1000 8 NanoProp 5000 ...

Страница 18: ...ayers If we add a drop of oil to a water surface a thin film is produced with a thickness of only one molecule Surface active compounds like proteins behave in the same way The Turboflotor Blue 1000 uses its air bubbles to create a large water surface for the waste substances to attach themselves to These air bubbles are forced into the reactor pipe in a such a way that they undergo a long contact...

Страница 19: ...ers cannot be adjusted correctly in the starting phase However this will be settled by itself after occupying the aquarium Adjustment Due to the construction air and water mixing is done automatically and no adjustment is required The water level in the skimmer can be adjusted at the flow regulator Fig 3 No 4 If the foam is too damp just continue to open the flow regulator Air bubbles If the skimm...

Страница 20: ...y daily or weekly depending on organic load The reaction pipe of the skimmer needs to be cleaned only once or twice a year The venturi pump should be cleaned at the same time The pump has to be removed and the complete pump housing and mesh wheel flushed with clean water The same procedure should be done with the air injection nozzle 3 8 Problems Problems may arise if the ration of drawn air and w...

Страница 21: ...40 V 18 watts max adjustable from 6 12 V 4 2 Features The NanoProp 5000 magnetically coupled current pump is very quiet in operation It has a fully encapsulated synchronous motor All materials are salt water resistant The pump is operated with 12 V safety voltage transformer is included The propeller of the rotor is designed as a 3 blade model This design runs more smooth than the 2 blade propelle...

Страница 22: ...ransformer to the level 6 9 12 V When operating at 6 V we recommend firstly to select 9 or 12 V and then re set to 6 V The pump is open at the front Therefore it should never be started uncontrolled e g via a timer Animals could be in the sucking in basket and they could be injured or killed by the starting propeller 4 4 Exploded parts diagram Fig 5 Structure NanoProp 5000 1 Filter basket 2 Rotor ...

Страница 23: ...e noise can occur that ceases later on 5 Installation of trickle filter pump PF 1000 The aquarium water flows into the inflow compartment over a comb Fig 2 No 10 From the inflow compartment the water flows over the trickle filter There are two filter baskets that can be filled with activated carbon or phosphate absorbers After the trickle filter there s the clean water compartment Fig 2 No 5 where...

Страница 24: ...mum litre hour l min Pump height max 1 000 16 1 0 m Length of cable Protection class Protection 1 5 m II IP68 Max submergence 1 m 1m Max water temperature 35 C Fig 6 Powerfilter PF 1000 1 Motor housing 2 Pump head 7 Holding plate 8 Rubber sucker 9 Impeller 10 Ceramic shaft 11 Rubber bearing 12 Power plug ...

Страница 25: ...ickle filter plate Fig 2 No 3 Activated carbon and phosphate remover have to be exchanged regularly The sponge Fig 2 No 2 has to be washed if necessary The overflow comb Fig 2 No 10 has to be cleaned of algae and dirt remainders too 7 Cover with fans not included in open version The fans are connected to the transformer provided via an Y connecting cable The fans are adjustable and should remain c...

Страница 26: ...option replace the defective part free of charge always provided the product has been installed correctly is used for the purpose that was intended by us is used in accordance with the operating instructions and is returned to us carriage paid The warranty term is not applicable on the all consumable products Proof of Purchase is required by presentation of an original invoice or receipt indicatin...

Страница 27: ...r PERCULA est un système complet avec meuble support un écumeur une installation de filtre et un éclairage AB Aqua Medic GmbH Gewerbepark 24 49143 Bissendorf Allemagne __________________________________________________________________________________________ ...

Страница 28: ...si qu une minuterie et une rampe de prises de courant La puissance du chauffage dépend de la température environnante de l aquarium S il est installé dans une pièce non chauffée sa puissance devra être de 250 watt environ Dans une pièce chauffée 100 à 150 watt sont suffisants Percula 100 ou 150 300 watt pour le Percula 125 2 Montage du meuble support voir photo 1 Le montage est à effectuer d après...

Страница 29: ...29 Schéma 1 Meuble Installez le meuble dans l ordre numéroté ...

Страница 30: ...ion extractible 10 Peigne de surverse 3 Plaque de ruissellement 11 Tuyau brassage avec articulation à rotule 4 Filtre à ruissellement 12 Tuyau rigide pompe de relevage 5 Compartiment eau propre 13 PF 1000 6 Perçage pour le retour 14 Panier du filtre 7 Grille support 15 Turboflotor Blue 1000 8 NanoProp 5000 ...

Страница 31: ...ulles d air Ces bulles d air sont injectées dans le tuyau à réaction afin qu elles aient un temps de contact prolongé à contre courant dans l eau Enrichies avec des composés organiques elles montent vers le haut et forment une écume sèche qui se liquéfie dans le tuyau à écume et est finalement poussée dans le récipient à écume De cette manière il est possible de retirer efficacement des polluants ...

Страница 32: ... Il dépend cependant fortement du niveau d eau Lors de la mise en oeuvre dans l aquarium Percula le niveau d eau du compartiment de l écumeur peut être réglé avec la coulisse du filtre à ruissellement Ce réglage peut être utilisé pour le réglage du rendement de l écumeur Bulles d air Si l écumeur est rajouté à un aquarium existant il est possible qu il y ait d importantes quantités de substances o...

Страница 33: ...ellement soit 1 à 2 fois par an La pompe Dispergator doit être démontée et nettoyée selon le même intervalle afin que le rendement en air ne soit pas entravé Dans ce but il faut démonter la pompe et rincer avec de l eau propre l ensemble du corps de pompe ainsi que la roue à filament L injecteur d air doit également être nettoyé et rincé à l eau propre 3 8 Problèmes Des problèmes de fonctionnement...

Страница 34: ...100 240 V 18 W max Réglable de 6 à 12 V 4 2 Caractéristiques La pompe de circulation magnétique NanoProp se caractérise par son silence de fonctionnement après une journée de fonctionnement Elle possède un moteur synchrone encapsulé Tous les matériaux résistent à l eau de mer La pompe fonctionne sous une tension de sécurité de 12 volts le transformateur est compris dans la colis L hélice à trois a...

Страница 35: ...n la tension 6 9 12 volts Lors du fonctionnement en 6 volts nous conseillons le démarrage avec 9 ou 12 volts puis de revenir à 6 volt afin d assurer un démarrage correct La pompe est ouverte à l avant Il ne faut donc jamais la démarrer sans surveillance p ex au moyen d une minuterie Des animaux pourraient se trouver sur le panier d aspiration la rotation de l hélice pourrait les blesser ou les tue...

Страница 36: ... L eau de l aquarium coule à travers un peigne schéma 2 No 10 vers le compartiment d arrivée Du compartiment d arrivée l eau passe vers le filtre à ruissellement Là se trouve deux paniers du filtre qui peuvent être remplis de charbon actif ou d adsorbeur de phosphates Le compartiment d eau propre suit le filtre à ruissellement schéma 2 No 5 dans lequel se trouve une pompe PF 1000 qui retourne l ea...

Страница 37: ...6 1 0 m Longueur de câble en Classe de protection Type de protection 1 5 m II IP68 Plus grande profondeur de fonctionnement 1 m 1m Température moyenne maxi 35 C Schéma 6 Montage du Powerfilter PF 1000 1 Bloc moteur 2 Fermeture corps de pompe 7 Support 8 Ventouses caoutchouc 9 Rotor 10 Axe céramique 11 Coussinet caoutchouc 12 Prise de courant ...

Страница 38: ...ulièrement changés La mousse schéma 2 No 2 doit également être nettoyée en fonction des besoins Le peigne schéma 2 No 10 est à libérer des algues et des restes de déchets 7 Couvercle avec ventilateurs pas inclus avec une version ouverte Les ventilateurs sont reliés au transformateur fourni par un câble de liaison Les ventilateurs sont réglables et devraient ils restent constamment en fonction à la...

Страница 39: ... sel de mer de la société Aqua Medic est composé à partir de sels de pureté supérieure De cette manière il contribue à soutenir l aquariophile dans ses efforts à conserver ces substances au niveau le plus faible possible La fixation des pierres et coraux réussit ans problème avec la colle sous marine Reef Construct 9 Garantie AB Aqua Medic GmbH donne une garantie de 12 mois à partir de la date d a...

Отзывы: