background image

03_07

A

DJUSTING


THE


REAR


SHOCK


ABSORBER

 (S

TD

 - S

TD

 ABS)

REAR SHOCK ABSORBER

ADJUSTMENT

Standard

Medium load

Sports use

Rebound damping adjustment,

screw (1)

Open 17 clicks from fully closed

Open 12 - 16 clicks from fully

closed

Open 12 - 16 clicks from fully

closed

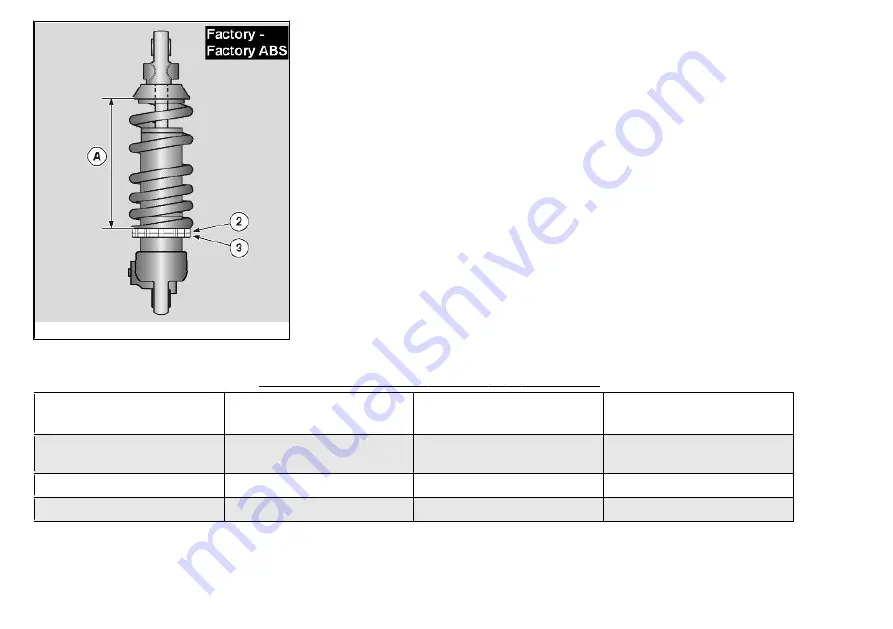
Spring A length

170 mm (6.69 in)

170 mm (6.69 in)

170 mm (6.69 in)

Spring preload, ring nut (2)

Contact an Official Aprilia Dealer

Contact an Official Aprilia Dealer

Contact an Official Aprilia Dealer

69

3 Use

Содержание DORSODURO 750 ABS 2015

Страница 1: ...ecautions for using your vehicle It also describes features details and devices to assure you that you have made the right choice We believe that if you follow our suggestions you will soon get to know your new vehicle well and that it will continue to give you satisfactory service for many years to come This booklet is an integral part of the vehicle and must be handed over to the new owner in th...

Страница 2: ...ecks that should be carried out on the vehicle at an Aprilia Dealer or Authorised Workshop The booklet also contains instructions for simple repairs Any operations not specifically described in this booklet require the use of special tools and or particular technical knowledge for these operations please take your vehicle to an Aprilia Dealer or Authorised Workshop 2 ...

Страница 3: ...arts of the booklet that should be read with particular care The different symbols are used to make each topic in the manual simple and quick to locate Before starting the engine read this booklet carefully particularly the SAFE RIDING section Your safety as well as other s does not only depend on the quickness of your reflexes and agility but also on how well you know your vehicle the state of ma...

Страница 4: ...4 ...

Страница 5: ...n 49 Flasher button 49 Start up button 50 Engine stop switch 50 System ABS 51 Immobilizer system operation 54 Opening the saddle 55 Glove tool kit compartment 57 Identification 57 Luggage anchor point 58 USE 61 Checks 62 Refuelling 65 Rear shock absorbers adjustment 67 Front fork adjustment 70 Justering af greb til forbremse 74 Clutch lever adjustment 74 Running in 74 Starting up the engine 76 Rid...

Страница 6: ...Rear turn indicators 115 Number plate light 116 Rear view mirrors 116 Front and rear disc brake 117 Periods of inactivity 120 Cleaning the vehicle 121 Transport 124 Chain backlash check 124 Chain backlash adjustment 125 Checking wear of chain front and rear sprockets 125 Chain lubrication and cleaning 126 TECHNICAL DATA 127 Kit equipment 137 PROGRAMMED MAINTENANCE 139 Scheduled maintenance table 1...

Страница 7: ...DORSODURO 750 ABS_DORSODURO 750 Factory ABS Chap 01 General rules 7 ...

Страница 8: ...then carefully removing the insects and more stubborn stains before washing the vehicle To prevent stains do not wash the motorcycle immediately after exposure to sunlight and do not wash it in the sun If the vehicle is used during the winter months be sure to frequently wash the motor cycle To remove anti icing salt sprayed on roads in the winter wash the motorcycle with cold water immediately af...

Страница 9: ...e stains from tree resins gasoline oil brake fluid or bird excrement in general must be removed immediately otherwise permanent stains on the paint can appear After washing it is easy to identify marks and residual stains remove them from the body using a soft cloth and brand name non abrasive polish and protect with a pro tective wax for cars Periodic care a thorough cleaning and regular protecti...

Страница 10: ...RIGHTEN THEM WITH POLISH PASTE PRO TECT THEM WITH WAXES OR SUITABLE ACID FREE PRODUCTS E G VASELINE RADIATOR IF USING THE MOTORCYCLE IN THE WINTER ON ROADS WITH DE ICING SALT REGULARLY WASH THE RADIATOR TO PREVENT AESTHETIC DAMAGE AND THE ENGINE FROM OVERHEATING WASH USING PLENTY OF WATER FOR EXAMPLE USE GARDEN RUBBER WITH WATER AT LOW PRESSURE RUBBER PARTS Clean the rubber parts using water and m...

Страница 11: ...open or very well ventilated area Never let the engine run in an enclosed area If you do work in an enclosed area make sure to use a smoke ex traction system CAUTION EXHAUST EMISSIONS CONTAIN CARBON MONOXIDE A POISONOUS GAS WHICH CAN CAUSE LOSS OF CONSCIOUSNESS AND EVEN DEATH CAUTION CARBON MONOXIDE IS ODOURLESS AND COLOURLESS THEREFORE IT CANNOT BE DETECTED BY SMELL SIGHT OR OTHER SENSES DO NOT B...

Страница 12: ...SPARKS OR OTHER HEAT SOURCES WHICH MAY CAUSE IGNITION OR EXPLOSION DO NOT ALLOW FUEL TO DISPERSE INTO THE ENVIRONMENT KEEP OUT OF THE REACH OF CHILDREN IF THE VEHICLE FALLS OR IS ON A STEEP INCLINE FUEL CAN LEAK Hot components The engine and the exhaust system components get very hot and remain in this con dition for a certain time interval after the engine has been switched off Before handling th...

Страница 13: ...F THEY TURN ON DURING THE NORMAL OPERATION OF THE ENGINE IT MEANS THAT THE OIL PRESSURE IN THE CIRCUIT IS INSUFFI CIENT IN THIS CASE THE ENGINE MUST BE IMMEDIATELY SHUT OFF IN ORDER TO AVOID ANY POSSIBLE DAMAGE PERFORM THE MOTOR OIL LEVEL CHECK IF THE INSUFFICIENT MOTOR OIL PRESSURE LIGHT REMAINS DESPITE THE ABOVE PROCEDURE BEING PER FORMED CORRECTLY CONTACT AN AUTHORIZED Moto Guzzi Dealer TO HAVE...

Страница 14: ...NK IT KEEP OUT OF THE REACH OF CHILDREN DO NOT REMOVE THE RADIATOR CAP WHEN THE ENGINE IS STILL HOT THE COOLANT IS UNDER PRESSURE AND MAY CAUSE BURNS Used engine oil and gearbox oil CAUTION IT IS ADVISABLE TO WEAR PROTECTIVE IMPERMEABLE GLOVES WHEN SERVICING THE VEHICLE THE ENGINE OR GEARBOX OIL MAY CAUSE SERIOUS INJURIES TO THE SKIN IF HANDLED FOR PROLONGED PERIODS OF TIME AND ON A REGULAR BA SIS...

Страница 15: ...D SEEK MEDICAL ADVICE KEEP OUT OF THE REACH OF CHILDREN Battery hydrogen gas and electrolyte CAUTION THE BATTERY ELECTROLYTE IS TOXIC CORROSIVE AND AS IT CONTAINS SULPHURIC ACID IT CAN CAUSE BURNS WHEN IN CONTACT WITH THE SKIN WHEN HANDLING BATTERY ELECTROLYTE WEAR TIGHT FITTING GLOVES AND PROTECTIVE APPAREL IN THE EVENT OF SKIN CONTACT WITH THE ELECTROLYTIC FLUID RINSE WELL WITH PLENTY OF CLEAN W...

Страница 16: ...C ACID IS COM PATIBLE WITH THE BATTERY BEING ACTIVATED Stand BEFORE SETTING OFF MAKE SURE THE STAND HAS BEEN COMPLETELY RETRACTED TO ITS POSITION DO NOT REST THE RIDER OR PASSENGER WEIGHT ON THE SIDE STAND Reporting of defects that affect safety Unless otherwise specified in this Use and Maintenance Booklet do not remove any mechanical or electrical component CAUTION SOME CONNECTORS IN THE VEHICLE...

Страница 17: ...ding Authorised centre for vehicles disposal Vehicle recycling cost The proper recycling process of vehicle to be scrapped has a cost If the vehicle is equipped with the seal Vehicles recycling the recycling fee should not be paid because the cost is already included in the retail price suggested by the manufacturer Transportation and collection costs however are not included Therefore the collec ...

Страница 18: ...ur nearest vehicle disposal centre or the following organisations Japan Automobile Recycling Promotion Centre Home page http www jarc or jp Japan Automobile Recycling Promotion Centre call centre for vehicles recy cling Telephone 03 3598 8075 Time From 9 30 am to 5 00 pm Except holidays weekends and the first and last day of the year 18 1 General rules ...

Страница 19: ...DORSODURO 750 ABS_DORSODURO 750 Factory ABS Chap 02 Vehicle 19 ...

Страница 20: ...Arrangement of the main components 02_01 02_02 02_03 02_04 02_01 20 2 Vehicle ...

Страница 21: ...iring 2 Front left turn indicator 3 Clutch fluid reservoir 4 Left rear view mirror 5 Passenger seat strap 6 Battery 7 Glove box toolkit 8 Saddle 9 Taillight 10 Rear left turn indicator 11 Seat lock 12 Swingarm 13 Drive chain 21 2 Vehicle ...

Страница 22: ...m fluid reservoir 25 Front right turn indicator 26 Front headlamp 27 Expansion tank cap 28 Expansion tank 29 Air filter box air filter 30 Oil filter 31 Engine oil plug 32 Engine oil level 33 Rear brake lever 34 Right hand rider footrest 35 Rear brake system fluid reservoir 36 Rear shock absorber 37 Right hand passenger footrest 38 License plate light 39 Rear right turn indicator 22 2 Vehicle ...

Страница 23: ...02_03 23 2 Vehicle ...

Страница 24: ...ide fairing 2 Front left turn indicator 3 Clutch fluid reservoir 4 Left rear view mirror 5 Battery 6 Glove box toolkit 7 Saddle 8 Rear grab handles 9 Taillight 10 Rear left turn indicator 11 Seat lock 12 Swingarm 13 Drive chain 24 2 Vehicle ...

Страница 25: ...adlamp 27 Expansion tank cap 28 Expansion tank 29 Front tone wheel 30 Front ABS sensor 31 Air filter box air filter 32 Oil filter 33 ABS control unit 34 Engine oil plug 35 Engine oil level 36 Rear brake lever 37 Right hand rider footrest 38 Rear brake system fluid reservoir 39 Rear ABS sensor 40 Rear tone wheel 41 Rear shock absorber 42 Right hand passenger footrest 43 License plate light 44 Rear ...

Страница 26: ... control lever 2 Ignition switch steering lock 3 Instrument panel 4 Front brake lever 5 Throttle grip 6 High beam flashing switch 7 MODE Control 8 Turn indicator control 9 Horn button 10 Hazard 11 Starter engine stop mapping selection button 26 2 Vehicle ...

Страница 27: ...02_06 27 2 Vehicle ...

Страница 28: ...02_07 Alternatively 10 Engine stop button 11 Start up push button mapping selection 28 2 Vehicle ...

Страница 29: ...prevents start up in case the system does not identify a key which has been stored before The vehicle is supplied with two keys already programmed The instrument panel ac cepts a maximum of four keys at the same time contact an Official Aprilia Dealer to enable these keys or to disable a key that has been lost When the vehicle is delivered 29 2 Vehicle ...

Страница 30: ...the vehicle can be started if the immobilizer system is faulty the instrument panel need not be replaced should the ignition switch be changed new keys can be programmed 02_09 Light unit 02_09 Key 1 High beam warning light blue 2 Left turn indicator warning light green 3 General warning light red 4 Gear in neutral warning light green 5 Side stand lowered warning light amber yellow 6 Abs warning li...

Страница 31: ...Y ON the following indicators on the instru ment panel are lit for two seconds The logo All warning lights The rpm indicator pointer moves and then goes back to its original position 02_12 NOTE EVERY TIME THE SELECTOR IS HELD DOWN TO THE RIGHT OR LEFT YOU CAN GO FROM ONE CONFIGURATION TO ANOTHER 31 2 Vehicle ...

Страница 32: ... menu The following functions are displayed in the middle of the instrument panel map selected top left speed speedometer Engine temperature bar The following functions are displayed at the bottom of the instrument panel total odometer Trip computer diary active alarms 02_15 2 Km 1 24 mi after the low fuel warning light illuminates the distance travelled in reserve is shown on the digital display ...

Страница 33: ... 300 Km 186 mi remaining before the next scheduled maintenance interval With the key set to KEY OFF the general alarm warning light flashes to indicate the activation of the locking system To minimise battery consumption the light stops flashing after 48 hours 02_17 Alarms 02_17 02_18 02_19 02_20 02_21 02_22 In case of failure a different icon is displayed according to the cause at the bottom of t...

Страница 34: ...ital display Take your vehicle as soon as possible to an Official Aprilia Dealer In these cases the control unit activates a safety procedure that limits the vehicle performance so that the rider is able to reach an Official Aprilia Dealer at low speed According to the type of failure performance can be limited in two ways a by reducing the maximum torque produced b by keeping the engine at idle s...

Страница 35: ...s condition 02_21 Electronic control unit disconnected alarm In case no connection is detected the disconnection icon is displayed on the instru ment panel and the red general warning light turns on to signal this condition 02_22 Turn indicator malfunction When the instrument panel detects a failing turn indicator the turn indicator warning light flashes twice as fast and the problem is signalled ...

Страница 36: ...t panel digital display T is the TOURING mapping S is the SPORT mapping R is the RAIN mapping The TOURING mode has been thought for smooth tourist riding In the SPORT mode you get more acceleration this variant has been thought for a sporting use of the vehicle CAUTION ONLY EXPERT RIDERS RIDING ON ROADS WITH GOOD GRIP ARE ADVISED TO USE THIS MODE IT IS NOT RECOMMENDED FOR WET SURFACES AND OR ROADS...

Страница 37: ...HROTTLE GRIP IS RELEASED To change mappings proceed as follows press the button once and the symbol for the mapping currently being used is shown in negative on the display press the button a second time and within 1 5 seconds from the first pressing the next mapping is selected and highlighted in negative on the display If more than 1 5 seconds elapse and the button is not pressed again the next ...

Страница 38: ...ISPLAY turns on In each journal each time the MODE control is briefly pressed to the right or left the following information is displayed in sequence ODOMETER TRIP ODOMETER TRAVELLING TIME MAXIMUM SPEED MEAN SPEED AVERAGE FUEL CONSUMPTION CURRENT FUEL CONSUMPTION MENU only with the vehicle at a standstill With the following options TRIP ODOMETER TRAVELLING TIME MAXIMUM SPEED MEAN SPEED AVERAGE FUE...

Страница 39: ...02_27 02_28 At zero speed when the display shows the MENU press and hold down the central button to access the instrument panel advanced functions 39 2 Vehicle ...

Страница 40: ...ronometer is reset After that time and if the button is pressed again the data is stored and the next timekeeping begins Timekeeping is cancelled by pressing and holding down the central button or when speed goes back to zero the display shows the last timekeeping Timekeeping starts again following the steps described above After storing 40 times this function is over A new series of timekeeping c...

Страница 41: ...ctivated only the hours indicator is shown Each time the MODE selector is pressed to the right the hour value increases likewise each time the MODE selector is pressed to the left the hour value decreases Press the MODE selector central part to store the set value and to shift to minute adjustment The minute indicator is no longer displayed when this function is activated only the hour indicator i...

Страница 42: ...ration menu When the battery is first activated the instrument panel is set to the run in rev value Afterwards the last set value is displayed RUN IN REVOLUTIONS 6000 rpm MINIMUM REVOLUTIONS 5000 rpm MAXIMUM REVOLUTIONS 12000 rpm If the set threshold value is exceeded the warning light on the instrument panel starts to flash It turns off when the value goes back below the threshold limit 02_32 BAC...

Страница 43: ...n the following message is displayed ENTER OLD CODE After recognising the old code the new code is requested and the display shows the following message ENTER NEW CODE Once the operation is finished the display shows the DIAGNOSIS menu If the code has been used this operation is not allowed 43 2 Vehicle ...

Страница 44: ...ted within 20 seconds the operation finishes After recognising the second key the insertion of the new code is required with the message ENTER NEW CODE Once the operation is finished the display shows the DIAGNOSIS menu If the code has been used this operation is not allowed Once the operation is finished the instrument panel shows the SETTINGS menu 12H 24H Select the 12H 24H option from the SETTI...

Страница 45: ... times This option shows the stored chronometer times Press the MODE selector for a cou ple of seconds to the right or left to scroll the time screens hold it down to display the CHRONOMETER menu If the battery is removed the stored times are lost Delete times This option deletes the stored chronometer times A deletion confirmation is reques ted Once the operation is finished the display goes back...

Страница 46: ...n to choose the interface language The options are ITALIANO ENGLISH FRANÇAIS DEUTSCH ESPAÑOL Once the operation is finished the display goes back to the LANGUAGES menu 02_36 Ignition switch 02_36 The ignition switch 1 is located at the front of the fuel reservoir The vehicle is supplied with two keys one is the spare key The lights go off when the ignition switch is set to OFF NOTE THE KEY ACTIVAT...

Страница 47: ... locked The engine cannot be started The lights of the front and rear headlamps are activated The ignition key can be extracted Once the key has been extracted the immobilizer system is active if present Locking the steering wheel To lock the steering Turn the handlebar completely to the left Turn the key to OFF Push in the key and turn it anticlockwise to the left steer the handlebar slowly until...

Страница 48: ... IF THE WARNING LIGHT WITH ARROWS FLASHES QUICKLY IT MEANS THAT ONE OR BOTH TURN SIGNALS LIGHT BULBS ARE BURNT OUT The turn indicators have a self cancelling function that implements the following logic With the vehicle at standstill speed zero the turn indicators continue flashing in definitely With the vehicle in motion the turn signals self cancel when one the two following conditions is met Af...

Страница 49: ...nd recommence from zero 02_39 Passing button 02_39 Uses the high beam flash in case of danger or emergency Releasing the switch deactivates the high beam flash 02_40 Flasher button 02_40 Ove previsto By pressing the button with the ignition switch turned to ON the four turn indicators and their warning lights on the panel turn on at the same time The HAZARD lights remains on even after removing th...

Страница 50: ...rter motor spins the engine CAUTION FIVE SECONDS AFTER THE ENGINE IS STARTED THIS BUTTON CAN BE USED AS MAPPING SELECTION BUTTON 02_43 Engine stop switch 02_43 02_44 It acts as an engine cut off or emergency stop switch Press this switch to stop the engine 50 2 Vehicle ...

Страница 51: ...ol over the vehicle taking into consideration never to exceed the physical limits of vehicle grip on the road The rider is fully responsible for riding at a suitable speed based on weather and road conditions always leaving an appropriate safety margin Under no circumstances can the ABS system compensate for the rider s misjudge ment or improper use of brakes NOTE WHEN THE ABS STARTS WORKING A PUL...

Страница 52: ...he vehicle after the initial instrument panel check the ABS warning light flashes until a speed of 5 kph 3 1 mph is exceeded and then it switches off or continues to flash even after exceeding the speed of 5 kph 3 1 mph If the ABS warning light continues flashing or is permanently on a failure has been detected and the ABS has been automatically deactivated In this case carry out the following ope...

Страница 53: ...E UP AGAIN AND RIDE OVER 5 km h 3 11 mph THE ABS SYSTEM ACTS ON BOTH THE FRONT AND REAR WHEELS BY OB TAINING INFORMATION FROM THE ROTATION LOCKING TONE WHEELS ALWAYS CHECK THAT THE TONE WHEEL IS CLEAN AND REGULARLY CHECK THAT THE DISTANCE FROM THE SENSOR IS CONSTANT ON ALL 360 GRADES SHOULD THE WHEELS BE REMOVED AND REFITTED IT IS VERY IMPORTANT TO CHECK THAT THE DISTANCE BETWEEN TONE WHEEL AND SE...

Страница 54: ...n the ignition key is removed Keep the second key in a safe place since it is not possible to make a copy if it gets lost This would imply replacing numerous parts of the vehicle besides the locks Each key in the grip has an electronic device transponder which modulates the radio frequency signal emitted by a special built in aerial in the switch when the vehicle is started The modulated signal is...

Страница 55: ...liser off indicator light off Immobiliser armed indicator light flashing Key not recognised indicator lamp flashing rapidly 02_46 Opening the saddle 02_46 02_47 02_48 Rest the vehicle on its stand Insert the key 1 in the lock on the license plate holder Turn the key 1 anticlockwise remove the saddle 2 by sliding it off from the passenger seat strap 3 There is a useful document toolkit compartment ...

Страница 56: ... front retainers correctly Push the centre of the saddle 2 where the rear retainers are to trip the lock CAUTION BEFORE LOWERING AND LOCKING THE SADDLE CHECK THAT THE KEY HAS NOT BEEN LEFT IN THE GLOVEBOX TOOL KIT COMPARTMENT BEFORE SETTING OFF MAKE SURE THAT THE SADDLE IS CORRECTLY LOCKED INTO POSITION 56 2 Vehicle ...

Страница 57: ...et The chassis number is handy when purchasing spare parts CAUTION THE MODIFICATION OF THE IDENTIFICATION CODES IS A SERIOUS PUNISH ABLE CRIME HOWEVER THE LIMITED WARRANTY FOR NEW VEHICLES WILL BE VOID IF THE VEHICLE IDENTIFICATION NUMBER VIN HAS BEEN MODI FIED OR NOT PROMPTLY DETERMINED CHASSIS NUMBER The frame number is stamped on the right hand side of the headstock Chassis No 57 2 Vehicle ...

Страница 58: ...port anything that is not secured making absolutely certain it is firmly and securely fixed Secure the luggage well not forgetting that it must not project beyond the rear edge of the saddle The heat from the exhaust system could damage the luggage Do not transport luggage that projects and that covers the luminous and acoustic sig nals and or the lamps 58 2 Vehicle ...

Страница 59: ...59 2 Vehicle ...

Страница 60: ...60 2 Vehicle ...

Страница 61: ...DORSODURO 750 ABS_DORSODURO 750 Factory ABS Chap 03 Use 61 ...

Страница 62: ... TECTED OR SUSPECTED CHECKING TAKES VERY LITTLE TIME BUT CON SIDERABLY INCREASES SAFETY CAUTION ACCORDING TO THE TIME ELAPSED FROM THE MOMENT THE KEY IS SET TO KEY ON UNTIL THE ENGINE STARTS THE STOP LIGHT CAN BE ACTIVATED FOR ABOUT HALF A SECOND OR NOT 03_01 This vehicle has been programmed to indicate in real time any operation failure stored in the electronic control unit memory Every time the ...

Страница 63: ... lubricate if necessary Engine oil Check and or top up as required Wheels tyres Check that tyres are in good conditions Check inflation pressure tyre wear and potential damage Remove any possible strange body that might be stuck in the tread design Brake levers Check they function smoothly Lubricate the joints and adjust the travel if necessary Clutch Check for proper operation Check clutch lever ...

Страница 64: ...cate couplings and joints if necessary Check the safety switch for correct operation Clamping elements Check that the clamping elements are not loose Adjust or tighten them as required Drive chain Check it for backlash Fuel tank Check the coolant level and refill if necessary Check the circuit for leaks or obstructions Check that the tank cap closes correctly Coolant Fluid level inside the expansi...

Страница 65: ... 03_03 To refuel Lift the cover 1 Introduce the key 2 in the fuel tank cap lock 3 Turn the key anticlockwise lift and remove the fuel filler cap Refuel CAUTION DO NOT ADD ADDITIVES OR ANY OTHER SUBSTANCES TO THE FUEL WHEN USING A FUNNEL ENSURE THAT IT IS PERFECTLY CLEAN WHEN FILLING THE TANK COMPLETELY DO NOT FILL BEYOND THE LOWER EDGE OF THE RECESS SEE FIGURE WHEN REFUELLING AVOID FUEL LEAKS THAT...

Страница 66: ... INJURIES Characteristic Fuel capacity reserve included 12 l 2 64 UKgal 3 17 US gal Fuel reserve 2 8 l 0 62 UKgal 0 74 US gal after refuelling The fuel cap may only be refitted with the key 2 inserted Once the key 2 is inserted press the cap to close it again Remove the key 2 Close the cover 1 MAKE SURE THE CAP IS TIGHTLY CLOSED 66 3 Use ...

Страница 67: ...M MENDED IF THE VEHICLE IS USED IN WET OR DUSTY AREAS OFF ROAD OR FOR SPORTING APPLICATIONS CHECK AND IF NECESSARY ADJUST THE REAR SHOCK ABSORBER THE STANDARD REGULATION OF THE REAR SHOCK ABSORBER IS INTEN DED TO SATISFY NORMAL TOUR DRIVING CONDITIONS IN ANY CASE IT IS POSSIBLE TO INSERT PERSONAL SETTINGS DEPENDING ON VEHICLE UTILIZATION WHEN COUNTING THE NUMBER OF CLICKS OF THE ADJUSTER SCREW 1 A...

Страница 68: ...RELOAD SETTING IS SUITABLE FOR THE MAJOR ITY OF RIDING CONDITIONS IF REQUIRED CONTACT AN OFFICIAL Aprilia DEALER TO REQUEST A PERSONALISED SETTING 03_06 ADJUSTMENTS Regular adjustment standard rider only Medium load setting for example rider with passenger and or luggage Setting for sports use 68 3 Use ...

Страница 69: ...ing adjustment screw 1 Open 17 clicks from fully closed Open 12 16 clicks from fully closed Open 12 16 clicks from fully closed Spring A length 170 mm 6 69 in 170 mm 6 69 in 170 mm 6 69 in Spring preload ring nut 2 Contact an Official Aprilia Dealer Contact an Official Aprilia Dealer Contact an Official Aprilia Dealer 69 3 Use ...

Страница 70: ...9 0 059 in 170 1 5 mm 6 69 0 059 in Spring preload ring nut 2 Contact an Official Aprilia Dealer Contact an Official Aprilia Dealer Contact an Official Aprilia Dealer 03_08 Front fork adjustment 03_08 03_09 03_10 03_11 03_12 03_13 03_14 Operating the front brake lever press the handlebar repeatedly to send the fork fully down The shock absorber should compress and extend smoothly with no signs of ...

Страница 71: ...raulic rebound damping FACTORY The right hand stem is equipped with an upper set screw 3 for adjusting compression damping CAUTION TO PREVENT DAMAGE DO NOT FORCE THE ADJUSTER 1 2 BEYOND THE RESPECTIVE END OF TRAVEL IN EITHER DIRECTION USE THE SAME SPRING PRELOAD SETTINGS FOR BOTH STEMS RIDING THE VEHICLE WITH DIFFER ENT SETTINGS FOR THE TWO STANCHIONS REDUCES STABILITY WHEN SPRING PRELOAD IS INCRE...

Страница 72: ...r and or luggage Setting for sports use CAUTION TO COUNT THE NUMBER OF RELEASES AND OR REVOLUTIONS OF ADJUST MENT SETTINGS 1 2 ALWAYS START FROM THE MOST RIGID SETTING WHOLE CLOCKWISE ROTATION OF THE SETTING DO NOT FORCE THE SET SCREWS 1 2 TO TURN BEYOND THE END OF THE STROKE ON BOTH SIDES SO AS NOT DAMAGE THEM 72 3 Use ...

Страница 73: ...closed Open 5 turns from fully closed Open 5 turns from fully closed Rebound damping adjustment screw 2 Open 10 turns from fully closed Open 5 10 turns from fully closed Open 5 10 turns from fully closed ADJUSTING THE FRONT FORK FACTORY FACTORY ABS SACHS FRONT FORK ADJUSTMENT Standard Medium load Sports use Spring preloading nut 1 Open 5 turns from fully closed Open 5 turns from fully closed Open ...

Страница 74: ...e set screw 3 The MAX and MIN clicks correspond to a lever end handgrip distance of about 118 mm 4 65 in and 115 mm 4 53 in respectively Push the control lever 1 forward and turn the set screw 3 until the lever 1 is at the desired distance Running in Running in is essential to ensure the durability of the vehicle During the first 1000 Km 621 37 mi observe the following rules to ensure the reliabil...

Страница 75: ...LE IS ONLY AVAILABLE AFTER THE SERVICE AT THE END OF THE RUNNING IN PERIOD Follow these guidelines Do not twist the throttle grip abruptly and completely when the engine is working at a low revs either during or after run in During the first 100 Km 62 14 miles use the brakes gently avoiding sudden or prolonged braking That is to permit the adequate adjustment of the pad friction material to the br...

Страница 76: ...ll times EXHAUST FUMES CONTAIN CARBON MONOXIDE AN EXTREMELY HARMFUL SUBSTANCE IF INHALED NEVER START THE ENGINE IN A CLOSED OR INSUFFICIENTLY VENTILATED SPACE FAILURE TO OBSERVE THIS WARNING COULD LEAD TO UNCONSCIOUSNESS AND EVEN DEATH DUE TO SUFFOCATION CAUTION WITH THE SIDE STAND LOWERED THE ENGINE MAY ONLY BE STARTED WITH THE GEARBOX IN NEUTRAL IF YOU ATTEMPT TO ENGAGE A GEAR IN THIS CONDITION ...

Страница 77: ...ge The multifunction display shows the ignition screen for 2 seconds On the instrument panel all warning lights 4 and the backlighting are on for 2 seconds The rpm indicator 5 goes to the bottom of the scale and after 3 seconds it goes back to the minimum value The current value is instantly indicated on the instrument panel during regular vehicle riding IF THE LOW FUEL WARNING LIGHT 6 ON THE INST...

Страница 78: ...e vehicle controlled by the control unit that starts working automatically whenever necessary cold start TO AVOID EXCESSIVE BATTERY CONSUMPTION DO NOT HOLD DOWN THE STARTER BUTTON 2 MORE THAN TEN SECONDS IF THE ENGINE FAILS TO START AFTER THIS TIME WAIT TEN SECONDS AND PRESS THE STARTER BUTTON 2 AGAIN PRESS THE STARTER BUTTON 2 BUT DO NOT ACCELERATE AND RELEASE IT AS SOON AS THE ENGINE STARTS 78 3...

Страница 79: ...SPLAYED AND THE GENERAL WARNING LIGHT IS ON THIS MEANS THAT THE OIL PRESSURE IN THE CIR CUIT IS TOO LOW Engage at least one brake lever and do not accelerate until you set off DO NOT SET OFF SUDDENLY WHEN THE ENGINE IS COLD RIDE AT LOW SPEED FOR SEVERAL KILOMETRES THIS WILL ALLOW THE ENGINE TO WARM UP AND REDUCE POLLUTING EMISSIONS AND FUEL CONSUMPTION 79 3 Use ...

Страница 80: ...so allows an electronic control of the throttle thus replacing the traditional cable When riding at high altitudes the RIDE BY WIRE system offsets the unavoidable loss of power 1 every 100 metres of slope due to the reduced concentration of oxygen in the air by opening the throttle bodies Therefore the engine performance when torque demand is requested by means of the throttle is the same as when ...

Страница 81: ...UCTED ON HOW TO BEHAVE TO PREVENT DANGEROUS SITUATIONS WHEN RIDING BEFORE SETTING OFF MAKE SURE THE STAND HAS BEEN COMPLETELY RETRACTED TO ITS POSITION 03_26 To start Turn on the engine Adjust the inclination of the rear view mirrors to ensure proper visibility CAUTION WITH THE VEHICLE AT A STANDSTILL PRACTICE USING THE REAR VIEW MIRRORS THE MIRRORS ARE CONVEX SO OBJECTS MAY SEEM FARTHER AWAY THAN...

Страница 82: ...ATE SUDDENLY WHEN RELEASING THE CLUTCH FOR THE SAME REASON 03_28 Slowly release the clutch lever 3 and at the same time accelerate by slightly twisting the throttle grip 2 Pos B The vehicle starts moving forward For the first kilometres travelled limit the speed in order to warm up the en gine DO NOT EXCEED THE MAXIMUM RECOMMENDED ENGINE SPEED Accelerate gradually by twisting the throttle grip 2 P...

Страница 83: ...o operations and engage a higher gear IF THE ENGINE OIL PRESSURE ICON IS DISPLAYED AND THE GENERAL WARNING LIGHT IS ON DURING REGULAR ENGINE OPERATION THIS MEANS THAT THE ENGINE OIL PRESSURE IN THE CIRCUIT IS TOO LOW IF THIS OCCURS STOP THE ENGINE AND CONTACT AN APRILIA Official Deal er SHIFTING FROM A HIGHER TO A LOWER GEAR CALLED DOWNSHIFT IS CARRIED OUT 83 3 Use ...

Страница 84: ...r gear Release the brake levers when it is operated Release the clutch lever 3 and accelerate moderately IF AN ENGINE OVERHEATING ALARM INDICATOR IS SHOWN ON THE MULTI FUNCTION DIGITAL DISPLAY STOP THE VEHICLE AND LET THE ENGINE RUN AT 3000 rpm FOR ABOUT TWO MINUTES SO THAT THE COOLANT FLOWS REGULARLY IN THE SYSTEM THEN SET THE ENGINE STOP SWITCH TO OFF AND CHECK THE COOLANT LEVEL IF THE TEMPERATU...

Страница 85: ...PPING WHILE TRAVELLING UPHILL CLOSE THE THROTTLE COM PLETELY AND ONLY USE THE BRAKES TO HOLD THE VEHICLE IN POSITION USING THE ENGINE TO HOLD THE VEHICLE ON A HILL MAY CAUSE THE CLUTCH TO OVERHEAT BRAKING CONTINUOUSLY WHILE GOING DOWNHILL MAY RESULT IN FRIC TION GASKET OVERHEATING AND CONSEQUENTLY IN POOR BRAKING TAKE ADVANTAGE OF THE ENGINE COMPRESSION AND SHIFT UP GEARS USING THE BRAKES ALTERNAT...

Страница 86: ...porary halt keep at least one of the vehicle brakes held CAUTION WHENEVER POSSIBLE AVOID ROUGH BRAKING SUDDEN DECELERATION AND BRAKING IN EXCESS Parking It is very important to select an adequate parking spot in compliance with road signals and the guidelines described below NOTE TO MOVE THE BIKE GRIP THE HANDLEBAR WITH ONE HAND AND THE PAS SENGER BELT ON THE SADDLE WITH THE OTHER WHATEVER YOU DO ...

Страница 87: ...NOT REST THE RIDER OR PASSENGER WEIGHT ON THE SIDE STAND Catalytic silencer The vehicle has a silencer with a platinum palladium rhodium three way metal catalytic converter This device oxidises the CO carbon monoxide producing carbon dioxide and the UHC unburned hydrocarbons producing water vapour and reduces NOx nitrogen oxide producing oxygen and nitrogen present in the exhaust fumes DO NOT PARK...

Страница 88: ...cement reasons in order to control noise emission before the sale or delivery of the vehicle to the ultimate buyer or while it is used using the vehicle after that device or element has been removed or rendered non operating Check the muffler exhaust silencer and the silencer pipes make sure there are no signs of rust or holes and that the exhaust system works properly If you not an increase in ex...

Страница 89: ...OF OBSTACLES Suggestion to prevent theft CAUTION WHEN USING A DISC LOCKING DEVICE PAY UTMOST ATTENTION TO RE MOVE IT BEFORE RIDING FAILURE TO OBSERVE THIS WARNING MAY CAUSE SERIOUS DAMAGE TO THE BRAKING SYSTEM AND ACCIDENTS WITH CON SEQUENT PHYSICAL INJURIES OR EVEN DEATH NEVER leave the ignition key in the lock and always use the steering lock Park the vehicle in a safe place such as a garage or ...

Страница 90: ...NAME ADDRESS TELEPHONE NO WARNING IN MANY CASES STOLEN VEHICLES CAN BE IDENTIFIED BY DATA IN THE USE MAINTENANCE BOOKLET 03_34 03_35 90 3 Use ...

Страница 91: ...e vehicle and only with the side stand lowered 03_38 The stand is designed to support the weight of the vehicle and a small additional weight which does not include the rider and passenger Mounting into driving position with the side stand in place is permitted only to prevent the possibility of the vehicle falling or overturn and does not indicate the possibility for the rider and passenger s wei...

Страница 92: ...ND DISMOUNTING FROM THE VEHICLE DO NOT DISMOUNT OR EVEN ATTEMPT TO DISMOUNT BY JUMPING OR STRETCHING OUT YOUR LEG IN ORDER TO TOUCH THE GROUND IN BOTH CASES THE STABILITY AND EQUILIBRIUM OF THE VEHICLE COULD BE COM PROMISED CAUTION BAGGAGE OR OBJECTS ATTACHED TO THE REAR PART OF THE VEHICLE CAN CREATE AN OBSTACLE DURING MOUNTING AND DISMOUNTING FROM THE VEHICLE IN ALL CASES THINK AHEAD AND MOVE YO...

Страница 93: ...IDER SHOULD NOT OPEN OR TRY TO OPEN THE PASSENGER FOOTR ESTS FROM THE RIDER S SEAT AS IT COULD COMPROMISE THE STABILITY AND EQUILIBRIUM OF THE VEHICLE Have the passenger open the two passenger foot pegs Show the passenger how to mount the vehicle Use your left foot to push on the side stand and make it fully return to its position DISMOUNTING Select an appropriate parking spot Stop the vehicle MAK...

Страница 94: ...vehicle balanced in the driving position Show the passenger how to dismount from the vehicle RISK OF FALLING OR OVERTURNING MAKE SURE THAT THE PASSENGER HAS DISMOUNTED FROM THE VEHICLE DO NOT PLACE YOUR WEIGHT UPON THE SIDE STAND Lean the motorcycle until the stand touches the ground Correctly grip the handlebar and dismount from the vehicle Turn the handlebar completely to the left Place the pass...

Страница 95: ...DORSODURO 750 ABS_DORSODURO 750 Factory ABS Chap 04 Maintenance 95 ...

Страница 96: ...LEM PROVIDED THAT THE ALARM WARNING LIGHT AND THE ENGINE OIL PRESSURE ICON DO NOT TURN ON SIMULTANEOUSLY ON THE DISPLAY CAUTION DO NOT LET THE ENGINE IDLE WITH THE VEHICLE AT A STANDSTILL TO WARM UP THE ENGINE AND OBTAIN THE OPERATING TEMPERATURE OF ENGINE OIL PREFERABLY CHECK THE OIL AFTER A JOURNEY OF AFTER TRAVELLING APPROXIMATELY 15 Km 10 miles IN EXTRAURBAN CONDITIONS ENOUGH TO WARM UP THE EN...

Страница 97: ... NOT GO BEYOND THE MAX AND BELOW THE MIN LEVEL MARK TO AVOID SEVERE ENGINE DAMAGE Fill with engine oil as required Unscrew and remove the cap 1 When using a funnel or any other element make sure it is perfectly clean DO NOT ADD ADDITIVES OR ANY OTHER SUBSTANCES TO THE OIL CAUTION USE HIGH QUALITY 15W 50 OIL Top up the oil in the reservoir until you reach the correct level 97 4 Maintenance ...

Страница 98: ...TIONS YOURSELF FOLLOW THESE INSTRUCTIONS 04_03 04_04 Check the engine oil level frequently For replacement CAUTION HOT OIL IS MORE FLUID AND WILL DRAIN OUT MORE EASILY AND COM PLETELY IDEAL TEMPERATURE IS REACHED AFTER THE ENGINE HAS RUN FOR ABOUT TWENTY MINUTES OIL BECOMES VERY HOT WHEN THE ENGINE IS HOT BE CAREFUL NOT TO GET BURNED WHEN CARRYING OUT THE OPERATIONS DESCRIBED BELOW 98 4 Maintenanc...

Страница 99: ... plug 2 Remove any metal scrap attached to the drainage plug 2 magnet Screw and tighten the drainage plug 2 Locking torques N m Oil drainage plug M16x1 5 19 Nm 14 01 lbf ft ENGINE OIL FILTER REPLACEMENT Change the engine oil filter 3 every 20 000 km 12 428 miles or each time you change the engine oil Remove the engine oil filter 3 Never reuse an old filter Screw the new engine oil filter 3 Tyres T...

Страница 100: ...LY WORN TYRES MAY COMPROMISE TRACTION AND HANDLING REPLACE TYRES WHEN WORN OR IF THERE IS A PUNCTURE IN THE TREAD AREA BIGGER THAN 5 mm 0 197 in BALANCE WHEELS AFTER A TYRE IS MENDED USE ONLY TYRE SIZES INDI CATED BY THE MANUFACTURER CHECK THAT THE INFLATION VALVES HAVE THEIR CAPS FITTED TO AVOID UNEXPECTED FLAT TYRES REPLACEMENT REPAIR MAINTENANCE AND BALANCING OPERATIONS ARE HIGHLY IMPORTANT AND...

Страница 101: ...N AND REPLACE SPARK PLUGS PLEASE CON TACT AN Official Aprilia Dealer IF YOU HAVE SUFFICIENT EXPERIENCE FOL LOW THE INSTRUCTIONS IN THIS WORKSHOP BOOKLET WHICH IS AVAILA BLE AT ANY DEALER Removing the air filter CAUTION TO REMOVE CHECK AND REPLACE THE AIR FILTER PLEASE CONTACT AN Official Aprilia Dealer IF YOU ARE ADEQUATELY TRAINED AND EXPERI ENCED REFER TO THE INSTRUCTIONS IN THIS WORKSHOP BOOKLE...

Страница 102: ...EK MEDICAL ADVICE IMMEDIATELY CAUTION TAKE CARE NOT TO POUR COOLANT ONTO HOT ENGINE OR EXHAUST SYS TEM COMPONENTS THE FLUID MAY CATCH FIRE AND BURN WITH INVISIBLE FLAMES WHEN CARRYING OUT MAINTENANCE OPERATIONS IT IS ADVISA BLE TO WEAR LATEX GLOVES CONTACT AN Official APRILIA Dealer FOR REPLACEMENT DO NOT DISPOSE OF THE FLUID INTO THE ENVIRONMENT KEEP OUT OF THE REACH OF CHILDREN DO NOT REMOVE THE...

Страница 103: ...the two wheels on the ground Turn the handlebar to the left keeping the vehicle upright Make sure that the coolant level in the expansion tank is between the MAX MAX maximum level and MIN MIN minimum level refer ence marks 04_06 Otherwise Remove the filler cap 1 Top up with recommended coolant until the coolant level is near the MAX reference mark Do not exceed this level or the coolant will spill...

Страница 104: ...l to the reservoir edge Check that the fluid in the reservoir is above the MIN reference mark For the rear brake keep the vehicle upright and check that the fluid in the reservoir is parallel to the reservoir edge Make sure that the fluid level in the reservoir is above the LOWER MIN reference mark Top up if the fluid does not reach at least the LOWER MIN reference mark Check brake pads and disc f...

Страница 105: ...op up CAUTION TO HAVE THE BRAKING SYSTEM FLUID TOPPED UP PLEASE CONTACT AN Official Aprilia Dealer IF YOU ARE SUITABLY AND EXPERIENCED FOLLOW THE INSTRUCTIONS IN THE WORKSHOP BOOKLET WHICH IS AVAILABLE FROM ANY DEALER 105 4 Maintenance ...

Страница 106: ...at the fluid level in the reservoir is above the MIN reference mark Top up if the fluid does not reach at least the MIN reference mark Topping up clutch fluid CAUTION FOR CLUTCH FLUID TOP UP PLEASE CONTACT AND Official Aprilia Dealer IF YOU ARE ADEQUATELY TRAINED AND EXPERIENCED REFER TO THE IN STRUCTIONS IN THIS WORKSHOP BOOKLET AVAILABLE ALSO AT ANY DEALER 106 4 Maintenance ...

Страница 107: ...erminal Move the positive lead 7 aside Hold the battery 8 firmly and lift it out of its compartment Put the battery 8 away on a level surface in a cool and dry place Refit the saddle CAUTION WHEN REFITTING THE BATTERY MAKE SURE IT IS CORRECTLY POSITIONED AND POLES ARE NOT INVERTED CAUTION UPON REFITTING CONNECT THE LEAD TO THE POSITIVE TERMINAL FIRST AND AFTERWARDS THE LEAD TO THE NEGATIVE TERMINA...

Страница 108: ...equate battery charger Set the battery charger for the recharge type indicated Connect the battery to the battery charger CAUTION WHEN RECHARGING OR USING THE BATTERY BE CAREFUL TO HAVE THE ROOM ADEQUATELY AIRED DO NOT BREATH GASES RELEASED WHEN THE BATTERY IS RECHARGING Switch on the battery charger Characteristic RECHARGE MODES Recharge Ordinary Electric Current 1 0 A Time 8 10 hours Recharge Fa...

Страница 109: ...e longer than fifteen days it is necessary to recharge the battery to avoid sulphation Remove the battery In winter or when the vehicle is out of use for prolonged periods check charge level frequently about once a month to prevent deterioration Recharge it fully with an ordinary charge If the battery is still on the vehicle disconnect the cables from the terminals NOTE THE FIRST TIME THE ENGINE I...

Страница 110: ...or engine starting failure Check the auxiliary 15A fuses first then the main 30A fuses CAUTION DO NOT REPAIR FAULTY FUSES NEVER USE A FUSE THAT IS DIFFERENT THAN WHAT IS SPECIFIED TO PRE VENT DAMAGES TO THE ELECTRICAL SYSTEM OR SHORT CIRCUITS AND THE RISK OF FIRE CAUTION A FUSE THAT BLOWS FREQUENTLY MAY INDICATE A SHORT CIRCUIT OR OVERLOAD IF THIS OCCURS CONSULT AN APRILIA Official Dealer 110 4 Ma...

Страница 111: ...tions described above for auxiliary fuses NOTE IF THE SPARE FUSE IS USED REPLACE WITH ONE OF THE SAME TYPE IN THE CORRESPONDING FITTING CAUTION REMOVING THE 30 A FUSES RESETS THESE FUNCTIONS DIGITAL CLOCK TRIP INFORMATION AND CHRONOMETER TIMES 04_17 AUXILIARY FUSES A Coil Light logic relay Recovery logic relay Stop Horn Daylight running lights License plate light 10A B Low beam high beam lights 15...

Страница 112: ...ersion without ABS H Spare fuses 30 A I Battery charging fan relay live positive 30 A 04_19 MAIN FUSES version with ABS H Spare fuses 30 A 20 A I Battery charging fan relay live positive 30 A J ABS fuse 20 A Lamps CAUTION TO REMOVE CHECK AND REPLACE THE BULB PLEASE CONTACT AN Official Aprilia Dealer IF YOU ARE ADEQUATELY TRAINED AND EXPERIENCED RE 112 4 Maintenance ...

Страница 113: ...ical wall Turn on the dipped beam light sit on the vehicle and check that the light beam projected onto the wall is a little below the level of the headlight about 9 10 of the total height To carry out vertical adjustment of the light beam Rest the vehicle on its stand Working from the front rear side of the windshield use a short crosshead screwdriver to operate on the specific screw 1 SCREW it c...

Страница 114: ...left UNDO it anticlockwise to move the light beam to the right NOTE CHECK THAT THE LIGHT BEAM HORIZONTAL DIRECTION IS CORRECT 04_23 Front direction indicators 04_23 Rest the vehicle on its stand Loosen and remove screw 1 Remove glass 2 Press bulb 3 slightly and turn it anticlockwise Pull the bulb 3 out of its fitting Insert a bulb of the same type adequately WARNING IF THE HEADLIGHT 4 PROTRUDES FR...

Страница 115: ...IN THIS WORKSHOP BOOKLET AVAILABLE ALSO AT ANY DEALER 04_24 Rear turn indicators 04_24 Rest the vehicle on its stand Loosen and remove screw 1 Remove glass 2 Press bulb 3 slightly and turn it anticlockwise Pull the bulb 3 out of its fitting Insert a bulb of the same type adequately WARNING IF THE HEADLIGHT 4 PROTRUDES FROM ITS FITTING INSERT IT AGAIN PROPERLY 115 4 Maintenance ...

Страница 116: ...ET AVAILABLE ALSO AT ANY DEALER Rear view mirrors 04_25 04_26 Park the vehicle on its centre stand on safe and level ground Move the protection casing 1 HOLD THE REAR VIEW MIRROR 4 TO AVOID DROPPING IT BY ACCIDENT 04_25 Keep the screw 2 blocked and completely unscrew the nut 3 HANDLE PLASTIC AND PAINTED COMPONENTS WITH CARE DO NOT SCRATCH OR SPOIL THEM Remove the rear view mirror 4 116 4 Maintenan...

Страница 117: ... VIEW MIRRORS CORRECTLY AND TIGHTEN THE NUTS IN ORDER TO ENSURE STABILITY 04_26 After refitting Adjust the rear view mirror angle correctly Front and rear disc brake 04_27 04_28 04_29 04_30 04_31 CAUTION CHECK THE BRAKE PAD WEAR BEFORE EACH TRIP AND EVERY 5000 km 3106 mi 117 4 Maintenance ...

Страница 118: ... ABS At the back for the rear brake callipers 1 Std Std ABS on the right side of the vehicle look from above downwards for the rear brake calliper 2 CAUTION EXCESSIVE WEAR OF THE FRICTION MATERIAL MAKES THE PAD METAL SUPPORT GET INTO CONTACT WITH THE DISC WHICH RESULTS IN A MET ALLIC NOISE AND SPARKS IN THE CALLIPER THEREFORE BRAKING EFFI CIENCY AND DISC SAFETY AND INTEGRITY ARE AT RISK 118 4 Main...

Страница 119: ...l thickness even of one front or rear pad is reduced to a value of about 1 5 mm 0 06 in or even if one of the wear indicators is not very visible contact an Official Aprilia Dealer to have all the calliper pads replaced 119 4 Maintenance ...

Страница 120: ...e the tyres Set the vehicle in a room with no heating or humidity with minimum temper ature variations and not exposed to sun rays Wrap and tie a plastic bag around the exhaust pipe opening to keep moisture out NOTE PLACE A SUITABLE SUPPORT UNDER THE VEHICLE TO KEEP BOTH WHEELS OFF THE GROUND Put the vehicle on the front stand optional and on the back stand optional Cover the vehicle do not use pl...

Страница 121: ...y in the atmosphere seashore areas hot and wet weath er Special environmental seasonal conditions use of salt anti icing chemical products on the roads in winter Always clean off any smog and pollution residue tar stains insects bird droppings etc from the bodywork Avoid parking the vehicle under trees During some seasons resins fruits or leaves containing aggressive chemical substances that may d...

Страница 122: ...use degreasing detergent brushes and old cloths Wash anodised or painted aluminium parts with neutral soap and water Using aggressive detergents may damage the surface treatment of these components TO CLEAN THE HEADLIGHTS USE A SPONGE SOAKED IN WATER AND MILD DETERGENT RUBBING THE SURFACE GENTLY AND RINSING FREQUENTLY WITH PLENTY OF WATER REMEMBER TO CLEAN THE VEHICLE CAREFULLY BEFORE APPLYING SIL...

Страница 123: ...AN ANY RUBBER OR PLASTIC SADDLE COMPONENTS USE WATER AND MILD SOAP CAUTION DO NOT USE SOLVENTS OR PETROL BY PRODUCTS ACETONE TRICHLORO ETHYLENE TURPENTINE PETROL THINNERS TO CLEAN THE SADDLE USE INSTEAD DETERGENTS WITH SURFACE ACTIVE AGENTS NOT EXCEEDING 5 NEUTRAL SOAP DEGREASING DETERGENTS OR ALCOHOL DRY THE SADDLE WELL AFTER CLEANING CAUTION DO NOT APPLY PROTECTIVE WAX ON THE SADDLE AS IT MAY BE...

Страница 124: ...VICE INSTEAD TO HAVE THE INFLAMMABLE FLUIDS DRAINED 04_38 Chain backlash check 04_38 To check the clearance Shut off the engine Rest the vehicle on its stand Engage neutral gear Check that the vertical oscillation at a point between the pinion and the crown on the lower branch of the chain is approx 25 30 mm 0 98 1 18 in Move the vehicle forward so as to check the chain vertical oscillation in oth...

Страница 125: ... THIS WORKSHOP BOOKLET AVAILABLE ALSO AT ANY DEALER Checking wear of chain front and rear sprockets Also check the following parts and make sure that the chain pinion and sprocket do not have Damaged rollers Loosened pins Dry rusty flattened or jammed chain links Excessive wear Missing sealing rings Excessively worn or damaged pinion or sprocket teeth CAUTION IF THE CHAIN ROLLERS ARE DAMAGED THE P...

Страница 126: ...ations should be more frequent if there are signs of quick rust Lubricate the chain whenever necessary After washing and drying the chain lubricate it with spray grease for sealed chains THE TRANSMISSION CHAIN HAS RUBBER O RINGS BETWEEN THE SIDE PLATES OF THE CHAIN ITSELF THAT ARE USED TO HOLD THE GREASE UT MOST ATTENTION IS REQUIRED WHEN ADJUSTING LUBRICATING WASHING OR REPLACING THE CHAIN CHAIN ...

Страница 127: ...DORSODURO 750 ABS_DORSODURO 750 Factory ABS Chap 05 Technical data 127 ...

Страница 128: ...65 in Saddle height 900 mm 35 43 in Wheelbase 1505 mm 59 25 in Kerb weight 206 kg 454 lb Dry weight unfuelled 196 kg 432 lb ENGINE Model M551M Type 90 longitudinal V twin 4 stroke 4 valves per cylinder 2 overhead camshafts Cylinder number 2 Total engine capacity 749 9 cm 45 76 cu in 128 5 Technical data ...

Страница 129: ...tarter Electric starter Engine idle speed 1400 100 rpm Clutch Multiple disk oil bathed clutch with control on the left side of the handlebar Lubrication system Wet crankcase Pressure system regulated by a trochoidal pump Air filter With dry cartridge filter Cooling Fluid GEARBOX Type Mechanical 6 speeds with foot lever on the left hand side of the engine 129 5 Technical data ...

Страница 130: ... 0 79 USgal 3 2 l with oil filter change 0 70 UKgal 0 85 USgal Coolant 1 8 l 0 40 UKgal 0 48 USgal Seats 2 Maximum weight limit 400 kg 882 lb GEAR RATIOS Gear ratio Gear primary drive 38 71 1st gear ratio 14 36 secondary 2nd gear ratio 17 32 secondary 3rd gear ratio 20 30 secondary 4th gear ratio 22 28 secondary 5th gear ratio 23 26 secondary 130 5 Technical data ...

Страница 131: ...AIN Type Endless without master link and with sealed links No of links 108 Model 525 ZRPK FUEL SYSTEM Type Electronic injection Multipoint Throttle valve diameter Ø 52 mm 2 05 in Fuel Premium unleaded petrol minimum octane rating 95 NORM and 85 NOMM 131 5 Technical data ...

Страница 132: ... Stem diam 43 mm 1 69 in Front Factory Factory ABS Sachs upside down stanchions with adjustable hydraulic damping and 43mm 1 69 in diameter stanchions Travel 160 mm 6 3 in Rear Std Std ABS Oscillating swingarm and adjustable hydraulic single shock absorber Rear Factory Factory ABS Oscillating swingarm with Sachs piggy back single shock absorber and adjustable spring preloading wheelbase and hydrau...

Страница 133: ...meter of 32 03 1 26 in and two calliper pads Front Factory Factory ABS Double floating disc Ø 320 mm 12 60 in radially mounted calliper with four Ø 32 mm 1 26 in pistons and two calliper pads Rear Std Std ABS Factory 240 mm diam 9 45 in disc brake with a single 35 mm 1 38in diam piston calliper Rear Factory ABS 240 mm 9 45 in disc brake with 34 mm diameter 1 34 in single piston calliper 133 5 Tech...

Страница 134: ...rd PIRELLI CORSA III DUNLOP SPORTMAX QUALIFIER Front tyre 120 70 ZR17 Front tyre pressure rider only 2 3 bar 230 kPa 33 36 PSI rider passenger 2 4 bar 240 kPa 34 81 PSI Rear tyre 180 55 ZR17 Rear tyre pressure rider only 2 5 bar 250 kPa 36 26 PSI rider passenger 2 7 bar 270 kPa 39 16 PSI 134 5 Technical data ...

Страница 135: ...Resistance 5 kOhm ELECTRICAL SYSTEM Battery 12 V 10 Ah YTX 12 BS Alternatively Battery 12 V 12 Ah YTX 14 BS Main fuses 30A Secondary fuses 3A 10A 15A 20A ABS fuses where foreseen 20 A Alternator permanent magnet type 13 5 V 450 W at 6000 rpm BULBS High beam light 12 V 60 W H4 135 5 Technical data ...

Страница 136: ...t running light stop light LED License plate light 12V 5W Rpm indicator lighting LED Multifunction display lighting LED WARNING LIGHTS High beam light LED Right turn indicator LED Left turn indicator LED General warning LED Gear in neutral LED Side stand down LED Fuel reserve LED ABS LED 136 5 Technical data ...

Страница 137: ...shaped hex Allen keys 2 One 10 13 mm 0 39 0 51 in double open ended spanner 3 Pliers to extract fuses 4 19 mm 0 75 in single open ended spanner 5 Double ended Phillips hexagonal screwdriver 6 Toolkit pouch 7 Shock absorber ring nut adjustment wrench 8 Maximum weight allowed 1 5 kg 3 3 lb 137 5 Technical data ...

Страница 138: ...138 5 Technical data ...

Страница 139: ...DORSODURO 750 ABS_DORSODURO 750 Factory ABS Chap 06 Programmed maintenance 139 ...

Страница 140: ...ched Carrying out scheduled services on time is essential for the validity of your warranty For further information regarding Warranty procedures and Scheduled Maintenance please refer to the Warranty Booklet NOTE CARRY OUT MAINTENANCE OPERATIONS AT HALF THE INTERVALS SPECI FIED IF THE VEHICLE IS USED IN PARTICULAR RAINY OR DUSTY CONDI TIONS OFF ROAD OR FOR TRACK USE I INSPECT AND CLEAN ADJUST LUB...

Страница 141: ...ring bearings and steering clearance I I I Wheel bearings I I Diagnosis by tool I I I I I Brake discs I I I Air filter I R I R Engine oil filter R R R Fork I I General vehicle operation I I I Valve clearance A A Cooling system I I Braking systems I I I Light circuit I I I Safety switches I I Clutch control fluid 2 I I I Brake fluid 2 I I I Coolant 2 I I I 141 6 Programmed maintenance ...

Страница 142: ...ressure wear 5 I I I I I Wheels I I I Bolts and nuts tightening I I I Suspension and setting I I I Fault warning light on instrument panel 4 Fuel lines 3 I I Clutch wear I I Break pad wear I I I I I 06_01 Table of recommended products 06_01 Piaggio C S p A prescribes eni products for the scheduled maintenance of its vehicles 142 6 Programmed maintenance ...

Страница 143: ...ed grease containing EP extreme pressure additives with optimal water repellent properties ISO L X BCHB 2 DIN 51 825 KP2K 20 AGIP CHAIN LUBE SPRAY Spray lubricating grease AGIP BRAKE 4 Brake fluid SAE J 1703 FMVSS 116 DOT 3 4 ISO 4925 CUNA NC 956 DOT 4 synthetic fluid AGIP BRAKE 5 1 Clutch fluid FMVSS 116 DOT 5 1 Non silicone synthetic fluid AGIP PERMANENT SPECIAL Ethylene glycol based antifreeze ...

Страница 144: ...144 6 Programmed maintenance ...

Страница 145: ...ngine stop 50 F Fork 70 Fuel 12 Fuses 110 G Gearbox oil 14 H Headlight 113 Horn 48 I Identification 57 Immobilizer 54 Instrument panel 29 M Maintenance 95 139 140 Maintenance Table 140 Mirrors 116 R rear view mirrors 116 Recommended products 142 Ride by wire 80 S Saddle 55 Scheduled maintenance 140 Shock absorbers 67 Spark plug 101 Stand 16 89 Start up 50 Stop switch 50 T Technical data 127 Turn i...

Страница 146: ...ontrol procedures to guarantee reliability and durability The descriptions and images in this publication are given for illustrative purposes only and are not binding Piaggio C While the basic characteristics as described and illustrated in this booklet remain unchanged Piaggio C S p A reserves the right at any time and without being required to update this publication beforehand to make any chang...

Отзывы: