background image

11 

SD INDICATOR 

Indicator (blue) turn on when you connect the SD 
Memory card through SD Card port 

12 

USB INDICATOR 

Indicator (blue) turn on when you connect the Memory 
device through USB host ports 

13 

IR WINDOW 

Receiving IR signals from the remote control 

14 

15 

STATUS INDICATOR 

STANDBY INDICATOR 

Indicator (blue) turns on when the system is alive 

Indicator (red) turns on when the system is in standby 
mode 


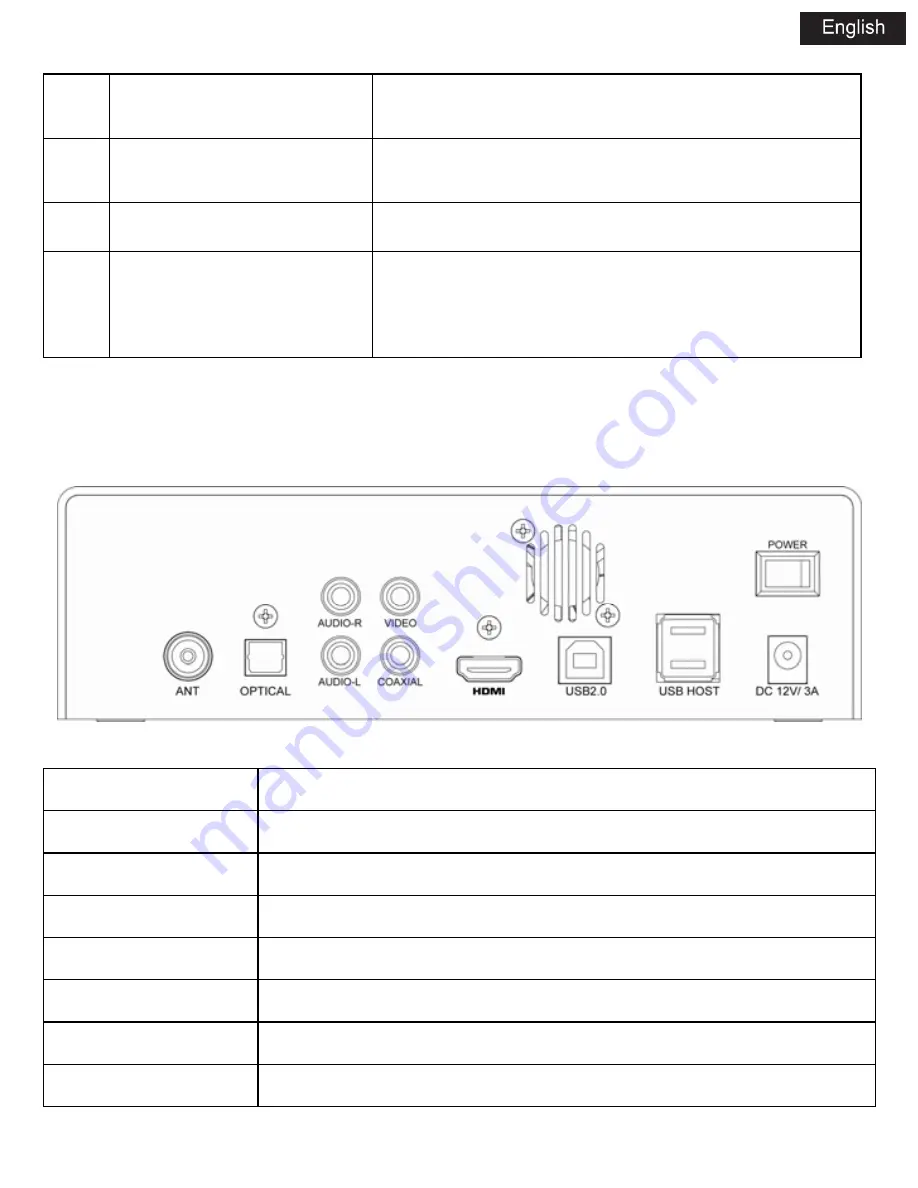
3.1.3 REAR PANEL 


NAME FUNCTION 

DC 

DC IN jack 

USB 2.0 

USB device 

AUDIO-R 

Audio OUT jack (Right Channel) 

VIDEO 

Video OUT jack 

OPTICAL 

Optical jack 

HDMI 

HDMI jack 

USB HOST 

USB host port 

Содержание APPMPHDTDT

Страница 1: ...o Adjustable video output resolution NTSC PAL 576p 720p 1080i 1080p Multimedia Playback Supports major audio video and image file formats 1080p HD video decoding Movie format AVI MKV TS TP M2TS MPG MJPG MP4 MOV VOB Music format MP3 WMA AAC Photo format JPEG BMP PNG Photo slide show with background music DVB T TV Receiver Supports Digital Video Broadcasting Terrestrial DVB T reception Electronic Pr...

Страница 2: ...Remote Control Battery 2 AV Cable 1 USB Device cable 1 User Manual 1 Note The actual contents in the package might be different from the packing list in t his manual We hope that this product will bring you a lot of enjoyment We are committed to apply multimedia technolog y in your work entert ainment famil y daily life car and everywhere Welcome to be with us Thank you again for choosing our prod...

Страница 3: ...ore cleaning it Never connect the adapter to the pl ayer in a humid or dusty area Do not replace the adapter or cabl e s wire or connector 1 3 3 Radio Interference If not properly shielded almost all electronic devices will get radio interference Under some conditions your player might get interference The design of th is player has f ollowed the FC C CE standard an d has follo wed t he following ...

Страница 4: ...agnetic field the product will malfunction the n unplug th e p ower cable and the p roduct will return to no rmal performance next time it is powered on 2 CONNECTION 2 1 Connecting the Power Supply 1 Connect the AC adaptor to the player s DC IN jack 2 Plug in the AC adaptor to the power outlet Note DC 12V 3A 2 2 Connecting a USB Device 1 Make sure the player is powered on 2 Plug in the USB stick U...

Страница 5: ...eo and audio via a single cable 2 4 3 Connecting to an Digital Amplifier 1 F ollow t he picture and plug i n the RCA connector on your c oaxial cable to the player s S PDIF Coaxial jack Or if you use optic al fiber please plug in the Toslink connector on your optical fiber to the player s S PDIF Optical jack 2 Plug in the other connector on your coaxial cable or optical fiber to the digital audio ...

Страница 6: ...3 OPERATION 3 1 Player Introduction 3 1 1 REMOTE CONTROL ...

Страница 7: ...o move the highlight up while navigation menus 12 DOWN Press to move the highlight down while navigation 13 LEFT Press to move the highlight left while navigation menus 14 RIGHT Press to move the highlight right while navigation menus Press to selected the favorite music 15 OK Press to confirm 16 YELLOW Press to add a recording schedule 17 RED Press to edit the prerecord schedule 18 BLUE Press to ...

Страница 8: ...plays an on screen list of programs for the coming week when watching Digital Terrestrial TV 29 GOTO Press to select the time point 30 SUB T Press to set subtitle options 31 TTX Press to enter TTX interface 32 THUMB Press to show the 9 pictures on screen 33 P N Press to choose HDMI CVBS 34 ZOOM Press to zoom in out the image photo or video 35 MUTE Press to mute audio output press again to resume 3...

Страница 9: ...up 4 DOWN Move the highlight down 5 LEFT Move the highlight left 6 RIGHT Move the highlight right 7 OK Enter Play 8 PLAY PAUSE Play Pause switch 9 HDD INDICATOR Indicator Blue turns on when you read the data in the HDD 10 USB INDICATOR Indicator blue turn on when you connect the Memory device through USB host ports ...

Страница 10: ...orts 13 IR WINDOW Receiving IR signals from the remote control 14 15 STATUS INDICATOR STANDBY INDICATOR Indicator blue turns on when the system is alive Indicator red turns on when the system is in standby mode 3 1 3 REAR PANEL NAME FUNCTION DC DC IN jack USB 2 0 USB device AUDIO R Audio OUT jack Right Channel VIDEO Video OUT jack OPTICAL Optical jack HDMI HDMI jack USB HOST USB host port ...

Страница 11: ...e rea r panel the player is on the standby mode After press the POWER key on the front panel or on the RC the power indicator will turn red to blue The player soon will show the logo and then enter the home screen Power Off Press the po wer button on th e front panel the pl ayer will soon e nter standby mode and the power indicator will turn red Then switch the power key on the rear panel on to of...

Страница 12: ...ge you w ish in the setup menu the selected langu age will take eff ect immediately Select the language that you want Aspect Ratio AUTO Display picture or movie on original aspect ratio 4 3 Full Display picture or movie on the full screen Pan Scan 4 3 Displa y a wide picture on t he e ntire screen and cuts off th e redundant portions Select when a standard 4 3 TV is connected Letter Box 4 3 Displa...

Страница 13: ...ound color TRA NSPARENT YELLOW GREEN WHITE GRAY SUBTITLE FONT COLOR Select to adjust subtitle font color RED GREEN BLUE START RESUME Select to turn on off resume playback auto bookmarking feature for movies Changing photo setting Slide show time Select to adjust slid show time 2S 3S 5S 7S Slide mode there ar e 46 slid show mo de you can choose RADOM 0 1 45 Format You can format a HDD FAT32 or NTFS...

Страница 14: ... destination file press t he RIGHT button and the file will be marked and then p ress ENTER to delete them immediately or will be delete w hen y ou exit the playlist 4 Movie menu In this mode all folders and supported videos in current directory will be displayed 5 Browser menu In this mode all folders and supported c ontents music photos and movies w ill be displayed 4 3 TV 4 3 1 DVB T TV Player ...

Страница 15: ...n all frequency Manual Search press right key start to manual search setting Country press left right key to choose the country Antenna power press left right key to choose the antenna type Program Program edit press right ke y to enter program edit sub menu t he enter password 88888 In this mode the four color keys will be used under this mode Move yellow Skip Green Edit Red Delete Blue EPG p res...

Страница 16: ...rmation Press right key to show the system information model NO SW Version HW Version USB PVR configure press right key to choose the PVR target disk SD Memory card USB Host or SATA HDD 4 3 2 TV Play Recording mode BUTTON FUNCTION CH CH Press to view preview next channel INFO Press to sho w t he channel infor mation If you want to view detail information such as frequenc y ban dwidth Just press in...

Страница 17: ...e under re cording schedule menu GREEN Press to enter the PVR booking menu SETUP Press to enter to setup menu LEFT Right or Vol Vol Press to adjust volume EXIT Press to return to main menu NUMERIC BUTTONS Press to put into the number when you manual search channel 4 3 2 1 TV Recording The system support two recording mode as bello ws And you can read the files you had recorded in PVR interface Not...

Страница 18: ...nue recording ch annel A or change to channel B to st art recordi ng schedule task When the recording is finishes the device will return to channel A 3 If you are watching channel A the s ystem will show you a dia log windows when timing up then you can choose tocancel or change to start the schedule recording task When the recording is finishes the device will return to channel A 4 if you are on ...

Страница 19: ... ess Enter to st art delete 5 SYSTEM UPDATE Download the updated firmware from Approx s website www printyourideas com Select to update the firmware from via a USB stick 1 Copy the firmware file to the root directory of a USB stick and connect it to the USB HOST port of the player 2 Enter BROWSER icon and then move cursor to select the firmware file then press OK key to start upgrade software Keep...

Отзывы: