


HARDWARAE INSTALLATION
KP-5372 Fanless POS Terminal
11
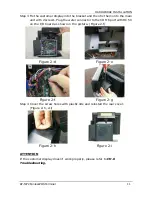
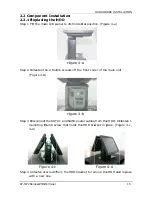
Step 3 Fix the customer display into the bracket and then fix them onto the main
unit with 2 screws. Plug the wafer connector to the COM 6 port with DC 5V
on the I/O board as shown in the picture. (Figure 2-f)
Figure 2-d
Figure 2-e
Figure 2-f
Figure 2-g
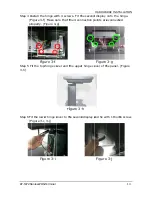
Step 4 Cover the screw holes with plastic lids and reinstall the rear cover.
(Figure 2-h, 2-i)
Figure 2-h
Figure 2-i
ATTENTION
If the customer display doesn’t work properly, please refer to CH.6
Troubleshooting.
Содержание KP-5372
Страница 1: ...http www appostar com KP 5372 Touch POS Terminal User Manual Edition NOV 2012 Version 1 02...
Страница 9: ...PRODUCT OVERVIEW KP 5372 Fanless POS Terminal 5 1 3 I O Interface...
Страница 42: ...BIOS SETUP 38 KP 5372 Touch POS Terminal F81216 Second Super IO Configuration...
Страница 48: ...BIOS SETUP 44 KP 5372 Touch POS Terminal Host Bridge...
Страница 60: ...TROUBLESHOOTING 56 KP 5372 Touch POS Terminal...


